- Pyenv – Install Multiple Python Versions for Specific Project
- What is Pyenv?
- How Does pyenv Work?
- How to Install Pyenv in Linux
- How to Install Multiple Python Versions in Linux
- Managing Multiple Versions of Python on Ubuntu 18.04
- Downloading the Latest Python Version
- Installing Alternative Python from Source
- Managing Alternative Python Installations
Pyenv – Install Multiple Python Versions for Specific Project
Managing multiple versions of Python on a Linux system is not an easy task, especially for beginners. Sometimes it even gets worse when you want to develop and run multiple projects with different Python versions on the same server. However, this shouldn’t be the case if you employ pyenv.
What is Pyenv?
Pyenv is a simple, powerful and cross-platform tool for managing multiple Python versions on Linux systems, that used for.
- Switching the global Python version on a per-user basis.
- setting the local Python version on per-project basis.
- Managing of virtual environments created by anaconda or virtualenv.
- Overriding the Python version with an environment variable.
- Searching commands from multiple versions of Python and more.
How Does pyenv Work?
Usually, a single default version of Python is used to run all your applications, unless you explicitly specify the version you want to use within the application. But pyenv implements a simple concept of using shims (lightweight executables) to pass your command to the correct Python version you want to use, when you have multiple versions installed.
These shims are inserted by pyenv in a directories in front of your PATH. So when you run a Python command, it is intercepted by the appropriate shim and passed to pyenv, which then establishes the Python version that has been specified by your application, and passes your commands along to the rightful Python installation. This is an overview of how pyenv operates.
In this article, we will show how to install the latest version of pyenv in Linux. We will also demonstrate the first three uses case listed above.
How to Install Pyenv in Linux
1. First install all the required packages for installing different Python versions from sources using following command on your respective Linux distribution.
------------ On Debian/Ubuntu/Linux Mint ------------ $ sudo apt install curl git-core gcc make zlib1g-dev libbz2-dev libreadline-dev libsqlite3-dev libssl-dev ------------ On CentOS/RHEL ------------ # yum -y install epel-release # yum install git gcc zlib-devel bzip2-devel readline-devel sqlite-devel openssl-devel ------------ On Fedora 22+ ------------ # yum install git gcc zlib-devel bzip2-devel readline-devel sqlite-devel openssl-devel
2. Next, grab the the latest pyenv source tree from its Github repository and install it in $HOME/.pyenv path using following command.
$ git clone https://github.com/pyenv/pyenv.git $HOME/.pyenv
3. Now you need to set the environment variable PYENV_ROOT to point to the path where you installed pyenv and export it. Then add $PYENV_ROOT/bin to your PATH to run pyenv command-line utility like any other system commands.
You also need to enable shims as well as autocompletion by adding the pyenv init to your shell. Do all these things in your $HOME/.bashrc bash startup file, as shown.
Copy and paste the following lines at the end of this file.
## pyenv configs export PYENV_ROOT="$HOME/.pyenv" export PATH="$PYENV_ROOT/bin:$PATH" if command -v pyenv 1>/dev/null 2>&1; then eval "$(pyenv init -)" fi
4. Once you have made the above changes, you can either source $HOME/.bashrc file or restart the shell as shown.
$ source $HOME/.bashrc OR $ exec "$SHELL"
How to Install Multiple Python Versions in Linux
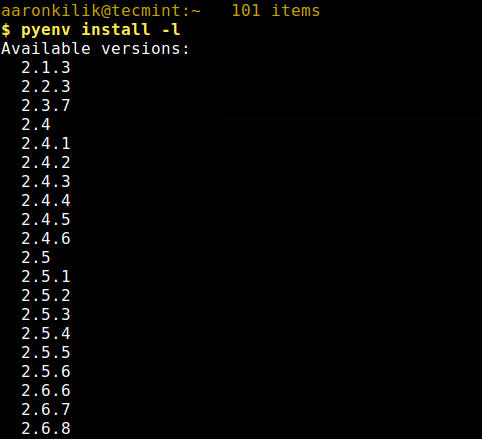
5. At this point, you should be ready to start using pyenv. Before you install any Python version, you can view all available versions with this command.
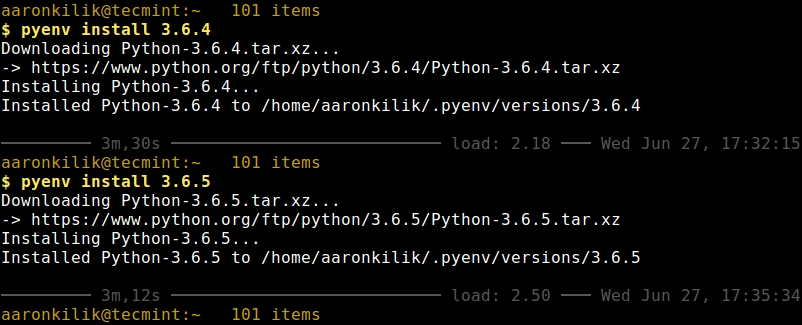
6. You can now install multiple Python version via pyenv, for example.
$ pyenv install 3.6.4 $ pyenv install 3.6.5
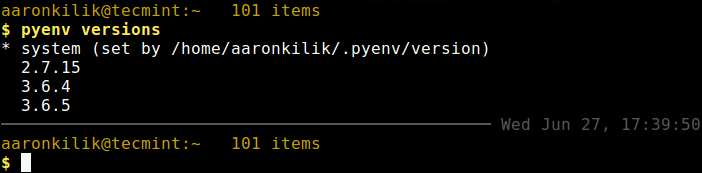
7. To list all Python versions available to pyenv, run the following command. This will only show versions installed via pyenv itself.
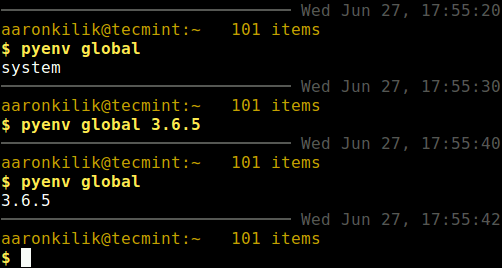
8. You can check the global Python version with the following command, by this time, the default version should be the one set by the system, not pyenv.
You can set the global python version using the pyenv command.
$ pyenv global 3.6.5 $ pyenv global
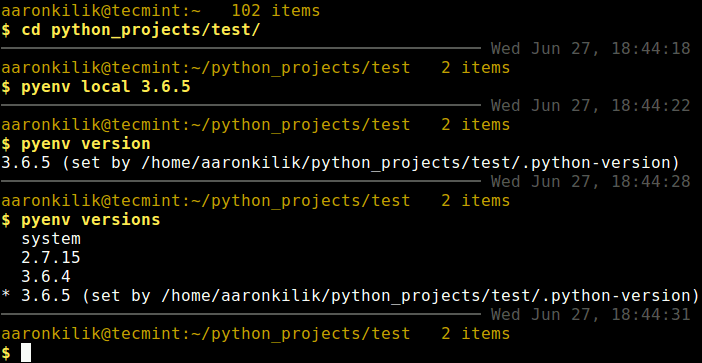
9. You can now set the local Python version on per-project basis, for instance, if you have a project located in $HOME/python_projects/test, you can set the Python version of it using following command.
$ cd python_projects/test $ pyenv local 3.6.5 $ pyenv version #view local python version for a specific project OR $ pyenv versions
10. Pyenv manages virtual environments via the pyenv-virtualenv plugin which automates management of virtualenvs and conda environments for Python on Linux and other UNIX-like systems.
You can start by installing this plugin using following commands.
$ git clone https://github.com/yyuu/pyenv-virtualenv.git $HOME/.pyenv/plugins/pyenv-virtualenv $ source $HOME/.bashrc
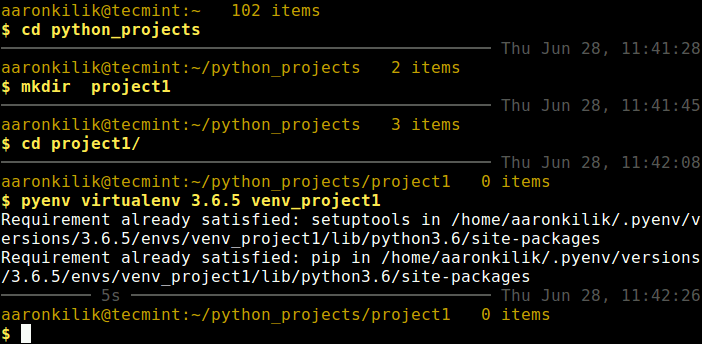
11. Now we will create a test virtual environment called venv_project1 under a project called project1 as follows.
$ cd python_projects $ mkdir project1 $ cd project1 $ pyenv virtualenv 3.6.5 venv_project1
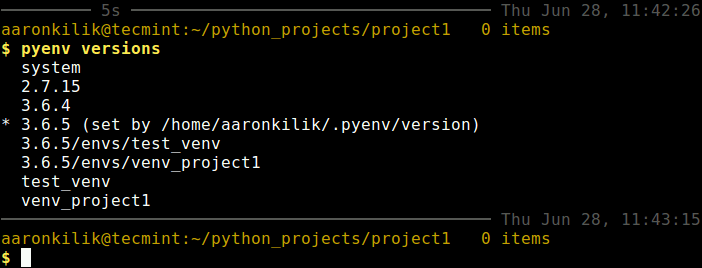
12. Now when you list all Python versions, your virtual environments as well as their local python versions should be listed also, as shown in the screenshot.
13. To activate a virtualenv, for example venv_project1, type following command.
$ pyenv activate venv_project1
Note: You may get the message below while using the latest version of pyenv-virtualenv plugin for the first time.
pyenv-virtualenv: prompt changing will be removed from future release. configure `export PYENV_VIRTUALENV_DISABLE_PROMPT=1' to simulate the behavior.
Add the line export PYENV_VIRTUALENV_DISABLE_PROMPT=1 in your $HOME/.bashrc file, where you added other pyenv configs, and source the file to simulate the behavior being emphasized.
14. To deactivate the activated virtualenv, run this command.
For more information, you can list all pyenv commands using following command.
For more information, go to the pyenv Github repository: https://github.com/pyenv/pyenv
Using pyenv is really that simple. In this guide, we showed how to install it, as well as demonstrated some of its use cases for managing multiple python versions on a Linux system. Use the feedback form below to ask any questions or share your thoughts about this tool.
Managing Multiple Versions of Python on Ubuntu 18.04

Easily install and manage multiple versions of Python on Ubuntu 18.04 or older.
There are a number of subtle differences to managing versions of Python on older distributions of Ubuntu. If you’re running Ubuntu 18.04 or older, go here.
One of my earliest frustrations with Python development had nothing to do with Python itself, but rather the needlessly esoteric act of deploying a Python app. Code bootcamps and tutorials do a fine job of teaching students how to run Python code locally, but the most meaningful applications don’t run on local machines: they run on servers, on the internet, because that’s the point, isn’t it? Maybe I’m taking crazy pills here.
Depending on which version of Ubuntu you’re running, your VPS probably shipped with either Python 2.7, or both Python 2.7 and Python 3.6. But what if you don’t want to run either of those versions? If you’re like me, you might have tried to replace your system’s default installation and destroyed your machine in the process. In case nobody has told you not to do that, I’ll do the honors: don’t do that.
So what do we do? There are a couple of ways to go about getting an updated version of Python on Ubuntu, but using Ubuntu’s built-in «alternative install» is optimal for a number of reasons:
- We want to leave our system version of Python intact.
- It’s best to avoid messing around with your Python PATH whenever possible.
- We can easily switch the active version of Python on our machine via a convenient CLI.
We’re going to walk through how to install the current latest version of Python alongside Ubuntu’s system Python versions safely and easily.
Downloading the Latest Python Version
The first step should be familiar: we need to update Ubuntu’s mirrors and packages to make sure we pull the latest packages when we install anything:
The first link on the above page should read Latest Python 3 Release — Python 3.X. On that page, scroll to the «files» section and copy the URL of the Gzipped source tarball.
On your Ubuntu machine, you’re going to fetch the Python source from the URL you copied with wget . The lines below will download a compressed Python 3.9.2 archive to your /opt folder and unzip it:
$ cd /opt $ sudo wget https://www.python.org/ftp/python/3.8.0/Python-3.8.0.tgz $ sudo tar xzf Python-3.8.0.tgzThe latest version of Python is now downloaded. Now we just need to install it. correctly.
Installing Alternative Python from Source
The frustration of installing Python with apt-get install python3.X is that it’ll install Python just fine, but Ubuntu will still default to using whichever version of Python is the default. Luckily for us, Ubuntu allows us to install additional (AKA: alternative) versions of Python by providing us with the make altinstall command:
$ cd Python-3.8.0 $ sudo ./configure --enable-optimizations $ sudo make altinstallThis may take a moment to complete. Once finished, go ahead and verify that the version of Python 3 you wanted is installed on your box:
$ python3 --version Python 3.8.0And there it is! A shiny new Python: Python 3.8. Ubuntu conveniently makes this the default for us.
Managing Alternative Python Installations
So, we now have a few versions of Python installed on our machine. There’s a system default Python 2.7, A system default Python 3, and now our newly added Python 3.8. We want to leave our system default Python installations alone, but we want to develop in Python 3.8. so how do we manage this?
Luckily, Linux has us covered in this scenario with the update-alternatives command. We can tell Ubuntu that we have a bunch of alternative versions of the same software on our machine, thus giving us the ability to switch between them easily. Here’s how it works:
$ update-alternatives --install /usr/bin/python python /usr/bin/python3.6 1 $ update-alternatives --install /usr/bin/python python /usr/bin/python3.8 2 We ran update-alternatives twice: once for Python 3.6, and once for Python 3.8 (don’t worry about Python 2.7, your system knows about it. trust me). Now we can use update-alternatives —list to list all the alternative installations we have of certain software:
$ update-alternatives --list python /usr/bin/python3.6 /usr/local/bin/python3.8Now we can swap between versions of Python! Run the following:
$ update-alternatives --config pythonYou should be hit with a prompt like the one below. This will list all the versions of Python your system recognizes. Select the version of Python you’d like to use by providing the «selection» number to the prompt:
There are 2 choices for the alternative python (providing /usr/bin/python). Selection Path Priority Status ------------------------------------------------------------ * 0 /usr/local/bin/python3.8 2 auto mode 1 /usr/bin/python3.6 1 manual mode 2 /usr/local/bin/python3.8 2 manual mode Press to keep the current choice[*], or type selection number: And you’ve done it! To switch Python versions, all you need to do is respond to the above prompt with the selection number representing the Python version you want to use.
It sounds absurd, but succeeding at changing Python versions in Ubuntu without breaking things is fairly impressive. I’d argue this is mostly the fault of those who teach Python. If «those who can’t do, teach,» it’s fair to assume a lot of Python courses are taught by those who haven’t launched meaningful software. That was harsh, but don’t @ me regardless.
We’ve done the «hard» part, but there’s a bit of housekeeping to take care of. We still need to install pip for our newly installed Python, as well as upgrade pip to the latest version:
$ apt install python3-pip $ python3.8 -m pip install --upgrade pip