- How To Setup Apache, PHP & MongoDB in Ubuntu & Debian
- Installing Apache
- Installing PHP
- Installing MongoDB
- Installing MongoDB PHP Module
- Conclusion
- Getting Set Up to Run PHP with MongoDB
- Prerequisites
- Installation
- Installing Apache
- Installing PHP
- Installing the PHP extension
- Troubleshooting your PHP configuration
- Create a User
- Add Your IP Address to the Access List
- Connect to Your Database
How To Setup Apache, PHP & MongoDB in Ubuntu & Debian
MongoDB is a free open-source, schema-free, NoSQL database which is getting more popular day by day among web developers. It is a document-oriented database and is known for its processing speed.
In order to use MongoDB for our projects, we will first need to install it on our system along with its dependencies and some other tools. In this post, we will learn to install and set up Apache, PHP, and MongoDB on Ubuntu and Debian operating systems.
Installing Apache
First of all, we will install Apache on our system. Apache is a web server software and a popular HTTP client; it helps in creating virtual hosts. To install Apache on our system we will use the below-given command:
sudo apt updatesudo apt install apache2 -y
Note: The commands given in this article will work on both Ubuntu and Debian as both of them use the same package manager.
Installing PHP
To install PHP along with its common modules on our system we just need to run a simple command:
sudo apt install -y php7.4 libapache2-mod-php7.4 We have installed PHP 7.4 on our system. You can install the version and the modules that you require for your project.
Installing MongoDB
Unfortunately, MongoDB is not available in the default repositories of Ubuntu and Debian. So we will have to first import the public key which will be used by the package management system:
wget -qO - https://www.mongodb.org/static/pgp/server-5.0.asc | sudo apt-key add - If the terminal gives an error while executing the above-given command then you will have to install GnuPG on your system before executing this command again.
The next step is to create a list file for your version of the operating system. As I am running Ubuntu 20.04, I will run the following command:
echo "deb [ arch=amd64,arm64 ] https://repo.mongodb.org/apt/ubuntu focal/mongodb-org/5.0 multiverse" | sudo tee /etc/apt/sources.list.d/mongodb-org-5.0.list For Debian 10:
echo "deb http://repo.mongodb.org/apt/debian buster/mongodb-org/5.0 main" | sudo tee /etc/apt/sources.list.d/mongodb-org-5.0.list Next, we need to reload the local package database and then install the latest stable release of Mongodb:
sudo apt updatesudo apt install -y mongodb-org
This will install the MongoDB server on your system.
Installing MongoDB PHP Module
For the last step, we need to install the MongoDB PHP module which is required for connecting PHP with MongoDB.
sudo apt install php7.4-mongodb Make sure to install the MongoDB module for the same version of PHP.
Run the following command to check the MongoDB module is enabled for the PHP CLI environment.
Next, restart the Apache server to apply changes.
sudo systemctl restart apache2 You can also create a phpinfo() file at the Apache document root. When you access this file in web broser,
Conclusion
MongoDB is a well-known, high-performance, NoSQL database. It is highly scalable and is different from Relational Database Systems such as MySQL and PostgreSQL. In this post, we learned how to install it along with its dependencies and other related tools.
Getting Set Up to Run PHP with MongoDB
![]()
Welcome to this quickstart guide for MongoDB and PHP. I know you’re probably excited to get started writing code and building applications with PHP and MongoDB. We’ll get there, I promise. Let’s go through some necessary set-up first, however.
This guide is organized into a few sections over a few articles. This first article addresses the installation and configuration of your development environment. PHP is an integrated web development language. There are several components you typically use in conjunction with the PHP programming language. If you already have PHP installed and you simply want to get started with PHP and MongoDB, feel free to skip to the next article in this series .
A brief note on PHP and Apache: Because PHP is primarily a web language — that is to say that it’s built to work with a web server — we will spend some time at the beginning of this article ensuring that you have PHP and the Apache web server installed and configured properly. There are alternatives, but we’re going to focus on PHP and Apache.
PHP was developed and first released in 1994 by Rasmus Lerdorf . While it has roots in the C language, PHP syntax looked much like Perl early on. One of the major reasons for its massive popularity was its simplicity and the dynamic, interpreted nature of its implementation.
Prerequisites
MacOS Catalina or later: You can run PHP on earlier versions but I’ll be keeping to MacOS for this tutorial.
Installation
Next, we’re going to use a package manager to install things. This ensures that our dependencies will be met. I prefer Homebrew , or brew for short. To begin using brew , open your terminal app and type:
The installation prompts are fairly straightforward. Enter your password where required to assume root privileges for the install. When it’s complete, simply type the following to verify that brew is installed correctly:
If you experience trouble at this point and are unable to get brew running, visit the Homebrew installation docs .
You can also verify your homebrew installation using brew doctor . Confirm that any issues or error messages are resolved prior to moving forward. You may find warnings, and those can usually be safely ignored.
Installing Apache
The latest macOS 11.0 Big Sur comes with Apache 2.4 pre-installed but Apple removed some critical scripts, which makes it difficult to use.
So, to be sure we’re all on the same page, let’s install Apache 2.4 via Homebrew and then configure it to run on the standard ports (80/443).
When I was writing this tutorial, I wasted a lot of time trying to figure out what was happening with the pre-installed version. So, I think it’s best if we install from scratch using Homebrew.
You should now be able to open a web browser and visit http://localhost:8080 and see something similar to the following:
The standard Apache web server doesn’t have support for PHP built in. Therefore, we need to install PHP and configure Apache to recognize and interpret PHP files.
Installing PHP
If you’ve installed previous versions of PHP, I highly recommend that you clean things up by removing older versions. If you have previous projects that depend on these versions, you’ll need to be careful, and back up your configurations and project files.
Once this completes, you can test whether it’s been installed properly by issuing the following command from your command-line prompt in the terminal.
Installing the PHP extension
Now that we have php installed, we can configure Apache to use PHP to interpret our web content, translating our php commands instead of displaying the source code.
PECL (PHP Extension Community Library) is a repository for PHP Extensions, providing a directory of all known extensions and hosting facilities or the downloading and development of PHP extensions. pecl is the binary or command-line tool (installed by default with PHP) you can use to install and manage PHP extensions. We’ll do that in this next section.
Install the PHP MongoDB extension before installing the PHP Library for MongoDB. It’s worth noting that full MongoDB driver experience is provided by installing both the low-level extension (which integrates with our C driver) and high-level library, which is written in PHP.
After saving php.ini, restart the Apache service and to verify installation, you can use the following command.
You are now ready to begin using PHP to manipulate and manage data in your MongoDB databases. Next, we’ll focus on getting your MongoDB cluster prepared.
Troubleshooting your PHP configuration
If you are experiencing issues with installing the MongoDB extension, there are some tips to help you verify that everything is properly installed and configured.
First, you can check that Apache and PHP have been successfully installed by creating an info.php file at the root of your web directory. In the file, add the following content:
Then navigate to http://localhost:8080/info.php and you should see a blank page with just the Hello World text.
Save, and then refresh the info.php page. You should see a page with a large table of PHP information like this:
IMPORTANT: In production servers, it’s unsafe to expose information displayed by phpinfo() on a publicly accessible page
“Configuration File (php.ini) Path” property shows where your PHP runtime is getting its php.ini file from. It can happen that the mongodb.so extension was added in the wrong php.ini file as there may be more than one.
“Additional .ini files parsed” shows potential extra PHP configuration files that may impact your specific configuration. These files are in the directory listed by the “Scan this dir for additional .ini files” section in the table.
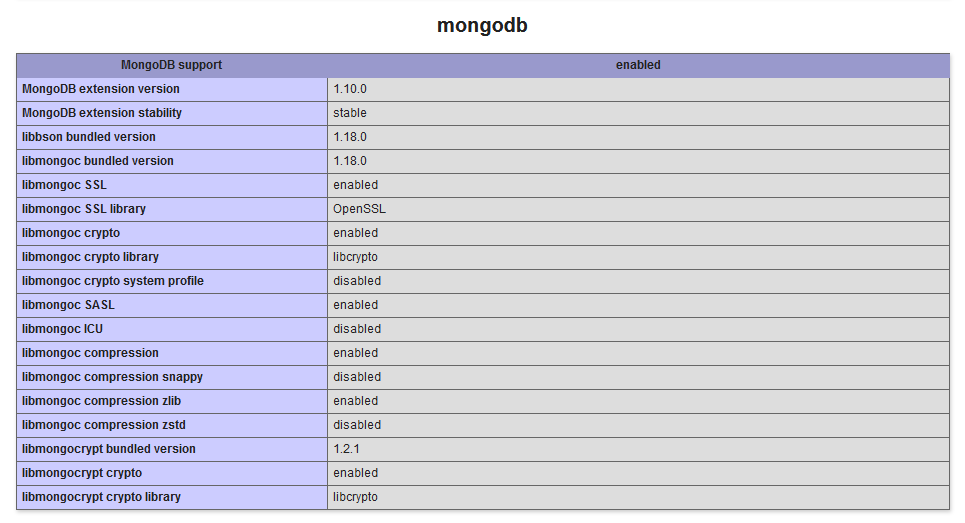
Its presence indicates that the MongoDB extension has been properly loaded and is functioning. You can also see its version number to make sure that’s the one you intended to use.
If you don’t see this section, it’s likely the MongoDB extension failed to load. If that’s the case, look for the “error_log” property in the table to see where the PHP error log file is, as it may contain crucial clues. Make sure that “log_errors” is set to ON. Both are located in the “Core” PHP section.
If you are upgrading to a newer version of PHP, or have multiple versions installed, keep in mind that each version needs to have its own MongoDB extension and php.ini files.
Start a MongoDB Cluster on Atlas
Now that you’ve got your local environment set up, it’s time to create a MongoDB database to work with, and to load in some sample data you can explore and modify.
Get started with an M0 cluster on Atlas today. It’s free forever, and it’s the easiest way to try out the steps in this blog series.
It will take a couple of minutes for your cluster to be provisioned, so while you’re waiting, you can move on to the next step.
Set Up Your MongoDB Instance
Hopefully, your MongoDB cluster should have finished starting up now and has probably been running for a few minutes.
The following instructions were correct at the time of writing but may change, as we’re always improving the Atlas user interface:
In the Atlas web interface, you should see a green button at the bottom-left of the screen, saying «Get Started.» If you click on it, it’ll bring up a checklist of steps for getting your database set up. Click on each of the items in the list (including the «Load Sample Data» item—we’ll use this later to test the PHP library), and it’ll help you through the steps to get set up.
The fastest way to get access to data is to load the sample datasets into your cluster right in the Atlas console. If you’re brand new, the new user wizard will actually walk you through the process and prompt you to load these.
If you already created your cluster and want to go back to load the sample datasets, click the ellipsis (three dots) next to your cluster connection buttons (see below image) and then select Load Sample Dataset .
Now, let’s move on to setting the configuration necessary to access your data in the MongoDB Cluster. You will need to create a database user and configure your IP Address Access List .
Create a User
Following the «Get Started» steps, create a user with «Read and write access to any database.» You can give it the username and password of your choice. Make a copy of them, because you’ll need them in a minute. Use the «autogenerate secure password» button to ensure you have a long, random password which is also safe to paste into your connection string later.
Add Your IP Address to the Access List
When deploying an app with sensitive data, you should only whitelist the IP address of the servers which need to connect to your database. To whitelist the IP address of your development machine, select «Network Access,» click the «Add IP Address» button, and then click «Add Current IP Address» and hit «Confirm.»
Connect to Your Database
The last step of the «Get Started» checklist is «Connect to your Cluster.» Select «Connect your application» and select «PHP» with a version of «PHPLIB 1.8.»
Click the «Copy» button to copy the URL to your paste buffer. Save it to the same place you stored your username and password. Note that the URL has
Now it’s time to actually write some PHP code to connect to your MongoDB database! Up until now, we’ve only installed the supporting system components. Before we begin to connect to our database and use PHP to manipulate data, we need to install the MongoDB PHP Library.
Composer is the recommended installation tool for the MongoDB library. Composer is a tool for dependency management in PHP. It allows you to declare the libraries your project depends on and it will manage (install/update) them for you.