- Getting Started with Bottom Sheets in Android Using Kotlin Part 2 [Beginner Friendly]
- What will you learn?
- Building the app
- arnold-wafula / ModalBottomSheet-Medium
- A small project that demonstrates the implementation of the modal bottom sheet in android. Written for my article on medium (Getting Started with Bottom Sheets in Android Using Kotlin [Beginner Friendly])
- ModalBottomSheet-Medium
- Difference between a modal bottom sheet and a fullscreen modal bottom sheet
- Bottom sheet behavior states
- Output
- Advantages of bottom sheets
- Conclusion
- Android BottomSheet Example in Kotlin
- What is BottomSheet?
- Types of BottomSheet
- States of BottomSheet
- Project Creation
- Example of Persistent BottomSheet
- Example of Modal BottomSheet
- Conclusion
Getting Started with Bottom Sheets in Android Using Kotlin Part 2 [Beginner Friendly]
As discussed in part 1 of the article, a bottom sheet is an elevated surface anchored to the bottom of the screen. We also saw how it allows room for more user interface elements such as images and text. In this article, we will create a modal bottom sheet that occupies the entire height of the screen. Remember the types of bottom sheets? Modal bottom sheet and Standard bottom sheet. In case you want to learn how to create a fullscreen standard bottom sheet, refer to this article by Narayan Panthi.
What will you learn?
- Creating a full-screen bottom sheet
- What is a bottom sheet behavior
- Different bottom sheets states
- Advantages of using bottom sheets
Building the app
Similar to the modal bottom sheet we created in part 1, the fullscreen bottom sheet will extend the BottomSheetDialogFragment class. If you wish to go straight into the source code, click the GitHub link below;
arnold-wafula / ModalBottomSheet-Medium
A small project that demonstrates the implementation of the modal bottom sheet in android. Written for my article on medium (Getting Started with Bottom Sheets in Android Using Kotlin [Beginner Friendly])
ModalBottomSheet-Medium
A simple android project that demonstrates the implementation of the modal bottom sheet in android. Written for my article on medium.


Since we had already set up the project, we will only make changes to two files and add a few resources such as text strings, images, and a drawable. The item_bottomsheet_fullscreen.xml file includes a header image, title, subtitle, and paragraph text inside a NestedScrollView. Find the source code below;
I created a toolbar that contains a close button which can be used as an alternative to swiping the bottom sheet down to dismiss it. I also added a drawable for the header image.
Difference between a modal bottom sheet and a fullscreen modal bottom sheet
So you might ask, what is the difference in implementation between the two? One thing we realize is the height. The fullscreen modal bottom sheet covers the entire screen height. How is this made possible? The peekHeight attribute. But first, we have to set the screen height to MATCH_PARENT.
// Height of the view bottomSheet.layoutParams.height = ViewGroup.LayoutParams.MATCH_PARENT Subsequently, define the bottom sheet behavior and apply the peekHeight attribute to it. According to official Android developer documentation,
Bottom sheet behavior is an interaction behavior plugin for a child view of CoordinatorLayout to make it work as a bottom sheet.
val behavior = BottomSheetBehavior.from(bottomSheet) behavior.peekHeight = resources.displayMetrics.heightPixels // Pop-up height Bottom sheet behavior states
There are six states in the bottom sheet behavior;
- STATE_EXPANDED — bottom sheet is visible and its maximum height and it is neither dragging nor settling.
- STATE_COLLAPSED — visible but only its peek height is shown. Usually the ‘resting position’ of a Bottom Sheet.
- STATE_DRAGGING — user is actively dragging the bottom sheet up or down.
- STATE_HALF_EXPANDED — the bottom sheet is half-expanded (used when fitToContents is false).
- STATE_HIDDEN — the bottom sheet is hidden and no longer visible.
- STATE_SETTLING — settling to a specific height after a drag/swipe gesture.
To better understand the states, check out this issue by SilverEnd on GitHub. In our project, we only use the expanded state.
behavior.state = BottomSheetBehavior.STATE_EXPANDED // Expanded state With that understanding, you can now copy FullscreenBottomSheetDialog.kt source code below and paste it into your project;
Output
Advantages of bottom sheets
- Swipeable — bottom sheets allow for an interactive user experience.
- Easily Accessible — since they are anchored at the bottom of the screen, interacting with them is easy.
Conclusion
So that is a simple way to build a fullscreen modal bottom sheet in android. I hope you learned something new 😊. See you on the next one.
Android BottomSheet Example in Kotlin
Have you ever seen any BottomSheet in any mobile application? Is this a new term for you? Have you seen this type of UI in Google maps?
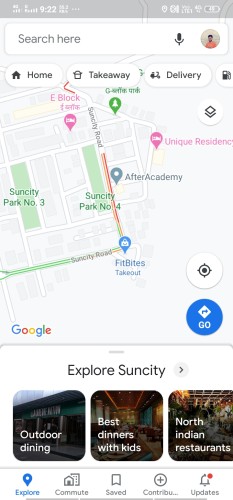
And this is called BottomSheet . Now, you can say that you have used this BottomSheet in many applications such as Google Maps, Google Drive, Uber, and many other applications. But it’s time to make a BottomSheet of your own.
Welcome to MindOrks! In this blog, we are going to learn how to implement BottomSheet in Android.
The following is the timeline of this blog:
- What is BottomSheet?
- Types of BottomSheet
- States of BottomSheet
- Project creation
- Example of Persistent BottomSheet
- Example of Modal BottomSheet
- Conclusion
What is BottomSheet?
A BottomSheet is a component that is used to display some information by sliding the view up from the bottom of the screen and also, you can hide this BottomSheet when the message is conveyed to the users. This is a nice way of conveying some message or performing some task in Android.
Types of BottomSheet
A BottomSheet is of two types:
- Persistent BottomSheet: The Persistent BottomSheet is visible along with other UI components on the screen. Initially, some content of this Persistent BottomSheet is visible(you can set the peek height i.e. the initial height of BottomSheet to 0 also) and when you slide it up, then rest of the content will appear along with the BottomSheet. The following is an example of Persistent BottomSheet:

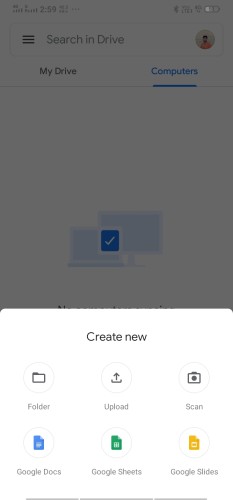
- Modal BottomSheet: This looks similar to some alert-dialog or some dialog fragment but originating from the bottom of the screen. Unlike Persistent BottomSheet, it is totally invisible initially, and on certain action(maybe a button click), it appears from the bottom of the screen. It generally contains some list of items and the items of the list correspond to some action. The following is an example of Modal BottomSheet:
States of BottomSheet
In total, a BottomSheet has five states and with the help of these states, we can perform various actions according to our need.
- STATE_COLLAPSED: This state indicates that the BottomSheet is collapsed i.e. the bottom sheet is visible up to its peek height only.
- STATE_EXPANDED: This state indicates that the BottomSheet is fully expanded to its maximum height and all the content of the BottomSheet is visible.
- STATE_DRAGGING: This state indicates that the BottomSheet is dragging either in the upward direction or in the downward direction.
- STATE_SETTLING: This state indicates that the BottomSheet is settling either to the max height or to the peek height. (Sometimes height can be 0 also when behavior_hideable is set to true )
- STATE_HIDDEN: This state indicates that the BottomSheet is hidden i.e. it is possible only when the value of behavior_hideable is set to true . Once, the BottomSheet is hidden, you can’t scroll it to make it visible. To make it visible again, you need to change its state by some action(maybe on some button click).
So, these states are important while dealing with a BottomSheet. Now, let’s move on to the example part.
Project Creation
Open Android Studio and create a project with Empty Activity.
Project name: BottomSheetExample
In order to use BottomSheet you need to add the dependency of material design in your app-level build.gradle file. So, add the below line in your build.gradle file and sync the project:
implementation 'com.google.android.material:material:1.2.0'Always use the latest version. (You can find the latest version of the material design from here )
NOTE: Always make sure that the repositories section of build.gradle includes Google’s Maven Repository google()
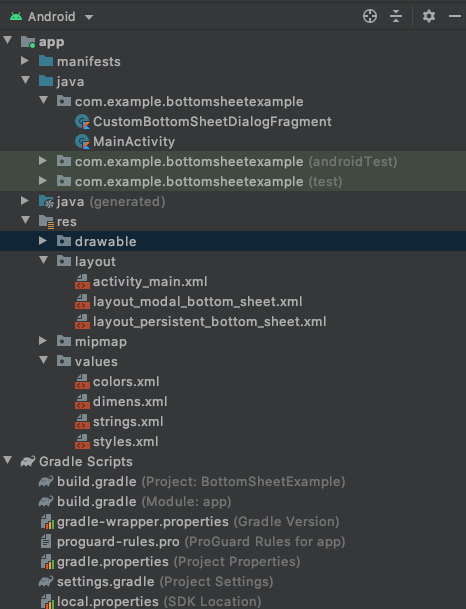
Here in our example, we will cover both Persistent and Modal BottomSheet. So, we need to make two layout files for both the BottomSheets and a class for Modal BottomSheet. Here is our project structure:
Also, we will be using some string value and dimensions. So, the following is the code for our strings.xml file:
BottomSheetExample Persistent Bottom Sheet Modal Bottom Sheet Learn Bottom Sheet A BottomSheet is a component that is used to display some information by sliding the view up in the screen and also you can hide this BottomSheet when the message is conveyed to the users. This is a nice way of conveying some message or performing some task in Android. Types of BottomSheet \n\nA BottomSheet is of two types: \n\nPersistent BottomSheet \n\nModal BottomSheet Button 1 Button 2 Button 3 And below is the code for dimens.xml file:
16sp 24sp 0dp 16dp 32dp 60dp You can hardcode these values.
Now, let’s begin with Persistent BottomSheet.
Example of Persistent BottomSheet
Let’s first make the UI of the Persistent BottomSheet. So, here is the code for layout_persistent_bottom_sheet.xml :
Here, we are having two text views, one for the title and one for the description. Few things that you can notice from the above code is:
The behavior of the layout is set to com.google.android.material.bottomsheet.BottomSheetBehavior
Some flags are set such as:
- behavior_hideable: This is used to set if the bottom sheet can be hidden totally when we drag it down or not.
- behavior_peekHeight: This is height up to which the bottom sheet will be visible in the collapsed state.
- behavior_skipCollapsed: When it is set to true and the bottom sheet is hidable, then it will not have a collapsed state.
After that, we need to add this layout to our activity_main.xml file. Also, as discussed earlier, we will have two buttons on the main page, one for Persistent BottomSheet and other for Modal BottomSheet. So, here is the code for activity_main.xml file:
If you see the above code, then you will find that the BottomSheet is the direct child of the CoordinatorLayout.
Now, if you run the app, then you will see the BottomSheet present on the screen. In order to observe various states of the BottomSheet, you can override the onStateChanged() function in your MainActivity.kt file.
The following is the code of MainActivity:
class MainActivity : AppCompatActivity() < private lateinit var bottomSheetBehavior: BottomSheetBehavioroverride fun onCreate(savedInstanceState: Bundle?) < super.onCreate(savedInstanceState) setContentView(R.layout.activity_main) bottomSheetBehavior = BottomSheetBehavior.from(bottomSheet) bottomSheetBehavior.addBottomSheetCallback(object : BottomSheetBehavior.BottomSheetCallback() < override fun onSlide(bottomSheet: View, slideOffset: Float) < // handle onSlide >override fun onStateChanged(bottomSheet: View, newState: Int) < when (newState) < BottomSheetBehavior.STATE_COLLAPSED ->Toast.makeText(this@MainActivity, "STATE_COLLAPSED", Toast.LENGTH_SHORT).show() BottomSheetBehavior.STATE_EXPANDED -> Toast.makeText(this@MainActivity, "STATE_EXPANDED", Toast.LENGTH_SHORT).show() BottomSheetBehavior.STATE_DRAGGING -> Toast.makeText(this@MainActivity, "STATE_DRAGGING", Toast.LENGTH_SHORT).show() BottomSheetBehavior.STATE_SETTLING -> Toast.makeText(this@MainActivity, "STATE_SETTLING", Toast.LENGTH_SHORT).show() BottomSheetBehavior.STATE_HIDDEN -> Toast.makeText(this@MainActivity, "STATE_HIDDEN", Toast.LENGTH_SHORT).show() else -> Toast.makeText(this@MainActivity, "OTHER_STATE", Toast.LENGTH_SHORT).show() > > >) btnBottomSheetPersistent.setOnClickListener < if (bottomSheetBehavior.state == BottomSheetBehavior.STATE_EXPANDED) bottomSheetBehavior.state = BottomSheetBehavior.STATE_COLLAPSED else bottomSheetBehavior.state = BottomSheetBehavior.STATE_EXPANDED >> >Here, we have created a variable of BottomSheetBehavior and on click of the button we are changing its state i.e. when it is expanded then we are collapsing it and vice-versa.
Now, run the app and try to observe various states of the BottomSheet.
Example of Modal BottomSheet
The implementation of Modal BottomSheet is similar to that of a fragment or simply a DialogFragment. But here, we use BottomSheetDialogFragment.
So, let’s first make the UI. In this example, we will have three buttons. So, the code for layout_modal_bottom_sheet.xml will be:
Now, we have already made one class named CustomBottomSheetDialogFragment . In this class, we will inflate the layout and handle the button clicks of the Modal BottomSheet. The following is the code for the same:
class CustomBottomSheetDialogFragment : BottomSheetDialogFragment() < companion object < const val TAG = "CustomBottomSheetDialogFragment" >override fun onCreateView( inflater: LayoutInflater, container: ViewGroup?, savedInstanceState: Bundle? ): View? < return inflater.inflate(R.layout.layout_modal_bottom_sheet, container, false) >override fun onActivityCreated(savedInstanceState: Bundle?) < super.onActivityCreated(savedInstanceState) firstButton.setOnClickListener < //handle click event Toast.makeText(context, "First Button Clicked", Toast.LENGTH_SHORT).show() >secondButton.setOnClickListener < //handle click event Toast.makeText(context, "Second Button Clicked", Toast.LENGTH_SHORT).show() >thirdButton.setOnClickListener < //handle click event Toast.makeText(context, "Third Button Clicked", Toast.LENGTH_SHORT).show() >> >And finally, we need to call this class from the MainActivtiy on the click of the button. So, the code for this will be:
btnBottomSheetModal.setOnClickListener < CustomBottomSheetDialogFragment().apply < show(supportFragmentManager, CustomBottomSheetDialogFragment.TAG) >>That’s it. Now, run the app and test both the BottomSheets i.e. the persistent and the modal. You can modify the UI according to your use case.
Conclusion
In this blog, we learned how to implement BottomSheet in our Android Application. We saw the types of BottomSheet that we can implement and finally we saw how to implement both these BottomSheets.
For more info on BottomSheets you can visit the official page .
Hope you enjoyed creating BottomSheet with us.
Do share this blog to spread the knowledge.