[Solved]-Mirror an image using Python-Opencv
img now has the image half-flipped. This happens because you are writing the content on the same image source, losing the old content anytime until you reach the middle. (Notice that X-x will increase the image size by 1 pixel. If the image width is 100, in the first iteration X-x = 100 — 0 = 100 and because it starts from 0, the image is made wider 1 pixel.) Then, you start copying back. Also, you do not use that content because:
img = graphics.Image(graphics.Point(0,0), image2) Here is the problem: you just overwrote the content of img without giving it any use. Later:
win = graphics.GraphWin(image2, img.getWidth(), img.getHeight()) img.draw(win) This seems unrelated with the purpose of the function (flip an image). What I would do is:
import graphics import sys def Flip(image_filename): img_src = graphics.Image(graphics.Point(0, 0), image_filename) img_dst = img_src.clone() X, Y = img_src.getWidth(), img_src.getHeight() for x in range(X): for y in range(Y): r, g, b = img_src.getPixel(x, y) color = graphics.color_rgb(r, g, b) img_dst.setPixel(X-x-1, y, color) return img_dst if __name__ == '__main__': input = sys.argv[1] or 'my_image.ppm' output = 'mirror-%s' % input img = Flip (input) img.save(output) Notices that the function Flip only take care of flipping the image, outside the function you can do whatever you need the image, as you can see in ‘main’ program.
If you want to use only one image, it is possible and more efficient. For that, you can use the same principle for swapping values between variables:
def Flip(image_filename): img = graphics.Image(graphics.Point(0, 0), image_filename) X, Y = img.getWidth(), img.getHeight() for x in range(X/2): for y in range(Y): r_1, g_1, b_1 = img.getPixel(x, y) color_1 = graphics.color_rgb(r_1, g_1, b_1) r_2, g_2, b_2 = img.getPixel(X-x-1, y) color_2 = graphics.color_rgb(r_2, g_2, b_2) img.setPixel(X-x-1, y, color_1) img.setPixel(x, y, color_2) return img Related Query
- Mirror an image using Python
- How to crop an image in OpenCV using Python
- How to write text on a image in windows using python opencv2
- How can one display an image using cv2 in Python
- How to Draw a point in an image using given co-ordinate with python opencv?
- Detect text area in an image using python and opencv
- Finding red color in image using Python & OpenCV
- Read a base 64 encoded image from memory using OpenCv python library
- Cropping Concave polygon from Image using Opencv python
- Python — byte image to NumPy array using OpenCV
- Splitting Image using OpenCV in python
- Remove background of the image using opencv Python
- How to write text on image using opencv python in run-time application
- Detect if image is color, grayscale or black and white using Python
- How to get image from video using opencv python
- Determine if an image exists within a larger image, and if so, find it, using Python
- Using OpenCV’s Image Hashing Module from Python
- Draw two-sided arrow on image using opencv python
- Counting particles using image processing in python
- Changing colours of an area in an image using opencv in python
- Python — Detect a QR code from an image and crop using OpenCV
- Displaying opencv image using python flask
- Opencv Python Crop Image Using Numpy Array
- Using python opencv to load image from zip
- Cropping circle from image using opencv python
- How to extract multiple objects from an image using Python OpenCV?
- Creating image tiles (m*n) of original image using Python and Numpy
- How to make a free hand shape(random) on an image in python using opencv
- How to open an image from an url with opencv using requests from python
- How to crop a region of small pixels in an image using OpenCv in Python
More Query from same tag
- bad_alloc() error while haar cascade training
- detect edge using python and Opencv2
- How to simply do np.where not includes np.where
- Can’t connect to more than 6 IP cameras at the same moment
- Copy part of image to another image with EmguCV
- TypeError:integer argument expected int got float in opencv circle
- Measuring the distance of a point to a mask in OpenCV python
- How to determine if a rectangle is well formed using open cv
- how to use openCV as a motion detector (not looking for video output)
- ASP.NET Core stream video from the OpenCVSharp capture
- OpenCV: Reading a YAML file into a CvMat structure
- image retrieval from its values(euclidean distance) in python opencv
- How to augment scanned document image with creases, folds and wrinkles?
- Choosing parameters for HOUGH_GRADIENT_ALT
- NormalBayesClassifier is giving undeclared identifier in opencv code
- Trim / Cut video on Android using FFMpeg’s Copy
- cv2 rename ä ö ü to ae oe ue
- OpenCV: How to normalize face (remove shadow)?
- How to pass image frames camera to a function in wasm (C++)?
- How to apply two color thresholds to image OpenCV
- Displaying a video using OpenCV 2.4.1
- OpenCV — Dragging image blocks in a window
- Is there a way to get eigenvalues for a particular point in an image?
- Boost Python wrapper for a c++ class that uses Opencv 2.3
- Convert pixel coordinate into world coordinate in OpenCv2
- To use OpenCV/cv2 to compare and mark the difference between 2 images (with pictures)
- opencv c++ imgshow is ok but the video I have saved is just black
- Is there a way to correctly align faces?
- Unable to access pixel values from greyscale image
- How getPerspectiveTransform and warpPerspective work? [Python]
Image Flipping and Mirroring with NumPy and OpenCV
In this blog article, I will explain how we can mirror or flip an image in Python. All it is required is understanding the basic mathematics behind various matrix operations and matrix manipulations.
Credits of Cover Image — Photo by Michael Busch on Unsplash
Package requirements
- NumPy — For matrix operations and manipulating the same.
- OpenCV — For reading the image and converting it into a 2D array (matrix).
- Matplotlib — For plotting the matrix as an image.
For this mini-project, I am using a famous Lena image which is mainly used for testing the computer vision models. Make sure to download this image and save it in the current working directory.
import cv2 import numpy as np from matplotlib import pyplot as plt Let’s get started
First, we read the image file using the imread() method from the module cv2 . To do that, we simply need to import the package and use so. Hence by doing this, we get the image in the form of a matrix.
By default, imread() method reads the image in BGR ( Blue , Green , Red ) format. To convert the read image into regular format i.e., RGB ( Red , Green , Blue ) we use cvtColor() method from the same module cv2 .
def read_this(image_file, gray_scale=False): image_src = cv2.imread(image_file) if gray_scale: image_rgb = cv2.cvtColor(image_src, cv2.COLOR_BGR2GRAY) else: image_rgb = cv2.cvtColor(image_src, cv2.COLOR_BGR2RGB) return image_rgb The above function returns an image matrix from the image file that is passed. It consists of regular if and else condition if we want to get the image matrix either in gray_scale or RGB format.
Mirroring the Image
To mirror the image basically, we need to reverse the matrix row-wise from left to right. For example, let’s consider a matrix A .
If we want to mirror this matrix (row-wise), then it would be —
>>> import numpy as np >>> mirror_ = np.fliplr(A) >>> mirror_ [[1, 1, 4], [0, 8, 2], [1, 8, 3]] We can also do this without using the NumPy module. If so, we get to use loops and reverse each row. This would take a while if performed the same on image matrices as they are very large matrices and we don’t want our code to perform very slow.
def mirror_this(image_file, gray_scale=False, with_plot=False): image_rgb = read_this(image_file=image_file, gray_scale=gray_scale) image_mirror = np.fliplr(image_rgb) if with_plot: fig = plt.figure(figsize=(10, 20)) ax1 = fig.add_subplot(2, 2, 1) ax1.axis("off") ax1.title.set_text('Original') ax2 = fig.add_subplot(2, 2, 2) ax2.axis("off") ax2.title.set_text("Mirrored") if not gray_scale: ax1.imshow(image_rgb) ax2.imshow(image_mirror) else: ax1.imshow(image_rgb, cmap='gray') ax2.imshow(image_mirror, cmap='gray') return True return image_mirror The above function returns an image matrix that is reversed or flipped row-wise from left to right.
mirror_this(image_file="lena_original.png", with_plot=True) 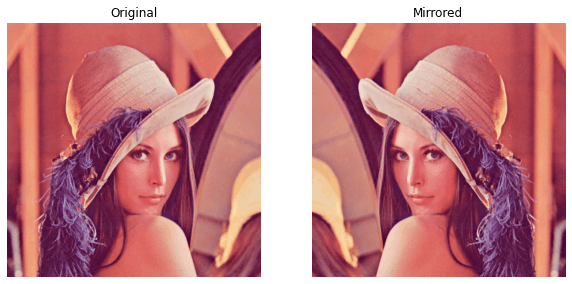
mirror_this(image_file="lena_original.png", gray_scale=True, with_plot=True) 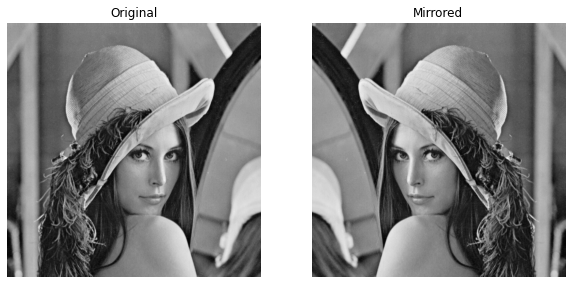
Flipping the Image
To flip the image basically, we need to reverse the matrix column-wise from up to down. For example, let’s consider a matrix B .
If we want to flip this matrix (column-wise), then it would be —
>>> import numpy as np >>> flip_= np.flipud(B) >>> flip_ [[3, 8, 1], [2, 8, 0], [4, 1, 1]] We use NumPy for flipping the matrix in order to maintain the fastness of the code.
def flip_this(image_file, gray_scale=False, with_plot=False): image_rgb = read_this(image_file=image_file, gray_scale=gray_scale) image_flip = np.flipud(image_rgb) if with_plot: fig = plt.figure(figsize=(10, 20)) ax1 = fig.add_subplot(2, 2, 1) ax1.axis("off") ax1.title.set_text('Original') ax2 = fig.add_subplot(2, 2, 2) ax2.axis("off") ax2.title.set_text("Flipped") if not gray_scale: ax1.imshow(image_rgb) ax2.imshow(image_flip) else: ax1.imshow(image_rgb, cmap='gray') ax2.imshow(image_flip, cmap='gray') return True return image_flip The above function returns an image matrix that is reversed or flipped column-wise from up to down.
flip_this(image_file='lena_original.png', with_plot=True) 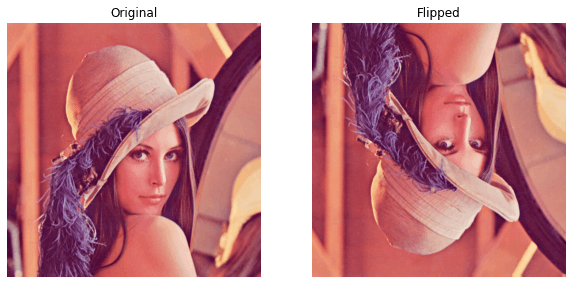
flip_this(image_file='lena_original.png', gray_scale=True, with_plot=True) 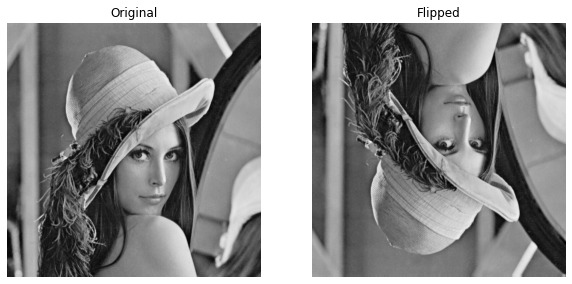
The Complete Code
class ImageOpsFromScratch(object): def __init__(self, image_file): self.image_file = image_file def read_this(self, gray_scale=False): image_src = cv2.imread(self.image_file) if gray_scale: image_rgb = cv2.cvtColor(image_src, cv2.COLOR_BGR2GRAY) else: image_rgb = cv2.cvtColor(image_src, cv2.COLOR_BGR2RGB) return image_rgb def mirror_this(self, with_plot=True, gray_scale=False): image_rgb = self.read_this(gray_scale=gray_scale) image_mirror = np.fliplr(image_rgb) if with_plot: self.plot_it(orig_matrix=image_rgb, trans_matrix=image_mirror, head_text='Mirrored', gray_scale=gray_scale) return None return image_mirror def flip_this(self, with_plot=True, gray_scale=False): image_rgb = self.read_this(gray_scale=gray_scale) image_flip = np.flipud(image_rgb) if with_plot: self.plot_it(orig_matrix=image_rgb, trans_matrix=image_flip, head_text='Flipped', gray_scale=gray_scale) return None return image_flip def plot_it(self, orig_matrix, trans_matrix, head_text, gray_scale=False): fig = plt.figure(figsize=(10, 20)) ax1 = fig.add_subplot(2, 2, 1) ax1.axis("off") ax1.title.set_text('Original') ax2 = fig.add_subplot(2, 2, 2) ax2.axis("off") ax2.title.set_text(head_text) if not gray_scale: ax1.imshow(orig_matrix) ax2.imshow(trans_matrix) else: ax1.imshow(orig_matrix, cmap='gray') ax2.imshow(trans_matrix, cmap='gray') return True Basic Image Operations Package
imo = ImageOpsFromScratch(image_file='lena_original.png') ### Mirroring ### imo.mirror_this() imo.mirror_this(gray_scale=True) ### Flipping ### imo.flip_this() imo.flip_this(gray_scale=True) The above image results will be displayed. Now that everything is sorted we can create other image operations like equalize() , solarize() etc. I have not covered that in this article but definitely in the next one.
What I have gained from this?
- By implementing this, I have learned and understood the logic behind various image operations and how to put that in the form of code.
We can also do the same using a well-known image library Pillow . But, as a developer, we need to know things work from start to end. This is something where everyone should be curious about.
Please do read my another article related to image processing and computer vision where I explain image convolution from scratch.