- Update user info php
- Объектно-ориентированный стиль
- Список пользователей
- Обновление пользователя
- Процедурный стиль
- Список пользователей
- Обновление пользователя
- User profile edit in PHP and MYSQL | Update user account details after logging in using PHP
- How do users edit their profile after logging into account in PHP?
- Simple User Profile With Update Profile Info Using PHP/MYSQL
- Steps to Create User Profile With Update Profile Info Using PHP/MYSQL
- User Profile
- User Log In
- Register
- Sample Screenshots:
- Downloadable Source Code
- Inquiries
- 12 thoughts on “Simple User Profile With Update Profile Info Using PHP/MYSQL”
Update user info php
В MySQL для обновления применяется sql-команда UPDATE :
UPDATE Таблица SET столбец1 = значение1, столбец2 = значение2. WHERE столбец = значение
Для примера возьмем использованную в прошлых темах таблицу Users со следующим определением:
CREATE TABLE Users (id INTEGER AUTO_INCREMENT PRIMARY KEY, name VARCHAR(30), age INTEGER)
Объектно-ориентированный стиль
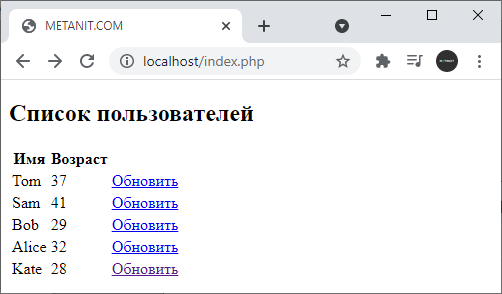
Сначала определим файл index.php , который будет выводить список пользователей с ссылками на их обновление:
Список пользователей
connect_error)< die("Ошибка: " . $conn->connect_error); > $sql = "SELECT * FROM Users"; if($result = $conn->query($sql))< echo "
| Имя | Возраст | |
|---|---|---|
| " . $row["name"] . " | "; echo "" . $row["age"] . " | "; echo "Изменить | "; echo "
Здесь используется команда SELECT, которая получает всех пользователей из таблицы Users. В таблице третий столбец хранит ссылку на скрипт update.php, который мы далее создадим и которому передается параметр id с идентификатором пользователя, которого надо изменить.
Для обновления данных определим скрипт update.php :
connect_error)< die("Ошибка: " . $conn->connect_error); > ?> real_escape_string($_GET["id"]); $sql = "SELECT * FROM Users WHERE "; if($result = $conn->query($sql))< if($result->num_rows > 0) < foreach($result as $row)< $username = $row["name"]; $userage = $row["age"]; >echo "Обновление пользователя
Имя:
Возраст:
"; > else< echo "Пользователь не найден"; > $result->free(); > else< echo "Ошибка: " . $conn->error; > > elseif (isset($_POST["id"]) && isset($_POST["name"]) && isset($_POST["age"])) < $userid = $conn->real_escape_string($_POST["id"]); $username = $conn->real_escape_string($_POST["name"]); $userage = $conn->real_escape_string($_POST["age"]); $sql = "UPDATE Users SET name = '$username', age = '$userage' WHERE "; if($result = $conn->query($sql)) < header("Location: index.php"); >else< echo "Ошибка: " . $conn->error; > > else < echo "Некорректные данные"; >$conn->close(); ?> Весь код обновления структурно делится на две части. В первой части мы обрабатываем запрос GET. Когда пользователь нажимает на ссылку «Обновить» на странице index.php , то отправляется запрос GET, в котором передается id редактируемого пользователя.
if($_SERVER["REQUEST_METHOD"] === "GET" && isset($_GET["id"]))
И если это запрос GET, то нам надо вывести данные редактируемого пользователя в поля формы. Для этого получаем из базы данных объект по переданному id
$userid = $conn->real_escape_string($_GET["id"]); $sql = "SELECT * FROM Users WHERE "; if($result = $conn->query($sql))Далее получаем полученные данные и, если они имеются, выводим их в поля формы. Таким образом, пользователь увидит на форме данные обновляемого объекта.
Вторая часть скрипта представляет обработку POST-запроса - когда пользователь нажимает на кнопку на форме, то будет отправляться POST-запрос с отправленными данными. Мы получаем эти данные и отправляем базе данных команду UPDATE с этими данными, используя при этом параметризацию запроса:
$userid = $conn->real_escape_string($_POST["id"]); $username = $conn->real_escape_string($_POST["name"]); $userage = $conn->real_escape_string($_POST["age"]); $sql = "UPDATE Users SET name = '$username', age = '$userage' WHERE "; if($result = $conn->query($sql))После выполнения запроса к БД перенаправляем пользователя на скрипт index.php с помощью функции
Таким образом, пользователь обращается к скрипту index.php , видит таблицу с данными и нажимает на ссылку "Обновить" в одной из строк.
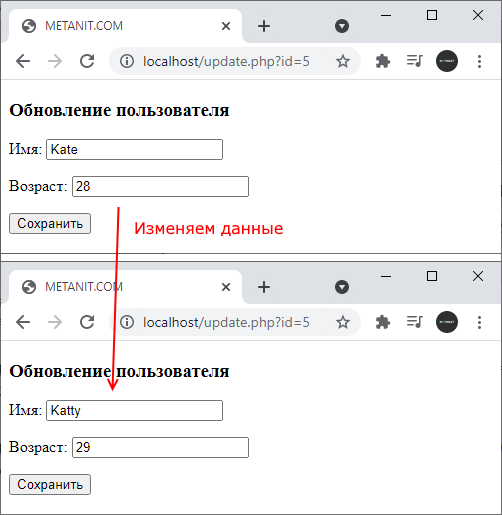
После нажатия его перебрасывает на скрипт update.php , который выводит данные редактируемого объекта. Пользователь изменяет данные и нажимает на кнопку.
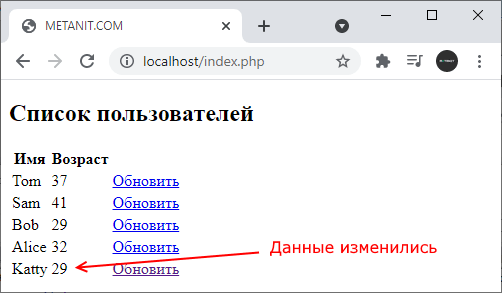
Данные в запросе POST отправляются этому же скрипту update.php , который сохраняет данные и перенаправляет пользователя обратно на index.php .
Процедурный стиль
Список пользователей
$sql = "SELECT * FROM Users"; if($result = mysqli_query($conn, $sql))< echo "
| Имя | Возраст | |
|---|---|---|
| " . $row["name"] . " | "; echo "" . $row["age"] . " | "; echo "Изменить | "; echo "
?> 0) < foreach($result as $row)< $username = $row["name"]; $userage = $row["age"]; >echo "Обновление пользователя
Имя:
Возраст:
"; > else< echo "Пользователь не найден"; > mysqli_free_result($result); > else < echo "Ошибка: " . mysqli_error($conn); >> elseif (isset($_POST["id"]) && isset($_POST["name"]) && isset($_POST["age"])) < $userid = mysqli_real_escape_string($conn, $_POST["id"]); $username = mysqli_real_escape_string($conn, $_POST["name"]); $userage = mysqli_real_escape_string($conn, $_POST["age"]); $sql = "UPDATE Users SET name = '$username', age = '$userage' WHERE "; if($result = mysqli_query($conn, $sql))< header("Location: index.php"); >else < echo "Ошибка: " . mysqli_error($conn); >> else < echo "Некорректные данные"; >mysqli_close($conn); ?>
User profile edit in PHP and MYSQL | Update user account details after logging in using PHP

The update operation is very important for dynamic web development. We are creating login and registration from scratch. In this tutorial, we will learn how to update user profile after logging in to user account using PHP and MYSQL database. A login system requires many features to give a better environment for the account dashboard. On my account page or dashboard, users can change their profile details after login, like – user can change the first name, last name, username, profile image, etc. We had discussed update operation in previous PHP tutorials. We will use an update operation with user session-id or email.
Let’s discuss the process –
How do users edit their profile after logging into account in PHP?
The update operation plays an important role. We will use an update operation with session user email. It will help to update user data by authorized (who can log in to account) users.
For example- A user enters login and password to log in own account. The user gets logged in and redirects to my account page. My account page contains user details like – user first name, user last name, and user username. On my account user can see the edit profile button and when the user clicks on the edit profile button, he redirects to the update page where the user can change the first name, last name, username, user profile image, etc.
The update operation executes and data update through the current session email id. We can set the user id while login.
We already created an account page with an edit profile button. You can check here(Login and registration in PHP – Part 1 )
In these tutorials, we are using PHP and bootstrap.
Bootstrap – Bootstrap is an open-source HTML and CSS framework which allows the design of websites to use ready-made classes and modules. We will create a user edit profile form using bootstrap also.
edit-profile.php
$email=$_SESSION["login_email"]; $findresult = mysqli_query($dbc, "SELECT * FROM users WHERE email= '$email'"); if($res = mysqli_fetch_array($findresult)) < $username = $res['username']; $oldusername =$res['username']; $fname = $res['fname']; $lname = $res['lname']; $email = $res['email']; $image= $res['image']; >?> Note:- Kindly create a folder with name = images in the same path then execute the code above.
In the PHP file above –
1. First of all, we fetch current user data using session email like we already fetched data on the account.php page. It’s very easy to fetch user row by session email from the MYSQL database using PHP.
2. In the update operation, we always create and form and fetch user-related data from the database and echo it in the text box. We are updating the image also using type files. It will help to update user profile images during the session.
3. In this profile update operation, we validated the username if already exists.
4. When the user clicks the save button the data hold by the POST method and updated by the update query using session email.
5. When we write user profile update code during the session, we create a condition for image upload or not change old uploaded image.
Like – if the user does not browse any image, it means image_temp will be empty and we never update the null value in the database. That’s why we create if condition for this situation-
When the image doesn’t browse then do not update and upload an image and when the image browses then delete an old image, move the new user profile image into the folder (images) and also update the new image into the database using session-id or email. You can use a user id or email.
Simple User Profile With Update Profile Info Using PHP/MYSQL
Good day everyone! Today is another tutorial for all PHP developers, especially for the beginners in PHP programming. I will teach you to create a Simple User Profile With Update Profile Info Using PHP/MYSQL.
This article can answer the question posted in StackOverflow about how to view user’s profiles using PHP.
But before that, make sure you are done creating a simple login and registration. If you are not yet, this tutorial might help you. >> click here
Steps to Create User Profile With Update Profile Info Using PHP/MYSQL
Step 1. First, create a database, name it as any name you desire. In my case, I use “ITSOURCECODE” as the name of the database.
CREATE TABLE `users` ( `user_id` int(11) NOT NULL, `username` text NOT NULL, `password` text NOT NULL, `full_name` text NOT NULL, `gender` text NOT NULL, `age` int(11) NOT NULL, `address` text NOT NULL) ENGINE=MyISAM DEFAULT CHARSET=latin1;
Make sure you are done doing in the login and registration. A link will be seen and view on the link above. And Make sure to Create a “connection.php” file to hold the database connection to our PHP project.
Step 3. For the user’s profile, create and update “profile.php” file then put the following codes.
User Profile
Please Fill-out All Fields ?>
Step 4. Update the “index.php” file by putting the following codes.
User Log In
Please Fill-out All Fields
0) < ?> > ?> Step 5. For registration of user profile information, create “register.php” file then put the following codes.
Register
Please Fill-out All Fields