- PHP Form Select
- Form Select as List Box
- Form Select as multi-select list box
- Example
- Next chapter.
- PHP Select Option
- A quick introduction to the element
- Getting the selected value from a element
- Select with multiple options
- Summary
- Select All Form Fields In A Single Instance With PHP
- Select all php form
- Обработка флажков
- Форма ввода данных
- Переключатели
- Форма ввода данных
- Список
- Форма ввода данных
- Форма ввода данных
PHP Form Select
A pull-down menu allows users to choose a single item from a predefined list of options. The size attribute’s value of 1 tells the browser that you want the list to be in a pull-down menu format.
Within the select element, you create an option element for each of your options.
Place the option label between thetags.
Each option element can have an optional value attribute, which is the value sent to the server if that option is selected.
If you don’t include a value attribute, the text between thetags is sent instead:
//j av a 2 s . com Form Select as List Box
A list box works like a pull-down menu, except that it displays several options at once.
To turn a pull-down menu into a list box, change the size attribute from 1 to the number of options to display at once:
/*j a v a 2s. c o m*/ Form Select as multi-select list box
A multi-select list box allows the user to select multiple items at once by holding down Ctrl or Command key.
To turn a normal list box into a multi-select box, add the attribute multiple with a value of «multiple» to the select element.
If the user selects more than one option, all the selected values are sent to the server:
/*from j ava2 s . c o m*/ You can preselect an option in any type of select element by adding the attribute selected=»selected» to the relevant tag — for example: .
Example
Name the following script as index.htm. It has a multi-select list box.
/* j a v a 2 s. c o m*/ The following script is for index.php.
Next chapter.
What you will learn in the next chapter:
PHP Select Option
Summary: in this tutorial, you will learn how to use the element to create a drop-down list and a list box and how to get the selected values from the element in PHP.
A quick introduction to the element
The is an HTML element that provides a list of options. The following shows how to define a element in HTML:
label for="color">Background Color: label> select name="color" id="color"> option value="">--- Choose a color --- option> option value="red">Red option> option value="green">Green option> option value="blue">Blue option> select>Code language: HTML, XML (xml)The element has two important attributes:
- id – the id associates the element with a element
- name – the name attribute associates with the value for a form submission.
The element nested inside the element defines an option in the menu. Each option has a value attribute. The value attribute stores data submitted to the server when it is selected.
If an option doesn’t have the value attribute, the value attribute defaults to the text inside the element.
To select an option when the page loads for the first time, you can add the selected attribute to the element.
The following example selects the Green option when the page first loads:
label for="color">Background Color: label> select name="color" id="color"> option value="">--- Choose a color --- option> option value="red">Red option> option value="green" selected>Green option> option value="blue">Blue option> select>Code language: HTML, XML (xml)Getting the selected value from a element
We’ll create a form that uses a element.
First, create the following folders and files:
├── css | └── style.css ├── inc | ├── footer.php | ├── get.php | ├── header.php | └── post.php └── index.php Code language: JavaScript (javascript)Second, place the following code in the header.php file:
html> html lang="en"> head> meta charset="UTF-8"> meta name="viewport" content="width=device-width, initial-scale=1.0"> link rel="stylesheet" href="css/style.css"> title>PHP select option title> head> body class="center"> main>Code language: HTML, XML (xml)Third, place the following code in the footer.php file:
main> body> html>Code language: HTML, XML (xml) Fourth, add the following code to the get.php file to create a form that has one element with a submit button:
form action="" method="post"> div> label for="color">Background Color: label> select name="color" id="color"> option value="">--- Choose a color --- option> option value="red">Red option> option value="green" selected>Green option> option value="blue">Blue option> select> div> div> button type="submit">Select button> div> form>Code language: HTML, XML (xml)The form uses the POST method to submit data to the webserver.
Finally, add the following code to the post.php file:
$color = filter_input(INPUT_POST, 'color', FILTER_SANITIZE_STRING); ?> if ($color) : ?> p>You selected span style="color:"> echo $color ?> span> p> p>a href="index.php">Back to the form a> p> else : ?> p>You did not select any color p> endif ?>Code language: HTML, XML (xml)To get the selected value of the element, you use the $_POST superglobal variable if the form method is POST and $_GET if the form method is GET .
Alternatively, you can use the filter_input() function to sanitize the selected value.
If you select the first option of the element, the selected value will be empty. Otherwise, the selected value is red, green, or blue.
Select with multiple options
To enable multiple selections, you add the multiple attribute to the element:
select name="colors[]" id="colors" multiple> . select>Code language: HTML, XML (xml)When you select multiple options of a element and submit the form, the name will contain multiple values rather than a single value. To get multiple selected values, you add the square brackets ( []) after the name of element.
Let’s take a look at an example of using a element with multiple selections.
First, create the following folders and files:
. ├── css | └── style.css ├── inc | ├── footer.php | ├── get.php | ├── header.php | └── post.php └── index.phpCode language: JavaScript (javascript)Second, place the following code into the header.php file:
html> html lang="en"> head> meta charset="UTF-8" /> meta name="viewport" content="width=device-width, initial-scale=1.0" /> title>PHP Listbox title> link rel="stylesheet" href="css/style.css"> head> body class="center"> main>Code language: HTML, XML (xml)Third, add the following code to the footer.php file:
main> body> html>Code language: HTML, XML (xml) Fourth, include the header.php and footer.php files in the index.php :
require __DIR__ . '/inc/header.php'; $request_method = strtoupper($_SERVER['REQUEST_METHOD']); if ($request_method === 'GET') < require __DIR__ . '/inc/get.php'; > elseif ($request_method === 'POST') < require __DIR__ . '/inc/post.php'; > require __DIR__ . '/inc/footer.php'; Code language: HTML, XML (xml)If the HTTP request is GET, the index.php file will show a form from the get.php file. When the form is submitted, the post.php file will handle the form submission.
Fifth, create a form that contains a element with the multiple attribute in the get.php file. The name of the element has an opening and closing square bracket [] so that PHP can create an array that holds the select values.
form action="" method="post"> div> label for="colors">Background Color: label> select name="colors[]" id="colors" multiple> option value="red">Red option> option value="green">Green option> option value="blue">Blue option> option value="purple">Purple option> option value="magenta">Magenta option> option value="cyan">Cyan option> select> div> div> button type="submit">Submit button> div> form>Code language: HTML, XML (xml)Finally, handle the form submission in the post.php file:
$selected_colors = filter_input( INPUT_POST, 'colors', FILTER_SANITIZE_STRING, FILTER_REQUIRE_ARRAY ); ?> if ($selected_colors) : ?> p>You selected the following colors: p> ul> foreach ($selected_colors as $color) : ?> li style="color:"> echo $color ?> li> endforeach ?> ul> p> p> else : ?> p>You did not select any color. p> endif ?> a href="index.php">Back to the form a>Code language: HTML, XML (xml)The post.php file uses the filter_input() function to get the selected colors as an array. If you select one or more colors, the post.php file will display them.
Summary
- Use the element to create a dropdown list.
- Use the multiple attribute to create a list that allows multiple selections.
- Use $_POST to get the selected value of the select element if the form method is POST (or $_GET if the form method is GET ).
- Add square brackets( [] ) after the name of the element to get multiple selected values.
Select All Form Fields In A Single Instance With PHP
I’m starting to learn PHP and have the code below, which includes a connection to the database from a db.php file, which then runs a query which uses HTML form data that is added to a MYSQL database. In the code below there is an if statement that means the $firstname field must have content. If I have a larger form and want to ensure every form field is filled in, is there a PHP function where I can select all form fields with a «name» attribute (or something similar)? I appreciate I could write out the if statement x number of times for each field but I was thinking there must be an inbuilt PHP function for this? But I couldn’t see anything in the PHP docs? Any help would be wonderful.
else < $query = "INSERT INTO user(firstname, email) VALUE('', '')"; $add_name_query = mysqli_query($connection, $query); if (!$add_name_query) < die('QUERY FAILED' . mysqli_error($connection)); >> > ?> It is a very bad idea to use die(mysqli_error($conn)); in your code, because it could potentially leak sensitive information. See this post for more explanation: mysqli or die, does it have to die?
Hi @dharman — yes I know, this is just simplified localhost code I’m playing around with I wouldn’t use this in production.
Ok, then why are you asking us about it. Please fix this issue first and then look at other issues. There is no point in working anymore with this version of the code. You will have to delete is as soon as you fix it and then write it properly.
The answer to your question is: No, there is no such thing. PHP has absolutely no idea about your HTML form. PHP can only check what was submitted. It is your responsibility to check whether the values submitted are the ones you expected.
Yes, that is pretty much how it all works. Generally, we would have functions or classes that abstract this from us so it is not a huge issue.
Select all php form
Формы могут содержать различные элементы — текстовые поля, флажки, переключатели и т.д., обработка которых имеет свои особенности.
Обработка флажков
Флажки или чекбоксы (html-элемент ) могут находиться в двух состояниях: отмеченном (checked) и неотмеченном. Например:

Если флажок находится в неотмеченном состоянии, например:
то при отправке формы значение данного флажка не передается на сервер.
Если флажок отмечен, то при отправке на сервер для поля remember будет передано значение on :
Если нас не устраивает значение on , то с помощью атрибута value мы можем установить нужное нам значение:
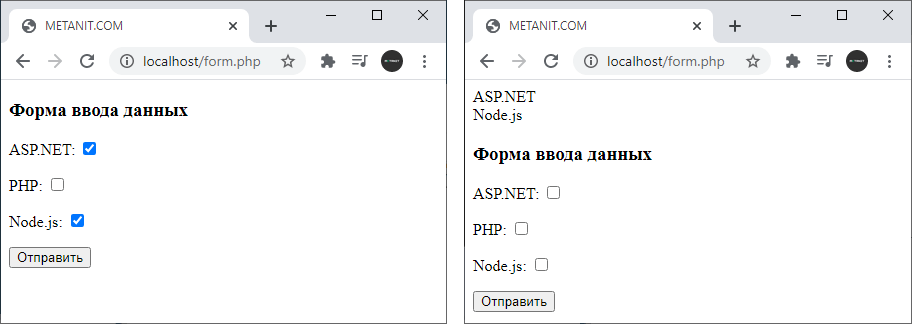
Иногда необходимо создать набор чекбоксов, где можно выбрать несколько значений. Например:
"; > ?>Форма ввода данных
ASP.NET:
PHP:
Node.js:
В этом случае значение атрибута name должно иметь квадратные скобки. И тогда после отправки сервер будет получать массив отмеченных значений:
$technologies = $_POST["technologies"]; foreach($technologies as $item) echo "$item
";
В данном случае переменная $technologies будет представлять массив, который можно перебрать и выполнять все другие операции с массивами.
Переключатели
Переключатели или радиокнопки позволяют сделать выбор между несколькими взаимоисключающими вариантами:
?>Форма ввода данных
ASP.NET
PHP
Node.js
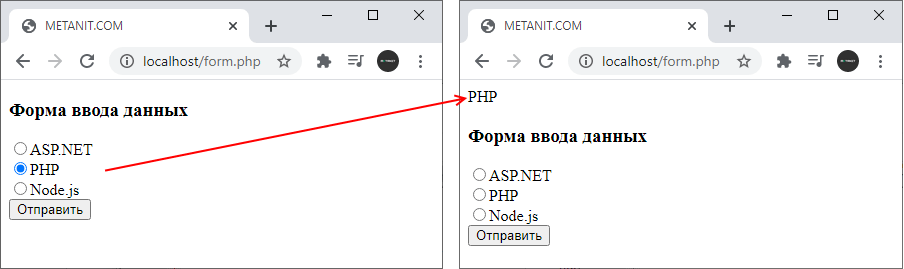
На сервер передается значение атрибута value у выбранного переключателя. Получение переданного значения:
Список
Список представляет элемент select , который предоставляет выбор одного или нескольких элементов:
?>Форма ввода данных
Элемент содержит ряд вариантов выбора в виде элементов :
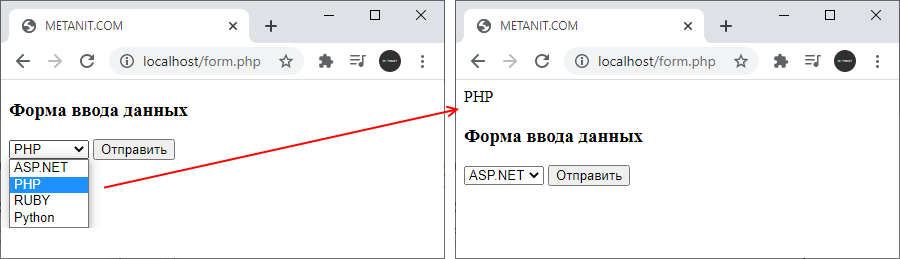
Получить выбранный элемент в коде PHP как и обычное одиночное значение:
Но элемент также позволяет сделать множественный выбор. И в этом случае обработка выбранных значений изменяется, так как сервер получает массив значений:
"; > ?>Форма ввода данных
Такие списки имеют атрибут multiple=»multiple» . Для передачи массива также указываются в атрибуте name квадратные скобки: name=»courses[]»