- Posting array form php
- Форма ввода данных
- Форма ввода данных
- Posting array form php
- Форма ввода данных
- Форма ввода данных
- Post Array From HTML Form To PHP (Simple Examples)
- TLDR – QUICK SLIDES
- TABLE OF CONTENTS
- HTML POST ARRAY TO PHP
- EXAMPLE 1) POST A SIMPLE ARRAY TO PHP
- 1A) THE HTML
- 1B) SERVER-SIDE PHP
- EXAMPLE 2) POST NESTED ARRAY TO PHP
- 2A) THE HTML
- 2B) SERVER-SIDE PHP
- EXAMPLE 3) POSTING ARRAY WITH AJAX
- 3A) THE HTML
- 3B) THE JAVASCRIPT
- 3C) SERVER PHP
- DOWNLOAD & NOTES
- SUPPORT
- EXAMPLE CODE DOWNLOAD
- EXTRA BITS & LINKS
- ONLY FOR PHP!
- JSON ENCODE-DECODE
- LINKS & REFERENCES
- YOUTUBE TUTORIAL
- INFOGRAPHICS CHEAT SHEET
- THE END
- Leave a Comment Cancel Reply
- Search
- Breakthrough Javascript
- Socials
- About Me
- How to submit an associative array with HTML & PHP
- Latest Posts
- Scan Your Docker Images and Containers with VirusTotal: A Step-by-Step Guide
- Bitbucket for Newbies: Mastering Basic Commands and Collaborating on Code
- Accelerate Your Performance Testing on Ubuntu with k6 and Postman-to-k6
- Solve the “Cannot read properties of undefined (reading ‘type’)” error with these simple fixes
- Solving the ‘tail: inotify resources exhausted’ Error on Ubuntu
Posting array form php
В прошлых темах была рассмотрена отправка на сервер отдельных значений. Однако отправка набора значений, то есть массивов в PHP может вызвать некоторые сложности. Рассмотрим, как можно отправить на сервер и соответственно получить на сервере массивы данных.
Например, определим следующий файл users.php :
 echo "В массиве " . count($users) . " элементa/ов
"; foreach($users as $user) echo "$user
"; ?>
В данном случае мы предполагаем, что параметр «users», который передается в запросе типа GET, будет представлять массив. И соответствено мы сможем получить из него данные.
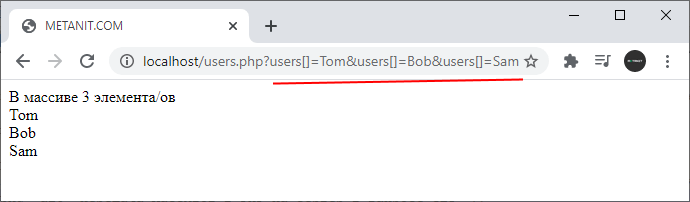
Чтобы передать массив этому скрипту, обратимся к нему со следующим запросом:
http://localhost/users.php?users[]=Tom&users[]=Bob&users[]=Sam
Чтобы определить параметр строки запроса как массив, после названия параметра указываются квадраные скобки []. Затем мы можем присвоить некоторое значение: users[]=Tom . И сколько раз подобным образом будет присвоено значений, столько значений и будет в массиве. Все значения, как и обычно, отделяются амперсандом. Так, в данном случае в массив передаются три значения.
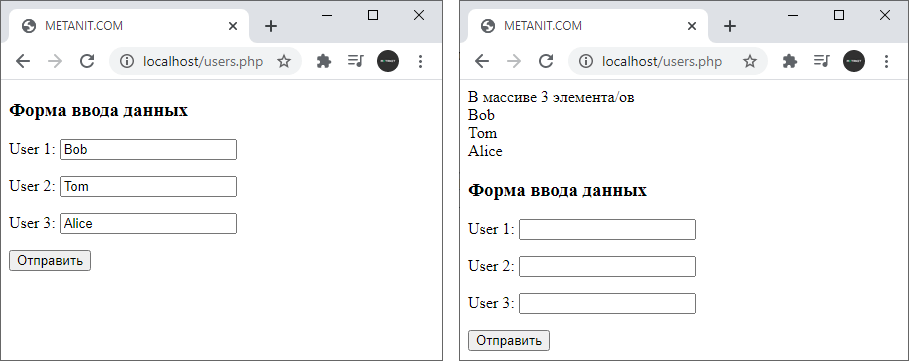
Подобным образом мы можем отправлять данные в запросе POST из формы. Например, определим следующий скрипт:
"; foreach($users as $user) echo "$user
"; > ?>Форма ввода данных
User 1:
User 2:
User 3:
Как известно, название ключа передаваемых на сервер данных соответствует значению атрибута name у элемента формы. И чтобы указать, что какое-то поле ввода будет поставлять значение для массива, у атрибут name поля ввода в качестве значения принимает название массива с квадратными скобками:
Соответственно, сколько полей ввода с одним и тем же именем массива мы укажем, столько значений мы сможем передать на сервер. Так, в данном случае на сервер передается три значения в массиве users:
Причем данный принцип применяется и к другим типам полей ввода формы html.
При этом в примерах выше передавался обычный массив, каждый элемент которого в качестве ключа имеет числовой индекс. Соотвенно, используя индекс, мы можем получить определенный элемент массива:
$firstUser = $_POST["users"][0]; echo $firstUser;
Но также мы можем в элементах формы явным образом указать ключи:
$secondUser
$thirdUser"; > ?>Форма ввода данных
User 1:
User 2:
User 3:
Например, первое поле добавляет в массив элемент с ключом «first»
Поэтому на сервере мы можем с помощью данного ключа получить соответствующий элемент:
$firstUser = $_POST["users"]["first"];
Posting array form php
В прошлых темах была рассмотрена отправка на сервер отдельных значений. Однако отправка набора значений, то есть массивов в PHP может вызвать некоторые сложности. Рассмотрим, как можно отправить на сервер и соответственно получить на сервере массивы данных.
Например, определим следующий файл users.php :
 echo "В массиве " . count($users) . " элементa/ов
"; foreach($users as $user) echo "$user
"; ?>
В данном случае мы предполагаем, что параметр «users», который передается в запросе типа GET, будет представлять массив. И соответствено мы сможем получить из него данные.
Чтобы передать массив этому скрипту, обратимся к нему со следующим запросом:
http://localhost/users.php?users[]=Tom&users[]=Bob&users[]=Sam
Чтобы определить параметр строки запроса как массив, после названия параметра указываются квадраные скобки []. Затем мы можем присвоить некоторое значение: users[]=Tom . И сколько раз подобным образом будет присвоено значений, столько значений и будет в массиве. Все значения, как и обычно, отделяются амперсандом. Так, в данном случае в массив передаются три значения.
Подобным образом мы можем отправлять данные в запросе POST из формы. Например, определим следующий скрипт:
"; foreach($users as $user) echo "$user
"; > ?>Форма ввода данных
User 1:
User 2:
User 3:
Как известно, название ключа передаваемых на сервер данных соответствует значению атрибута name у элемента формы. И чтобы указать, что какое-то поле ввода будет поставлять значение для массива, у атрибут name поля ввода в качестве значения принимает название массива с квадратными скобками:
Соответственно, сколько полей ввода с одним и тем же именем массива мы укажем, столько значений мы сможем передать на сервер. Так, в данном случае на сервер передается три значения в массиве users:
Причем данный принцип применяется и к другим типам полей ввода формы html.
При этом в примерах выше передавался обычный массив, каждый элемент которого в качестве ключа имеет числовой индекс. Соотвенно, используя индекс, мы можем получить определенный элемент массива:
$firstUser = $_POST["users"][0]; echo $firstUser;
Но также мы можем в элементах формы явным образом указать ключи:
$secondUser
$thirdUser"; > ?>Форма ввода данных
User 1:
User 2:
User 3:
Например, первое поле добавляет в массив элемент с ключом «first»
Поэтому на сервере мы можем с помощью данного ключа получить соответствующий элемент:
$firstUser = $_POST["users"]["first"];
Post Array From HTML Form To PHP (Simple Examples)
Welcome to a tutorial on how to post an array from an HTML form to PHP. The “standard” HTML form fields are easy enough. Just add the name attribute to the fields, submit the form, and that’s it. But what if we want to post an array instead?
To post an array from an HTML form to PHP, we simply append a pair of square brackets to the end of the name attribute of the input field. For example:
But how about doing this with AJAX? How about multi-dimensional arrays? How do we handle the post data in PHP? That is what we will walk through in this guide, with examples. Read on to find out!
TLDR – QUICK SLIDES

TABLE OF CONTENTS
HTML POST ARRAY TO PHP
All right, let us now get into the various examples of posting an array to a PHP script.
EXAMPLE 1) POST A SIMPLE ARRAY TO PHP
1A) THE HTML
As in the introduction, we only need to append square brackets [] behind the name to POST arrays to the PHP script.
1B) SERVER-SIDE PHP
Yep, this should be straightforward enough. Since we defined colors[] , $_POST[«colors»] will be an array.
EXAMPLE 2) POST NESTED ARRAY TO PHP
2A) THE HTML
Multi-dimensional array fields are not that difficult either – Just use 2 square brackets, and give the first one a key. That’s it, done.
2B) SERVER-SIDE PHP
No mystery here either – $_POST[«fav»] is a multi-dimensional array as expected.
EXAMPLE 3) POSTING ARRAY WITH AJAX
3A) THE HTML
Not much of a difference here – Still the same HTML form, but using onsubmit=»return save()» to use Javascript AJAX to handle the submission instead.
3B) THE JAVASCRIPT
function save () < // (A) GET FORM DATA var form = document.getElementById("myForm"), data = new FormData(form); // (B) TO MANUALLY APPEND MORE DATA data.append("address[]", "Foo Street 123"); data.append("address[]", "Hello World #234"); // (C) AJAX FETCH fetch("3c-AJAX.php", < method:"POST", body:data >) .then(res => res.text()) .then(res => < console.log(res); // DO SOMETHING >); return false; >- Collect data from the HTML form.
- Optional, we can manually append more fields to the data.
- Lastly, send the data to the server, and read the server response as text.
3C) SERVER PHP
Nothing to see here… Just a dummy script that will echo whatever is being submitted.
DOWNLOAD & NOTES
Here is the download link to the example code, so you don’t have to copy-paste everything.
SUPPORT
600+ free tutorials & projects on Code Boxx and still growing. I insist on not turning Code Boxx into a «paid scripts and courses» business, so every little bit of support helps.
EXAMPLE CODE DOWNLOAD
Click here for the source code on GitHub gist, just click on “download zip” or do a git clone. I have released it under the MIT license, so feel free to build on top of it or use it in your own project.
EXTRA BITS & LINKS
That’s all for this project, and here is a small section on some extras that may be useful to you.
ONLY FOR PHP!
Before the toxic trolls get angry – Take note that the above method of name=»something[]» works for PHP, but it can be different for other languages. For example, some languages may require all the name attribute to be the same instead:
JSON ENCODE-DECODE
To better support cross-platform data exchange, the common industry practice is to turn the array into a flat string, using JSON encode:
On the server side, we can do a JSON decode to get the array back.
P.S. Any programming language can encode-decode a JSON string so long as there is a library or parser.
LINKS & REFERENCES
YOUTUBE TUTORIAL
INFOGRAPHICS CHEAT SHEET

THE END
Thank you for reading, and we have come to the end of this guide. I hope that it has helped you with your project, and if you want to share anything with this guide, please feel free to comment below. Good luck and happy coding!
Leave a Comment Cancel Reply
Search
Breakthrough Javascript

Take pictures with the webcam, voice commands, video calls, GPS, NFC. Yes, all possible with Javascript — Check out Breakthrough Javascript!
Socials
About Me

W.S. Toh is a senior web developer and SEO practitioner with over 20 years of experience. Graduated from the University of London. When not secretly being an evil tech ninja, he enjoys photography and working on DIY projects.
Code Boxx participates in the eBay Partner Network, an affiliate program designed for sites to earn commission fees by linking to ebay.com. We also participate in affiliate programs with Bluehost, ShareASale, Clickbank, and other sites. We are compensated for referring traffic.
How to submit an associative array with HTML & PHP

This post will show you how to submit an associative array with HTML and PHP. This concept is quite useful when you need to submit array-type data such as shopping cart information.
Feel free to skip to ‘HTML forms and input‘ or to ‘Submitting Array data through HTML‘ if you’re quite familiar with the syntax of PHP’s array() function.

Latest Posts
Scan Your Docker Images and Containers with VirusTotal: A Step-by-Step Guide
Bitbucket for Newbies: Mastering Basic Commands and Collaborating on Code
Accelerate Your Performance Testing on Ubuntu with k6 and Postman-to-k6
Solve the “Cannot read properties of undefined (reading ‘type’)” error with these simple fixes
December 19, 2022 May 1, 2023
Solving the ‘tail: inotify resources exhausted’ Error on Ubuntu
December 18, 2022 May 1, 2023
Copyright 2018-2022 Anto Online.
All rights reserved. Please consider the information, scripts and instructions carefully before using it yourself. Make sure you have ample backups! The information, scripts and instructions are provided without warranty. Consult a professional if you are unsure. Anto does not speak on behalf of any company and our opinions are our own.
The feature images have been provided by pexels.com and unsplash.com.
How to submit an associative array with HTML & PHP
This post will show you how to submit an associative array with HTML and PHP. This concept is quite useful when you need to submit array-type data such as shopping cart information.
Feel free to skip to ‘HTML forms and input‘ or to ‘Submitting Array data through HTML‘ if you’re quite familiar with the syntax of PHP’s array() function.
Latest Posts
Scan Your Docker Images and Containers with VirusTotal: A Step-by-Step Guide
Bitbucket for Newbies: Mastering Basic Commands and Collaborating on Code
Accelerate Your Performance Testing on Ubuntu with k6 and Postman-to-k6
Solve the “Cannot read properties of undefined (reading ‘type’)” error with these simple fixes
December 19, 2022 May 1, 2023
Solving the ‘tail: inotify resources exhausted’ Error on Ubuntu
December 18, 2022 May 1, 2023
Copyright 2018-2022 Anto Online.
All rights reserved. Please consider the information, scripts and instructions carefully before using it yourself. Make sure you have ample backups! The information, scripts and instructions are provided without warranty. Consult a professional if you are unsure. Anto does not speak on behalf of any company and our opinions are our own.
The feature images have been provided by pexels.com and unsplash.com.