5. Styling Forms with django-formset
django-formset ships with renderers, each one specialized to render all possible Django form widgets, for five different CSS frameworks.
- Input fields of type text, with validation for minimum and maximum input length.
- Input fields of type text with pattern matching.
- Input fields of type number, with validation on their input range.
- Input fields of type date. This currently uses the default date widget from the browser, but future versions will offer their own native date widget.
- Checkboxes for a single input. They can be styled by reversing the label with its input field.
- Radio buttons with support for option groups. They can be arranged to align either horizontally or vertically.
- Multiple checkboxes with support for option groups. They can be arranged to align either horizontally or vertically.
- Select widgets with predefined options.
- Select widgets with autocomplete behavior.
- Select widgets allowing a limited number of multiple selections.
- Select widgets with a source and target field, allowing a large number of multiple selections. This widget usually is used for fields mapping a many-to-many relation.
- Textarea fields.
- Rich textarea fields.
- Slug input fields.
- File upload fields with asynchronous upload and drag & drop support.
Currently not supported widgets:
5.1. Default Styling
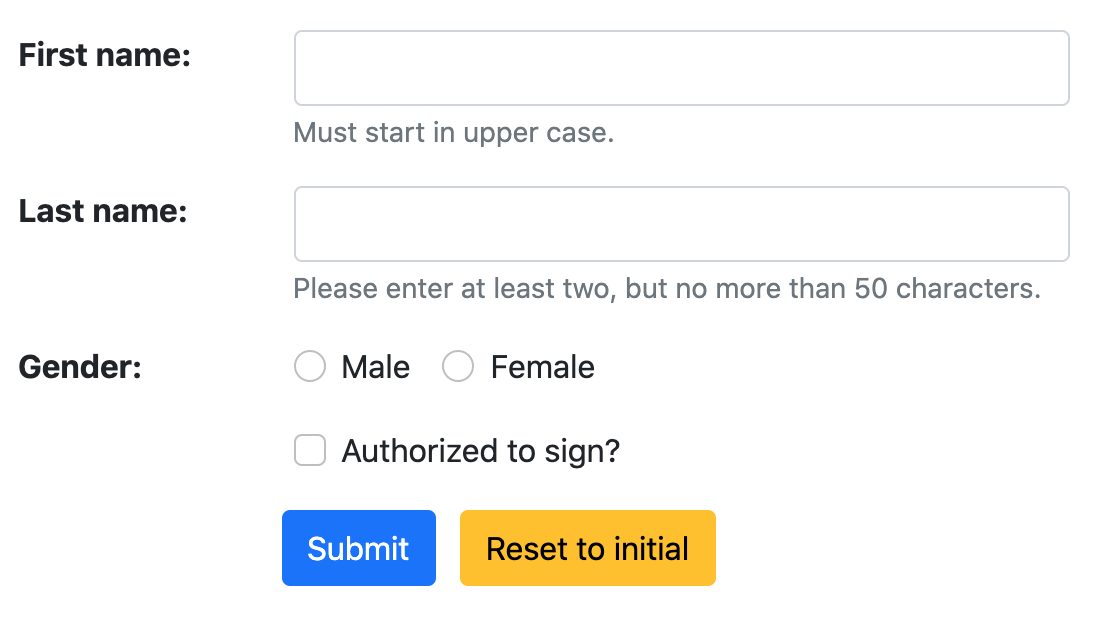
The default django-formset styling intentionally renders all the fields as the browser would by default. This admittedly looks very rough and we only use it, if we want to style every aspect of our website. This requires us to write the CSS ourselves. If we use one of the known CSS frameworks, then instead we will proceed with one of the specialized renderers. The concept for rendering a form remains the same, independently of the CSS framework.
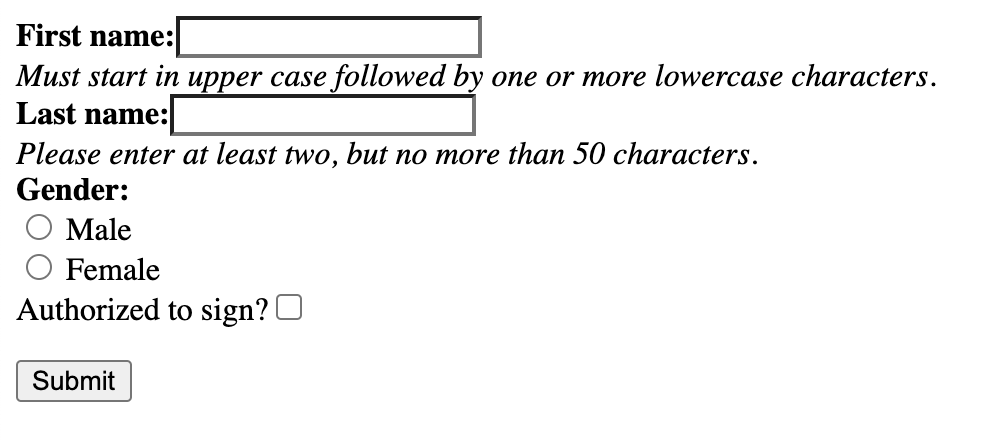
Say we have a typical Django form
from django.forms import forms, fields class RegisterPersonForm(forms.Form): first_name = fields.RegexField( r'^[A-Z][a-z -]+$', label="First name", error_messages='invalid': "A first name must start in upper case.">, help_text="Must start in upper case followed by one or more lowercase characters.", ) last_name = fields.CharField( label="Last name", min_length=2, max_length=50, help_text="Please enter at least two, but no more than 50 characters.", ) gender = fields.ChoiceField( label="Gender", choices=[('m', "Male"), ('f', "Female")], widget=widgets.RadioSelect, error_messages='invalid_choice': "Please select your gender.">, ) authorized = fields.BooleanField( label="Authorized to sign?", )
When rendered using the view class formset.views.FormView together with this template
load formsetify %> request.path >>" csrf-token=" csrf_token >>"> render_form form %> That form displays two text input fields, one for the person’s first- and its last name. Here we declared two constraints on the first two fields: The first name must start in upper case and contain at least one additional character in lower case, while the last name must consist of at least two, but no more than 50 characters. Additionally the user has to choose his gender using two radio input fields and a mandatory checkbox input to accept the terms and conditions.
Styling this form now is up to you. Use this as a starting point, if you edit the CSS of your project anyway. There are a few HTML tags and CSS classes, which might help styling:
- django-fieldgroup > label : The label right above the input element.
- django-fieldgroup input[type=». «] : The input element. Use the correct type here.
- django-fieldgroup > .dj-help-text : Some optional help text below the input field(s).
- django-fieldgroup > ul.dj-errorlist li.dj-placeholder : This list-element usually is empty. If filled, it contains the validation error message.
anywhere inside the -element of the page.
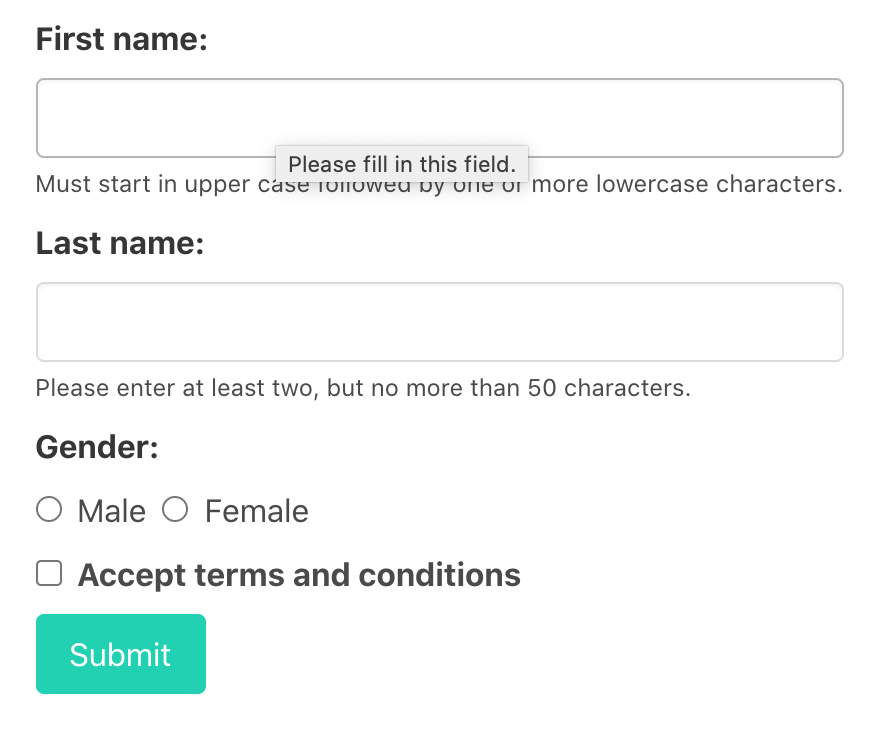
5.2. Bootstrap
Bootstrap is probably the most popular CSS framework nowadays, and django-formset offers a renderer, which renders all its input fields as proposed by the Bootstrap’s form usage guide.
In the template from above, we simply replace the templatetag against
render_form form "bootstrap" field_classes="mb-2" %> and get the same form instance rendered in a much nicer looking way:
Compared to the unstyled form shown in the previous section, we notice that the radio fields are inlined and that the checkbox is positioned before its label. This is intended behavior.
According to the Bootstrap’s usage guide, checkboxes shall be placed on the left side of their label. Django can’t handle this by itself, because it does not distinguish between checkbox input fields and other types of fields.
5.2.1. Inlining Form Fields
By using slightly different parameters, a form can be rendered with labels and input fields side by side, rather than beneath each other. This can be achieved by applying these CSS classes to the templatetag
request.path >>" csrf-token=" csrf_token >>"> render_form form "bootstrap" field_classes="row mb-3" label_classes="col-sm-3" control_classes="col-sm-9" %> and we get a form rendered as
5.2.2. Inlining Radio Buttons and Multiple Checkboxes
In django-formset, radio buttons and/or multiple checkboxes can be inlined, if there are only a few of them. The default threshold is 4 and can be modified with the parameter max_options_per_line . It can be passed in through the templatetag
render_form form "bootstrap" max_options_per_line=3 %> If the number of radio buttons and/or multiple checkboxes exceeds this threshold, those fields are rendered below each other.
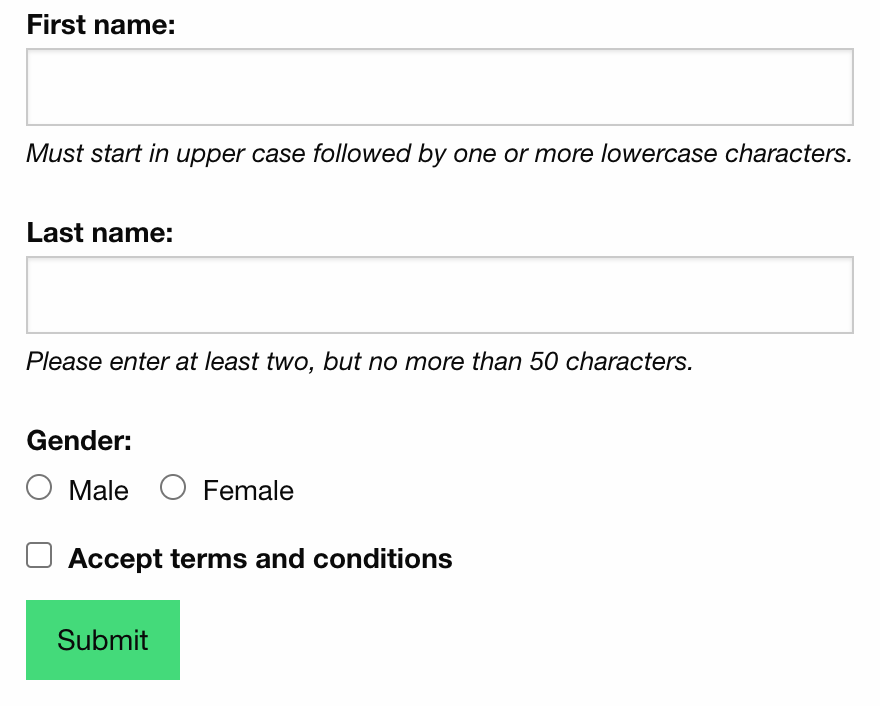
5.3. Bulma
Bulma is another popular CSS framework nowadays, and django-formset offers a renderer, which renders all its input fields as proposed by Bulma’s form control usage guide.
In the template from above, we simply replace the templatetag against
render_form form "bulma" field_classes="mb-2" %> and get the form instance rendered as:
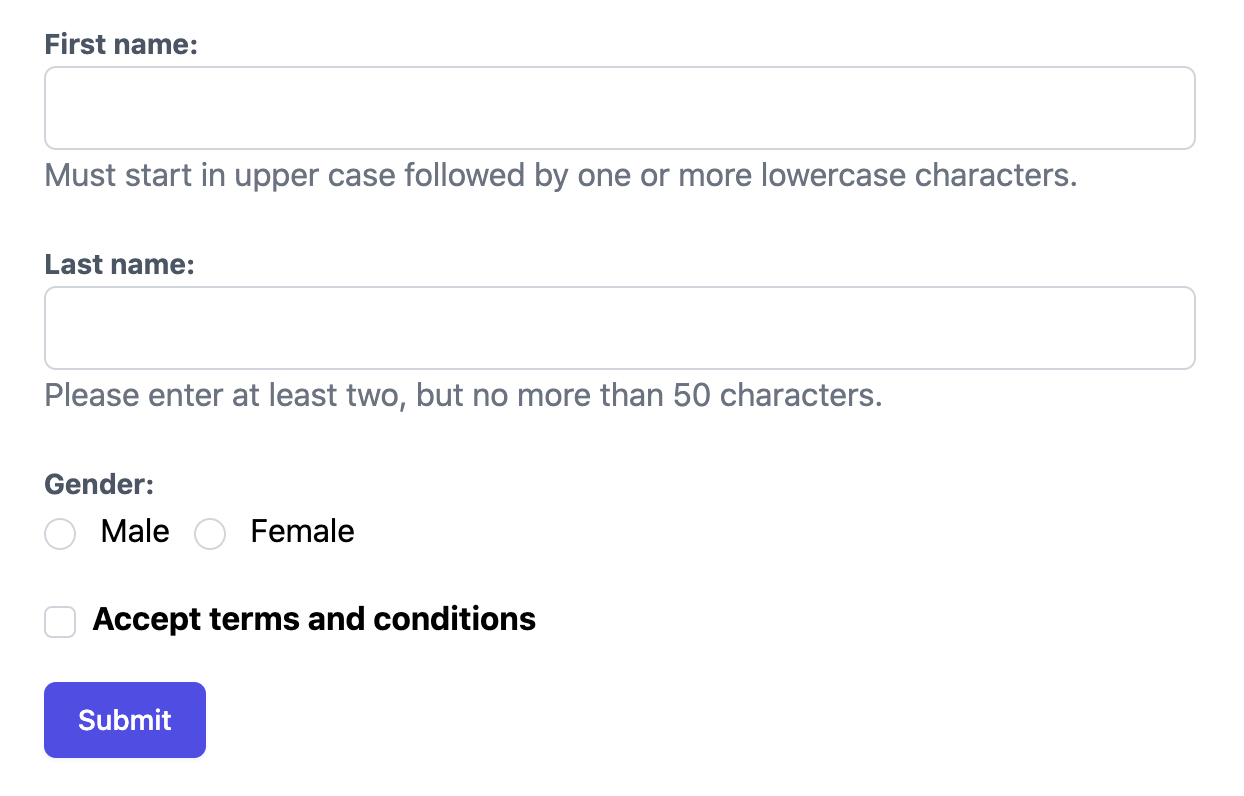
5.4. Foundation
Foundation claims to be the most advanced responsive front-end framework in the world. django-formset offers a renderer, which renders all its input fields as proposed by Foundation’s form control usage guide.
In the template from above, we simply replace the templatetag against
render_form form "foundation" %> and get the form instance rendered as:
Foundation currently does not get full support.
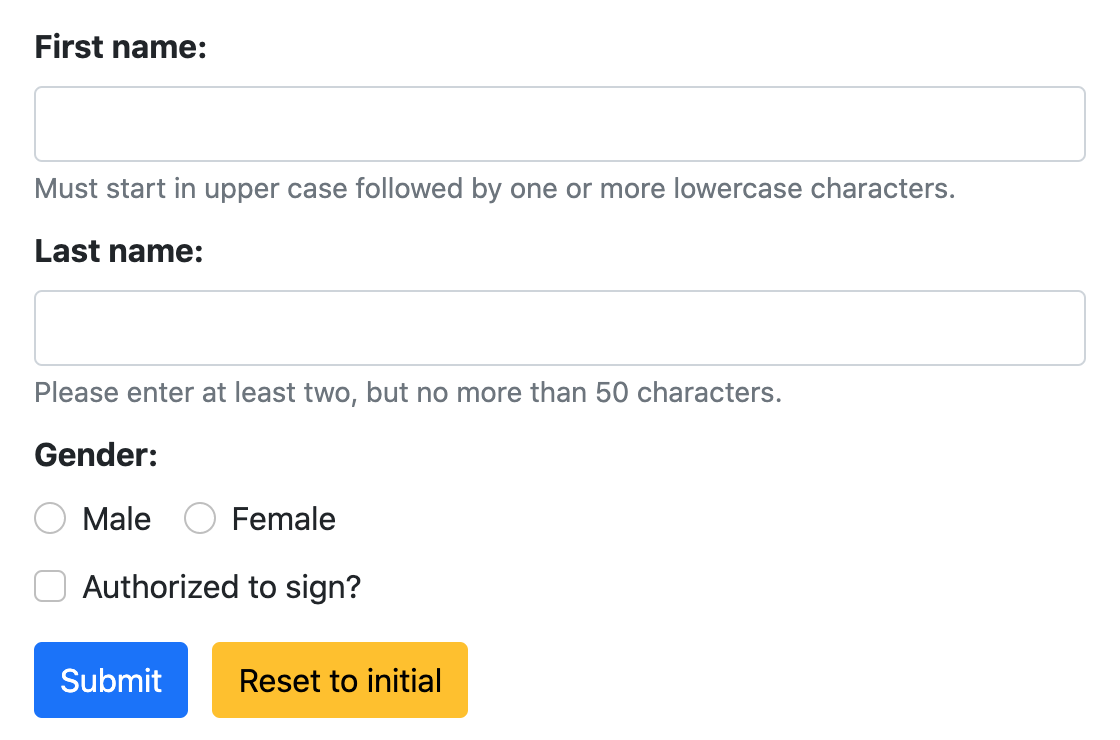
5.5. Tailwind
Tailwind CSS has attracted a lot of attention in the near past. It probably is the second most popular CSS framework after Bootstrap these days. The way Tailwind handles primitive elements such as input fields, requires an opinionated set of CSS classes as provided with a sample file for this project. Since Tailwind does not provide a form control usage guide, it’s up to the developers to define those classes for their project.
In the template from above, we must include the opinionated style definitions for our form elements or replace them against our individually styled ones. The form then is rendered with
. . render_form form "tailwind" %>
To adopt the form element styles, django-formset provides these CSS classes:
- formset-label : Styling for the input label.
- formset-text-input , formset-email-input , formset-date-input , formset-select , formset-select-multiple , formset-number-input , formset-textarea , formset-password-input : Styling the input field of the corresponding type.
- formset-dual-selector-select : Styling of the two fields.
- formset-dual-selector-lookup : Styling of the two fields used for option lookup.
- formset-checkbox , formset-checkbox-multiple : Styling of the checkbox input fields.
- formset-radio-select : Styling of the radio input fields.
- formset-inlined : Styling for the wrapper of inlined checkbox and/or radio input fields.
- formset-help-text : Styling of the element with a help text below input fields.
- dj-choose-file : Styling of the button to open the file browser.
- dj-delete-file : Styling of the button to delete a selected file.
- dj-download-file : Styling of the button to download a selected file.
5.6. UIKit
UIKit claims to be a lightweight and modular front-end framework for developing fast and powerful web interfaces. It has been added for completeness to test the form rendering capabilities of django-formset when working with exotic CSS frameworks. It offers a renderer, which renders all input fields as proposed by UIKit’s form rendering guide.
Unless there is a strong community interest, support for this framework might be removed in the future, since I do not see any benefit using UIKit compared to any of the much more popular and advanced CSS frameworks listed here.
Django forms and css
Поля формы применяют некоторые стили по умолчанию. Если же мы хотим применить к ним какие-то собственные стили и классы, то нам надо использовать ряд механизмов.
Прежде всего мы можем вручную выводить каждое поле и определять правила стилизации для этого поля или окружающих его блоков. Возьмем простейшую форму:
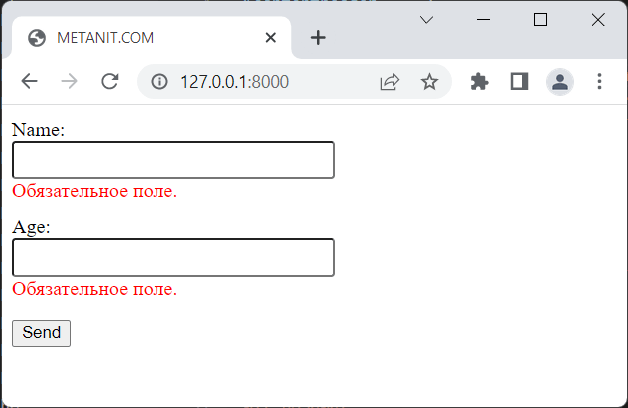
from django import forms class UserForm(forms.Form): name = forms.CharField(min_length=3) age = forms.IntegerField(min_value=1, max_value=100)
В шаблоне пропишем ее использование:
.alert .form-group .form-group input>>>Результа при отправке формы с ошибками:
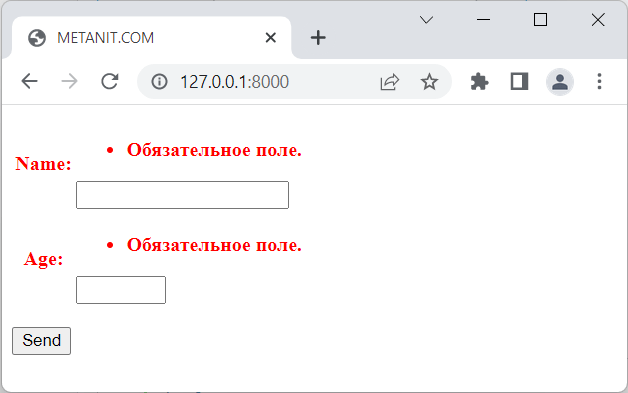
Второй механизм представляют свойства формы required_css_class и error_css_class , который соответственно применяют класс css к метке, создаваемой для поля формы, и к блоку ассоциированных с ним ошибок.
Например, определим следующую форму:
from django import forms class UserForm(forms.Form): name = forms.CharField(min_length=3) age = forms.IntegerField(min_value=1, max_value=100) required_css_class = "field" error_css_class = "error"В этом случае в шаблоне у нас должны быть определены или подключены классы «field» и «error»:
Но также можно было бы комбинировать оба способа:
Третий механизм стилизации представляет установка классов и стилей через виджеты:
from django import forms class UserForm(forms.Form): name = forms.CharField(widget=forms.TextInput(attrs=)) age = forms.IntegerField(widget=forms.NumberInput(attrs=))В данном случае через параметр виджетов attrs устанавливаются атрибуты того элемента html, который будет генерироваться. В частности, здесь для обоих полей устанавливается атрибут class , который представляет класс myfield.
И, допустим, в шаблоне будет определен класс myfield:
Custom CSS to Django form inputs
I think rendering an HTML form for you is one of Django’s biggest conveniences.
The downside is that the structure of the generated form is not customizable. In case you have a specific design and you need the placement of the inputs at a different position, Django gives you a way to render each element individually at the input control level as follows:
But a customization problem still remains: you cannot set custom classes to the individual input controls. The > will render the input control without giving you the chance to set a custom class.
This is problematic because most CSS frameworks (e.g. Bootstrap, Bulma) require you to set specific classes to input controls to style them appropriately.
One solution is to set these classes in the Form object:
class ExampleForm(forms.Form): subject = forms.CharField( widget=forms.TextInput(attrs=)) enabled = forms.BooleanField( widget=forms.TextInput(attrs=))But in my opinion, this creates a different issue. The Form object is supposed to model the form with its inputs’ data types and any other business logic requirements. It’s not supposed to be responsible for styling and other visual attributes. The place for such styling instructions is the template.
Unfortunately, I think there’s no built-in way of doing this in Django without using an external library. But fear not. There is such a small and lightweight library that does exactly that called django-widget-tweaks.
Using this library you can set custom CSS classes (and more) to your input controls, and you can set this in the template, where all the positioning and styling of the form logically belongs to:
The library offers quite a few more options in customizing form controls. If this has piqued your interest, have a look!
Hopefully, you learned a way to customize Django forms without mixing styling instructions in the Form model.