- How to Change the Color of PNG Image With CSS
- Create HTML
- Add CSS
- Example of changing a PNG image color:
- Result
- Example of changing the color of a PNG image with some filter styles:
- Example of changing the color of PNG image:
- Перекрашиваем картинки с помощью CSS
- Меняем оттенок цвета
- Сепия, чёрно-белое фото и насыщенность
- Сепия 50%
- Что дальше
- Css change image colors
- Learn Latest Tutorials
- Preparation
- Trending Technologies
- B.Tech / MCA
- Javatpoint Services
- Training For College Campus
How to Change the Color of PNG Image With CSS
In this tutorial, we’ll change the PNG image color with the help of CSS.
The easiest way of changing the color of png image is to use the filter property, which applies visual effects to the element (image). It has the following values:
filter: none | blur() | brightness() | contrast() | drop-shadow() | grayscale() | hue-rotate() | invert() | opacity() | saturate() | sepia() | url() | initial | inherit;With these values, we can change the color of the image.
Filters are new to browsers and are only supported in modern browsers. You can use -webkit-filter for Safari, Google Chrome, and Opera.
Let’s change an image color step by step.
Create HTML
body> img class="image-1" src="https://images.unsplash.com/photo-1480044965905-02098d419e96?ixlib=rb-1.2.1&ixid=eyJhcHBfaWQiOjEyMDd9&auto=format&fit=crop&w=1000&q=80" width="500px" height="250px" alt="filter applied" /> img class="image-2" src="https://images.unsplash.com/photo-1448227922836-6d05b3f8b663?ixlib=rb-1.2.1&ixid=eyJhcHBfaWQiOjEyMDd9&auto=format&fit=crop&w=1000&q=80" width="500px" height="250px" alt="filter applied" /> body>Add CSS
Now, we add styles to the «image-1» and «image-2» classes.
- Use the width property to set the width of both images.
- Set the filter property with its «invert» value on the «image-1″class. We set 100% to make the image fully inverted.
- Use the filter property with its «sepia» value (100%) on the «image-2» class.
img < width: 40%; float: left; > .image-1 < filter: invert(100%); -webkit-filter: invert(100%); > .image-2 < filter: sepia(100%); -webkit-filter: sepia(100%); >So, let’s see the outcome of our code.
Example of changing a PNG image color:
html> html> head> title>Convert image into different color title> style> img < width: 40%; float: left; > .image-1 < filter: invert(100%); -webkit-filter: invert(100%); > .image-2 < filter: sepia(100%); -webkit-filter: sepia(100%); > style> head> body> h2>Change PNG image color h2> img class="image-1" src="https://images.unsplash.com/photo-1480044965905-02098d419e96?ixlib=rb-1.2.1&ixid=eyJhcHBfaWQiOjEyMDd9&auto=format&fit=crop&w=1000&q=80" width="500px" height="250px" alt="filter applied" /> img class="image-2" src="https://images.unsplash.com/photo-1448227922836-6d05b3f8b663?ixlib=rb-1.2.1&ixid=eyJhcHBfaWQiOjEyMDd9&auto=format&fit=crop&w=1000&q=80" width="500px" height="250px" alt="filter applied" /> body> html>Result
Next, let’s see another example with eight values of the filter property.
Example of changing the color of a PNG image with some filter styles:
html> html> head> title>Title of the document title> style> body < background-color: #03030a; min-width: 800px; min-height: 400px > img < width: 20%; float: left; margin: 0; > /*Filter styles*/ .saturate < filter: saturate(3); -webkit-filter: saturate(3); > .grayscale < filter: grayscale(100%); -webkit-filter: grayscale(100%); > .contrast < filter: contrast(160%); -webkit-filter: contrast(160%); > .brightness < filter: brightness(0.25); -webkit-filter: brightness(0.25); > .blur < filter: blur(3px); -webkit-filter: blur(3px); > .invert < filter: invert(100%); -webkit-filter: invert(100%); > .sepia < filter: sepia(100%); -webkit-filter: sepia(100%); > .huerotate < filter: hue-rotate(180deg); -webkit-filter: hue-rotate(180deg); > .opacity < filter: opacity(50%); -webkit-filter: opacity(50%); > style> head> body> h2>Change PNG image color h2> img alt="Mona Lisa" src="http://i.stack.imgur.com/OyP0g.jpg" title="original"> img alt="Mona Lisa" src="http://i.stack.imgur.com/OyP0g.jpg" title="saturate" class="saturate"> img alt="Mona Lisa" src="http://i.stack.imgur.com/OyP0g.jpg" title="grayscale" class="grayscale"> img alt="Mona Lisa" src="http://i.stack.imgur.com/OyP0g.jpg" title="contrast" class="contrast"> img alt="Mona Lisa" src="http://i.stack.imgur.com/OyP0g.jpg" title="brightness" class="brightness"> img alt="Mona Lisa" src="http://i.stack.imgur.com/OyP0g.jpg" title="blur" class="blur"> img alt="Mona Lisa" src="http://i.stack.imgur.com/OyP0g.jpg" title="invert" class="invert"> img alt="Mona Lisa" src="http://i.stack.imgur.com/OyP0g.jpg" title="sepia" class="sepia"> img alt="Mona Lisa" src="http://i.stack.imgur.com/OyP0g.jpg" title="huerotate" class="huerotate"> img alt="Mona Lisa" src="http://i.stack.imgur.com/OyP0g.jpg" title="opacity" class="opacity"> body> html>You can also apply another technique. In the next example, we set id attributes («original» and «changed») for our elements. Then, we set filter: hue-rotate; on the «changed» id.
Example of changing the color of PNG image:
html> html> head> title>Convert image into different color title> style> #original, #changed < background: url('https://image.freepik.com/free-photo/orange-red-siamese-fighting-fish-betta-splendens-isolated-white-background_51519-539.jpg'); background-size: cover; width: 30%; margin: 0 10% 0 10%; padding-bottom: 28%; float: left; > #changed < -webkit-filter: hue-rotate(180deg); filter: hue-rotate(180deg); > style> head> body> h2>Change PNG image color h2> div id="original"> div> div id="changed"> div> body> html>Перекрашиваем картинки с помощью CSS
Это статья про веб-технологии и CSS — штуку, благодаря которой наши сайты выглядят красиво. Раньше CSS был простым инструментом оформления веб-страниц: можно было поменять цвет текста, фона, выровнять картинки или настроить расположение элементов на странице. Сейчас современный CSS может гораздо больше:
А ещё он может поменять цвет любого элемента на странице — перекрасить его в сепию, сделать чёрно-белым или добавить насыщенности. Про это и будет сегодняшняя статья.
Меняем оттенок цвета
Каждое изображение на экране состоит из пикселей, у каждого пикселя свой цвет. Цветов много, но их все можно представить в виде цветового круга оттенков. А если этот круг разбить на секторы, то можно понять, как поменяется тот или иной цвет, если мы повернём этот круг на сколько-то градусов:
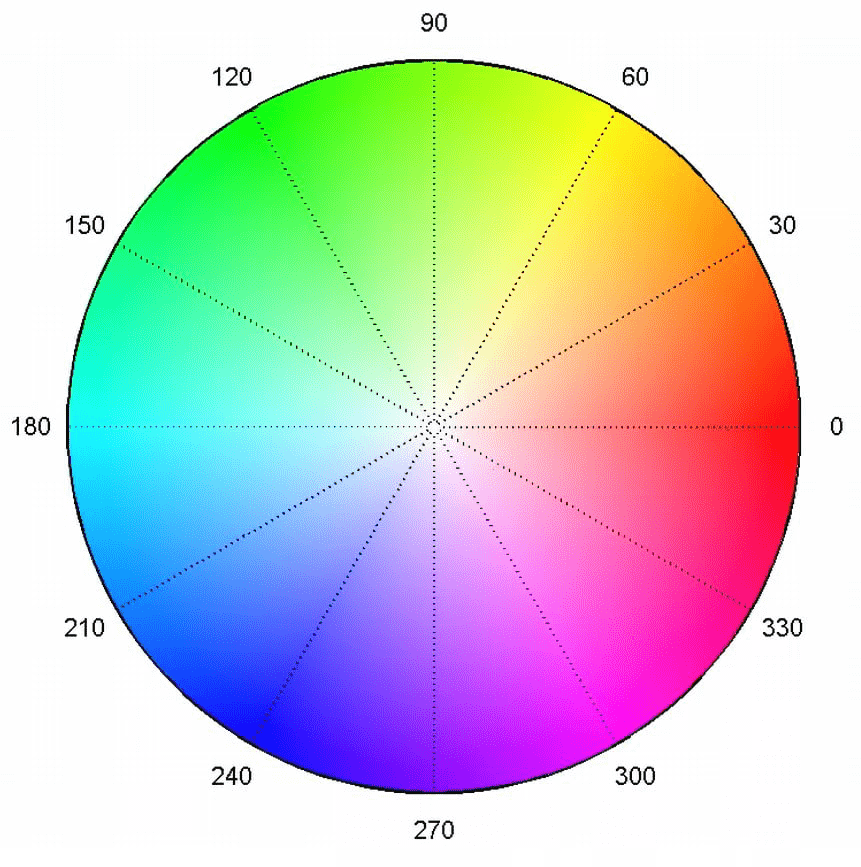
Например, если мы возьмём красный цвет, который лежит на нуле градусов, и повернём его на 60 градусов против хода часовой стрелки, то получим жёлтый цвет, а если на 120, то он превратится в зелёный. В это же время синий пиксель, который лежал на 240 градусах, после первого смещения превратится в фиолетовый (240 + 60 = 300), а после второго — в красный (240 + 120 = 360, или 0).
Зная это, мы можем пропорционально менять все цвета в изображении, просто поворачивая его на нужное количество градусов по кругу оттенков. Для этого в CSS используется команда filter: hue-rotate(), где в скобках указываются градусы, на которые поворачиваем круг. Например:
filter: hue-rotate(120deg); ← поворачиваем круг на 120 градусов filter: hue-rotate(-60deg); ← поворачиваем круг на 60 градусов в обратном направлении
Для примера поменяем цвета у эмодзи из стандартного набора:
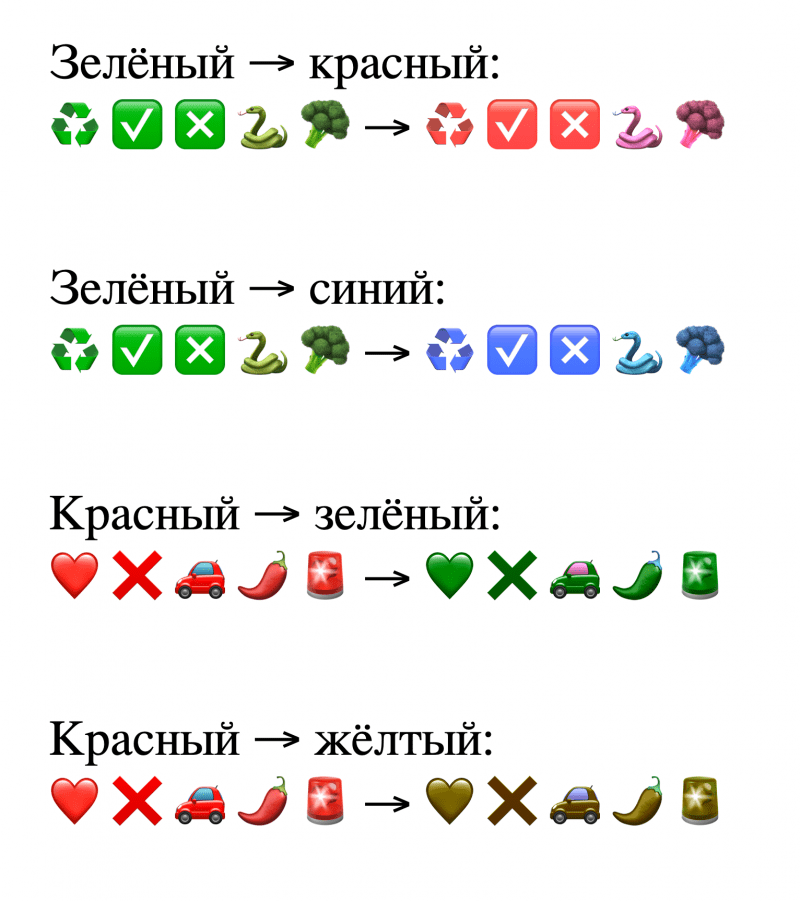
А вот простой код, который за это отвечает:
Зелёный → красный:
♻️ ✅ ❎ 🐍 🥦 →
Зелёный → синий:
♻️ ✅ ❎ 🐍 🥦 →
Красный → зелёный:
❤️ ❌ 🚗 🌶 🚨 →
Красный → жёлтый:
❤️ ❌ 🚗 🌶 🚨 →
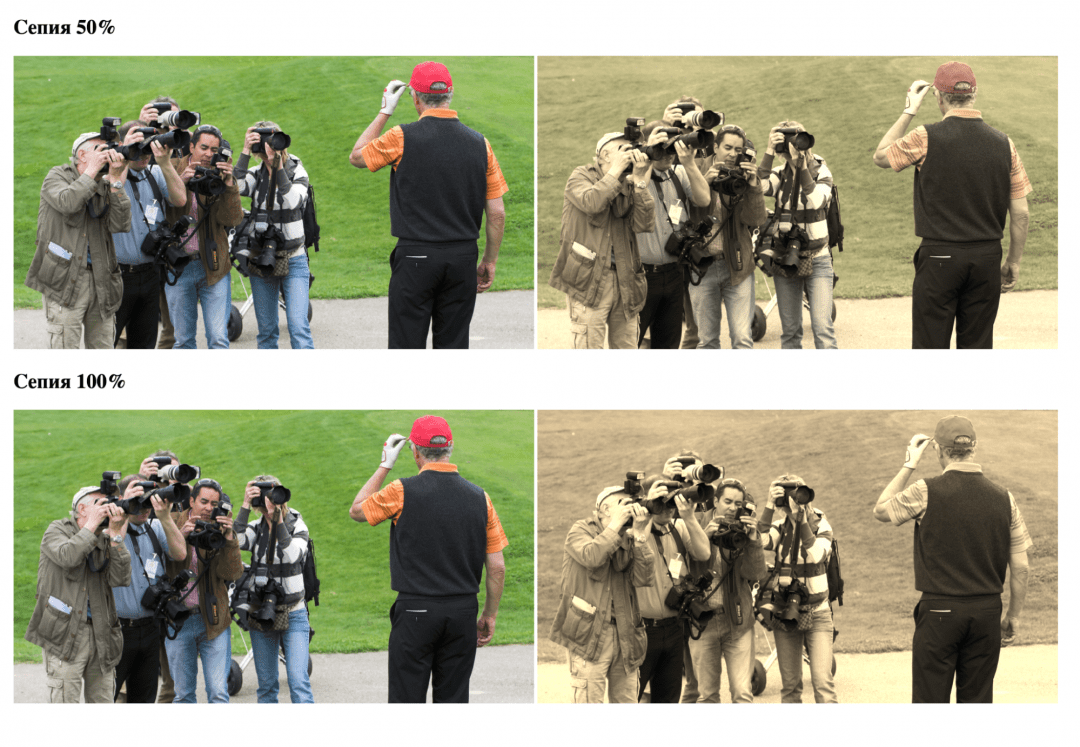
Сепия, чёрно-белое фото и насыщенность
Сепия — это имитация старой напечатанной фотографии, когда всё состоит из оттенков коричневого цвета (сепии). Чтобы сделать такой эффект, используют команду filter: sepia(100%) . Если нужно сохранить некоторые оттенки цветов, можно ослабить фильтр и указать, например, не 100%, а 50%:
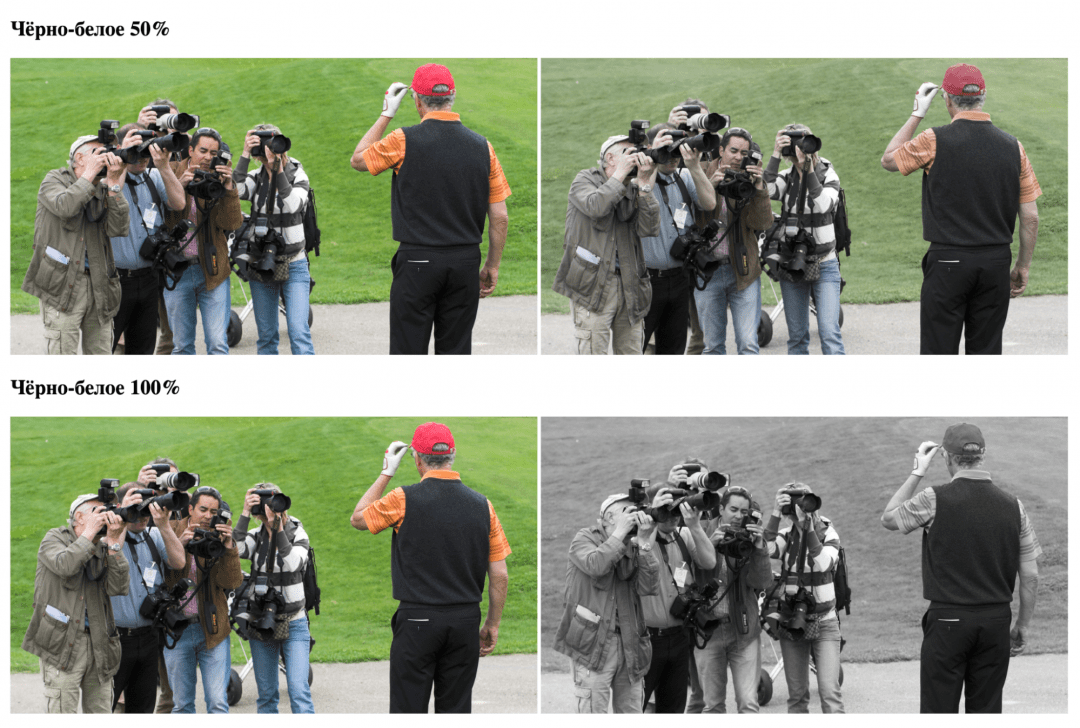
Для перевода в чёрно-белый оттенок используют команду filter: grayscale() , где в скобках указывают число от 0 до 1. Например, фильтр с параметром 0,5 приглушит все цвета наполовину, а с единицей — сделает полноценную чёрно-белую картинку:
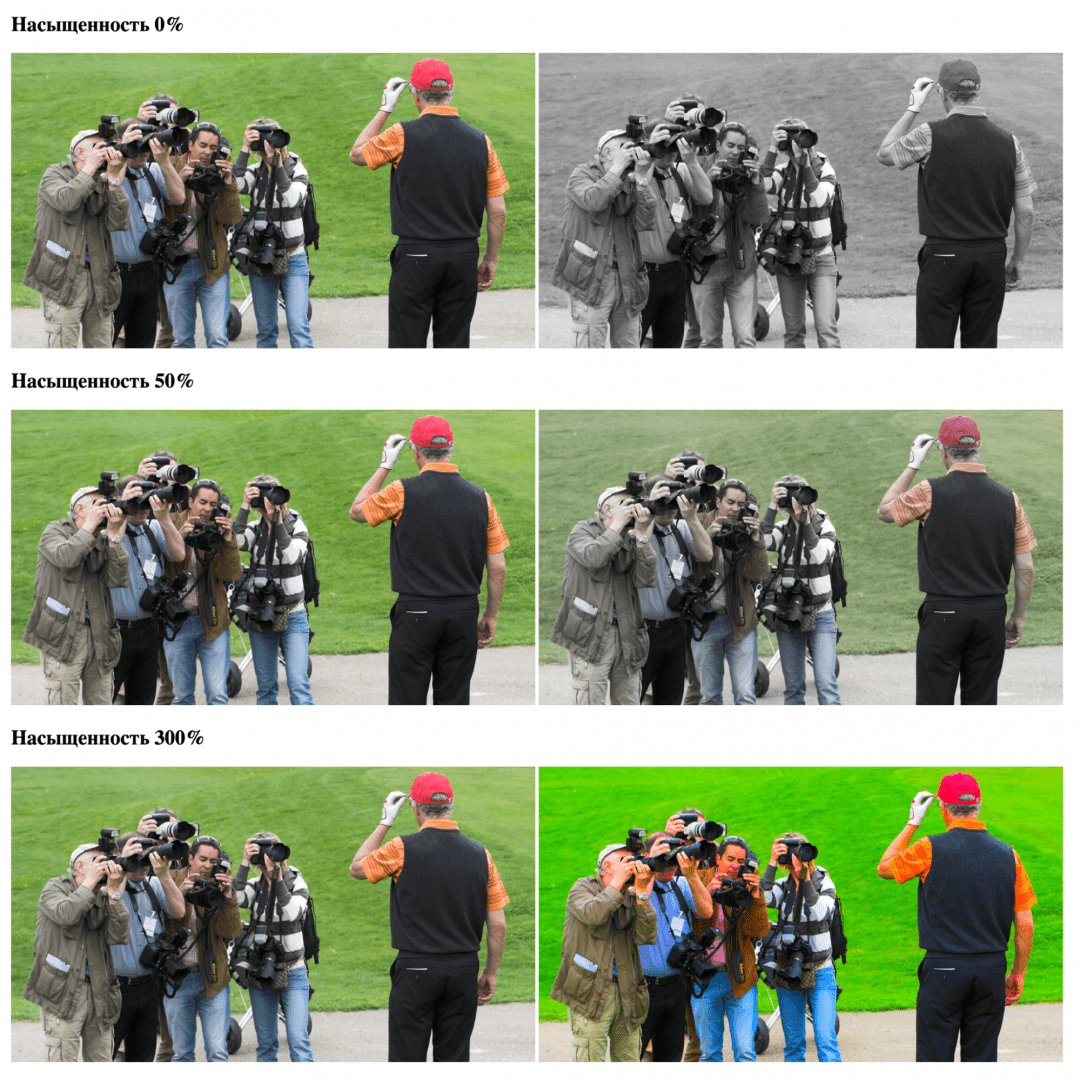
Насыщенность цветов управляется командой filter: saturate() по такому принципу:
- если в скобках единица, то насыщенность не меняется;
- если меньше единицы — цвета приглушаются и всё работает так же, как и команда filter: grayscale();
- если больше — цвета становятся насыщеннее в такое количество раз.
Например, если поставить насыщенность 0, то фото станет чёрно-белым, как в предыдущем случае, а если 3 — все цвета станут в 3 раза насыщеннее:
body < margin: 20px; >img < max-width: 48vw; >.sepia-50 < filter: sepia(75%); >.sepia-100 < filter: sepia(100%); >.bw-50 < filter: grayscale(0.5); >.bw-100 < filter: grayscale(1); >.sat-0 < filter: saturate(0); >.sat-50 < filter: saturate(0.5); >.sat-300
Сепия 50%

Что дальше
Постепенно приближаемся к тому, чтобы сделать свой графический редактор в браузере. А если вы умеете работать со слайдерами и управлять CSS-переменными, то можете уже сами сделать первую версию такого редактора.
Css change image colors
Learn Latest Tutorials


Preparation


Trending Technologies


B.Tech / MCA


Javatpoint Services
JavaTpoint offers too many high quality services. Mail us on h[email protected], to get more information about given services.
- Website Designing
- Website Development
- Java Development
- PHP Development
- WordPress
- Graphic Designing
- Logo
- Digital Marketing
- On Page and Off Page SEO
- PPC
- Content Development
- Corporate Training
- Classroom and Online Training
- Data Entry
Training For College Campus
JavaTpoint offers college campus training on Core Java, Advance Java, .Net, Android, Hadoop, PHP, Web Technology and Python. Please mail your requirement at [email protected].
Duration: 1 week to 2 week
Like/Subscribe us for latest updates or newsletter 


