How to Create an App Using HTML?
HTML is one of the popular markup languages in the world. As compared to other languages like C++, C#, Java, etc., HTML is relatively easier to learn.
Most people ask that can you use HTML to make an app. Well, the simple answer to this is yes. Creating an application using coding is usually a different task.
Whenever people plan to start their app development journey, they usually quit their plan because of the hassle they have to go through due to coding.
People think that to make a professional mobile application using HTML, they need to learn HTML app development, which is not the case.
What is HTML?
HTML is a markup language that you can use to make mobile applications and websites. This Hypertext Markup Language supports different elements that work as the building blocks of HTML pages.
Each element uses a <> tags. Besides, you will learn different HTML attributes that offer additional information. The attributes will reveal about the element.
Following are some of the common tags used in HTML.
By using these tags, you can create headings, paragraphs, title, add images, links, and perform other tasks in your mobile application. There are many other tags available that you can learn from Google and other sources. You can understand those tags and start practicing.
Essential Ways to Create an HTML Application
There are four primary methods, which you can use to make an HTML mobile application. Using the given methods, you can create any applications with an HTML version.
- Learn HTML
- Use a WYSIWYG editor
- Use a free web builder
- Hire Someone
You will get an in-depth knowledge of all these methods in this post.
1. Learn HTML
The first way to build an app using HTML is to learn it. You can learn HTML from different platforms, like Google and YouTube. Further, there are many paid as well as free HTML courses available on Udemy.
If you want to learn HTML, then make sure to start with tags. Learn all the essential tags and their uses so that you can understand things faster.
The HTML tags will help you create headings, paragraphs, add images, videos, and do other stuff. Apart from learning HTML, you can also learn other HTML versions. HTML5 is one of the most popular versions of HTML that you should know.
Using HTML5, you can create both websites as well as mobile applications. If you want to learn HTML and create a mobile app using it, you should first understand HTML tags.
2. Use a WYSIWYG Editor
If you do not want to learn HTML but still want to create an app, then do not worry because we also have an option for you. You can use the WYSIWYG editor to make an application.
The WYSIWYG editor will allow you to arrange your content on the app using various editing tools. It is a content editing tool, which you can utilize to edit text, graphics, and other stuff in your application.
The prime thing about the WYSIWYG editor is that you do not have to write source code. You can use a convenient rich text editor to design elements for your app.
It will also give a better preview of your work. Therefore, if you do not want to code, you should go for the WYSIWYG editor because it will be an ideal option for you.
Apart from the WYSIWYG editor, there are many similar editors available on the internet. You can choose a paid or free editor to make an HTML mobile app as per your budget.
Paid editors provide better features and options, which you might not locate in a free one. As per your project and budget, you can select either a free or a paid editor.
3. Use a Web Builder
You can also use a web builder to create a website and then convert it into a mobile application using AppsGeyser. It is only suitable if you want to convert a website into an application.
You can find many web builders on the internet that offer free services. You can use those web builders to make the desired website.
If you want better options, you can prefer a paid web builder because it usually comes with high-end features, designs, and templates.
You can make your website mobile-friendly using the web builders. Apart from web builders, you can utilize content management systems like WordPress and Wix to build a website and turn it into a mobile app.
The best thing about these content management systems is that they do not demand any programming knowledge.
4. Hire Someone
If you do not like any of the above methods, then this one is for you. You can hire a freelancer who knows how to program. You can pay some money and in return then will create the desired mobile application for you.
You can find a freelancer from Upwork, Fiverr, etc., that will help you make an application. You can find the best person for your project through these websites.
Before hiring someone, make sure to explain everything about your project. Tell them what you want in your application. You can also make a workflow chart or a diagram to explain things to the freelancer.
Explaining everything about the project will help you get the desired outcome. Depending on the type of application you want, some freelancers may charge you a hundred or even thousands of bucks.
If you only want a simple application, then you will not have to pay a lot. You can get a simple mobile app ready in a short time and at less cost.
Other than this, try choosing an experienced freelancer who knows the right way to execute the task. Ensure that he or she knows how to create the required application.
You can test their knowledge by asking a few simple questions related to the project. If they give the right answers, then you can hire them without any worry.
Wrapping Up
However, it is the easiest way to get your work done. Another way by which you can create any app is by using AppsGeyser. AppsGeyser will help you to create mobile applications even if you do not know any programming language.
You can use drag, drop, and other similar features to make your desired application using the AppsGeyser platform. Therefore, do not forget to try the AppsGeyser to create your favorite app with ease.
Создаем приложение для ANDROID быстро и просто
Сегодня я хотел бы поделиться с Вами, как быстро и просто можно создать приложение для Android с базовыми знаниями HTML CSS и JS. По данному примеру код на Java для Android будет минимальным. Благодаря платформе XAMARIN приложения для мобильных телефонов можно делать в Visual Studio.
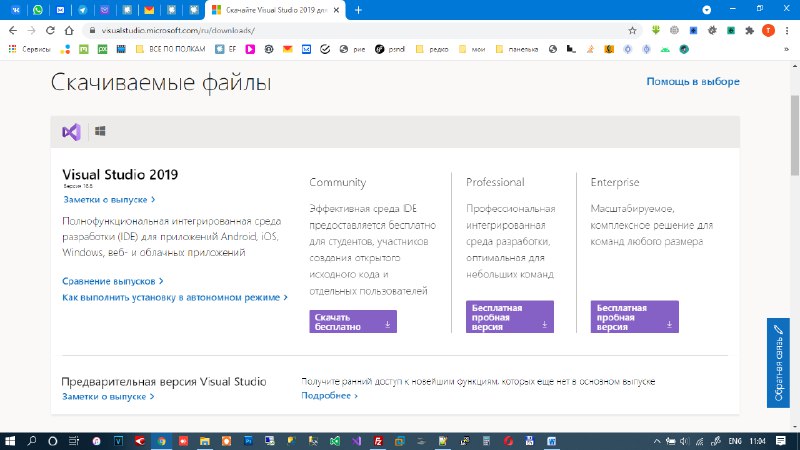
▍Шаг 1 — Переходим на сайт и Скачиваем бесплатную версию Community.
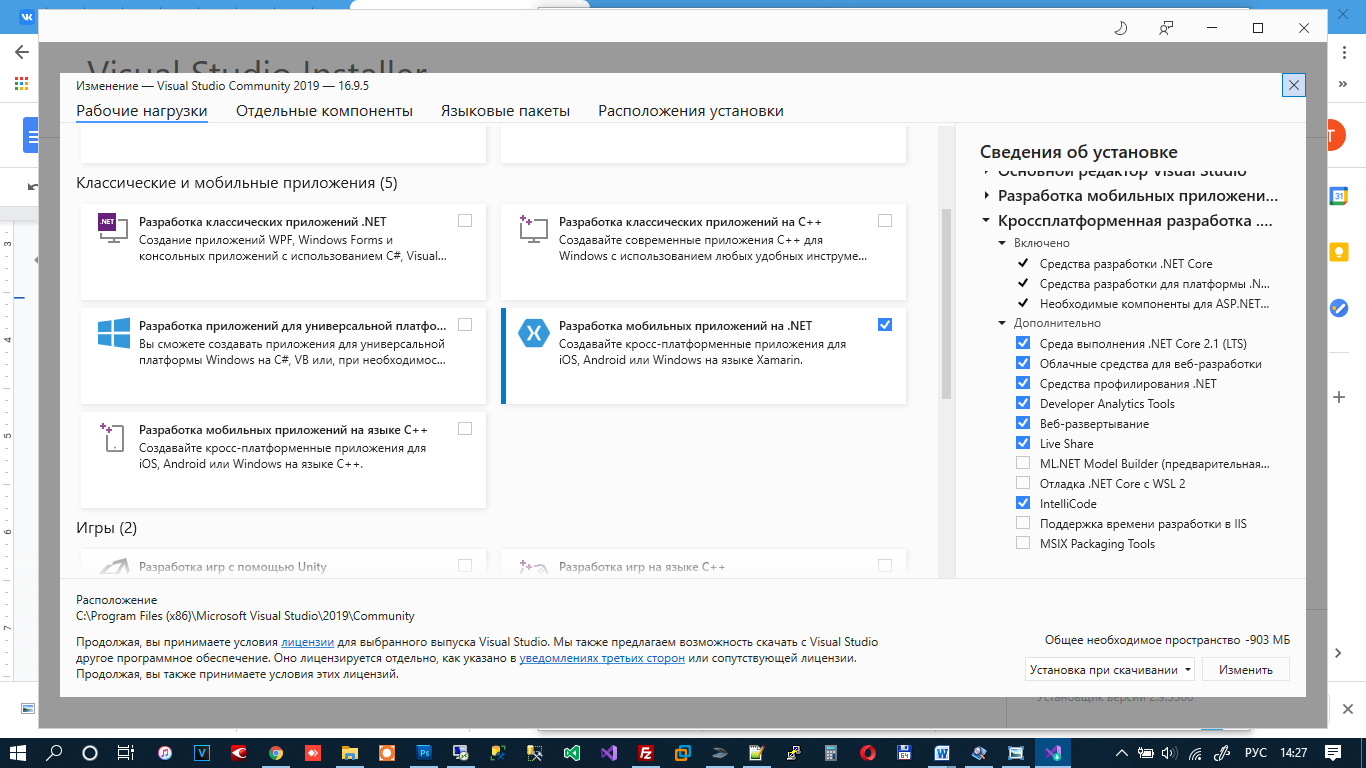
▍Шаг 2 — Запускаем установку и выбираем параметры. Нас интересует XAMARIN. Но Вы также можете выбрать другие параметры.
После успешной установки мы можем создать свой первый проект.
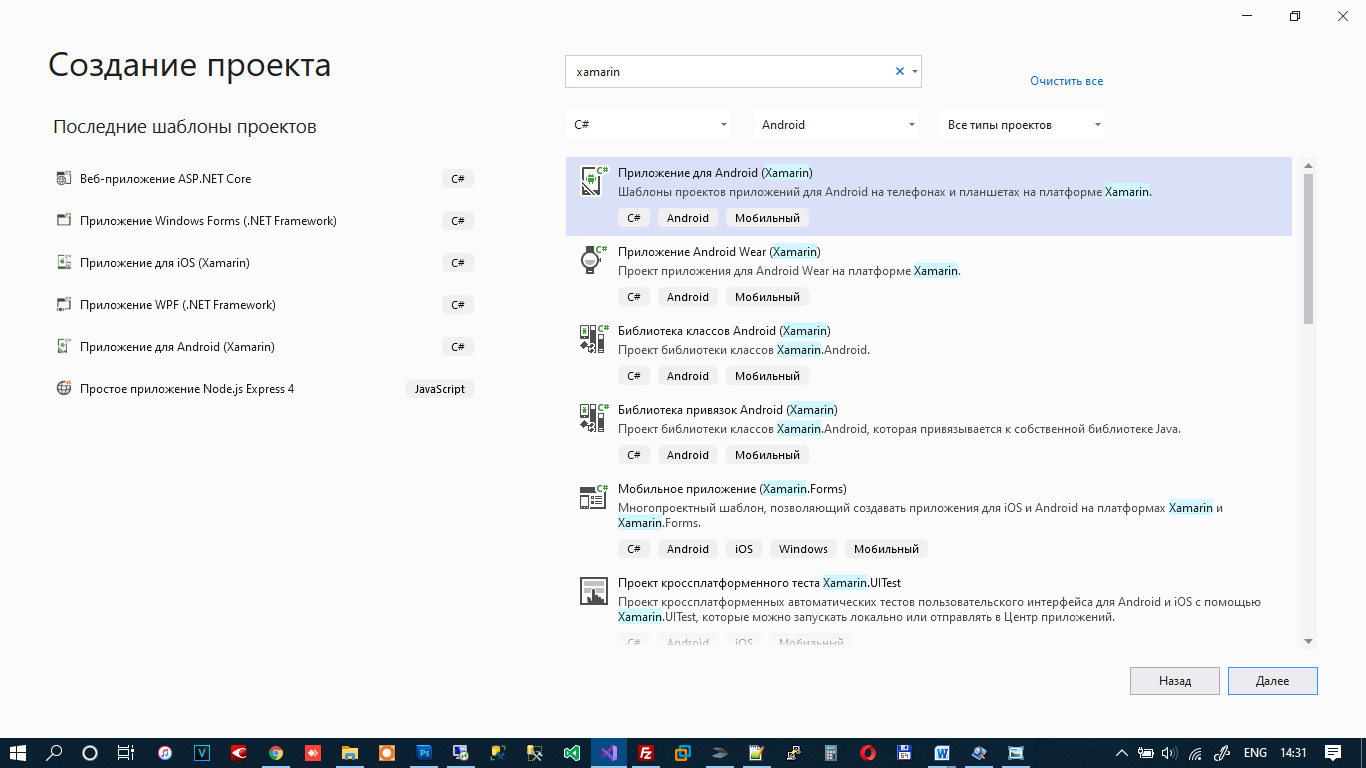
▍Шаг 3 — Запускаем Visual Studio. Создать проект. В фильтре пишем xamarin, платформа Android, язык c# (Если желаете другой язык можете его выбрать)
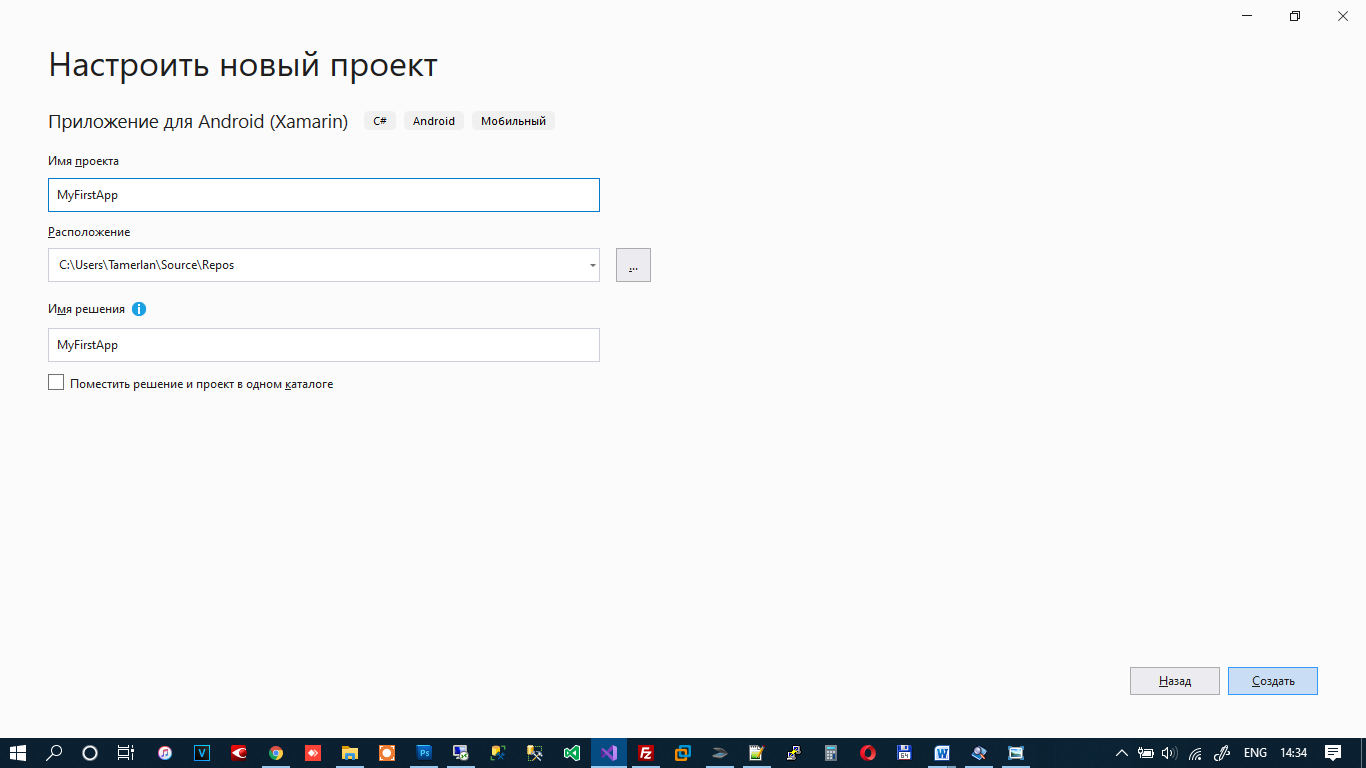
▍Шаг 4 — Далее. Указываете имя для своего приложения, выбираете каталог где его сохранить. Создать.
▍Шаг 5 — Указываем пустое приложение и выбираем минимальную версию андроида для запуска этого приложения.
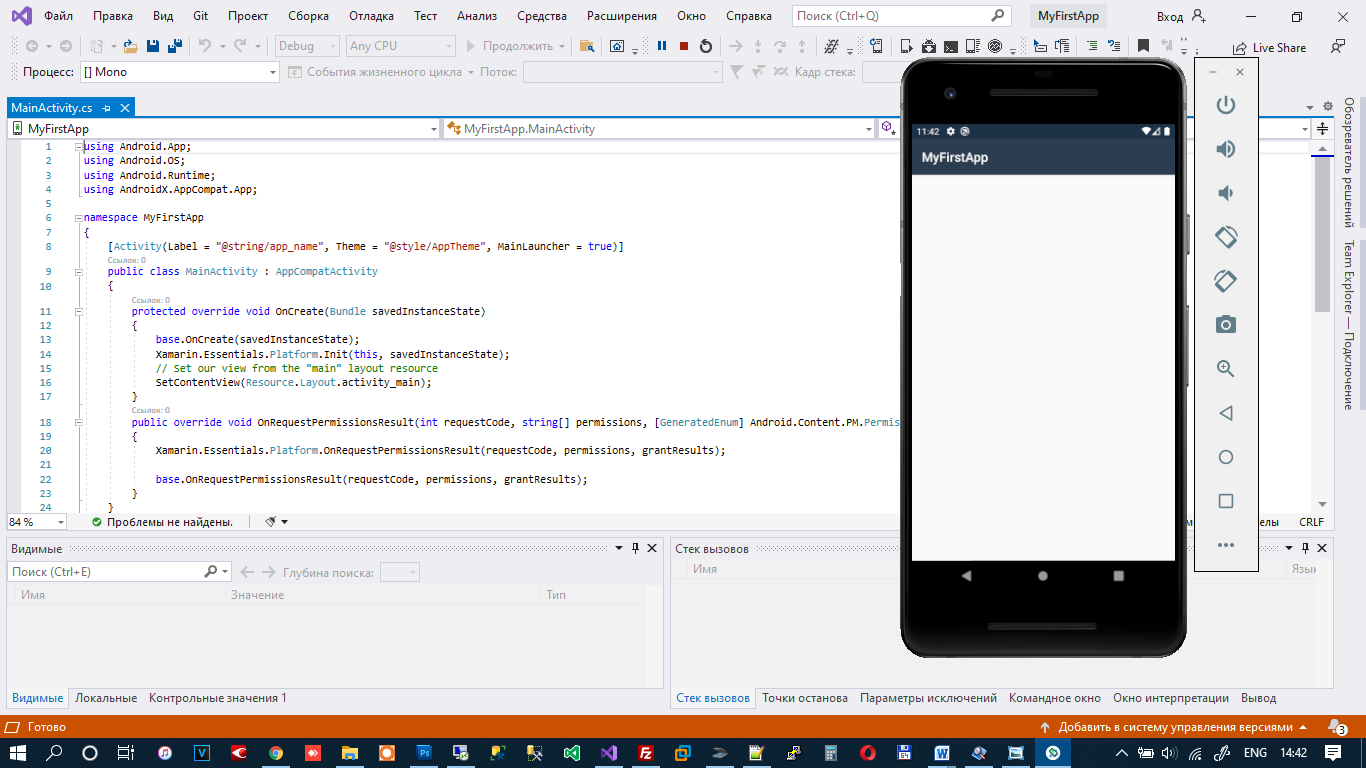
▍Шаг 6 — Жмем ок. Visual Studio автоматически создает код для приложения
Мы можем его запустить в эмуляторе, который идет комплекте с Visual Studio нажав клавишу F5.
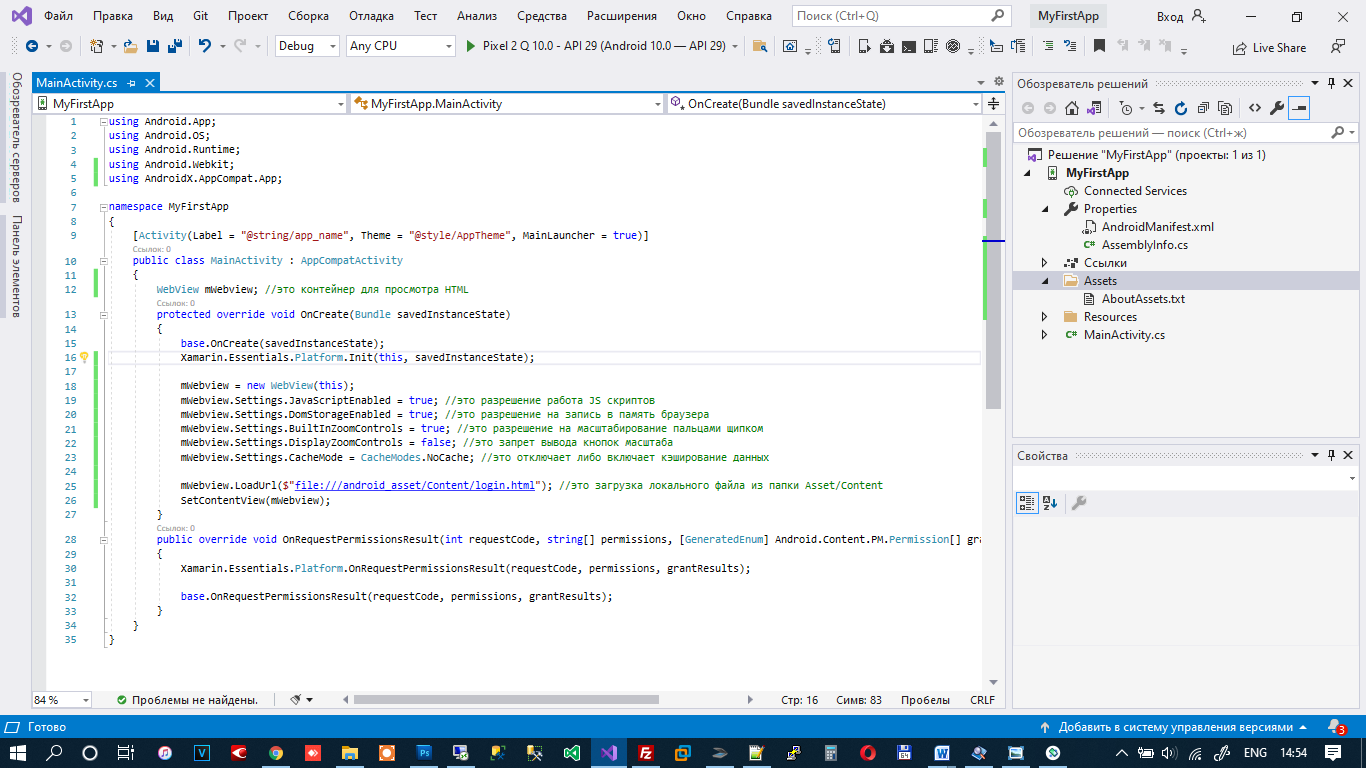
▍Шаг 7 — Теперь немного модифицируем код. В данном случае мы вообще не будем использовать Java. Так как мы будем кодить на C#.
Приводим код к такому виду. Здесь мы создаем WebView контейнер который будет грузить локальный HTML файл, который находится в проекте в папке Assets.
public class MainActivity : AppCompatActivity < WebView mWebview; //это контейнер для просмотра HTML protected override void OnCreate(Bundle savedInstanceState) < base.OnCreate(savedInstanceState); Xamarin.Essentials.Platform.Init(this, savedInstanceState); mWebview = new WebView(this); mWebview.Settings.JavaScriptEnabled = true; //это разрешение работа JS скриптов mWebview.Settings.DomStorageEnabled = true; //это разрешение на запись в память браузера mWebview.Settings.BuiltInZoomControls = true; //это разрешение на масштабирование пальцами щипком mWebview.Settings.DisplayZoomControls = false; //это запрет вывода кнопок масштаба mWebview.Settings.CacheMode = CacheModes.NoCache; //это отключает либо включает кэширование данных mWebview.LoadUrl($"file:///android_asset/Content/login.html"); //это загрузка локального файла из папки Asset/Content SetContentView(mWebview); >public override void OnRequestPermissionsResult(int requestCode, string[] permissions, [GeneratedEnum] Android.Content.PM.Permission[] grantResults) < Xamarin.Essentials.Platform.OnRequestPermissionsResult(requestCode, permissions, grantResults); base.OnRequestPermissionsResult(requestCode, permissions, grantResults); >>▍Шаг 8 — Создадим там папку Content.
▍Шаг 9 — Добавим в папку Content файл login.html
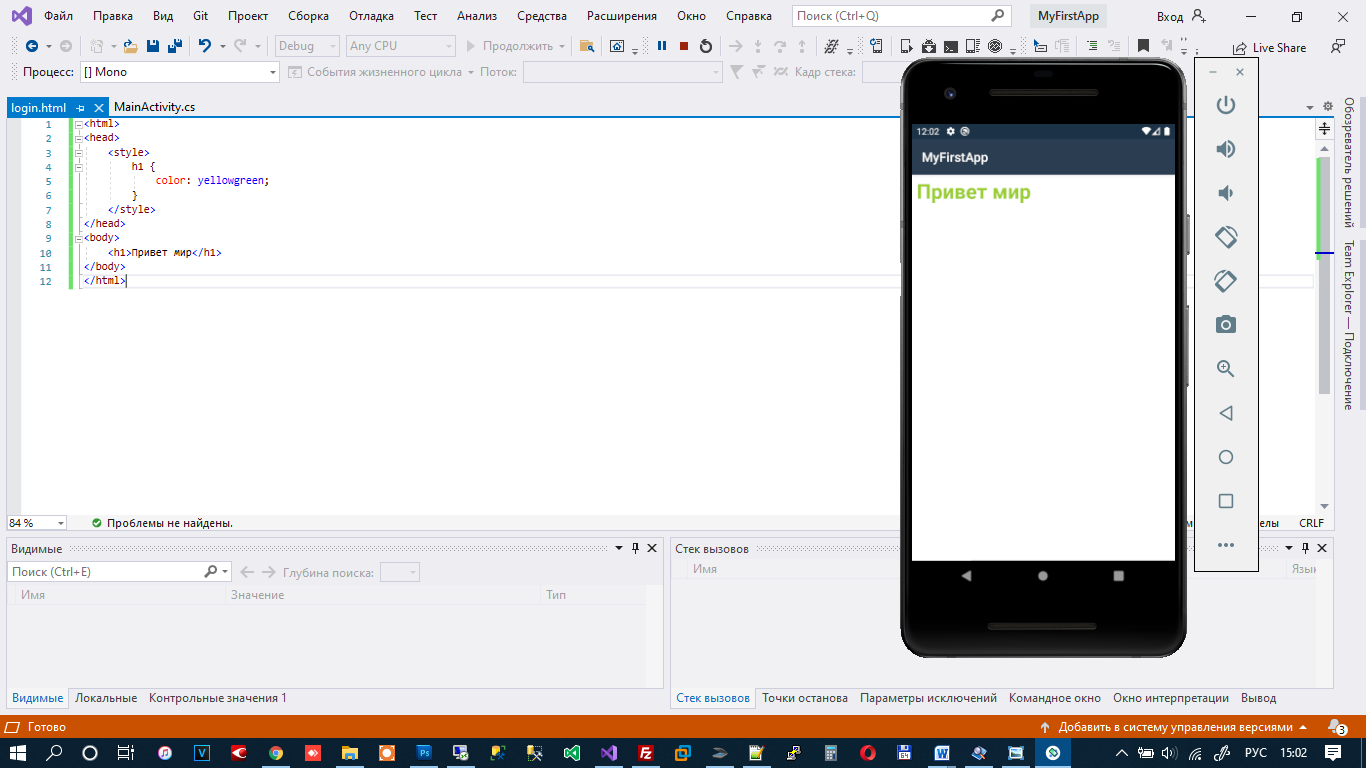
▍Шаг 10 — Далее уже пишем на привычном нам HTML CSS JS. Можем нажать на F5 и увидеть результат нашей работы.
По такому принципу можно создать приложение быстро и просто. Файлы html будут выглядеть одинаково на всех устройствах. То есть, Вы можете сделать приложения для Android и iOS с одинаковым интерфейсом. Не надо изучать сложные языки разметки, не надо изучать сложные макеты (сториборды) на iOS. Все можно сделать на HTML.
В идеале, вместо локальных файлов можно сделать загрузку со стороннего сайта. В этом случае Вы можете менять контент приложения без его обновления в AppStore и Google Play.
Q: Но как быть с функциями самой платформы? Пуш сообщения? Как взаимодействовать с самой платформой?
Все очень просто! JavaScript можно использовать для вызова функций Android:
▍Шаг 1 — Немного модифицируем наш файл MainActivity
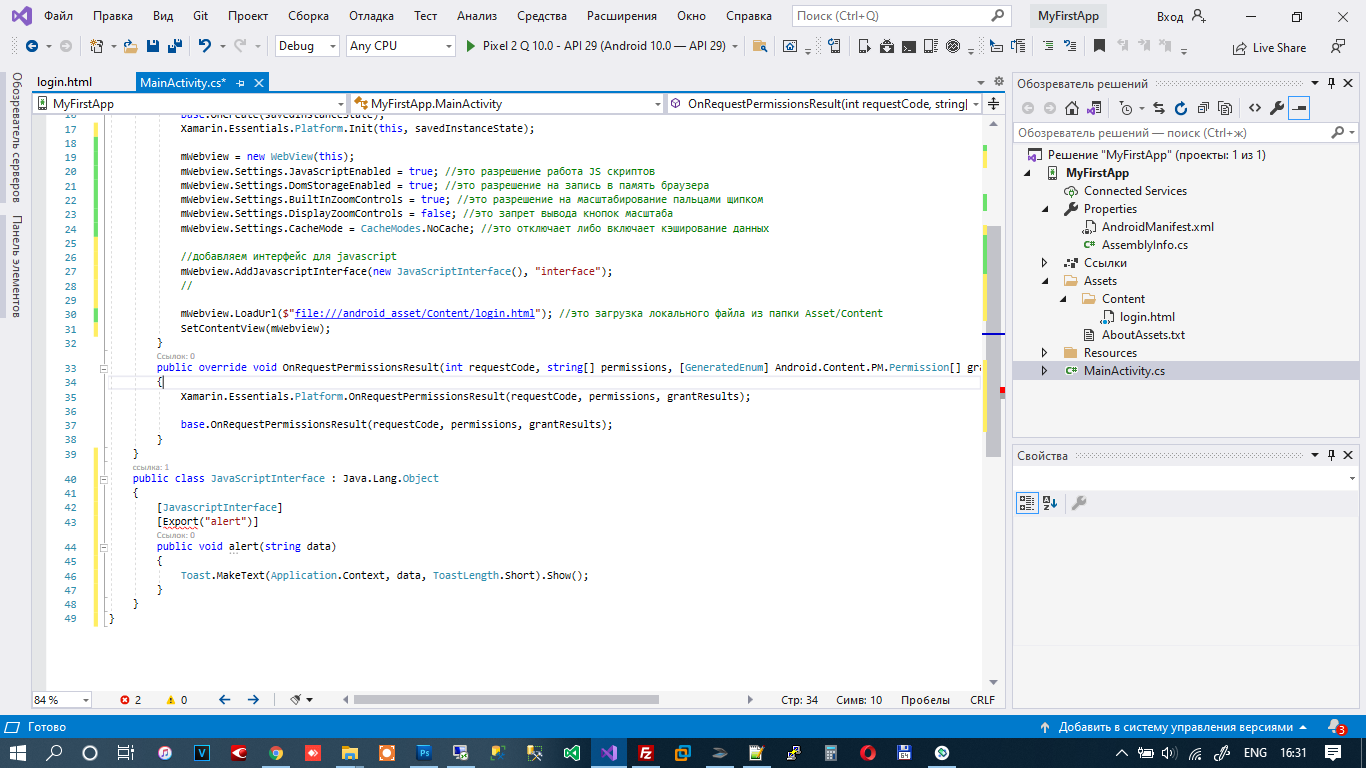
//добавляем интерфейс для javascript mWebview.AddJavascriptInterface(new JavaScriptInterface(), "interface"); //▍Шаг 2 — Далее создаем класс JavaScriptInterface на который будет ругаться Visual Studio
public class JavaScriptInterface : Java.Lang.Object < [JavascriptInterface] [Export("alert")] //здесь мы указываем название функции вызываемой из html файла interface.alert('сообщение пользователю'); public void alert(string data) < Toast.MakeText(Application.Context, data, ToastLength.Short).Show();//здесь Андроид выведет сообщение посредством Toast >> Мы видим, что теперь программа ругается на Export так как не знает что это такое.
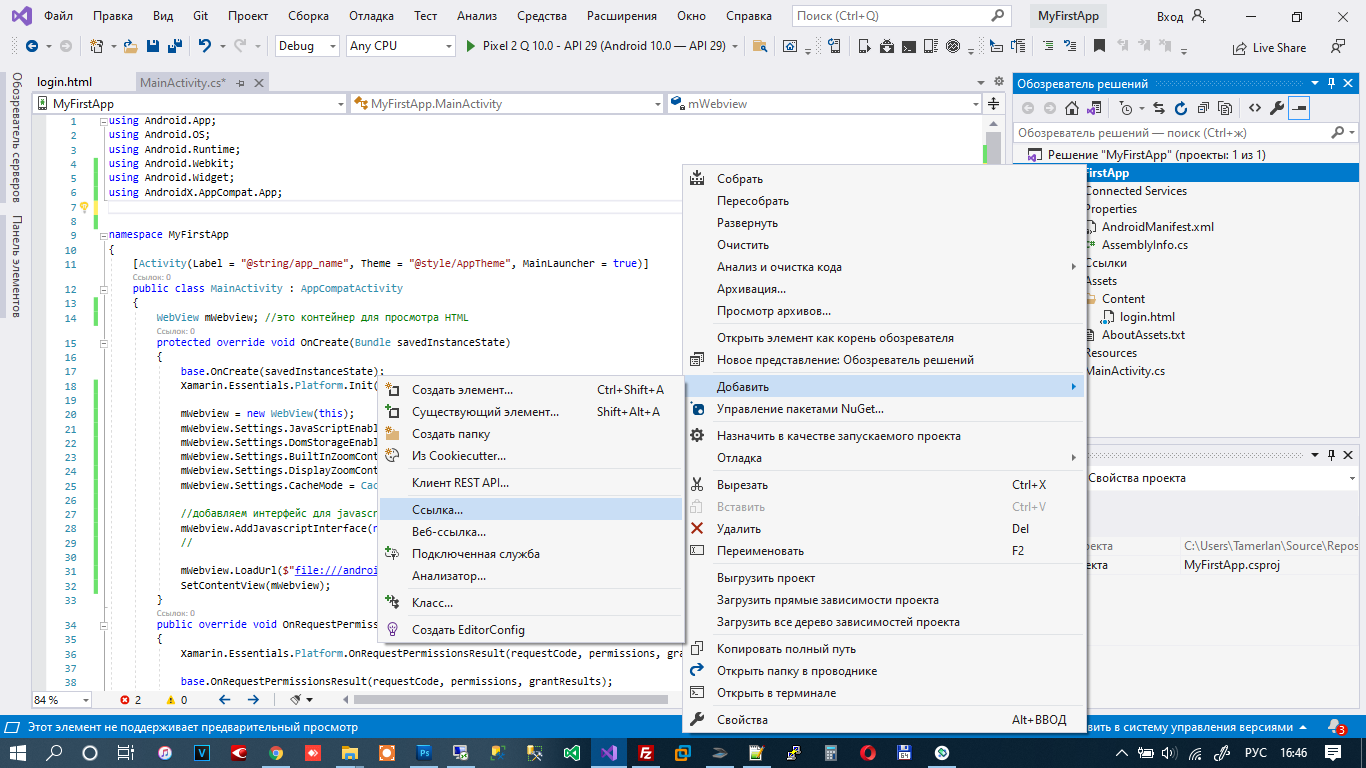
▍Шаг 3 — Добавим нужную библиотеку
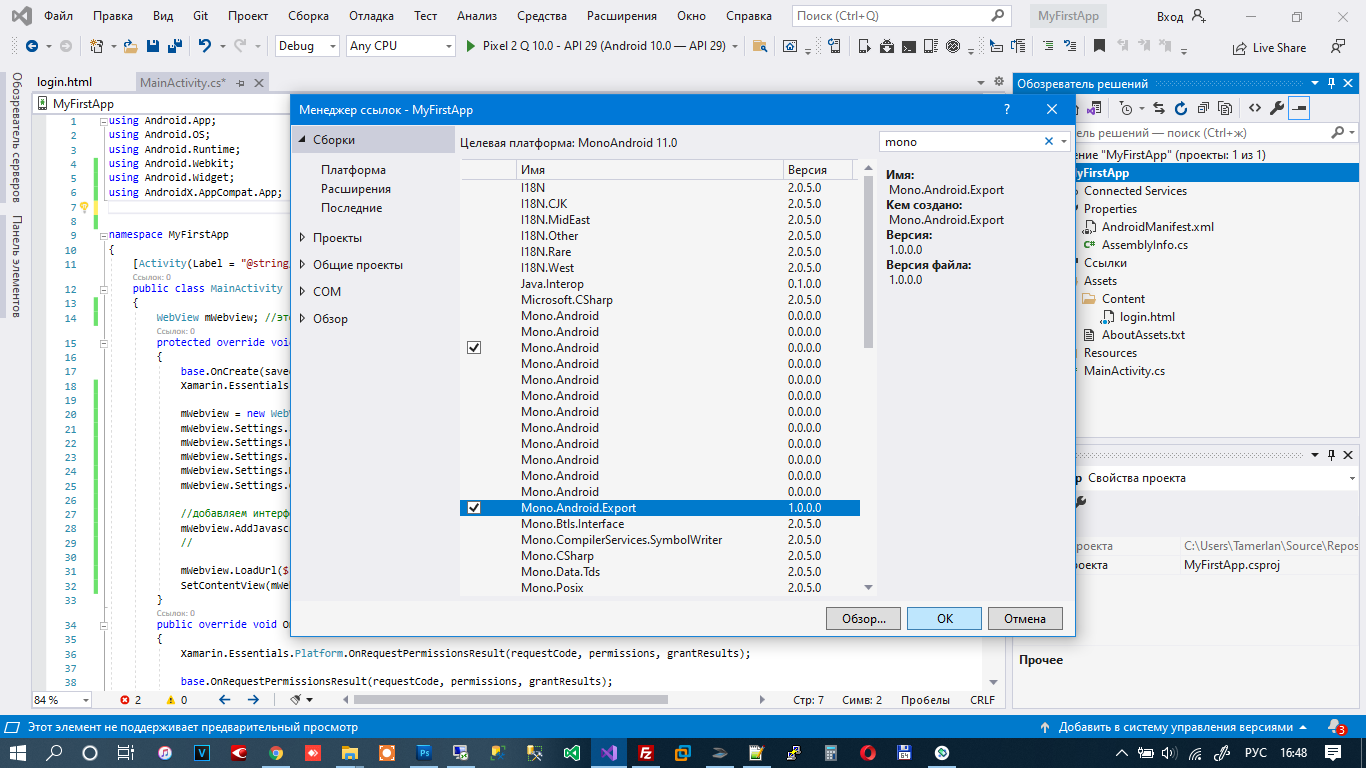
▍Шаг 4 — В фильтре напишем mono
▍Шаг 5 — Найдем Export и поставим галочку
▍Шаг 6 — Жмем ок и видим что ошибка пропала.
Так вы можете подключать библиотеки если вдруг Visual Studio ругается на что то.
Toast.MakeText(Application.Context, data, ToastLength.Short).Show();Данная функция это показ всплывающей информации на экране. Она выполняется именно на платформе Андроида. То есть мы можем написать в HTML файле вызов функции Андроида. Получается полное дружелюбие двух платформ по JavaScript интерфейсу. Данные можно передавать туда сюда. Вызывать переход от одной активити в другую. Все через HTML + JavaScript.
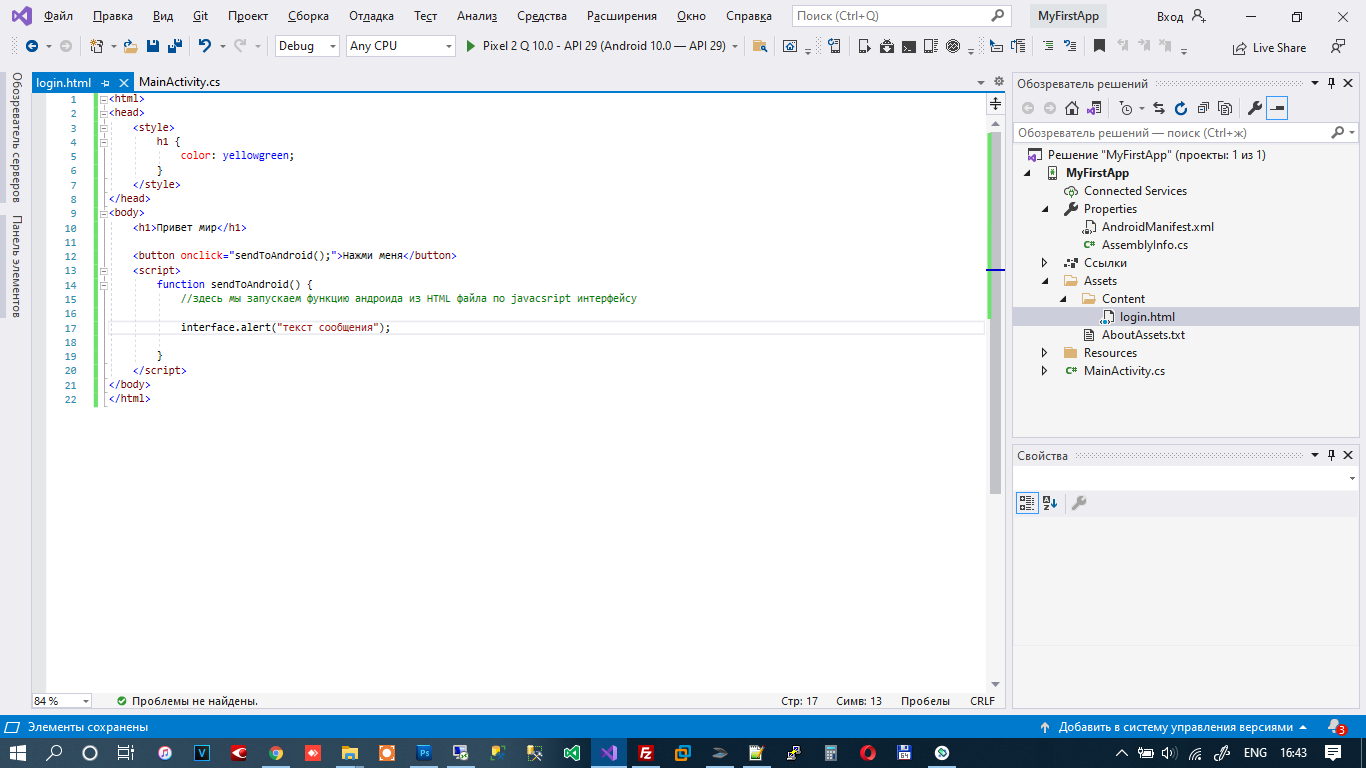
Немного модифицируем файл login.htm:
h1 Привет мир
Теперь при нажатии на кнопку HTML вызывается функция Toast андроида и выводиться сообщение пользователю.
P.s. Полный листинг MainActivity
using Android.App; using Android.OS; using Android.Runtime; using Android.Webkit; using Android.Widget; using AndroidX.AppCompat.App; using Java.Interop; namespace MyFirstApp < [Activity(Label = "@string/app_name", Theme = "@style/AppTheme", MainLauncher = true)] public class MainActivity : AppCompatActivity < WebView mWebview; //это контейнер для просмотра HTML protected override void OnCreate(Bundle savedInstanceState) < base.OnCreate(savedInstanceState); Xamarin.Essentials.Platform.Init(this, savedInstanceState); mWebview = new WebView(this); mWebview.Settings.JavaScriptEnabled = true; //это разрешение работа JS скриптов mWebview.Settings.DomStorageEnabled = true; //это разрешение на запись в память браузера mWebview.Settings.BuiltInZoomControls = true; //это разрешение на масштабирование пальцами щипком mWebview.Settings.DisplayZoomControls = false; //это запрет вывода кнопок масштаба mWebview.Settings.CacheMode = CacheModes.NoCache; //это отключает либо включает кэширование данных //добавляем интерфейс для javascript mWebview.AddJavascriptInterface(new JavaScriptInterface(), "interface"); // mWebview.LoadUrl($"file:///android_asset/Content/login.html"); //это загрузка локального файла из папки Asset/Content SetContentView(mWebview); >public override void OnRequestPermissionsResult(int requestCode, string[] permissions, [GeneratedEnum] Android.Content.PM.Permission[] grantResults) < Xamarin.Essentials.Platform.OnRequestPermissionsResult(requestCode, permissions, grantResults); base.OnRequestPermissionsResult(requestCode, permissions, grantResults); >> public class JavaScriptInterface : Java.Lang.Object < [JavascriptInterface] [Export("alert")] public void alert(string data) < Toast.MakeText(Application.Context, data, ToastLength.Short).Show(); >> >
