- Simple Login Application in Python Tutorial with Source Code
- Getting started
- Installing SQLite Browser
- Importing Modules
- Setting up the Main Frame
- Designing the Layout
- Creating the Database Connection
- Creating the Main Function
- Initializing the Application
- Invalid Credentail Image
- Valid Credentail Image
- Demo
- Looking for Free Python Projects? Visit the link below.
- Tags
- Comments
- it
- Hi kff, I’m glad that I could
- why is it the Login is
- why is it the Login is undefined?
- I need help with the login stage — i want to make multiple login
- Python GUI Login – Graphical Registration And Login System In Python
- Python GUI Login Tutorial – Getting Started With Tkinter
- Creating New Project
- Importing Tkinter Module
- How To Make a Login Page in Python with Example
- Project Software Information
- 5. Designing new window for login
- Output:
- 6. Login verification module
- 7. Login design and success message popup
- Output:
- 8. Design for login failed or invalid message popup
- Output:
- 9. Complete source code of the Login Page in Python with MySql Database
- How To Run The Login Page in Python with MySql Database with Source Code?
- Downloadable Source Code
- Conclusion:
Simple Login Application in Python Tutorial with Source Code
In this tutorial, we will create a Simple Login Application in Python. Python has a design philosophy that emphasizes code readability. That’s why Python is very easy to use especially for beginners who just started programming. It is very easy to learn the syntax emphasizes readability and it can reduce time-consuming in developing. So let’s now do the coding.
Getting started
First you will have to download & install the Python IDLE’s, here’s the link for the Integrated Development And Learning Environment for Python https://www.python.org/downloads/.
Installing SQLite Browser
After you installed Python, we will now then install the SQLite, here’s the link for the DB Browser for SQLite http://sqlitebrowser.org/.
Importing Modules
After setting up the installation and the database, run the IDLE and click file and then new file. After that a new window will appear containing a black file this will be the text editor for the python.
Then copy the code that I provided below and paste it inside the IDLE text editor
Setting up the Main Frame
After importing the modules, we will now then create the main frame for the application. To do that just copy the code below and paste it inside the IDLE text editor.
Designing the Layout
After creating the Main Frame we will now add some layout to the application. Just kindly copy the code below and paste it inside the IDLE text editor.
Creating the Database Connection
Then after setting up the design we will now create the database function. To do that just simply copy the code below and paste it inside the IDLE text editor
Creating the Main Function
This is the main function where the Entry will be check if there is a user exist in the database, after login correctly a new window will pop up. To do that just simply copy the code below then paste it inside the IDLE text editor.
Initializing the Application
After finishing the function save the application as ‘index.py’. This function will run the code and check if the main is initialize properly. To do that copy the code below and paste it inside the IDLE text editor.
There you have it we just created a Simple Login Application using Python. I hope that this simple tutorial helps you expand the idea of Python programming. For more updates and tutorials just kindly visit this site.
Enjoy Coding!!
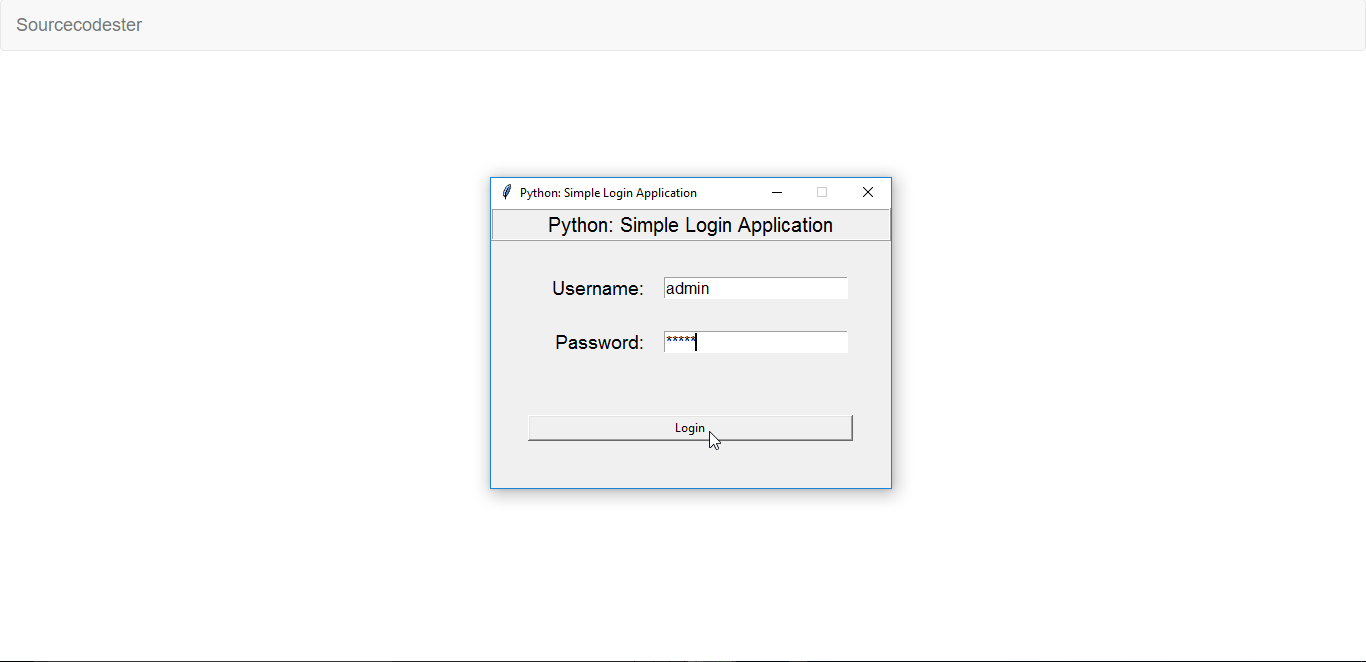
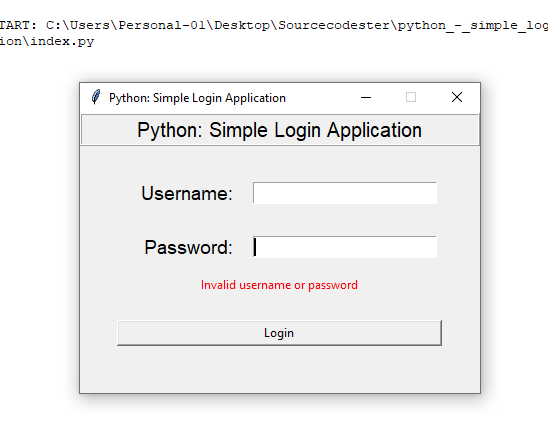
Invalid Credentail Image
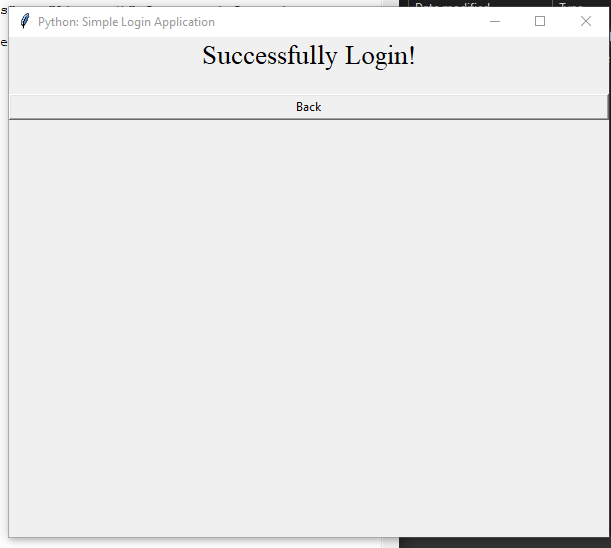
Valid Credentail Image
Demo
Looking for Free Python Projects? Visit the link below.
Tags
Comments
it
In reply to it by kff (not verified)
Hi kff, I’m glad that I could
why is it the Login is
why is it the Login is undefined?
In reply to why is it the Login is by Gerome823 (not verified)
why is it the Login is undefined?
It is undefined probably because you defined «Login» after the command was binded to the button. Move the «def Login():» above the bind command
I need help with the login stage — i want to make multiple login
in the database connection stage i made a elif statement to save the values employee def Database(): global conn, cursor conn = sqlite3.connect(«SCCSDatabase.db») cursor = conn.cursor() cursor.execute(«CREATE TABLE IF NOT EXISTS `member` (mem_id INTEGER NOT NULL PRIMARY KEY AUTOINCREMENT, username TEXT, password TEXT)») cursor.execute(«CREATE TABLE IF NOT EXISTS `employee` (employee_id INTEGER NOT NULL PRIMARY KEY AUTOINCREMENT, username1 TEXT, password1 TEXT)») cursor.execute(«SELECT * FROM `member` WHERE `username` = ‘admin’ AND `password` = ‘admin'») cursor.execute(«SELECT * FROM `employee` WHERE `username1` = ’employee’ AND `password1` = ’employee'») if cursor.fetchone() is None: cursor.execute(«INSERT INTO `member` (username, password) VALUES(‘admin’, ‘admin’)») conn.commit() elif cursor.fetchone() is None: cursor.execute(«INSERT INTO `employee` (username1, password1) VALUES(’employee’, ’employee’)») conn.commit() can you help me create another login with those values
Python GUI Login – Graphical Registration And Login System In Python

Welcome to Python GUI Login tutorial. In this tutorial i will teach you to create a Login form where user can register themselves and can login. Registration and Login requires everywhere, either you are filling any form or want to access any application. So in this tutorial we will see how to implement user registration and login in python.
In this, we will create a GUI interface. Python provides Tkinter toolkit to develop GUI applications. In python, you can develop any GUI applications easily. If you have ideas then you can turn your imagination into reality and make many creative things in programming. So without wasting time let’s start our Python GUI Login tutorial. It may be lengthy so guys please keep patience and follow this till the end, and i am pretty sure you will learn much knowledge and also enjoy.

Python GUI Login Tutorial – Getting Started With Tkinter
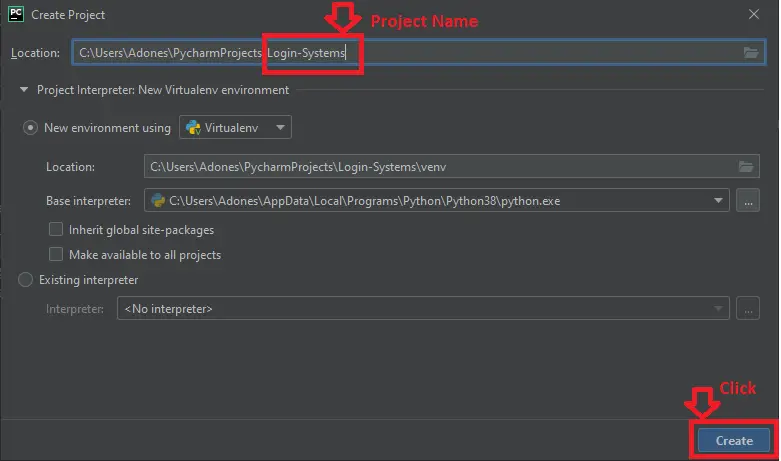
Creating New Project
Open your IDE and create a new project and then inside this project create a python file. I prefer PyCharm but you can prefer anyone as it doesn’t matters, but if you want to know best python IDEs then refer Best Python IDEs.
Importing Tkinter Module
For importing tkinter just write one line of code.
How To Make a Login Page in Python with Example

In this article, we’re going to learn on How To Make a Login Page in Python. Python’s usage is presently taking the web development scene by the usage of storm, growing always every year.
Project Software Information
5. Designing new window for login
Now we ought to implement login process. So for this, first of all we should layout a login window. It is equal as sign in window however having little changes.
def login(): global root2 root2 = Toplevel(root) root2.title("Account Login") root2.geometry("1400x750") root2.config(bg="white") global username_verification global password_verification Label(root2, text='Log In', bd=5,font=('arial', 12, 'bold'), relief="groove", fg="white", bg="blue",width=300).pack() username_verification = StringVar() password_verification = StringVar() Label(root2, text="").pack() Label(root2, text="Username :", fg="black", font=('arial', 12, 'bold')).pack() Entry(root2, textvariable=username_verification).pack() Label(root2, text="").pack() Label(root2, text="Password :", fg="black", font=('arial', 12, 'bold')).pack() Entry(root2, textvariable=password_verification, show="*").pack() Label(root2, text="").pack() Button(root2, text="Login", bg="blue", fg='white', relief="groove", font=('arial', 12, 'bold'),command=login_verification).pack() Label(root2, text="") - And now we will sooner or later take a look at our login process. So fill the username and password area in sign in form and press login button.
- When the above code is executed, it produces the following result below.
Output:
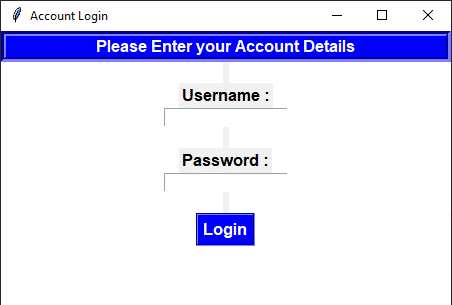
Python Login Page Input Fields
6. Login verification module
In this module we will verify the username and password for login.
def login_verification():
user_verification = username_verification.get()
pass_verification = password_verification.get()
sql = "select * from usertable where username = %s and password = %s"
mycur.execute(sql,[(user_verification),(pass_verification)])
results = mycur.fetchall()
if results:
for i in results:
logged()
break
else:
failed()
7. Login design and success message popup
Now we are able to outline a characteristic that will show a popup for successful login. So let’s see the way to do it.
So if the user has entered the valid entries then the popup success message will appear.
ef logged(): global logged_message logged_message = Toplevel(root2) logged_message.title("Welcome") logged_message.geometry("500x100") Label(logged_message, text="Login Successfully. Welcome <> ".format(username_verification.get()), fg="green", font="bold").pack() Label(logged_message, text="").pack() Button(logged_message, text="Logout", bg="blue", fg='white', relief="groove", font=('arial', 12, 'bold'), command=logged_destroy).pack() - If the user enter the correct username and password then the popup message successful will appear
- If the above code is executed, it produces the following result below.
Output:
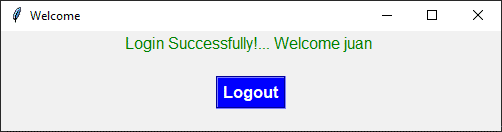
Python Login Page Successful Message
8. Design for login failed or invalid message popup
Now we are able to outline a characteristic that will show a popup for invalid message popup. So let’s see the way to do it.
So if the user has entered the invalid value then the invalid popup message will appear..
ef failed(): global failed_message failed_message = Toplevel(root2) failed_message.title("Invalid") failed_message.geometry("500x100") Label(failed_message, text="Invalid Username or Password", fg="red", font="bold").pack() Label(failed_message, text="").pack() Button(failed_message,text="Ok", bg="blue", fg='white', relief="groove", font=('arial', 12, 'bold'), command=failed_destroy).pack() - If the user enter the incorrect username or password then the invalid popup message will appear
- If the above code is executed, it produces the following result below.
Output:
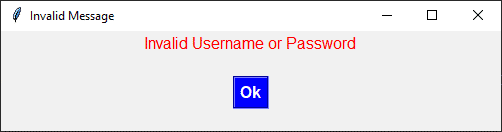
Python Login Page Error Message
9. Complete source code of the Login Page in Python with MySql Database
from tkinter import * import tkinter.messagebox import mysql.connector #connecting to the database connectiondb = mysql.connector.connect(host="localhost",user="root",passwd="",database="logindb") cursordb = connectiondb.cursor() def login(): global root2 root2 = Toplevel(root) root2.title("Account Login") root2.geometry("450x300") root2.config(bg="white") global username_verification global password_verification Label(root2, text='Please Enter your Account Details', bd=5,font=('arial', 12, 'bold'), relief="groove", fg="white", bg="blue",width=300).pack() username_verification = StringVar() password_verification = StringVar() Label(root2, text="").pack() Label(root2, text="Username :", fg="black", font=('arial', 12, 'bold')).pack() Entry(root2, textvariable=username_verification).pack() Label(root2, text="").pack() Label(root2, text="Password :", fg="black", font=('arial', 12, 'bold')).pack() Entry(root2, textvariable=password_verification, show="*").pack() Label(root2, text="").pack() Button(root2, text="Login", bg="blue", fg='white', relief="groove", font=('arial', 12, 'bold'),command=login_verification).pack() Label(root2, text="") def logged_destroy(): logged_message.destroy() root2.destroy() def failed_destroy(): failed_message.destroy() def logged(): global logged_message logged_message = Toplevel(root2) logged_message.title("Welcome") logged_message.geometry("500x100") Label(logged_message, text="Login Successfully. Welcome <> ".format(username_verification.get()), fg="green", font="bold").pack() Label(logged_message, text="").pack() Button(logged_message, text="Logout", bg="blue", fg='white', relief="groove", font=('arial', 12, 'bold'), command=logged_destroy).pack() def failed(): global failed_message failed_message = Toplevel(root2) failed_message.title("Invalid Message") failed_message.geometry("500x100") Label(failed_message, text="Invalid Username or Password", fg="red", font="bold").pack() Label(failed_message, text="").pack() Button(failed_message,text="Ok", bg="blue", fg='white', relief="groove", font=('arial', 12, 'bold'), command=failed_destroy).pack() def login_verification(): user_verification = username_verification.get() pass_verification = password_verification.get() sql = "select * from usertable where username = %s and password = %s" cursordb.execute(sql,[(user_verification),(pass_verification)]) results = cursordb.fetchall() if results: for i in results: logged() break else: failed() def Exit(): wayOut = tkinter.messagebox.askyesno("Login System", "Do you want to exit the system") if wayOut > 0: root.destroy() return def main_display(): global root root = Tk() root.config(bg="white") root.title("Login System") root.geometry("500x500") Label(root,text='Welcome to Log In System', bd=20, font=('arial', 20, 'bold'), relief="groove", fg="white", bg="blue",width=300).pack() Label(root,text="").pack() Button(root,text='Log In', height="1",width="20", bd=8, font=('arial', 12, 'bold'), relief="groove", fg="white", bg="blue",command=login).pack() Label(root,text="").pack() Button(root,text='Exit', height="1",width="20", bd=8, font=('arial', 12, 'bold'), relief="groove", fg="white", bg="blue",command=Exit).pack() Label(root,text="").pack() main_display() root.mainloop() How To Run The Login Page in Python with MySql Database with Source Code?
To run this project, you must have installed a Pycharm on your PC (for Windows). This Login Page in Python with MySql Database with Source Code purposes only!
After downloading the project you must follow the steps below:
Step 1: Unzip the file or Extract the file
Step 2: Double click the login
Step 3: Project is ready to run
Downloadable Source Code
I have here the list of Best Python Project with Source code free to download for free, I hope this can help you a lot.
Conclusion:
In this Login Page in Python with MySql Database with Source Code, I use the mysql.Connector library to set up a connection.