- HTML и формы
- Рендеринг HTML
- Формы рендеринга
- Использование пакетов шаблонов
- rest_framework/vertical 
- rest_framework/horizontal 
- rest_framework/inline 
- Полевые стили
- Load html page in ASP.NET MVC view
- Render HTML file in Node.js and Express.js framework
- Step 1: Install Express
- Step 2: Using sendFile() function
- Step 3: Render HTML in Express
- Directory Structure:
- Step 4: Render Dynamic HTML using templating engine
- Further reading
- Conclusion
- Reference
HTML и формы
REST-фреймворк подходит для возврата как ответов в стиле API, так и обычных HTML-страниц. Кроме того, сериализаторы могут использоваться в качестве HTML-форм и отображаться в шаблонах.
Рендеринг HTML
Для возврата HTML-ответов необходимо использовать либо TemplateHTMLRenderer , либо StaticHTMLRenderer .
Класс TemplateHTMLRenderer ожидает, что ответ будет содержать словарь контекстных данных, и отображает HTML-страницу на основе шаблона, который должен быть указан либо в представлении, либо в ответе.
Класс StaticHTMLRender ожидает, что ответ будет содержать строку предварительно отрендеренного HTML-содержимого.
Поскольку поведение статических HTML-страниц обычно отличается от поведения ответов API, вам, вероятно, придется писать любые HTML-представления явно, а не полагаться на встроенные типовые представления.
Вот пример представления, которое возвращает список экземпляров «Profile», отображенный в шаблоне HTML:
from my_project.example.models import Profile from rest_framework.renderers import TemplateHTMLRenderer from rest_framework.response import Response from rest_framework.views import APIView class ProfileList(APIView): renderer_classes = [TemplateHTMLRenderer] template_name = 'profile_list.html' def get(self, request): queryset = Profile.objects.all() return Response('profiles': queryset>)
profile_list.html :
html>body> h1>Profilesh1> ul> % for profile in profiles %> li> <profile.name >>li> % endfor %> ul> body>html> Формы рендеринга
Сериализаторы могут быть представлены в виде форм с помощью тега шаблона render_form и включения экземпляра сериализатора в качестве контекста в шаблон.
Следующее представление демонстрирует пример использования сериализатора в шаблоне для просмотра и обновления экземпляра модели:
from django.shortcuts import get_object_or_404 from my_project.example.models import Profile from rest_framework.renderers import TemplateHTMLRenderer from rest_framework.views import APIView class ProfileDetail(APIView): renderer_classes = [TemplateHTMLRenderer] template_name = 'profile_detail.html' def get(self, request, pk): profile = get_object_or_404(Profile, pk=pk) serializer = ProfileSerializer(profile) return Response('serializer': serializer, 'profile': profile>) def post(self, request, pk): profile = get_object_or_404(Profile, pk=pk) serializer = ProfileSerializer(profile, data=request.data) if not serializer.is_valid(): return Response('serializer': serializer, 'profile': profile>) serializer.save() return redirect('profile-list')
profile_detail.html** :
% load rest_framework %> html>body> h1>Profile - <profile.name >>h1> form action="" method="POST"> % csrf_token %> % render_form serializer %> input type="submit" value="Save"> form> body>html> Использование пакетов шаблонов
Тег render_form принимает необязательный аргумент template_pack , который указывает, какой каталог шаблонов должен быть использован для отображения формы и полей формы.
Фреймворк REST включает в себя три встроенных пакета шаблонов, все они основаны на Bootstrap 3. Встроенные стили: horizontal , vertical , и inline . По умолчанию используется стиль horizontal . Чтобы использовать любой из этих пакетов шаблонов, вам также потребуется включить CSS Bootstrap 3.
Следующий HTML будет ссылаться на версию CSS Bootstrap 3, размещенную в CDN:
Пакеты сторонних производителей могут включать альтернативные пакеты шаблонов, в которые входит каталог шаблонов, содержащий необходимые шаблоны форм и полей.
Давайте рассмотрим, как отобразить каждый из трех доступных пакетов шаблонов. В этих примерах мы будем использовать один класс сериализатора для представления формы «Вход в систему».
class LoginSerializer(serializers.Serializer): email = serializers.EmailField( max_length=100, style='placeholder': 'Email', 'autofocus': True> ) password = serializers.CharField( max_length=100, style='input_type': 'password', 'placeholder': 'Password'> ) remember_me = serializers.BooleanField()
rest_framework/vertical 
Представляет ярлыки формы над соответствующими входами элементов управления, используя стандартный макет Bootstrap.
Это пакет шаблонов по умолчанию.
% load rest_framework %> . form action="" method="post" novalidate> % csrf_token %> % render_form serializer template_pack='rest_framework/vertical' %> button type="submit" class="btn btn-default">Sign inbutton> form> 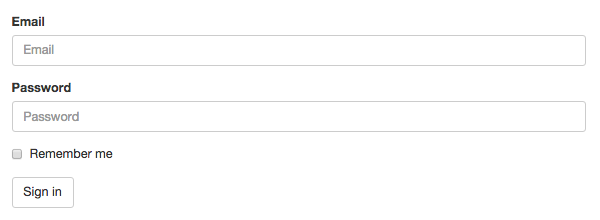
rest_framework/horizontal 
Представляет ярлыки и элементы управления рядом друг с другом, используя разделение колонок 2/10.
Это стиль формы, используемый в просматриваемых API и администраторских рендерах.
% load rest_framework %> . form class="form-horizontal" action="" method="post" novalidate> % csrf_token %> % render_form serializer %> div class="form-group"> div class="col-sm-offset-2 col-sm-10"> button type="submit" class="btn btn-default">Sign inbutton> div> div> form> 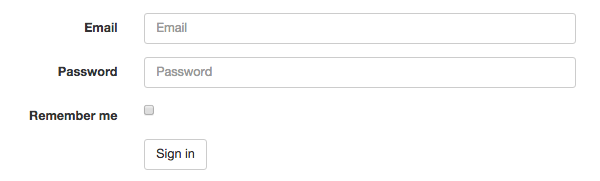
rest_framework/inline 
Компактный стиль формы, который представляет все элементы управления в линию.
% load rest_framework %> . form class="form-inline" action="" method="post" novalidate> % csrf_token %> % render_form serializer template_pack='rest_framework/inline' %> button type="submit" class="btn btn-default">Sign inbutton> form> 
Полевые стили
Поля сериализатора могут иметь свой стиль рендеринга, настроенный с помощью аргумента ключевого слова style . Этот аргумент представляет собой словарь опций, которые управляют используемым шаблоном и макетом.
Наиболее распространенным способом настройки стиля поля является использование аргумента ключевого слова base_template style, чтобы выбрать, какой шаблон из пакета шаблонов следует использовать.
Например, чтобы отобразить CharField как HTML textarea, а не как HTML input по умолчанию, вы должны использовать что-то вроде этого:
details = serializers.CharField( max_length=1000, style='base_template': 'textarea.html'> )
Если вы хотите, чтобы поле отображалось с использованием пользовательского шаблона, который не является частью включенного пакета шаблонов* , вы можете использовать опцию стиля template , чтобы полностью указать имя шаблона:
details = serializers.CharField( max_length=1000, style='template': 'my-field-templates/custom-input.html'> )
Шаблоны полей могут также использовать дополнительные свойства стиля, в зависимости от их типа. Например, шаблон textarea.html также принимает свойство rows , которое может быть использовано для влияния на размер элемента управления.
details = serializers.CharField( max_length=1000, style='base_template': 'textarea.html', 'rows': 10> )
Полный список опций base_template и связанных с ними опций стиля приведен ниже.
Дополнительные варианты стиля
Любое строковое, числовое или поле даты/времени
input_type, placeholder, hide_label, autofocus
rows, placeholder, hide_label
ChoiceField или реляционные типы полей
ChoiceField или реляционные типы полей
MultipleChoiceField или реляционные поля с many=True .
MultipleChoiceField или реляционные поля с many=True .
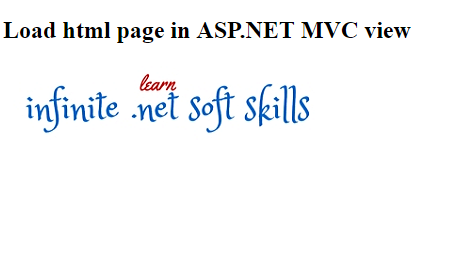
Load html page in ASP.NET MVC view
In this example, I will show you how to load an html page in asp.net MVC view. You can call an html page from your view using Html.Action helper method. In controller action you can return an HTML file by using FilePathResult; it will return the content of the file to the response. To prevent from vulnerability you could use childActionOnly attribute to the controller. Step 1: Right click on the «Controllers» folder and add «LoadHtml» controller. Copy and paste the following code.
public class LoadHtmlController : Controller

public ActionResult Index()

return View();
 >
 [ChildActionOnly]
public ActionResult GetHtmlPage(string path)

return new FilePathResult(path, "text/html");
 >
 >
Step 2: Right click on the «Index» action method in the «LoadHtmlController» and add «Index» view. Copy and paste the following code.
@
 ViewBag.Title = "Loadhtml page in ASP.NET MVC view";
>
h2>Load html page in ASP.NET MVC viewh2>
@Html.Action("GetHtmlPage","LoadHtml", new < path = "~/add.html" >)
Step 3: Right click on the project and create html file «add.html». Copy and paste the following code.
DOCTYPE html>
html xmlns="http://www.w3.org/1999/xhtml">
head>
title>title>
head>
body>
img class="temp-logo" src="http://www.infinetsoft.com/Images/logoinfi.png" title="learn infinite software skills through infinetsoft.com" alt="infinetsoft company logo">
body>
html>
Note: While running the project If you get the following  character displayed on the top of the html page. Please refer here .
Output:
Render HTML file in Node.js and Express.js framework
ExpressJS is a popular NodeJS web framework. ExpressJS allows you to develop a custom web server according to your project requirement. The Express project can be extended by installing various node modules. However, you don’t need to install multiple packages to handle HTML files and render them in the response.
This tutorial will teach you how to render HTML files in a custom NodeJS and ExpressJS Server. You don’t need to install extra modules to render an HTML file in Express. Just install express and you are good to go.
Step 1: Install Express
Create a new folder and initialize a new Node project using the following command.
Great. let’s move forward and learn about the function we will use to render HTML files in Express.
Step 2: Using sendFile() function
ExpressJS provides the sendFile() function, which can send HTML files to the browser and is then automatically interpreted by the browser. All we need to do is deliver an appropriate HTML file in every route.
For Example: When the user hits the main URL delivers index.html :
//assuming app is express Object. app.get('/',function(req,res) < res.sendFile('index.html'); >); Note: This code is for example purposes. It will cause a directory resolution error.
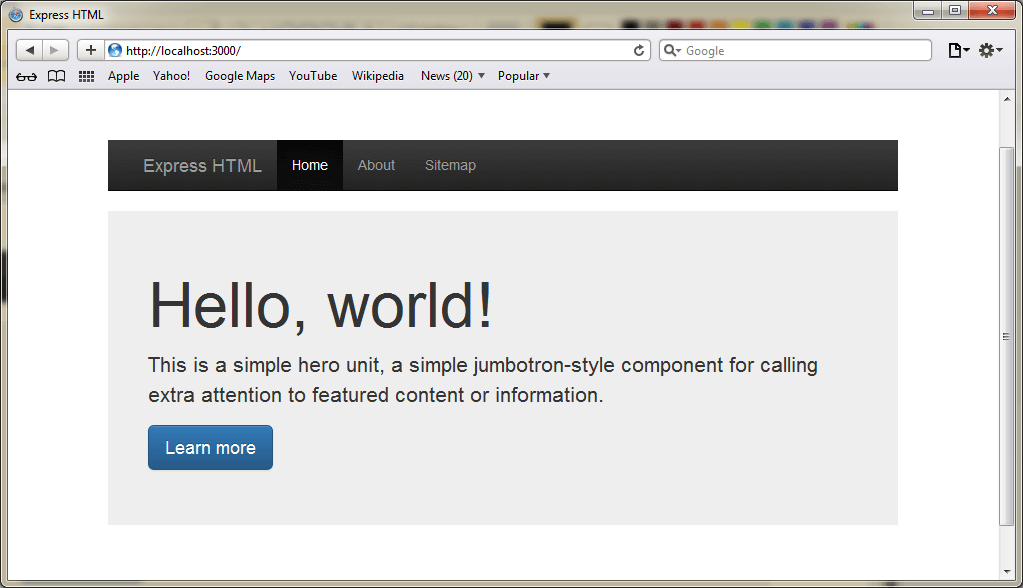
Step 3: Render HTML in Express
Let’s create a simple website consisting of a Home page. We will be using Bootstrap for designing and jQuery for event handling.
Directory Structure:
----- node_modules |--+express ---+ index.html ---+ about.html ---+ index.html --- app.js ----package.json
package.json
< "name": "htmlRender", "version": "1.0.0", "description": "", "main": "index.js", "scripts": < "test": "" >, "keywords": [], "author": "", "license": "ISC", "dependencies": < "express": "^4.16.4" >>
Below is our express server code.
app.js const express = require('express'); const app = express(); const path = require('path'); const router = express.Router(); router.get('/',function(req,res)< res.sendFile(path.join(__dirname+'/index.html')); //__dirname : It will resolve to your project folder. >); router.get('/about',function(req,res)< res.sendFile(path.join(__dirname+'/about.html')); >); router.get('/sitemap',function(req,res)< res.sendFile(path.join(__dirname+'/sitemap.html')); >); //add the router app.use('/', router); app.listen(process.env.port || 3000); console.log('Running at Port 3000'); Below is our “index.html” file.
Step 4: Render Dynamic HTML using templating engine
In the code shown above, we render static HTML files. However, there are scenarios where we need to render dynamic HTML templates. Before you get confused between static and dynamic templates, let me explain the difference quickly.
In static templates, we cannot pass custom variables and customize the template based on our needs. In dynamic templates, we can pass dynamic variables and render HTML files with different values.
Let’s build a simple project to understand the templating in Express. We will use the pug templating engine which is very popular and recommended by Express as well. We have used Pug for this website as well, in fact, this page is rendered using Pug templates.
Let’s install our dependencies.
Below is our Express server code.
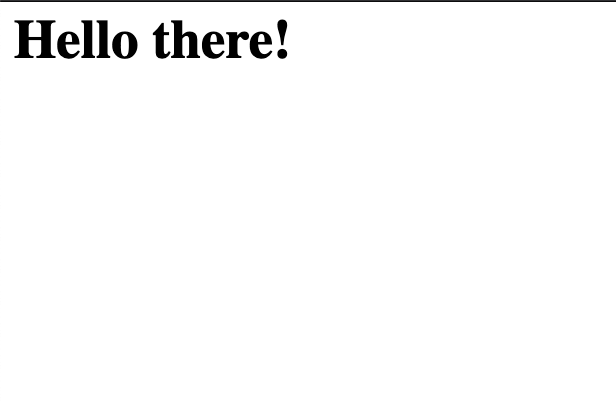
const express = require("express"); const app = express(); const path = require("path"); const router = express.Router(); app.set("view engine", "pug"); app.set("views", path.join(__dirname, "views")); router.get("/", (req, res) => < res.render("index"); >); router.get("/about", (req, res) => < res.render("about", < title: "Hey", message: "Hello there!" >); >); app.use("/", router); app.listen(process.env.port || 3000); console.log("Running at Port 3000"); Observe in routers, we are passing dynamic values to Pug templates. Here is the code of Pug templates residing in the views directory.
html head title Render HTML using PUG body h1 Welcome
html head title= title body h1= message
After running this code, navigate your browser to localhost:3000/about, you should see an HTML output rendered using Pug templates.
Awesome. These values can be fetched from a database or any other source and rendered using Pug templates.
Related articles about Databases: Database Tutorials
Further reading
Please read some of our best tutorials.
Conclusion
There are scenarios where you need to develop a web server that delivers HTML files like how your apache does. This can be done in Node.js using the sendFile() method and templating can be done using Pug module. However, this is not the optimal use of Node.js but you can use such a feature to achieve a custom web server for your own application.
Reference
Shahid
Founder of Codeforgeek. Technologist. Published Author. Engineer. Content Creator. Teaching Everything I learn!