- How to Set JAVA_HOME Variable in Ubuntu Linux Correctly
- Step 1: Check if JDK is installed
- Step 2: Get the location of JDK executable (Java Compiler)
- Step 3: Setting JAVA_HOME variable
- How to Find JAVA_HOME
- Get started with Spring 5 and Spring Boot 2, through the Learn Spring course:
- > CHECK OUT THE COURSE
- 1. Introduction
- 2. Windows-Specific Ways to Find JAVA_HOME
- 3. macOS and Linux-Specific Ways to Find JAVA_HOME
- 4. Using Java to Find JAVA_HOME
- 5. Conclusion
- How to Set JAVA_HOME Path in Ubuntu 20.04 and Ubuntu 22.04
- Install OpenJDK on Ubuntu
- Install OpenJDK 8
- Install OpenJDK 11
- Install OpenJDK 14
- Install OpenJDK 16
- Install OpenJDK 17
- Install OpenJDK 18
- Set JAVA_HOME Path
- Add JAVA bin directory to the PATH variable
- Test JAVA setup
- Search
- About This Site
- Latest Tutorials
How to Set JAVA_HOME Variable in Ubuntu Linux Correctly
If you are running Java programs on Ubuntu using Eclipse, Maven or Netbeans etc, you’ll need to set JAVA_HOME to your path. Otherwise, your system will complain that “java_home environment variable is not set”.
In this beginner’s tutorial, I’ll show the steps to correctly set Java Home variable on Ubuntu. The steps should be valid for most other Linux distributions as well.
The process consists of these steps:
- Making sure Java Development Kit (JDK) is installed.
- Finding the correct location of JDK executable.
- Setting the JAVA_HOME variable and making the change permanent.
Step 1: Check if JDK is installed
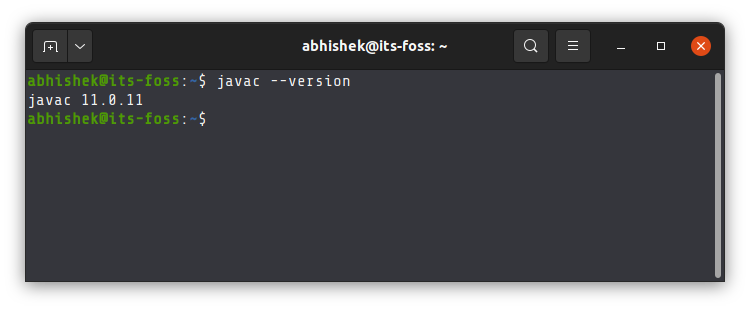
The simplest way to check if Java Development Kit (JDK) is installed on your Linux system is by running this command:
The above command checks the version of Java compiler. If it is installed, it will show the Java version.
If the command shows an error like javac command not found, you’ll have to install JDK.
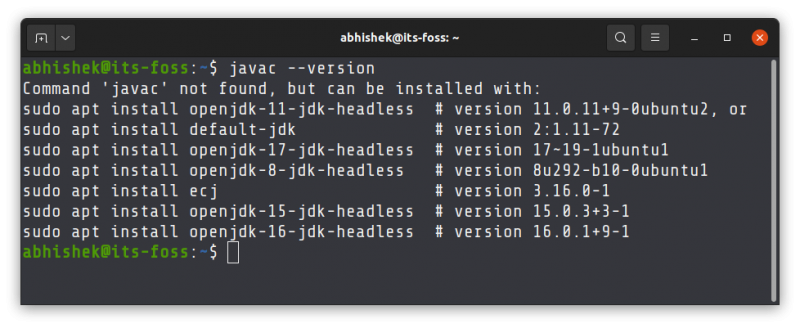
If Java Compiler is not installed on your system, install Java Development Kit using this command:
sudo apt install default-jdkThis will install the default Java version in your current Ubuntu version. If you need some other specific Java version, you’ll have to specify it while installing Java on Ubuntu.
Once you have made sure that Java Compiler is present on your system, it’s time to find its location.
Step 2: Get the location of JDK executable (Java Compiler)
The executable is usually located in the /usr/lib/jvm directory. I won’t left you on your own for a guessing game. Instead, let’s find out the path of the Java executable.
Use the which command to get the location of Java Compiler executable:
The problem here is that the location it gives is actually a symbolic link. You’ll have to follow it a couple of times:
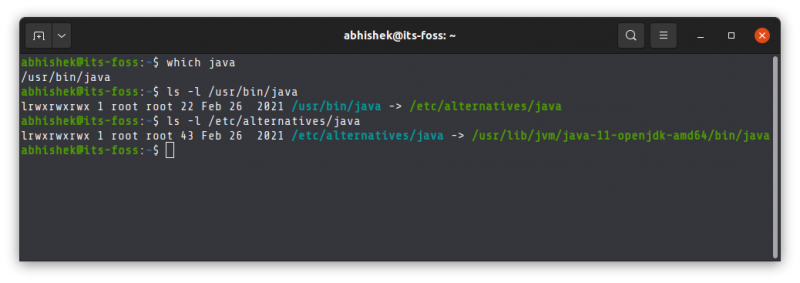
And when you find a path like /usr/lib/jvm/java-11-openjdk-amd64/bin/javac, you remove the /bin/javac from it to get something like /usr/lib/jvm/java-11-openjdk-amd64
An easier method is to follow the symbolic link and get to the actual executable file directly using this command:
readlink -f `which javac` | sed "s:/bin/javac::"The readlink command follows a symbolic link. I have used ` around which java. This is called command substitution and it replaces the command with its output. Sed is then used to replace /bin/javac by nothing and thus removing it altogether.
In my example, the location of the executable file is /usr/lib/jvm/java-11-openjdk-amd64. It could be different for you. Copy the correct path you got from the above command in your system. You know, you can copy paste in the Ubuntu terminal.
Step 3: Setting JAVA_HOME variable
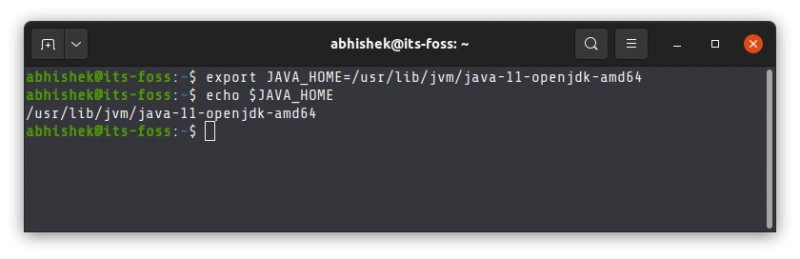
Now that you have got the location, use it to set the JAVA_HOME environment variable:
export JAVA_HOME=/usr/lib/jvm/java-11-openjdk-amd64/bin/javaCheck the value of JAVA_HOME directory:
Try to run your program or project in the SAME TERMINAL and see if it works.
This is not over yet. The JAVA_HOME variable you just declared is temporary. If you close the terminal or start a new session, it will be empty again.
To set JAVA_HOME variable ‘permanently’, you should add it to the bashrc file in your home directory.
You can use the Nano editor for editing files in the Linux terminal. If you do not want that and take a simple copy-paste approach, use the following commands:
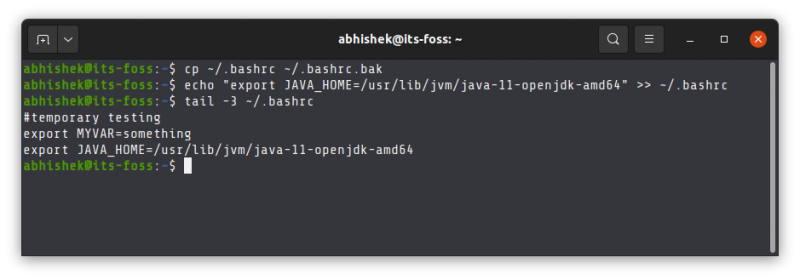
Back up your bashrc file (in case you mess it, you can get it back):
Next, use the echo command to append the export command you used at the beginning of this section. Change the command below to use the correct path as displayed by your system in.
echo "export JAVA_HOME=/usr/lib/jvm/java-11-openjdk-amd64" >> ~/.bashrcVerify that it has been correctly added to the end of the file:
The above tail command will show the last 3 lines of the specified file.
Here’s the entire output of the above three commands.
Now, even if you exit the session or restart the system, the JAVA_HOME variable will still be set to the value you specified. That’s what you want, right?
Do note that if you change the default Java version in the future, you’ll have to change the value of JAVA_HOME and point it to the correct executable path.
I hope this tutorial not only helped you to set Java Home, it also taught you how you are doing it.
If you are still facing issues or have any questions or suggestions, please let me know in the comments.
How to Find JAVA_HOME
![]()
Repeatedly, code that works in dev breaks down in production. Java performance issues are difficult to track down or predict.
Simply put, Digma provides immediate code feedback. As an IDE plugin, it identifies issues with your code as it is currently running in test and prod.
The feedback is available from the minute you are writing it.
Imagine being alerted to any regression or code smell as you’re running and debugging locally. Also, identifying weak spots that need attending to, based on integration testing results.
Of course, Digma is free for developers.
![]()
As always, the writeup is super practical and based on a simple application that can work with documents with a mix of encrypted and unencrypted fields.
![]()
We rely on other people’s code in our own work. Every day.
It might be the language you’re writing in, the framework you’re building on, or some esoteric piece of software that does one thing so well you never found the need to implement it yourself.
The problem is, of course, when things fall apart in production — debugging the implementation of a 3rd party library you have no intimate knowledge of is, to say the least, tricky.
Lightrun is a new kind of debugger.
It’s one geared specifically towards real-life production environments. Using Lightrun, you can drill down into running applications, including 3rd party dependencies, with real-time logs, snapshots, and metrics.
Learn more in this quick, 5-minute Lightrun tutorial:
![]()
Slow MySQL query performance is all too common. Of course it is. A good way to go is, naturally, a dedicated profiler that actually understands the ins and outs of MySQL.
The Jet Profiler was built for MySQL only, so it can do things like real-time query performance, focus on most used tables or most frequent queries, quickly identify performance issues and basically help you optimize your queries.
Critically, it has very minimal impact on your server’s performance, with most of the profiling work done separately — so it needs no server changes, agents or separate services.
Basically, you install the desktop application, connect to your MySQL server, hit the record button, and you’ll have results within minutes:
![]()
DbSchema is a super-flexible database designer, which can take you from designing the DB with your team all the way to safely deploying the schema.
The way it does all of that is by using a design model, a database-independent image of the schema, which can be shared in a team using GIT and compared or deployed on to any database.
And, of course, it can be heavily visual, allowing you to interact with the database using diagrams, visually compose queries, explore the data, generate random data, import data or build HTML5 database reports.
Get started with Spring 5 and Spring Boot 2, through the Learn Spring course:
> CHECK OUT THE COURSE
1. Introduction
In this quick tutorial, we’ll learn how to find JAVA_HOME on Windows, Mac, and Linux.
As we all know, JAVA_HOME is an environment variable that we commonly use to locate java executables, like java and javac.
2. Windows-Specific Ways to Find JAVA_HOME
If we’re using Windows as the operating system, first we need to open up our command line (cmd) and type:
If JAVA_HOME is defined in our environment, then the above command will print it out.
Or to show the location of the java executable, we can try:
3. macOS and Linux-Specific Ways to Find JAVA_HOME
If we’re using either macOS or Linux, we can open up our terminal and type:
If JAVA_HOME is defined in our environment, then the above command will print it out.
This probably just shows us /usr/bin/java, which really isn’t very helpful since it’s a symbolic link. To unravel this, we’ll use dirname and readlink.
dirname $(dirname $(readlink -f $(which javac)))$(dirname $(readlink $(which javac)))/java_homeThis command prints the currently used java folder.
4. Using Java to Find JAVA_HOME
If we’re able to run java ourselves, then we have a nearly platform-independent way as well:
java -XshowSettings:properties -versionRunning this command outputs numerous properties, one of them being java.home.
To parse it though, we’ll still need a platform-specific tool.
For Linux and macOS, we’ll use grep:
java -XshowSettings:properties -version 2>&1 > /dev/null | grep 'java.home' For Windows, we’ll use findstr:
java -XshowSettings:properties -version 2>&1 | findstr "java.home"5. Conclusion
In this brief article, we learned how to find JAVA_HOME on different operating systems.
If this didn’t work though, it’s possible we didn’t set the JAVA_HOME variable properly while installing Java.
![]()
Slow MySQL query performance is all too common. Of course it is. A good way to go is, naturally, a dedicated profiler that actually understands the ins and outs of MySQL.
The Jet Profiler was built for MySQL only, so it can do things like real-time query performance, focus on most used tables or most frequent queries, quickly identify performance issues and basically help you optimize your queries.
Critically, it has very minimal impact on your server’s performance, with most of the profiling work done separately — so it needs no server changes, agents or separate services.
Basically, you install the desktop application, connect to your MySQL server, hit the record button, and you’ll have results within minutes:
How to Set JAVA_HOME Path in Ubuntu 20.04 and Ubuntu 22.04

Many Java-based programs require the Java Runtime Environment (JRE) to run smoothly regardless of the operating system. For development, most IDEs like Eclipse and NetBeans require the Java Development Kit (JDK) on your computer. Whether you’re a newbie who wants to learn how to develop or an application you have installed requires a Java installation on your system, we’ve got you covered. Setting up the JAVA_HOME path is quite simple.
In this tutorial, we will learn how to install the JDK on Ubuntu 20.04 and Ubuntu 22.04 and set up the Java_HOME path. Let’s start with the installation of the JDK.
Install OpenJDK on Ubuntu
Note: Make sure that you have updated the Advanced Package Tool (APT) before you move forward to install OpenJDK.
Press Ctrl + Alt + T to open the terminal and enter the following command mentioned in the box. You can either install OpenJDK 8 or the newer versions OpenJDK 11 to OpenJDK 18. Not all versions are available on any Ubuntu version, you can check for available versions with the command:
Install OpenJDK 8
sudo apt install openjdk-8-jdk
Install OpenJDK 11
sudo apt install openjdk-11-jdk
Install OpenJDK 14
sudo apt install openjdk-14-jdk
Install OpenJDK 16
sudo apt install openjdk-16-jdk
Install OpenJDK 17
sudo apt install openjdk-17-jdk
Install OpenJDK 18
sudo apt install openjdk-18-jdk
You will be prompted to enter your sudo password to continue with the installation.

Once you’ve entered that, wait for the system to finish the installation and then move on to step 2.
Set JAVA_HOME Path
All you have to do now is to set the “JAVA_HOME” and “PATH” environment variables and then you are done. Enter the following commands to set your environment variables. Make sure that your environment variables point to a valid installation of JDK on your machine. For Ubuntu 18.04, the path is /usr/lib/jvm/java-8-openjdk-amd64/
export JAVA_HOME=/usr/lib/jvm/java-8-openjdk-amd64
To check whether your JAVA_HOME path has been successfully saved, enter the following command to check.
The value stored in the JAVA_HOME variable will be displayed on the terminal as you can see in the screenshot

Add JAVA bin directory to the PATH variable
Like we have added JAVA_HOME path, we will now update the PATH variable as well. To do that, enter the following command on the terminal.
export PATH=$PATH:$JAVA_HOME/bin
This will append the java bin directory to the existing PATH variable. You can also check the PATH variable by entering the following command

Test JAVA setup
You have successfully installed OpenJDK on your machine. You can verify your installation by entering the following command on your terminal.

Through this simple tutorial, you have now configured the JAVA_HOME variable in your operating system. You can now easily run java based applications as well as development environments on your machine.
Search
About This Site
Vitux.com aims to become a Linux compendium with lots of unique and up to date tutorials.