- CSS Buttons
- Example
- Button Sizes
- Example
- Example
- Rounded Buttons
- Example
- Colored Button Borders
- Example
- Hoverable Buttons
- Example
- Shadow Buttons
- Example
- Disabled Buttons
- Example
- Button Width
- Example
- Button Groups
- Example
- Bordered Button Group
- Example
- Vertical Button Group
- Example
- Button on Image
- Animated Buttons
- Example
- Example
- Example
- Example
- HTML button tag | link, onClick, style, color, size, Code example
- Syntax:
- HTML button tag Example:-
- HTML button link
- HTML button onclick | Event Attribute
- HTML button size
- HTML button background color & text color
- Q: How to create a radio button?
- Q: How to HTM L button disabled?
- HTML Button Size
- HTML Button Size
- HTML Button Size
- Tutorials
- CSS Button Size
- Example 01:
- Example 02: Using Inline CSS to Alter the Size of a Button in an HTML File
- Example 03: Increasing the Size of a Button When It Hovers With Our Cursor in an HTML File
- Example 04: Using the Font Size to Enhance the Size of a Button Using CSS
- Conclusion
- About the author
- Aqsa Yasin
CSS Buttons
Use the background-color property to change the background color of a button:
Example
Button Sizes
Use the font-size property to change the font size of a button:
Example
Use the padding property to change the padding of a button:
10px 24px 12px 28px 14px 40px 32px 16px 16px
Example
.button1
.button2
.button3
.button4
.button5
Rounded Buttons
Use the border-radius property to add rounded corners to a button:
Example
Colored Button Borders
Use the border property to add a colored border to a button:
Example
Hoverable Buttons
Use the :hover selector to change the style of a button when you move the mouse over it.
Tip: Use the transition-duration property to determine the speed of the «hover» effect:
Example
.button <
transition-duration: 0.4s;
>
.button:hover background-color: #4CAF50; /* Green */
color: white;
>
.
Shadow Buttons
Use the box-shadow property to add shadows to a button:
Example
.button1 <
box-shadow: 0 8px 16px 0 rgba(0,0,0,0.2), 0 6px 20px 0 rgba(0,0,0,0.19);
>
.button2:hover box-shadow: 0 12px 16px 0 rgba(0,0,0,0.24), 0 17px 50px 0 rgba(0,0,0,0.19);
>
Disabled Buttons
Use the opacity property to add transparency to a button (creates a «disabled» look).
Tip: You can also add the cursor property with a value of «not-allowed», which will display a «no parking sign» when you mouse over the button:
Example
Button Width
By default, the size of the button is determined by its text content (as wide as its content). Use the width property to change the width of a button:
Example
Button Groups
Remove margins and add float:left to each button to create a button group:
Example
Bordered Button Group
Use the border property to create a bordered button group:
Example
Vertical Button Group
Use display:block instead of float:left to group the buttons below each other, instead of side by side:
Example
Button on Image

Button
Animated Buttons
Example
Example
Add a «pressed» effect on click:
Example
Example
Add a «ripple» effect on click:
HTML button tag | link, onClick, style, color, size, Code example
HTML button is very important for any website, without it users can’t use functionalists of the website. With HTML Button Tag (Element) you can create a button. Another way is using the input tag to create a button.

Syntax:
HTML button tag Example:-
Creating button in HTML very easy, just use tag. Write a text (a test will show to users on the website) between open and close tags.
HTML button link
There are many ways to create a link in a button, Here is a simple way to do it. Use tag then tag. In anchor tag use the href attribute and value of it your target website .
HTML button onclick | Event Attribute
OnClick is an event attribute, which runs a script when a button is clicked by the user. It instructs the browser to do the task on clicks a button.
Example of OnClick attribute in button element:-
Code:- onClick button function called “myFunction()” and the script will pop up an alert box.
The onclick Event
function myFunction() 
HTML button size
You can change the size of button using CSS. See below example how to do it with inline CSS.
Note: You can’t be done with pure HTML/JS, you will need CSS.

HTML button background color & text color
You can Assigning background color and text-color to button in HTML suing CSS.
You need to keep all of your style properties in a single tag and separate them with semi-colons. Other ways are using the CSS class or ID.
See Below example code how to change the background color and test color of button in html.

Q: How to create a radio button?
Answer: To create a radio button in HTML you have to use input tag:
Q: How to HTM L button disabled?
Answer: To disable button in HTML use “ disabled “ attribute. Where a disabled attribute is a Boolean attribute.
Do comment if you have any doubt and suggestions on this tutorial.
Note: The All Examples code of HTML button element is tested on the Safari browser (Version 12.0.2).
OS: macOS 10.14 Catalina
Code: HTML 5 Version
HTML Button Size
The Tutorial illustrate an example from HTML Button size. In this Tutorial we create a HTML page, which display you HTML Button with attribute width and height specified.

HTML Button Size
HTML Button Size
Button in HTML is used to submit HTML page.
Understand with Example
The Tutorial illustrate an example from HTML Button size. In this Tutorial we create a HTML page, which display you HTML Button with attribute width and height specified.
Here is the video tutorial of «How to specify button size in HTML?»:
The tag indicate a push button.
The difference between the element and button created with the input element is that you can insert a content like image or text inside it.
Tutorials
- HTML
- Displaying images using Javascript
- Making Tab using Javascript
- Table Caption in HTM
- Use of Text Field
- Text Field in HTML
- Text Area in HTML
- Table & the Border attribute
- Set Background Colors and Images in HTML
- Radio Buttons in HTML
- Password Field in HTML
- Paragraph in HTML
- Unordered Lists
- Show Hyperlink in HTML Page
- Horizontal Rule in HTML
- Horizontal Rule Attribute in HTML
- Cascading Style Sheet(CSS)
- Action Submit Html
- Check Box in HTML
- Style Tags Used in HTML
- Styles in HTML
- Alignment of Image in HTML
- Send E-mail in HTML
- Horizontal Frameset in HTML
- Vertical Frameset in HTML
- Mixed Frameset in HTML
- Navigation Frame in HTML
- Set Frame Inside HTML
- HTML Post Radio Button
- HTML Post Image
- HTML Get Radio Button
- HTML get Method
- HTML File Upload
- Table Heading in HTML
- Table Empty Cell in HTML
- Tag Inside Table in HTML
- HTML Button Size
- Introduction to HTML
- HTML Elements
- Form and its Elements
CSS Button Size
![]()
This article will go over the concept of the button size in the CSS style approach. As we know, the default button is small in size and is not visible. So, we will use the CSS in two separate ways to increase the button size and alter it on an effect like the hover effect. All these examples will be performed in the Notepad++ environment.
Example 01:
In this example, we will use the width and height property for the button element to increase its size. We will use the CSS Style Tag approach in this example to add several properties. First, we will look at the default size of the button element present in an HTML file.
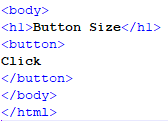
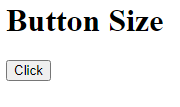
As we can see in the given script, we have not altered the size of the button. In the following output, we can see that the button size is very small and is not feasible for a web page.
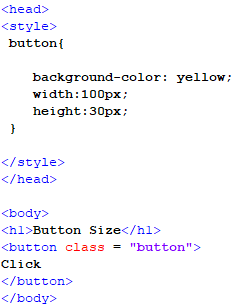
So, now we add the styling to the button. First, we open the head tag for the file. In this tag, the style tag for CSS is called. In this tag, we add all the properties for the button element. We write all the properties for the button element inside the button class parenthesis. First, we set the background color to “yellow”. Then, we set the width in pixel format to “100px”. Finally, we set the height in pixel format to “30px”. We close the style and head tags after all of the formatting are complete. Then, we go to the body tag. We write the page’s headline using the h1 tag in the body tag and then open the button tag. The class from the style tag is called in the button tag. Following that, we close the button tag with the text that displays on the button in between, as well as the body tag.
As explained earlier, we added the code in the previous script. Now, we open this new script on our browser after saving it in the correct format.
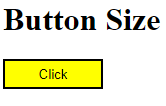
In the given output, we can see that the button has all the formatting including the size that we specified in the style class in the file header.
Example 02: Using Inline CSS to Alter the Size of a Button in an HTML File
In this example, we will use the inline CSS to change the size of an HTML file’s default button element. All the style properties will be assigned inside the button tag. This is an unconventional method to add CSS to any element and will only be associated with the current element.

As we can see in the previous snippet, we directly moved to the body of the file as all the content would be in the body tag. First, we open the h1 tag to write a heading for the page and then close it. Then, we open the button tag. In this tag, we call the style attribute by its keyword. After this, we write all the properties for the button element in the inverted commas and separate them by using the semicolon character. First, we assign the background color, “yellow”. Then, we assign the width in the pixel format. In the end, we assign the height, also in the pixel format. After this, we close the button tag with the text in between, which will appear on the button. And close the body tag along with it. Now, we save this file in the “.html” format and open it on our browser to get the following result:
As we can see in the output of our script, the heading and button from the body tag are visible. The button has all of the values defined in the tag, including the height and width.
Example 03: Increasing the Size of a Button When It Hovers With Our Cursor in an HTML File
In this example, we will use the width and height properties of the button element to make it bigger, only when the pointer is over it. In this example, we will use the CSS style tags to add numerous attributes and effects to the button element.
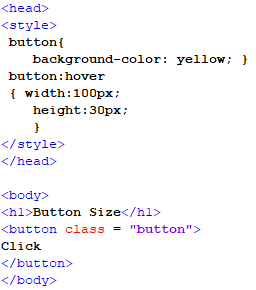
In this example, we customize the button using the CSS style tags. First, we open the file’s head tag. And then, we call the CSS style tag from there. We add all of the button element’s attributes in this tag. Inside the button class parenthesis, we enter all of the properties for the button element; in this example, we set the background color to “yellow.” Then, we open a button class that inherits a method called “hover”. In this function, we do the following: we set the width in pixel format to “100px” and set the height in pixel format to “30px”. After we finish formatting, we close the style and head tags. Then, we go to the body tag. We use the h1 tag to create the page’s title in the body tag, then open the button tag. The button tag uses the class from the style tag and have the text that appears on the button in between. Following that, we close the button tag and the body tag.

As we can see in the previous output, the size and the background color have changed as we hovered on the button with our cursor. This is because the hover function has all these properties defined in the style tag of the header’s file.
Example 04: Using the Font Size to Enhance the Size of a Button Using CSS
In this example, we will opt to a different method to change the size of a button. The font size property will be used to increase the size of a button using the style tag CSS.
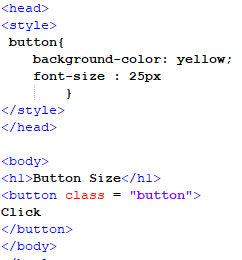
First, we open the style tag in the file header and create a styling class for the button. In this class, we assign a background color to the button. After that, we assign the font size as well. In this case, it is set to “25px”. Then, we close the class and the style and head tags, respectively. Then the body tag has a heading and a button tag which have the style tag class inherited in it. After this, we close the tags and save the file to open it on our browser.
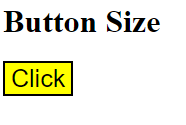
In the output screen, we can see that the button has an increased size from the default button that the HTML provides due to the change in the font size property.
Conclusion
In this article, we discussed the size of the button element present in the Hypertext Markup Language. The default button has a very small size which makes it difficult to navigate on a web page. So, we used the different approaches in CSS like the style tag and inline CSS approach. The most common property used to alter the size are the width and height property of a button. We discussed this concept and implemented this on the Notepad++. We also implemented the font size approach to increase the size of a button.
About the author
Aqsa Yasin
I am a self-motivated information technology professional with a passion for writing. I am a technical writer and love to write for all Linux flavors and Windows.