- Developing Spring Boot applications with Kotlin
- What is Kotlin?
- A sample Spring Boot + Kotlin project
- Additional tips
- Array annotation attribute
- Property injection
- Property placeholders
- Jackson Kotlin Module
- Experiment with the Java to Kotlin converter
- Feedbacks
- Наипростейший RESTful сервис на Kotlin и Spring boot
- Подготовка проекта
- Код
- Сущность Product
- Репозиторий ProductRepository
- Сервисный слой ProductService
- Контролер ProductsController
- Настройка приложения
- Тестирование
Developing Spring Boot applications with Kotlin
Just in time for Kotlin 1.0 release, we are adding support for Kotlin language to https://start.spring.io in order to make it easier to start new Spring Boot projects with this language.
This blog post is also an opportunity for me to explain why I find this language interesting, to show you a sample project in detail and to give you some tips.
What is Kotlin?
Kotlin is a language created by JetBrains. It runs on top of the JVM (but not only), it is an object oriented language that includes many ideas from functional programming. I won’t go too much in details about all Kotlin features (PDF, HTML), but I would like to highlight the ones I find the most interesting:
- Kotlin is a statically typed language, but thanks to its clever type inference, it allows you to write code as short and expressive as dynamic language with performances close to pure Java projects
- Properties support
- Relatively lightweight standard library compared to other languages
- Easy to learn: a Java developer can quickly understand most of the language (this quick comparison to Java is worth to read)
- Java interop is a first class concern and great
- Perfect for Android development
- Built-in immutability and null safety support
- Code is easy to read, efficient to write
- Allows to extend existing libraries without having to inherit from the class or use any type of design pattern such as Decorator
- No semicolon required 😉
You will find a lot of useful links to improve your Kotlin knowledge in this Kotlin digest 2015 blog post. Also have a look to these simple Kotlin exercices to have a quick overview of the language.
A sample Spring Boot + Kotlin project
Kotlin has been designed to play well with the Java ecosystem, and it seems to me that it shares the same pragmatic, innovative and opinionated mindset as Spring Boot, so they play well together. You can have a look at this simple Spring Boot + Spring Data JPA Kotlin project to see more concretely what it looks like.
Kotlin allows to write (and read) your domain model easily thanks to its very concise syntax to declare classes. You can see that Kotlin allows you to specify parameter default values, and types are declared after the name of the variable/parameter:
@Entity class Customer( var firstName: String = "", var lastName: String = "", @Id @GeneratedValue(strategy = GenerationType.AUTO) var id: Long = 0 ) The Spring MVC REST controller you can see below is using constructor level injection, and default visibility in Kotlin is public so no need to specify it. When a function returns a single expression, the curly braces can be omitted and the body is specified after a = symbol. It is even better since the return type can be inferred by the compiler.
@RestController class CustomerController (val repository:CustomerRepository) < @GetMapping("/") fun findAll() = repository.findAll() @GetMapping("/") fun findByLastName(@PathVariable name:String) = repository.findByLastName(name) > The Spring Data repository is self explanatory:
interface CustomerRepository : CrudRepository < fun findByLastName(name: String): List> Since Kotlin supports top-level functions, you can declare your application as simple as:
@SpringBootApplication class Application < @Bean fun init(repository: CustomerRepository) = CommandLineRunner < repository.save(Customer("Jack", "Bauer")) repository.save(Customer("Chloe", "O'Brian")) repository.save(Customer("Kim", "Bauer")) repository.save(Customer("David", "Palmer")) repository.save(Customer("Michelle", "Dessler")) >> fun main(args: Array) You need to use the kotlin-spring plugin to make automatically @Configuration classes and some others @Service or @Repository as open because they cannot be final in Spring due to CGLIB proxy usage (classes and methods in Kotlin are final by default without the open modifier). Beans using JDK dynamic proxies do not require open modifier.
Additional tips
Even if Spring Boot and Kotlin work pretty well together, these additional tips are worth to know. See this issue about improving Kotlin support in Spring Boot for more details.
Array annotation attribute
Unlike Java, Kotlin currently does not allow to specify array annotation attribute as a single value except for value attribute, so be aware that you will have to write @RequestMapping(method = arrayOf(RequestMethod.GET)) or @EnableAutoConfiguration(exclude = arrayOf(Foo::class)) .
This behavior is expected to be improved in the upcoming Kotlin 1.2 (see this Kotlin issue for more details). Spring Framework 4.3 composed annotation like @GetMapping or @PostMapping can also help.
Property injection
We have seen previously how to do constructor injection, since that’s the recommended approach (especially with Kotlin). If you have to perform property injection, you will have to use late-initialized properties because normally, raw properties declared as having a non-null type must be initialized in the constructor.
@RestController class CustomerController < @Autowired lateinit var repository:CustomerRepository // . >Property placeholders
$ is used for String interpolation in Kotlin, so you should escape it when using property placeholders: @Value(«\$») . As an alternative you can also use @ConfigurationProperties instead, see this Stack Overflow answer for more details.
Jackson Kotlin Module
If you are using Jackson you are likely to want to add com.fasterxml.jackson.module:jackson-module-kotlin dependency in order to allow it to deal with data classes with no default constructor or with Kotlin collections. It will be automatically register by Spring Framework 4.3+.
Experiment with the Java to Kotlin converter
Last tip, the Java to Kotlin converter available in IntelliJ IDEA (Menu Code -> Convert Java file to Kotlin file) is quite useful when you can’t figure out how to write something in Kotlin. So do not hesitate to write something in Java and use it to find the Kotlin counterpart. This comparison to Java documentation can also provide some help.
Feedbacks
We are interested by your feedbacks about developing Spring applications with Kotlin. This blog post is just an introduction, there is much more to say especially about using Spring Boot with more Kotlin idiomatic code like with Exposed SQL library, so stay tuned (update : this next Kotlin blog post is now available here) .
Наипростейший RESTful сервис на Kotlin и Spring boot

Со времен релиза Kotlin прошло уже более года, да и Spring boot претерпел изменения. Наткнувшись на статью о том как написать простой RESTful сервис используя Kotlin и Spring boot, захотелось написать о том как же это можно сделать сегодня.
Эта небольшая статья ориентированна на тех кто никогда не писал код на Kotlin и не использовал Spring boot.
Подготовка проекта
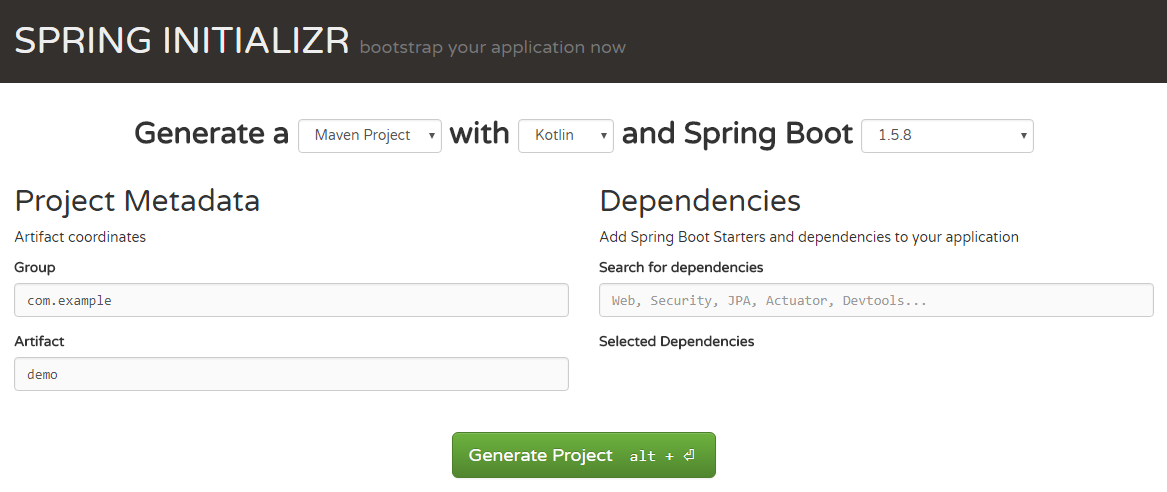
Для начала идем на сайт Spring Initializr для формирования шаблона приложения. Заполняем форму и скачиваем полученную заготовку:
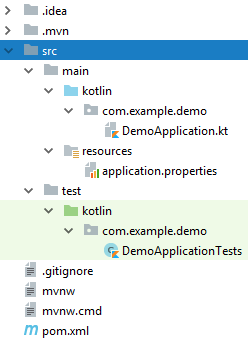
Получаем шаблон проекта со следующей структурой:
Добавляем пару зависимостей (можно указать при генерации шаблона приложения) необходимых для реализации MVC:
org.springframework.boot spring-boot-starter-data-jpa org.springframework.boot spring-boot-starter-data-rest А так же драйвер БД (в данном случае MySql)
mysql mysql-connector-java runtime 6.0.6 Код
Наш сервис будет состоять из одной сущности Product которая имеет свойства name и description . Так же мы опишем Repository и Controller . Весь код не для «пользователей» будем писать в пакете com.example.demo.system , а клиентский код положим в com.example.demo.service
Сущность Product
Создадим файл models.kt в неймспейсе com.example.demo.system и добавим туда следующий код:
package com.example.demo.system import javax.persistence.* import com.fasterxml.jackson.annotation.* @Entity // Указывает на то что этот класс описывает модель данных @Table(name = "products") // Говорим как назвать таблицу в БД data class Product( // Дата класс нам сгенерирует методы equals и hashCode и даст метод copy @JsonProperty("name") // Говорим как будет называться свойство в JSON объекте @Column(name = "name", length = 200) // Говорим как будет называться поле в БД и задаем его длину val name: String = "", // Объявляем неизменяемое свойство (геттер, а также поле для него будут сгенерированы автоматически) name, с пустой строкой в качестве значения по умолчанию @JsonProperty("description") @Column(name = "description", length = 1000) val description: String = "", @Id // Сообщяем ORM что это поле - Primary Key @JsonProperty("id") @Column(name = "id") @GeneratedValue(strategy = GenerationType.AUTO) // Также говорим ему что оно - Autoincrement val id: Long = 0L )Репозиторий ProductRepository
Создадим файл repositories.kt в неймспейсе com.example.demo.system с тремя строчками кода:
package com.example.demo.system import org.springframework.data.repository.* interface ProductRepository : CrudRepository // Дает нашему слою работы с данными весь набор CRUD операцийСервисный слой ProductService
Создаем файл ProductService.kt в неймспейсе com.example.demo.service со следующим кодом:
package com.example.demo.service import com.example.demo.system.* import org.springframework.stereotype.Service @Service // Позволяем IoC контейнеру внедрять класс class ProductService(private val productRepository: ProductRepository) < // Внедряем репозиторий в качестве зависимости fun all(): Iterable= productRepository.findAll() // Возвращаем коллекцию сущностей, функциональная запись с указанием типа fun get(id: Long): Product = productRepository.findOne(id) fun add(product: Product): Product = productRepository.save(product) fun edit(id: Long, product: Product): Product = productRepository.save(product.copy(id = id)) // Сохраняем копию объекта с указанным id в БД. Идиоматика Kotlin говорит что НЕ изменяемый - всегда лучше чем изменяемый (никто не поправит значение в другом потоке) и предлагает метод copy для копирования объектов (специальных классов для хранения данных) с возможностью замены значений fun remove(id: Long) = productRepository.delete(id) >Контролер ProductsController
Теперь создадим файл controllers.kt в неймспейсе com.example.demo.system со следующим кодом:
package com.example.demo.system import com.example.demo.service.* import org.springframework.http.HttpStatus import org.springframework.web.bind.annotation.* @RestController // Сообщаем как обрабатывать http запросы и в каком виде отправлять ответы (сериализация в JSON и обратно) @RequestMapping("products") // Указываем префикс маршрута для всех экшенов class ProductsController(private val productService: ProductService) < // Внедряем наш сервис в качестве зависимости @GetMapping // Говорим что экшен принимает GET запрос без параметров в url fun index() = productService.all() // И возвращает результат метода all нашего сервиса. Функциональная запись с выводом типа @PostMapping // Экшен принимает POST запрос без параметров в url @ResponseStatus(HttpStatus.CREATED) // Указываем специфический HttpStatus при успешном ответе fun create(@RequestBody product: Product) = productService.add(product) // Принимаем объект Product из тела запроса и передаем его в метод add нашего сервиса @GetMapping("") // Тут мы говорим что это GET запрос с параметром в url (http://localhost/products/) @ResponseStatus(HttpStatus.FOUND) fun read(@PathVariable id: Long) = productService.get(id) // Сообщаем что наш id типа Long и передаем его в метод get сервиса @PutMapping("") fun update(@PathVariable id: Long, @RequestBody product: Product) = productService.edit(id, product) // Здесь мы принимаем один параметр из url, второй из тела PUT запроса и отдаем их методу edit @DeleteMapping("") fun delete(@PathVariable id: Long) = productService.remove(id) >Настройка приложения
Создадим схему БД с именем demo и изменим файл application.properties следующим образом:
#------------------------- # Database MySQL #------------------------- # Какой драйвер будем использовать spring.datasource.driver-class-name=com.mysql.cj.jdbc.Driver # Имя пользователя для подключения к БД spring.datasource.username=**** # Пароль подключения к БД spring.datasource.password=**** # Строка подключения с указанием схемы БД, временной зоны и параметром отключающим шифрование данных spring.datasource.url=jdbc:mysql://127.0.0.1:3306/demo?serverTimezone=UTC&useSSL=false #------------------------- # ORM settings #------------------------- # Какой диалект использовать для генерации таблиц spring.jpa.hibernate.dialect=org.hibernate.dialect.MySQL5Dialect # Как генерировать таблицы в БД (создавать, обновлять, никак . ) spring.jpa.hibernate.ddl-auto=create # Выводим в SQL запросы spring.jpa.show-sql=trueВсе готово можно тестировать
Тестирование
Изменим файл DemoApplicationTests в неймспейсе com.example.demo следующим образом:
package com.example.demo import org.junit.* import org.junit.runner.RunWith import org.junit.runners.MethodSorters import org.springframework.http.MediaType import org.springframework.test.web.servlet.MockMvc import org.springframework.boot.test.context.SpringBootTest import org.springframework.test.context.junit4.SpringRunner import org.springframework.web.context.WebApplicationContext import org.springframework.beans.factory.annotation.Autowired import org.springframework.test.web.servlet.setup.MockMvcBuilders.* import org.springframework.test.web.servlet.result.MockMvcResultMatchers.* import org.springframework.test.web.servlet.request.MockMvcRequestBuilders.* @SpringBootTest @RunWith(SpringRunner::class) @FixMethodOrder(MethodSorters.NAME_ASCENDING) // Запускать тесты в алфавитном порядке class DemoApplicationTests < private val baseUrl = "http://localhost:8080/products/" private val jsonContentType = MediaType(MediaType.APPLICATION_JSON.type, MediaType.APPLICATION_JSON.subtype) // Записываем http заголовок в переменную для удобства private lateinit var mockMvc: MockMvc // Объявляем изменяемую переменную с отложенной инициализацией в которой будем хранить mock объект @Autowired private lateinit var webAppContext: WebApplicationContext // Объявляем изменяемую переменную с отложенной инициализацией в которую будет внедрен контекст приложения @Before // Этот метод будет запущен перед каждым тестом fun before() < mockMvc = webAppContextSetup(webAppContext).build() // Создаем объект с контекстом придожения >@Test fun `1 - Get empty list of products`() < // Так можно красиво называть методы val request = get(baseUrl).contentType(jsonContentType) // Создаем GET запрос по адресу http://localhost:8080/products/ с http заголовком Content-Type: application/json mockMvc.perform(request) // Выполняем запрос .andExpect(status().isOk) // Ожидаем http статус 200 OK .andExpect(content().json("[]", true)) // ожидаем пустой JSON массив в теле ответа >// Далее по аналогии @Test fun `2 - Add first product`() < val passedJsonString = """ < "name": "iPhone 4S", "description": "Mobile phone by Apple" >""".trimIndent() val request = post(baseUrl).contentType(jsonContentType).content(passedJsonString) val resultJsonString = """ < "name": "iPhone 4S", "description": "Mobile phone by Apple", "id": 1 >""".trimIndent() mockMvc.perform(request) .andExpect(status().isCreated) .andExpect(content().json(resultJsonString, true)) > @Test fun `3 - Update first product`() < val passedJsonString = """ < "name": "iPhone 4S", "description": "Smart phone by Apple" >""".trimIndent() val request = put(baseUrl + "1").contentType(jsonContentType).content(passedJsonString) val resultJsonString = """ < "name": "iPhone 4S", "description": "Smart phone by Apple", "id": 1 >""".trimIndent() mockMvc.perform(request) .andExpect(status().isOk) .andExpect(content().json(resultJsonString, true)) > @Test fun `4 - Get first product`() < val request = get(baseUrl + "1").contentType(jsonContentType) val resultJsonString = """ < "name": "iPhone 4S", "description": "Smart phone by Apple", "id": 1 >""".trimIndent() mockMvc.perform(request) .andExpect(status().isFound) .andExpect(content().json(resultJsonString, true)) > @Test fun `5 - Get list of products, with one product`() < val request = get(baseUrl).contentType(jsonContentType) val resultJsonString = """ [ < "name": "iPhone 4S", "description": "Smart phone by Apple", "id": 1 >] """.trimIndent() mockMvc.perform(request) .andExpect(status().isOk) .andExpect(content().json(resultJsonString, true)) > @Test fun `6 - Delete first product`() < val request = delete(baseUrl + "1").contentType(jsonContentType) mockMvc.perform(request).andExpect(status().isOk) >>Туториал лишь описывает один из многих вариантов реализации подобных приложений и не претендует вообще ни на что. Любая критика только приветствуется, буду рад узнать где я ошибся.