- @keyframes
- Кратко
- Пример
- Как понять
- Как пишется
- Подсказки
- CSS @keyframes Rule
- The keyframes in the animation sequence
- The keyframe selector
- The acceptable prefixes
- Syntax
- The @keyframes as a keyword
- Example of the @keyframes rule with the background-color property:
- Example of the @keyframes :
- Example of using the @keyframes to make a falling image:
- Values
- Browser support
- Background Color Animation With CSS (Simple Examples)
- TLDR – QUICK SLIDES
- TABLE OF CONTENTS
- DOWNLOAD & NOTES
- QUICK NOTES
- EXAMPLE CODE DOWNLOAD
- CSS BACKGROUND COLOR ANIMATION
- 1) BACKGROUND COLOR TRANSITION
- 2) BACKGROUND COLOR KEYFRAME SEQUENCE
- 3) BACKGROUND COLOR ANIMATION LOOP
- 4) BACKGROUND COLOR ANIMATION WITH OPACITY
- EXTRA BITS & LINKS
- COMPATIBILITY CHECKS
- LINKS & REFERENCES
- YOUTUBE TUTORIAL
- INFOGRAPHIC CHEAT SHEET
- THE END
@keyframes
Как настоящие художники-постановщики, создаём раскадровку для анимации.
Время чтения: меньше 5 мин
Кратко
Скопировать ссылку «Кратко» Скопировано
Директива @keyframes используется для создания ключевых кадров CSS-анимаций.
Пример
Скопировать ссылку «Пример» Скопировано
@keyframes circle-to-square from border-radius: 50%; background-color: red; > to border-radius: 0; background-color: blue; >>@keyframes circle-to-square from border-radius: 50%; background-color: red; > to border-radius: 0; background-color: blue; > >
Как понять
Скопировать ссылку «Как понять» Скопировано
Что из себя представляет любая анимация? Это переход от одного состояния элемента к другому состоянию.
Чтобы рассказать браузеру, с чего начать и чем закончить анимацию, используется директива @keyframes .
Как пишется
Скопировать ссылку «Как пишется» Скопировано
После ключевого слова @keyframes мы должны написать имя анимации. Оно понадобится нам, чтобы связать анимацию для конкретного элемента с ключевыми кадрами. Желательно, чтобы имя анимации было уникальным.
Если в коде встречается несколько директив с одинаковыми именами, то будет воспроизводиться последняя, стоящая ниже по коду анимация.
Ключевые кадры могут прописываться при помощи ключевых слов from (начальный кадр) и to (конечный кадр). Это удобно, если у вас всего два ключевых кадра. Если же кадров больше двух, то можно использовать проценты.
@keyframes circle-to-square from border-radius: 50%; background-color: red; > 50% border-radius: 25%; background-color: green; > to border-radius: 0; background-color: blue; >>@keyframes circle-to-square from border-radius: 50%; background-color: red; > 50% border-radius: 25%; background-color: green; > to border-radius: 0; background-color: blue; > >
Браузер расшифровывает ключевое слово from как 0 % , а ключевое слово to как 100 % .
Подсказки
Скопировать ссылку «Подсказки» Скопировано
💡 Задавайте уникальное имя каждой анимации.
💡 from равно 0 % , to равно 100 % .
💡 Если нужна простая анимация от исходного значения к конечному, то внутри директивы можно указать только финальный кадр.
@keyframes circle-to-square to border-radius: 0; background-color: blue; >>@keyframes circle-to-square to border-radius: 0; background-color: blue; > >
Подробнее об анимациях можно прочитать в статье «CSS-анимации».
CSS @keyframes Rule
The @keyframes at-rule is the basis for keyframe animations used to animate (gradually change from one style to another) many CSS properties. This rule allows specifying what should happen at specific moments during the animation by defining styles for keyframes (or waypoints) along the animation sequence.
The @keyframes is one of the CSS3 properties.
The @keyframes rule and its identifier are followed by a rule sets (i.e. style rules with selectors and declaration blocks, as in normal CSS code) delimited by curly braces.
The keyframes in the animation sequence
In curly braces, keyframe selectors are put, which define keyframes in the animation sequence when the styles should be changed. During the animation sequence, the set of CSS styles can be changed many times.
The keyframe selector
The keyframe declaration block includes CSS properties and their values. The keyframe selector can start with a percentage (%) or with the keywords «from» (same as 0%) and «to» (same as 100%). 0% is a starting point of the animation, 100% is the endpoint.
The acceptable prefixes
The @keyframes rule is fully supported by major browsers. However, for some prefixes are used:
- -webkit- Google Chrome 4.0
- -moz- Mozilla Firefox 5.0
- -webkit- Safari 4.0
- -webkit- Opera 15.0
- -o- Opera 12.0
Syntax
The @keyframes as a keyword
The @keyframes rule consists of a keyword «@keyframes» followed by an identifier (chosen by the developer), which defines the animation. To bind the animation to a certain element this identifier is referred to as a value for the animation-name property.
This is how it looks like:
/* define the animation */ @keyframes your-animation-name < /* style rules */ > /* apply it to an element */ .element < animation-name: your-animation-name; /* OR using the animation shorthand property */ animation: your-animation-name 1s …; >Example of the @keyframes rule with the background-color property:
html> html> head> title>Title of the document title> style> .element < padding: 50px; animation: backgrounds 4s infinite; > @keyframes backgrounds < 0% < background-color: #8ebf42 > 50% < background-color: #1c87c9; > 100% < background-color: #cccccc; > > style> head> body> h2>@keyframes example h2> div class="element">The background of this text is animated. div> body> html>In this example, we animate the background-color property. First, we set an identifier for the animation — bouncing. Then we set keyframe selectors — 0%, 50%, and 100% and define values for the property — green, blue and grey. It means that the background color at the starting point (0%) will be light green until it reaches another keyframe (50%). In the middle of the animation sequence, the background will turn to light blue (from 50%-100%), and at the endpoint (100%) it will be grey.
Example of the @keyframes :
html> html> head> title>Title of the document title> style> div < width: 10px; height: 100px; background: red; border-radius: 50%; position: relative; -webkit-animation: element 4s infinite; animation: element 4s infinite; > @-webkit-keyframes element < 0% < top: 0px; background: #1c87c9; width: 100px; > 100% < top: 200px; background: #8ebf42; width: 150px; > > @keyframes element < 0% < top: 0px; background: #1c87c9; width: 100px; > 100% < top: 200px; background: #8ebf42; width: 150px; > > style> head> body> h2>@keyframes rule example h2> div> div> body> html>Example of using the @keyframes to make a falling image:
html> html> head> title>Title of the document title> style> html, body < height: 90%; > .container < margin: 30px auto; min-width: 320px; max-width: 600px; height: 90%; overflow: hidden; > img < -webkit-transform-origin: left center; -ms-transform-origin: left center; transform-origin: left center; -webkit-animation: fall 5s infinite; animation: fall 5s infinite; > @-webkit-keyframes fall < from < -webkit-transform: rotate(0) translateX(0); transform: rotate(0) translateX(0); opacity: 1; > to < -webkit-transform: rotate(90deg) translateX(200px); transform: rotate(90deg) translateX(200px); opacity: 0.1; > > @keyframes fall < from < -webkit-transform: rotate(0) translateX(0); transform: rotate(0) translateX(0); opacity: 1; > to < -webkit-transform: rotate(90deg) translateX(200px); transform: rotate(90deg) translateX(200px); opacity: 0.1; > > style> head> body> h2>@keyframes example h2> div class="container"> img src="/build/images/w3docs-logo-black.png" alt="W3docs" width="150" height="50" /> div> body> html>Values
Browser support
Background Color Animation With CSS (Simple Examples)
Welcome to a tutorial on how to do background color animation with pure CSS. Once upon a time in the Stone Age of the Internet, doing color animations involves crazy scripts and fighting with digital monsters. But thankfully, it is a breeze with modern CSS.
- Use CSS transition to progressively change the background color.
- Demo
- #demo < transition: background-color 1s >
- document.getElementById(«demo»).style.backgroundColor = «red»;
-
- Use CSS keyframes to specify a sequence of background colors.
- @keyframes col < 0% 50% 100% >
- #demo
That covers the basics, but let us walk through more examples in this guide – Read on!
ⓘ I have included a zip file with all the example code at the start of this tutorial, so you don’t have to copy-paste everything… Or if you just want to dive straight in.
TLDR – QUICK SLIDES

TABLE OF CONTENTS
DOWNLOAD & NOTES
Firstly, here is the download link to the example code as promised.
QUICK NOTES
If you spot a bug, feel free to comment below. I try to answer short questions too, but it is one person versus the entire world… If you need answers urgently, please check out my list of websites to get help with programming.
EXAMPLE CODE DOWNLOAD
Click here to download the source code, I have released it under the MIT license, so feel free to build on top of it or use it in your own project.
CSS BACKGROUND COLOR ANIMATION
All right, let us now get started with the examples of background color animation with CSS.
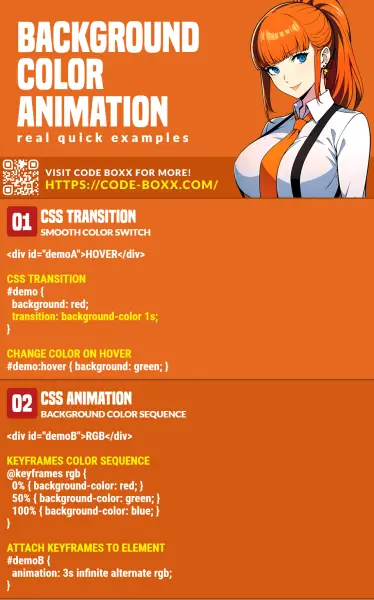
1) BACKGROUND COLOR TRANSITION
#demo < /* (A1) ALL WE NEED : CSS TRANSITION */ transition: background-color 1s; /* (A2) COSMETICS */ width: 100%; height: 100px; background-color: #eee; >/* (A3) BACKGROUND COLOR CHANGE */ #demo.swap
- (B1) We have a that defaults to background-color: #eee .
- (B2) Clicking on the button will toggle the .swap CSS class on #demo , effectively changing it to background-color: #e00 .
- (A1) Normally, the background color change will be instantaneous. But that single line of transition: background-color 1s is all it takes to do animation magic.
2) BACKGROUND COLOR KEYFRAME SEQUENCE
/* (A1) ANIMATION KEYFRAMES — BACKGROUND COLOR SEQUENCE */ @keyframes morph < 0% < background-color: red; >50% < background-color: green; >100% < background-color: blue; >> /* (A2) COSMETICS */ #demo < width: 100%; height: 100px; background-color: #eee; >/* (A3) BACKGROUND COLOR ANIMATION WITH KEYFRAMES */ #demo.swap
- (A1) Start by creating a set of @keyframes to define the sequence of background colors.
- (A3) Then, attach the keyframe sequence to a CSS class.
- (B) This is the same mechanism as the previous example. We only need to attach .swap to #demo , and this will effectively trigger the animation sequence.
3) BACKGROUND COLOR ANIMATION LOOP
/* (A1) BACKGROUND COLOR SEQUENCE */ @keyframes morph < 0% < background-color: red; >33% < background-color: green; >66% < background-color: blue; >100% < background-color: red; >> /* (A2) ATTACH SEQUENCE */ #demo By now, this should be pretty self-explanatory. As above, all we need is to create a set of @keyframes and attach it to an element/class. But in this example, we set the animation to loop infinitely, no Javascript is required to run.
4) BACKGROUND COLOR ANIMATION WITH OPACITY
/* (A1) BACKGROUND COLOR SEQUENCE */ @keyframes morph < 0% < background-color: rgba(0, 0, 0, 0); >50% < background-color: rgba(255, 0, 0, 0.5); >100% < background-color: rgba(0, 255, 0, 1); >> /* (A2) ATTACH SEQUENCE */ #demo Finally, this is for you guys who are wondering how to add opacity to the equation – Simply use rgba() instead of the “usual” hex or color name.
EXTRA BITS & LINKS
That’s all for the main tutorial, and here is a small section on some extras and links that may be useful to you.
COMPATIBILITY CHECKS
CSS animation and transitions are generally well-supported on all modern browsers.
LINKS & REFERENCES
YOUTUBE TUTORIAL
INFOGRAPHIC CHEAT SHEET
THE END
Thank you for reading, and we have come to the end of this short tutorial. I hope that it has helped you to better understand CSS animations on the background color. If you have anything to add to this guide, please feel free to comment below. Good luck and happy coding!