- JSZip Создаем .zip файлы
- Поддерживаемые Браузеры
- Документация
- Преобразовать html в zip
- Какую операционную систему и браузер поддерживает ezyZip?
- Что такое ezyZip?
- How to Create an HTML Archive ZIP
- How to Show File Extensions on Windows
- Organizing your HTML Archive Content
- How to Create a Zip File Containing Your HTML Files
JSZip Создаем .zip файлы
Итак давайте разберем, что тут происходит.
Создается экземпляр нашего zip архива, класс JSZip,.
Далее мы можем добавлять в него любые данные, допустим Hello.txt, также можно добавить папку images.
Далее положить в нее smile.gif, все это завернуть, и отдать вам как zip фаил.
Поддерживаемые Браузеры
| Opera | Firefox | Safari | Chrome |
|---|---|---|---|
| 7.5+ Имя файла «default.zip» | 3.0+ Имя файла набор из символов алфавита с расширением «.part» | Имя файла «Unknown» ( у меня Загруженное ) без расширения | Имя файла «download.zip» |
Думаю про IE я промолчу 🙂
Документация
new JSZip([compressionMethod])
compressionMethod, строка. Метод компрессии используемый в .zip файле.
Доступные методы.
«STORE» без компрессии, по умлочанию.
«DEFLATE» стандартная zip компрессия, нужен файл jszip-deflate.js
var zip = new JSZip(); // тоже что и new JSZip("STORE"); var zip = new JSZip("DEFLATE"); add(name, data [,options])
Добавить файл в наш zip архив. Поддерживает цепочку (chaining)
Опции (options)
base64, булево. Поставьте в true если data кодирована в base64. К примеру картинка из canvas.
binary, булево. По умолчанию в true если data в base64, иначе false
date, Дата. Используйте чтобы установить дату последнего изменения файла. Иначе будет использовано текущее время.
zip.add("Hello.txt", "Hello World\n"); zip.add("smile.gif", "R0lGODdhBQAFAIACAAAAAP/eACwAAAAABQAFAAACCIwPkWerClIBADs=", ); zip.add("magic.txt", "U2VjcmV0IGNvZGU=", ); zip.add("Xmas.txt", "Ho ho ho !", ); zip.add("animals.txt", "dog,platypus\n").add("people.txt", "james,sebastian\n"); Результат: Hello.txt, smile.gif, magic.txt, Xmas.txt, animals.txt, people.txt
folder(name)
zip.folder("images"); zip.folder("css").add("style.css", "body "); // or specify an absolute path (using forward slashes) zip.add("css/font.css", "body ") Результат: images/, css/, css/style.css, css/font.css
find(needle)
Сравнить строку или регулярное выражение со всеми именами файлов и вернуть объект с информацией по каждому совпадению.
zip.add("Readme", "Hello World!\n"); zip.add("Readme.French", "Bonjour tout le monde!\n"); zip.add("Readme.Pirate", "Ahoy m'hearty!\n"); zip.find("Readme"); // only finds "Readme" zip.find(/^Readme/); // Regular expression finds all three remove(name)
Удалить файл или папку
zip.add(»Hello.txt», «Hello World\n»);
zip.add(«temp.txt», «nothing»).remove(«temp.txt»);
zip.add("Hello.txt", "Hello World\n"); zip.folder("css").add("style.css", "body "); zip.remove("Hello.txt").remove("css"); generate(asBytes = false)
Генерирует zip архив. По умолчанию кодированный в base64, передайте true чтобы получить ‘голую’ byte строку.
content = zip.generate(); location.href="data:application/zip;base64,"+content; content = zip.generate(true); for (var c = 0; c < content.length; c++) < console.log(content.charCodeAt(c)); // do other things >Материал подготовлен в редакторе «Руки&Клавиатура»
Преобразовать html в zip
![]()
![]()

(Необязательно) Установите желаемый уровень сжатия, нажав на стрелку вниз рядом с «Конвертировать в ZIP».
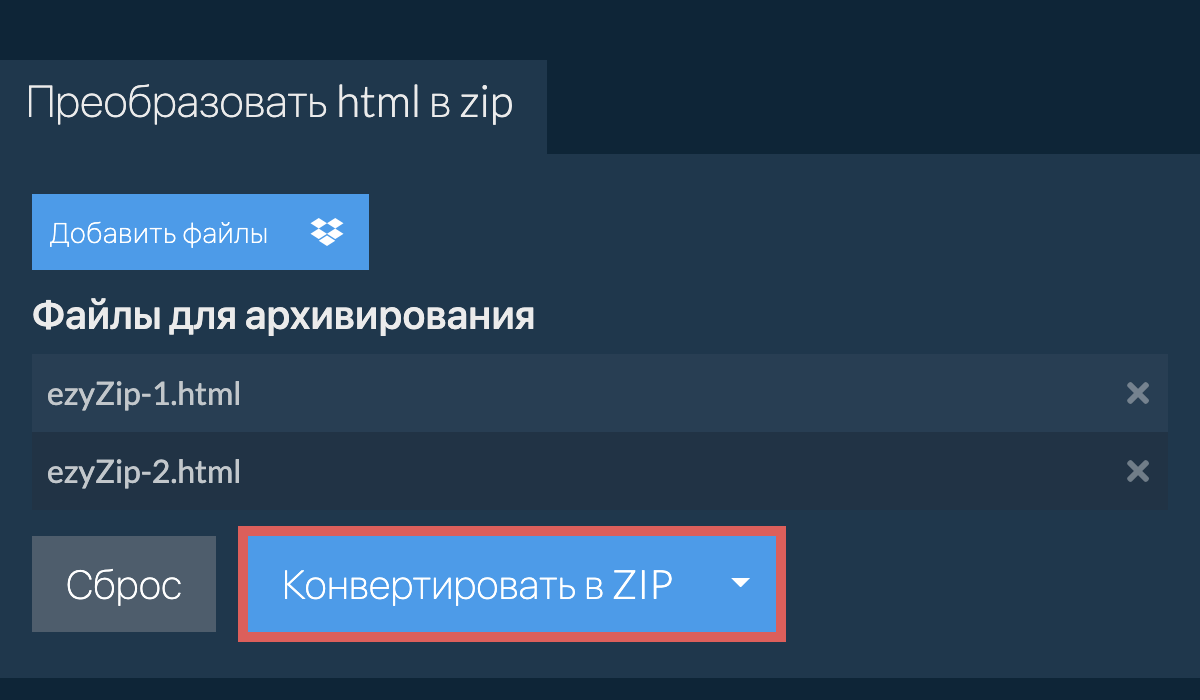
Нажмите «Преобразовать в ZIP». Он инициирует преобразование и автоматически сохранит файл zip на вашем диске по завершении.

Какую операционную систему и браузер поддерживает ezyZip?
ezyZip поддерживает любую ОС, которая может работать с современным браузером. Мы протестировали его для работы с Windows, MacOS, Linux (например, Ubuntu, Mint, Debian), Android, ChromeOS (Chromebook), Android, iOS (iPhone, iPad и iPod Touch).
Убедитесь, что вы используете последнюю версию одного из популярных браузеров или их вариации (например, Chrome, Firefox, Safari, Opera).
Что такое ezyZip?
ezyZip представляет собой онлайн-инструмент для сжатия и распаковки архивов, которое позволяет упаковывать файлы в архив. Он также поддерживает распаковку, что позволяет распаковывать zip-файлы.
В отличие от традиционных онлайн-утилит создания и распаковки архивов, при использовании ezyZip не требуется загружать файлы на сервер или скачивать файлы с сервера. Он работает локально как приложение HTML5/javascript в браузере, благодаря чему он работает гораздо быстрее, чем другие аналогичные онлайн-инструменты создания и распаковки архивов.
How to Create an HTML Archive ZIP
This article describes how to create a .zip file containing your HTML content that can be used in an HTML Archive activity.
How to Show File Extensions on Windows
While this step isn’t required, you may find it very helpful to display file extensions for the different types of files on your computer. This allows you to easily determine both the type of file you are seeing, and it’s complete filename.
To illustrate the difference, below is an image showing the file «index.html» with it’s file extension hidden:

Now below is an image showing the file «index.html» with it’s file extension visible:

This behavior is controlled by a setting in Windows that is easily turned on or off. This can be done using the following instructions:
- Click the Windows «Start» button and select «Computer».
- In the upper left hand corner, click the «Organize» button, and select «Folder and Search Options». This will open the «Folder Options» dialog.
- On the «Folder Options» dialog, select the «View» tab (as seen in the image below).
- Locate the checkbox labeled «Hide extensions for known file types» and uncheck the box.
- Click the «Apply» button in the lower right hand corner.
- Click OK.

You should now see extensions for all files when you browse folders on your computer.
- Click the Windows «Start» button and select «My Computer». In the menu along the top, select «Tools > Folder Options. «. This will open the «Folder Options» dialog.
- On the «Folder Options» dialog, select the «View» tab (as seen in the image below).
- Locate the checkbox labeled «Hide extensions for known file types» and uncheck the box.
- Click the «Apply» button in the lower right hand corner.
- Click OK.

Organizing your HTML Archive Content
The content used for an HTML Archive can be as simple as a single HTML file, or a complex structure of files, folders, and images. This type of structure is very similar to what you would create if you were making a Web site.
The first thing you’ll want to do is create a folder on your computer that will contain all of the files you will be using in your HTML files. As an example, I’ve created a folder on my computer named «My HTML Archive» that I’ve put all of my files that I will be using. You can organize your files any way you wish, but for this example I’ve created two folders named «images» and «pages». The «images» folder contains the file «logo.jpg», and the «pages» folder contains an HTML file named «support.html» as shown below:
.png)


Just like a website, every HTML Archive must have a file that is shown first. This file acts as the entry point that can be used to provide access to other files via hyperlinks. In my example, I’ve created an HTML file called «index.html» which will be the first page that is shown. This file links to the image «logo.jpg» and the HTML file, «support.html» as discussed earlier. While I’ve named my file «index.html», it can be named anything you want, but must be located at the top level, in this case in my containing folder «My HTML Archive», and must also contain the file extension «.html». Whatever you name this file, be sure to make note it, because you will be required to enter its filename in the HTML Archive activity’s settings on the Andromo Website. This filename is also case-sensitive.
How to Create a Zip File Containing Your HTML Files
Once you’re happy with all of your HTML content and have tested it to make sure all links are working properly, the next step is to create a .zip file that will contain your files. This .zip file will be the file that you will be uploading in the HTML Archive activity of your project on the Andromo website.
Creating the .ZIP File in Windows
By default, Windows Vista and Windows 7 has the ability to create .zip files, so this example will illustrate how to create it directly within Windows. If you’re using an earlier OS such as Windows XP, you can download free .zip utility software such WinZip or 7-Zip that can be used to create the zip file.
1) Browse to the Folder
Following the example discussed earlier, browse to the folder containing all of your HTML content, in particular, to the folder containing your index file, which should be directly visible in your containing folder. In this example, I’ve named the folder «My HTML Archive», and my index file is called «index.html». You should see the contents of the folder as seen below (Note: This is shown using «Details» view. You can change your view by selecting the «View» dropdown next to the «Organize» button):
.png)
2) Select the Contents of the Folder
The next step is to select all of the files and folders that you want to include in the .zip file as shown below.

3) Right-click on Selected Files
While all of the files are selected, right-click on one of your files such as your index file and choose «Send To > Compressed (zipped) Folder».

4) Provide a Name for the .ZIP File
Windows will automatically highlight the name of the .zip file so you can rename it. You can name this file anything you want, however you must preserve the «.zip» extension. For this example, I’ve named it «my_html_archive_sample.zip».

Updating Your HTML Archive Activity
———————————————————-
At this point you now have the required files and information in order to update your HTML Archive activity on the Andromo website.
Based on the above example, you’ll need to update 2 settings in your HTML Archive Activity, the .zip file and the HTML index file as discussed below.
The first setting you’ll need to update is the «HTML Archive File». This is the .zip file you’ve just created that you will need to upload by clicking the «Choose File» button. In my example, it’s the file named «my_html_archive_sample.zip».
This is the name of the file that was discussed previously in the section «Organizing your HTML Archive Content» that you’ve specified as the first page to show. The name chosen for this example was «index.html», so this is the full name of the file that needs to be entered there.

You can download the sample HTML Archive ZIP discussed in the above article below:
my_html_archive_sample.zip