Lesson: JDBC Basics
In this lesson you will learn the basics of the JDBC API.
- Getting Started sets up a basic database development environment and shows you how to compile and run the JDBC tutorial samples.
- Processing SQL Statements with JDBC outlines the steps required to process any SQL statement. The pages that follow describe these steps in more detail:
- Establishing a Connection connects you to your database.
- Connecting with DataSource Objects shows you how to connect to your database with DataSource objects, the preferred way of getting a connection to a data source.
- Handling SQLExceptions shows you how to handle exceptions caused by database errors.
- Setting Up Tables describes all the database tables used in the JDBC tutorial samples and how to create and populate tables with JDBC API and SQL scripts.
- Retrieving and Modifying Values from Result Sets develop the process of configuring your database, sending queries, and retrieving data from your database.
- Using Prepared Statements describes a more flexible way to create database queries.
- Using Transactions shows you how to control when a database query is actually executed.
- Using JdbcRowSet Objects
- Using CachedRowSetObjets
- Using JoinRowSet Objects
- Using FilteredRowSet Objects
- Using WebRowSet Objects
- Using Large Objects
- Using SQLXML Objects
- Using Array Objects
- Using DISTINCT Data Type
- Using Structured Objects
- Using Customized Type Mappings
- Using Datalink Objects
- Using RowId Objects
JDBC — Sample, Example Code
This chapter provides an example of how to create a simple JDBC application. This will show you how to open a database connection, execute a SQL query, and display the results.
All the steps mentioned in this template example, would be explained in subsequent chapters of this tutorial.
Creating JDBC Application
There are following six steps involved in building a JDBC application −
- Import the packages − Requires that you include the packages containing the JDBC classes needed for database programming. Most often, using import java.sql.* will suffice.
- Open a connection − Requires using the DriverManager.getConnection() method to create a Connection object, which represents a physical connection with the database.
- Execute a query − Requires using an object of type Statement for building and submitting an SQL statement to the database.
- Extract data from result set − Requires that you use the appropriate ResultSet.getXXX() method to retrieve the data from the result set.
- Clean up the environment − Requires explicitly closing all database resources versus relying on the JVM’s garbage collection.
Sample Code
This sample example can serve as a template when you need to create your own JDBC application in the future. This sample code has been written based on the environment and database setup done in the previous chapter. Copy and paste the following example in FirstExample.java, compile and run as follows −
import java.sql.*; public class FirstExample < static final String DB_URL = "jdbc:mysql://localhost/TUTORIALSPOINT"; static final String USER = "guest"; static final String PASS = "guest123"; static final String QUERY = "SELECT id, first, last, age FROM Employees"; public static void main(String[] args) < // Open a connection try(Connection conn = DriverManager.getConnection(DB_URL, USER, PASS); Statement stmt = conn.createStatement(); ResultSet rs = stmt.executeQuery(QUERY);) < // Extract data from result set while (rs.next()) < // Retrieve by column name System.out.print("ID: " + rs.getInt("id")); System.out.print(", Age: " + rs.getInt("age")); System.out.print(", First: " + rs.getString("first")); System.out.println(", Last: " + rs.getString("last")); >> catch (SQLException e) < e.printStackTrace(); >> >C:\>javac FirstExample.java C:\>
C:\>java FirstExample Connecting to database. Creating statement. ID: 100, Age: 18, First: Zara, Last: Ali ID: 101, Age: 25, First: Mahnaz, Last: Fatma ID: 102, Age: 30, First: Zaid, Last: Khan ID: 103, Age: 28, First: Sumit, Last: Mittal C:\>
Простой пример JDBC для начинающих
Здравствуйте! В этой статье я напишу простой пример соединения с базами данных на Java.Эта статья предназначена новичкам.Здесь я опишу каждую строчку объясню что зачем.
Но для начала немного теории.
JDBC (Java DataBase Connectivity — соединение с базами данных на Java) предназначен для взаимодействия Java-приложения с различными системами управления базами данных (СУБД). Всё движение в JDBC основано на драйверах которые указываются специально описанным URL.
А теперь практика.
Для начала создаём maven проект и в pom.xml помещаем зависимость для соединения с СУБД (В моём случае СУБД будет выступать MySQL):
mysql mysql-connector-java 5.1.38 
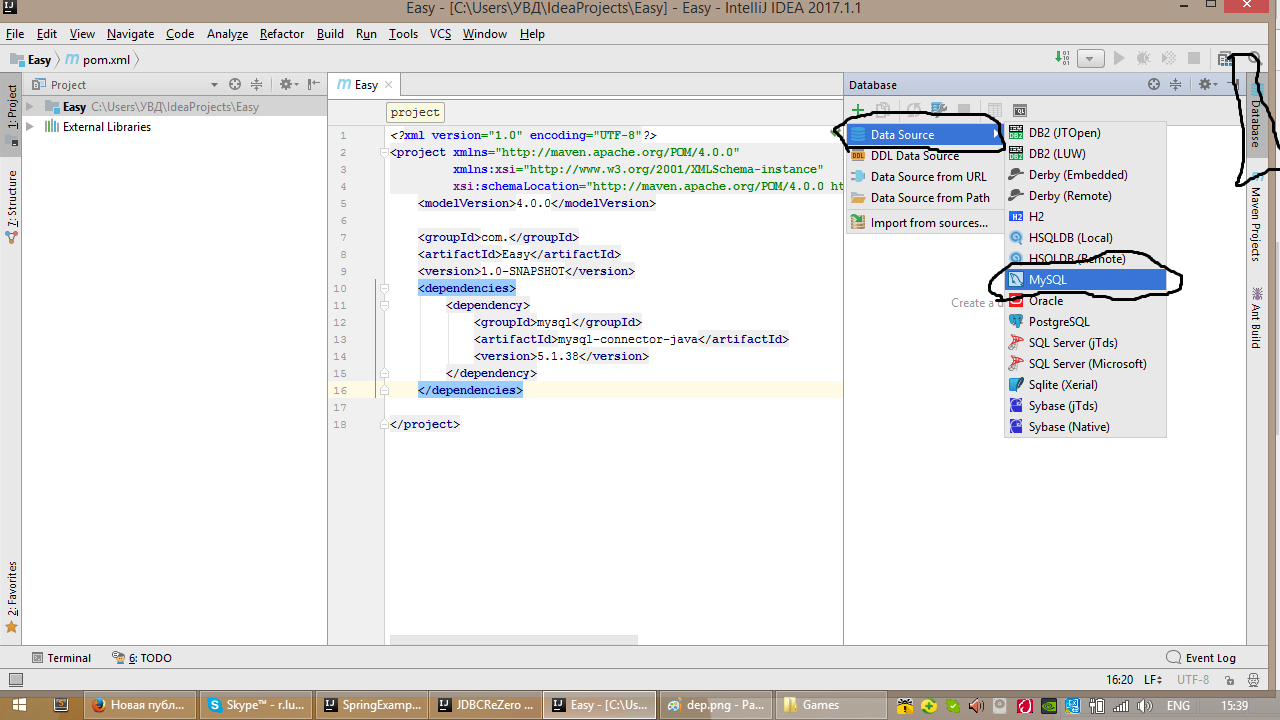
Дальше подключаемся к базе данных нужной вам(я пользуюсь IDEA Ultimate по этому я подключаюсь именно так).
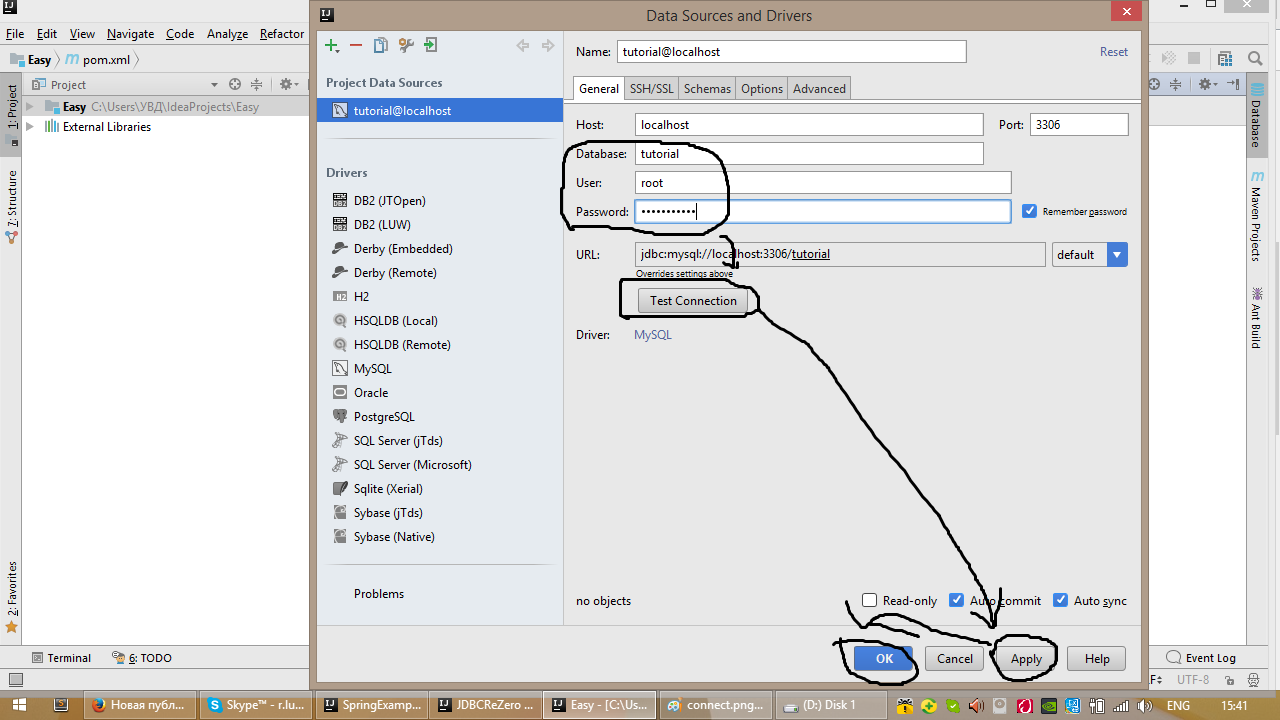
Дальше заполняем Database, User и Password.Обязательно проверяем соединение.
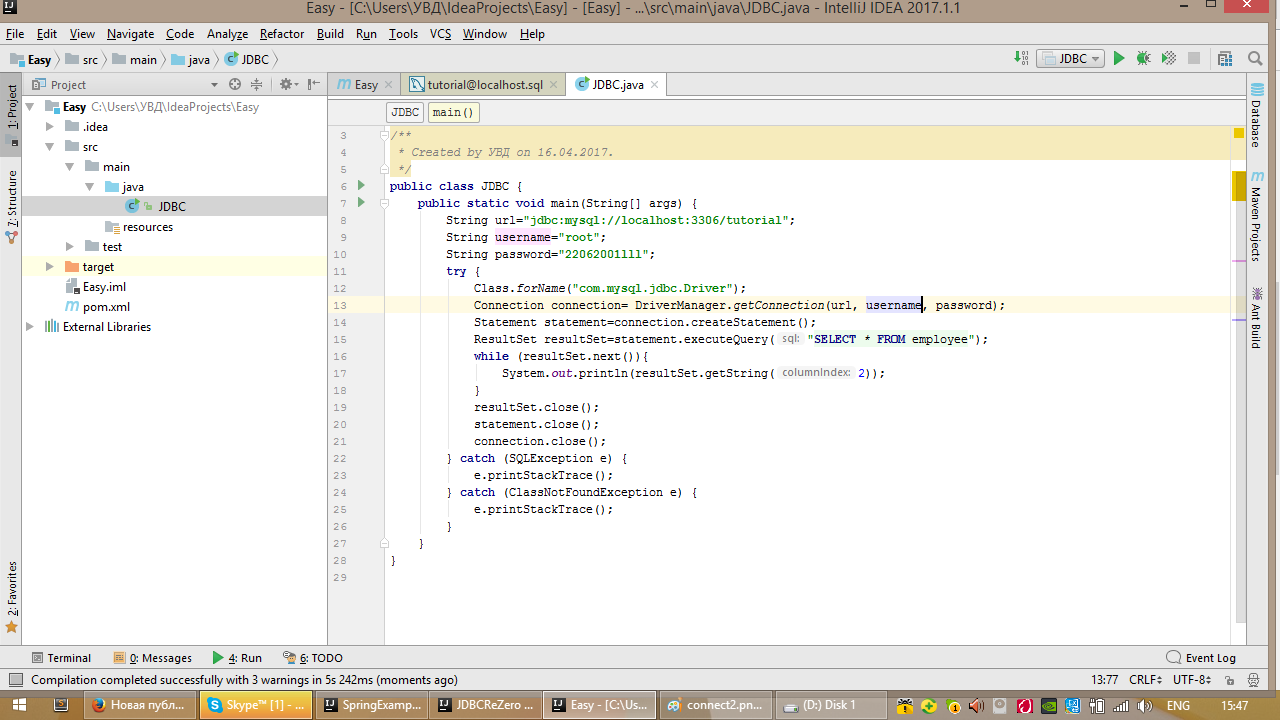
Дальше мы создаём сам класс.
А теперь разберём его построчно:
В начале мы создаём три переменные url,username и password. Образец указания url:
Username по умолчанию root.Password вы должны знать сами.
После с помощью строчки Class.forName(«com.mysql.jdbc.Driver») регестрируем драйвера. Дальше устанавливаем соединение с помощью DriverManager.getConnection (ваш url, username, password).
После с помощью connection (соединения) создаём простой запрос Statement методом createStatement().
Дальше создаём экземпляр класса ResultSet и формируем запрос через statement методом executeQuery (запрос).
Дальше мы заставляем пробежаться resultSet по всей базе данных и вывести то что нам нужно. Так с помощью объекта resultSet и его методов (getString,getInt и т.д. в зависимости от типа переменных в колонке) мы выводим.Так как мой запрос был для того что бы вывести всё, мы можем вывести любую колонку.
После закрываем resultSet,statement и connection (именно в такой последовательности). В процессе он будет показывать ошибки так как будет запрашивать обработку исключений в catch.Так что пишите catch заранее.
Теперь когда практика есть на неё можно наложить более глубокую теорию.Тема правда очень большая, желаю удачи в её изучении.
Processing SQL Statements with JDBC
In general, to process any SQL statement with JDBC, you follow these steps:
This page uses the following method, CoffeesTable.viewTable , from the tutorial sample to demonstrate these steps. This method outputs the contents of the table COFFEES . This method will be discussed in more detail later in this tutorial:
public static void viewTable(Connection con) throws SQLException < String query = "select COF_NAME, SUP_ID, PRICE, SALES, TOTAL from COFFEES"; try (Statement stmt = con.createStatement()) < ResultSet rs = stmt.executeQuery(query); while (rs.next()) < String coffeeName = rs.getString("COF_NAME"); int supplierID = rs.getInt("SUP_ID"); float price = rs.getFloat("PRICE"); int sales = rs.getInt("SALES"); int total = rs.getInt("TOTAL"); System.out.println(coffeeName + ", " + supplierID + ", " + price + ", " + sales + ", " + total); >> catch (SQLException e) < JDBCTutorialUtilities.printSQLException(e); >>Establishing Connections
First, establish a connection with the data source you want to use. A data source can be a DBMS, a legacy file system, or some other source of data with a corresponding JDBC driver. This connection is represented by a Connection object. See Establishing a Connection for more information.
Creating Statements
A Statement is an interface that represents a SQL statement. You execute Statement objects, and they generate ResultSet objects, which is a table of data representing a database result set. You need a Connection object to create a Statement object.
For example, CoffeesTable.viewTable creates a Statement object with the following code:
There are three different kinds of statements:
- Statement : Used to implement simple SQL statements with no parameters.
- PreparedStatement : (Extends Statement .) Used for precompiling SQL statements that might contain input parameters. See Using Prepared Statements for more information.
- CallableStatement: (Extends PreparedStatement .) Used to execute stored procedures that may contain both input and output parameters. See Stored Procedures for more information.
Executing Queries
To execute a query, call an execute method from Statement such as the following:
- execute : Returns true if the first object that the query returns is a ResultSet object. Use this method if the query could return one or more ResultSet objects. Retrieve the ResultSet objects returned from the query by repeatedly calling Statement.getResultSet .
- executeQuery : Returns one ResultSet object.
- executeUpdate : Returns an integer representing the number of rows affected by the SQL statement. Use this method if you are using INSERT , DELETE , or UPDATE SQL statements.
For example, CoffeesTable.viewTable executed a Statement object with the following code:
ResultSet rs = stmt.executeQuery(query);
Processing ResultSet Objects
You access the data in a ResultSet object through a cursor. Note that this cursor is not a database cursor. This cursor is a pointer that points to one row of data in the ResultSet object. Initially, the cursor is positioned before the first row. You call various methods defined in the ResultSet object to move the cursor.
For example, CoffeesTable.viewTable repeatedly calls the method ResultSet.next to move the cursor forward by one row. Every time it calls next , the method outputs the data in the row where the cursor is currently positioned:
ResultSet rs = stmt.executeQuery(query); while (rs.next()) < String coffeeName = rs.getString("COF_NAME"); int supplierID = rs.getInt("SUP_ID"); float price = rs.getFloat("PRICE"); int sales = rs.getInt("SALES"); int total = rs.getInt("TOTAL"); System.out.println(coffeeName + ", " + supplierID + ", " + price + ", " + sales + ", " + total); >// .Closing Connections
When you are finished using a Connection , Statement , or ResultSet object, call its close method to immediately release the resources it’s using.
Alternatively, use a try -with-resources statement to automatically close Connection , Statement , and ResultSet objects, regardless of whether an SQLException has been thrown. (JDBC throws an SQLException when it encounters an error during an interaction with a data source. See Handling SQL Exceptions for more information.) An automatic resource statement consists of a try statement and one or more declared resources. For example, the CoffeesTable.viewTable method automatically closes its Statement object, as follows:
public static void viewTable(Connection con) throws SQLException < String query = "select COF_NAME, SUP_ID, PRICE, SALES, TOTAL from COFFEES"; try (Statement stmt = con.createStatement()) < ResultSet rs = stmt.executeQuery(query); while (rs.next()) < String coffeeName = rs.getString("COF_NAME"); int supplierID = rs.getInt("SUP_ID"); float price = rs.getFloat("PRICE"); int sales = rs.getInt("SALES"); int total = rs.getInt("TOTAL"); System.out.println(coffeeName + ", " + supplierID + ", " + price + ", " + sales + ", " + total); >> catch (SQLException e) < JDBCTutorialUtilities.printSQLException(e); >>The following statement is a try -with-resources statement, which declares one resource, stmt , that will be automatically closed when the try block terminates:
try (Statement stmt = con.createStatement()) < // . >