- How to check whether a radio button is selected with JavaScript?
- Using the checked property of the radio button
- Syntax
- Example
- Using the checked property of the radio button to check whether a radio button is selected.
- Example
- Using the checked property of the radio button to check whether a radio button is selected
- Use the querySelector() method to check whether a radio button is selected
- Syntax
- Example
- Using the querySelector() method to check whether a radio button is selected.
- Input Radio checked Property
- Browser Support
- Syntax
- Property Values
- Technical Details
- More Examples
- Example
- Example
- Example
- Related Pages
- COLOR PICKER
- Report Error
- Thank You For Helping Us!
- How to Check Whether a Radio Button is Selected With JavaScript
- Setting up an HTML Form
- Method 1: Using the getElementsByName()
- Method 2: Using the querySelectorAll() Method
- Conclusion
- About the author
- Shehroz Azam
- JavaScript урок12. Объектная модель документа (продолжение): идентификация в javascript checkbox и radio
- Объект javascript checkbox
- Свойство checked
- Объект переключатель в javascript — radio и свойство checked
How to check whether a radio button is selected with JavaScript?
In the HTML, the radio buttons allow developers to create multiple options for a choice. Users can select any option, and we can get its value and know which option users have selected from the multiple options.
So, it is important to check which radio button the user selects to know their choice from multiple options. Let’s understand it via real-life examples. When you fill out any form and ask to choose a gender, you can see they give you three options, and you can select only one.
In this tutorial, we will learn two approaches to checking whether a radio button is selected using JavaScript.
Using the checked property of the radio button
We can access the radio element in JavaScript using various methods. After that, we can use its checked property to check whether the selected radio button is checked. If the value of the checked property is true, it means the radio button is selected; otherwise, it’s not selected.
Syntax
Users can follow the syntax below to check whether the radio button is selected using the checked property of the radio element.
Male
In the above syntax, we have accessed the radio button using its id and used the checked attribute to check whether the radio button is selected in the if-statement.
Example
In the example below, we have created three radio buttons containing different values, such as male, female, and others. In JavaScript, we have accessed each radio button by its id and checked the value of every radio button’s ‘checked’ property.
When the user selects any radio button and clicks on the button, they see a message showing the value of the selected radio button.
Using the checked property of the radio button to check whether a radio button is selected.
Male
Female
Other
Example
The example below is almost the same as the one above, but the difference is that we are accessing all radio buttons using their name at once. The getElementByName() method returns all radio elements with the name radio.
After that, we used the for-of loop to iterate through the array of radio buttons and check for every radio button using the ‘checked’ property whether the radio button is selected.
Using the checked property of the radio button to check whether a radio button is selected
10
20
30
Use the querySelector() method to check whether a radio button is selected
Programmers can use JavaScript’s querySelector() method to select any HTML element. Here, we have used the querySelector() method to select only the checked radio button. If no radio button is selected, it returns a null value.
Syntax
Users can follow the syntax below to use the querySelector() method to check whether the radio button is selected.
var selected = document.querySelector('input[name="year"]:checked'); In the above syntax, ‘year’ is the name of the group of radio buttons, and it returns any radio button which belongs to the ‘year’ group and is checked.
Example
In the example below, we created three radio buttons providing three different choices to the users. When users click on the Check selected year button, it invokes the getSelectedRadio() function, which uses the querySelector() method to select the radio button with the name ‘year’ and is checked from the DOM.
Users can click the button without selecting any radio button and observe the output.
Using the querySelector() method to check whether a radio button is selected.
1999
2021
2001
Users learned two different methods to get the checked radio buttons using JavaScript. The best way to do this is to use the querySelector() method, as we need to write only a single line of code.
Input Radio checked Property
The checked property sets or returns the checked state of a radio button. This property reflects the HTML checked attribute.
Browser Support
Syntax
Property Values
Technical Details
| Return Value: | A Boolean, returns true if the radio button is checked, and false if the radio button is not checked |
|---|
More Examples
Example
Find out if a radio button is checked or not:
Example
Use a radio button to convert text in an input field to uppercase:
Example
Several radio buttons in a form:
var coffee = document.forms[0];
var txt = «»;
var i;
for (i = 0; i < coffee.length; i++) if (coffee[i].checked) txt = txt + coffee[i].value + " ";
>
>
document.getElementById(«order»).value = «You ordered a coffee with: » + txt;
Related Pages

COLOR PICKER


Report Error
If you want to report an error, or if you want to make a suggestion, do not hesitate to send us an e-mail:
Thank You For Helping Us!
Your message has been sent to W3Schools.
Top Tutorials
Top References
Top Examples
Get Certified
W3Schools is optimized for learning and training. Examples might be simplified to improve reading and learning. Tutorials, references, and examples are constantly reviewed to avoid errors, but we cannot warrant full correctness of all content. While using W3Schools, you agree to have read and accepted our terms of use, cookie and privacy policy.
How to Check Whether a Radio Button is Selected With JavaScript
![]()
Radio buttons, an essential part of HTML forms, allow users to select one of the multiple options. They can be created by simply using the tag of type “radio”. Radio buttons are used in a group of two or more buttons with a common name. This makes it easier to fetch them into a single object and check their status. The status of a radio button can be checked by using two different methods which will be discussed in this write-up.
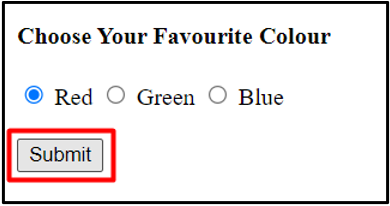
The first step of both these methods is the same which is to create a form containing radio buttons:
Setting up an HTML Form
We’ll just create a simple HTML form with a few radio buttons:
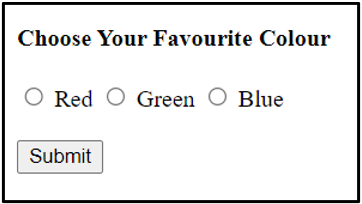
In the above code we first used a simple tag to give a heading so the user can easily understand the purpose of our form which is to choose a favourite colour. We then used the tag to create a form, inside which we have used tags to create three radio buttons which give different options to the users.
We have also used the tags to label our radio buttons. We then used a couple of tags to give ourselves a few line breaks so the whole form looks nice and evenly spaced. The form was ended with a tag which can be used to submit our form. The calls the checkValue() function when it is clicked.
Now we will write the JavaScript code to define the checkValue() function to check which radio button has been selected:
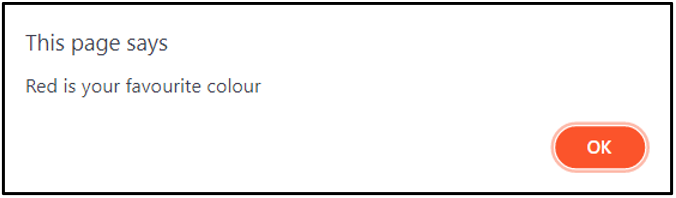
Method 1: Using the getElementsByName()
We can use the .checked() property to check whether a radio button has been selected or not:
function checkValue ( ) {
var radios = document.getElementsByName ( «colour» ) ;
for ( const radio of radios ) {
if ( radio.checked ) {
alert ( radio.value + » is your favourite colour» ) ;
break ;
}
}
}
Inside the checkValue() function we have first declared a variable named radios which receives a nodelist of all the radio buttons with the name colour. We then iterate over the nodelist and check the status of each radio button. If a radio button has been selected we use the alert() method to display which colour has been selected.
The code for the entire webpage:
< button id = "submit" onclick = "checkValue()" >Submit