- How to Get HTML Element (X, Y) Position with JavaScript
- Example
- Position Relative to Bottom and Right Corner
- Notice: The (X, Y) Position Doesn’t Change On Scroll
- How to Get (X, Y) Position Relative to Viewport?
- Свойство position
- position: static
- position: relative
- Координаты
- position: absolute
- Javascript position top right
- # Table of Contents
- # Set the Position of an Element using JavaScript
- # Position an Element under the Mouse on Click
- # Additional Resources
How to Get HTML Element (X, Y) Position with JavaScript
Getting the X, Y position of an HTML element in JavaScript can be accomplished using the following code:
let element = document.getElementById("example-element"); let x = element.offsetLeft; let y = element.offsetTop; console.log("Element X: " + x); console.log("Element Y: " + y); Where element is the HTML element whose position you want to retrieve.
The offsetLeft and offsetTop properties give us its X and Y position.
To get the position relative to the viewport (changes on the scroll and resizing), you can do:
let element = document.getElementById("example-element"); let x = element.getBoundingClientRect().left; let y = element.getBoundingClientRect().top; console.log("Element X (relative to viewport): " + x); console.log("Element Y (relative to viewport): " + y); I hope this quick answer helps. If you need examples, please read along. Also, I will show you how to get the position of the HTML element relative to the right corner and the bottom of the view.
Example
Let’s take a look at an example that demonstrates the above code in action in a real HTML page. Feel free to copy-paste the code and run it on your own setup.
#example-element
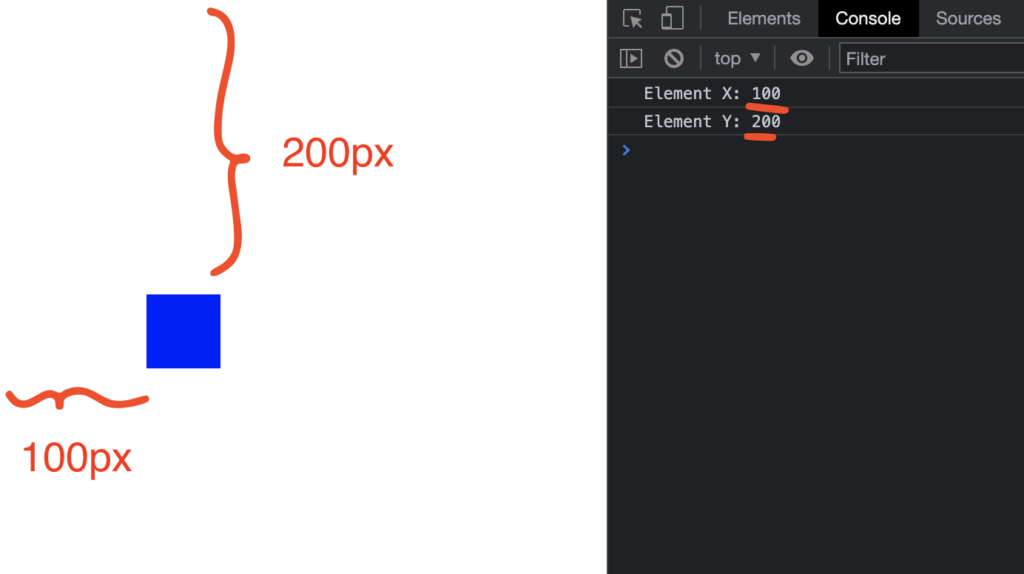
As you can see, the code logs the position of the blue HTML element into the console just like we defined it in the CSS.
Position Relative to Bottom and Right Corner
The above code showed you how to access the positions from the top and the left corner of the view.
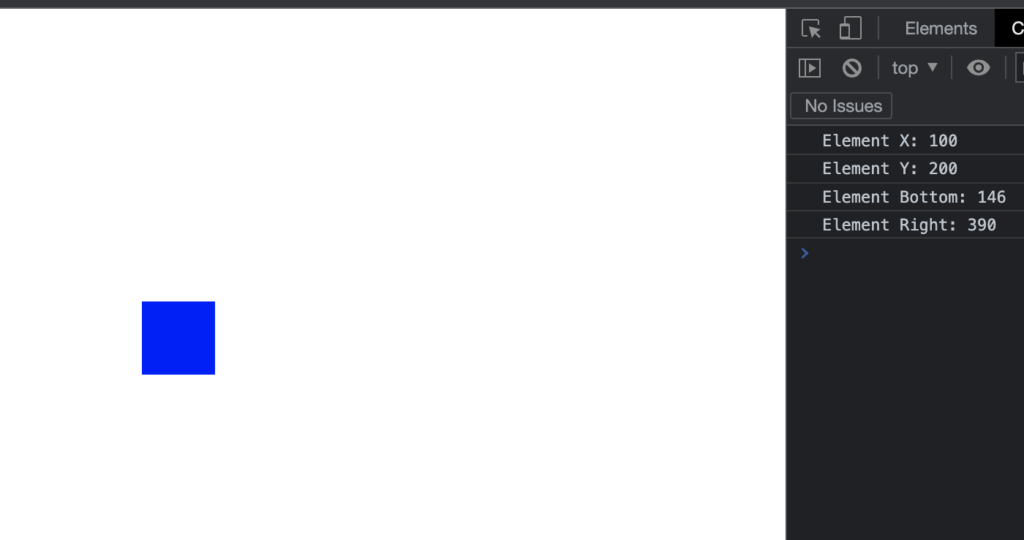
In case you want to get the x, and y position relative to the bottom and right corner of the view, subtract the x, y position from the width and the height of the view.
#example-element
Notice that the bottom and right variables change based on the size of the viewport.
Here’s a view with a bit more space to the right. Now the Element Right is at 390 pixels:
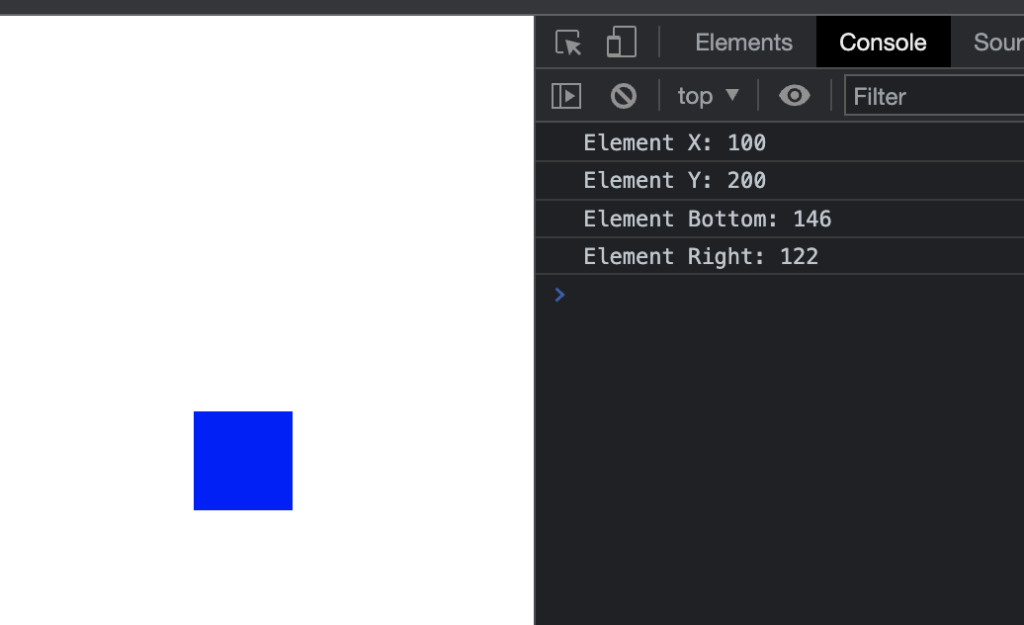
By shrinking the window size, the Element Right position shrinks too.
Notice: The (X, Y) Position Doesn’t Change On Scroll
Notice that the x, and y position stays the same if you scroll the page.
For example, let’s make the page high enough so that one can scroll:
body < height: 5000px; >#example-element
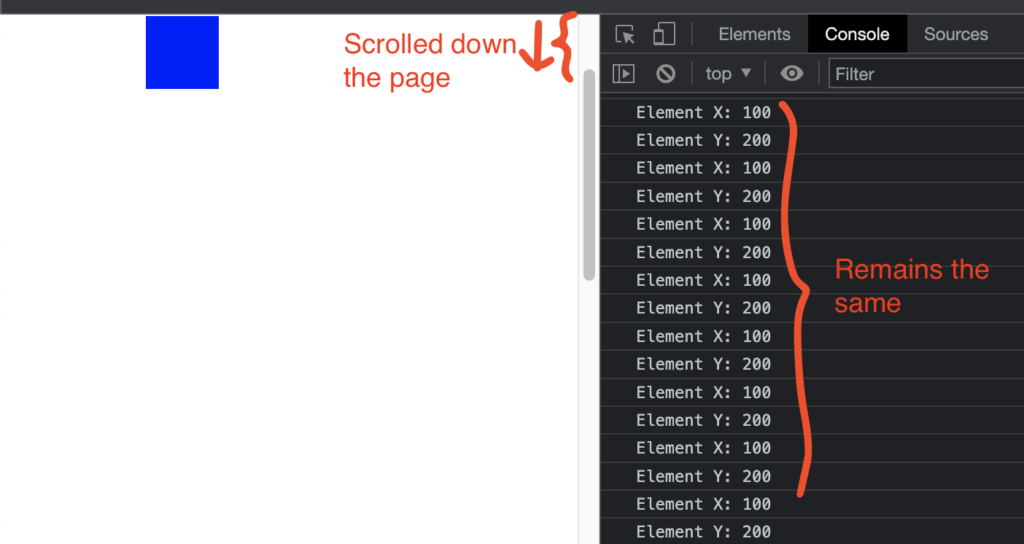
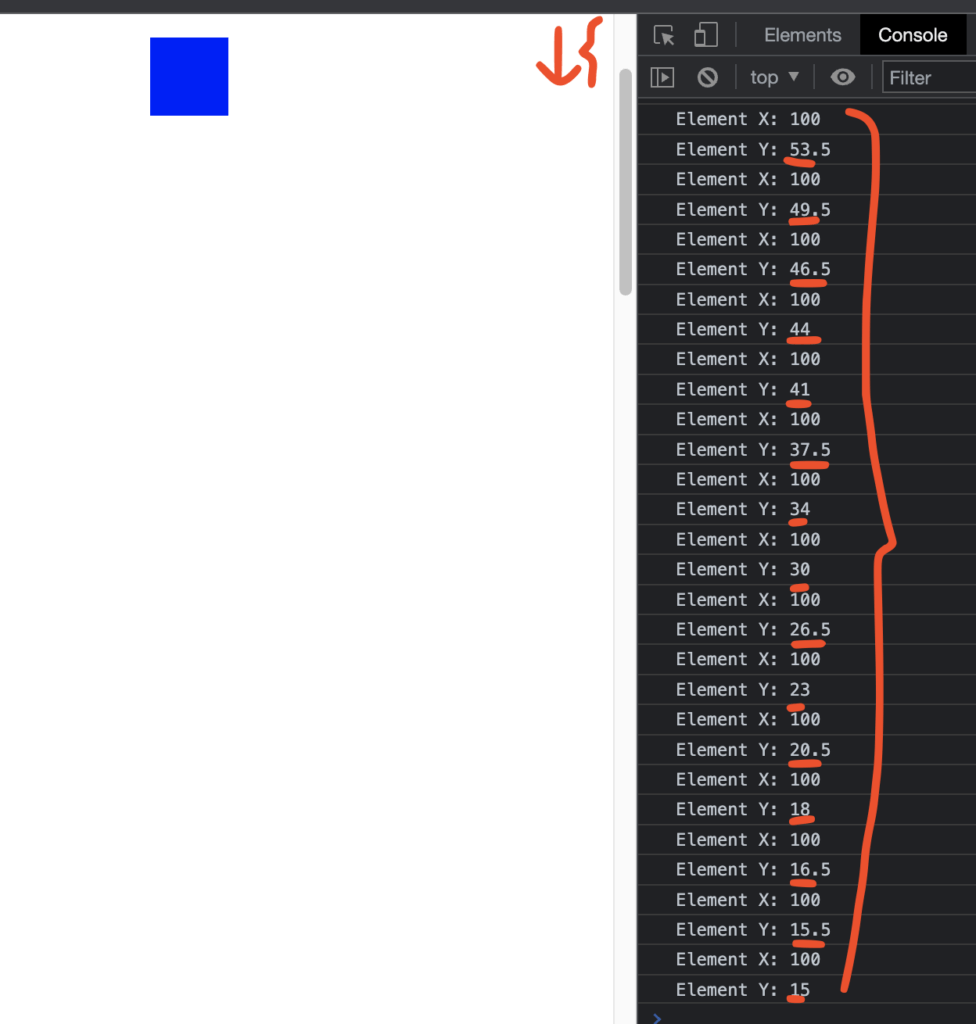
As you can see from the image, the position remains the same.
Sometimes this behavior is not what you intended. You want to get the position with respect to the visible view.
For example, in the above image, the y position should be closer to 0 because the HTML element is almost at the top of the scrolled view.
How to Get (X, Y) Position Relative to Viewport?
To get the position of the element with respect to the view, you can use the getBoundingClientRect method instead of offsetLeft and offsetTop . getBoundingClientRect returns the size of an element and its position relative to the viewport.
Here is an updated HTML page with a high enough height to allow for scrolling. Beside, there’s a JavaScript call to the function to log the position of the element with respect to the view when scrolling:
body < height: 5000px; >#example-element
Thanks for reading. Happy coding!
Свойство position
Свойство position позволяет сдвигать элемент со своего обычного места. Цель этой главы – не только напомнить, как оно работает, но и разобрать ряд частых заблуждений и граблей.
position: static
Статическое позиционирование производится по умолчанию, в том случае, если свойство position не указано.
Его можно также явно указать через CSS-свойство:
Такая запись встречается редко и используется для переопределения других значений position .
Здесь и далее, для примеров мы будем использовать следующий документ:
 Без позиционирования ("position: static"). Заголовок А тут - всякий разный текст.
. В две строки!
В этом документе сейчас все элементы отпозиционированы статически, то есть никак.
Элемент с position: static ещё называют не позиционированным.
position: relative
Относительное позиционирование сдвигает элемент относительно его обычного положения.
Для того, чтобы применить относительное позиционирование, необходимо указать элементу CSS-свойство position: relative и координаты left/right/top/bottom .
Этот стиль сдвинет элемент на 10 пикселей относительно обычной позиции по вертикали:
position: relative; top: 10px; h2 Заголовок сдвинут на 10px вниз. Заголовок
А тут - всякий разный текст.
. В две строки! Координаты
Для сдвига можно использовать координаты:
- top – сдвиг от «обычной» верхней границы
- bottom – сдвиг от нижней границы
- left – сдвиг слева
- right – сдвиг справа
Не будут работать одновременно указанные top и bottom , left и right . Нужно использовать только одну границу из каждой пары.
Возможны отрицательные координаты и координаты, использующие другие единицы измерения. Например, left: 10% сдвинет элемент на 10% его ширины вправо, а left: -10% – влево. При этом часть элемента может оказаться за границей окна:
 h2 Заголовок сдвинут на 10% влево. Заголовок А тут - всякий разный текст.
. В две строки!
Свойства left/top не будут работать для position:static . Если их всё же поставить, браузер их проигнорирует. Эти свойства предназначены для работы только с позиционированными элементами.
position: absolute
Абсолютное позиционирование делает две вещи:
- Элемент исчезает с того места, где он должен быть и позиционируется заново. Остальные элементы, располагаются так, как будто этого элемента никогда не было.
- Координаты top/bottom/left/right для нового местоположения отсчитываются от ближайшего позиционированного родителя, т.е. родителя с позиционированием, отличным от static . Если такого родителя нет – то относительно документа.
- Ширина элемента с position: absolute устанавливается по содержимому. Детали алгоритма вычисления ширины описаны в стандарте.
- Элемент получает display:block , который перекрывает почти все возможные display (см. Relationships between „display“, „position“, and „float“).
Например, отпозиционируем заголовок в правом-верхнем углу документа:
 h2 Заголовок в правом-верхнем углу документа. Заголовок А тут - всякий разный текст.
. В две строки!
Важное отличие от relative : так как элемент удаляется со своего обычного места, то элементы под ним сдвигаются, занимая освободившееся пространство. Это видно в примере выше: строки идут одна за другой.
Так как при position:absolute размер блока устанавливается по содержимому, то широкий Заголовок «съёжился» до прямоугольника в углу.
Иногда бывает нужно поменять элементу position на absolute , но так, чтобы элементы вокруг не сдвигались. Как правило, это делают, меняя соседей – добавляют margin/padding или вставляют в документ пустой элемент с такими же размерами.
В абсолютно позиционированном элементе можно одновременно задавать противоположные границы.
Браузер растянет такой элемент до границ.
Javascript position top right
Last updated: Jan 11, 2023
Reading time · 3 min

# Table of Contents
# Set the Position of an Element using JavaScript
To set the position of an element:
- Select the element and set its position property to absolute .
- Use the top property to set the element’s vertical position, e.g. box.style.top = ‘150px’ .
- Use the left property to set the element’s horizontal position, e.g. box.style.left = ‘150px’ .
Here is the HTML for the examples.
Copied!DOCTYPE html> html lang="en"> head> meta charset="UTF-8" /> title>bobbyhadz.comtitle> head> body> div id="box" style="background-color: salmon; width: 100px; height: 100px"> Box 1 div> script src="index.js"> script> body> html>
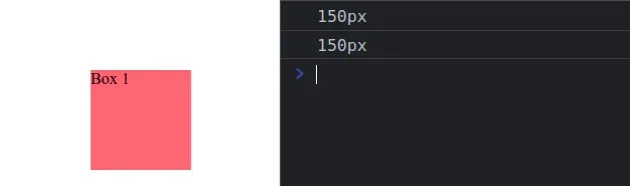
And here is the related JavaScript code.
Copied!const box = document.getElementById('box'); box.style.position = 'absolute'; box.style.top = '150px'; box.style.left = '150px'; console.log(box.style.top); // 👉️ "150px" console.log(box.style.left); // 👉️ "150px"
We first set the element’s position to absolute .
The element’s final position is determined by the values of top , right , bottom and left properties.
The top , right , bottom and left properties do not affect non-positioned elements.
We set the element’s top CSS property to 150px .
The top property specifies the distance to the top edge of the element’s containing block.
Copied!const box = document.getElementById('box'); box.style.position = 'absolute'; box.style.top = '150px'; box.style.left = '150px'; console.log(box.style.top); // 👉️ "150px" console.log(box.style.left); // 👉️ "150px"
We then used the left property to set the distance to the left edge of the element’s containing block.
If you have to set the element’s position at multiple different places in your code, create a reusable function.
Copied!function positionElement(el, x, y) el.style.position = 'absolute'; el.style.left = x + 'px'; el.style.top = y + 'px'; > const box = document.getElementById('box'); console.log(positionElement(box, 50, 150)); console.log(box.style.left); // 👉️ "50px" console.log(box.style.top); // 👉️ "150px"
The function takes the element, the x and y position as parameters, sets the element’s position property to absolute and positions it.
# Position an Element under the Mouse on Click
To position an element under the mouse on click:
- Set the element’s position property to absolute .
- Add a click event listener to the document object.
- Each time the mouse is clicked, set the element’s top and left properties to the coordinates of the mouse.
Here is the HTML for the next example.
Copied!DOCTYPE html> html lang="en"> head> meta charset="UTF-8" /> title>bobbyhadz.comtitle> head> body> div id="box" style="background-color: salmon; width: 100px; height: 100px"> Box 1 div> script src="index.js"> script> body> html>
And here is the related JavaScript code.
Copied!const box = document.getElementById('box'); box.style.position = 'absolute'; document.addEventListener('click', function handleClick(event) box.style.top = event.clientY - 50 + 'px'; box.style.left = event.clientX - 50 + 'px'; >);
If you open your browser and click at different places on the screen, you will see that the element gets positioned under your mouse cursor.
We added a click event listener on the document object, which invokes a function anytime the document is clicked.
Your requirements may vary but to position the element in the center of the cursor, we subtracted 50 from the clientY and clientX coordinates.
The clientY property provides the vertical coordinate at which the event occurred.
And the clientX property provides the horizontal coordinate at which the MouseEvent event occurred.
# Additional Resources
You can learn more about the related topics by checking out the following tutorials:
I wrote a book in which I share everything I know about how to become a better, more efficient programmer.