Кнопка
Рассмотрим пример, как нужно обрабатывать нажатия кнопки в форме с помощью JavaScript.
Создадим простейшую форму.
На данный момент кнопка ничего не делает. Получим доступ к кнопке.
var button = getElementById("addButton"); Далее следует создать код, который будет выполняться при нажатии кнопки.
function handleButtonClick
Осталось подключить созданную функцию к переменной
button.onclick = handleButtonClick; window.onload = init; function init() < var button = document.getElementById("addButton") button.onclick = handleButtonClick; >function handleButtonClick() При нажатии на кнопку появляется сообщение.
Идём дальше. Мы хотим получить текст, введённый пользователем в текстовом поле. Когда пользователь вводит текст, то у элемента input type=»text» в свойстве value появляется значение, которое и содержит текст пользователя. Таким образом, нам нужно сначала получить доступ к элементу страницы по идентификатору, а затем его свойство.
var button2 = document.getElementById("addButton2") button2.onclick = handleButtonClick2; function handleButtonClick2() Теперь выводится сообщение, в котором содержится имя кота. Не помешает небольшая проверка, что текст был введён.
function handleButtonClick2() < var textInput = document.getElementById("catNameInput2"); var catName = textInput.value; if(catName == "")< alert("Введите имя кота, пожалуйста"); >else < alert("Добавлено новое имя кота! " + catName); >> Третий шаг — выводить имена котов на самой странице. Мы уже приготовили список ul, к которому тоже можно получить доступ и добавлять дочерние элементы. Для получения доступа используем знакомый метод getElementById(). Для динамического создания нового элемента используется метод document.createElement(). После создания мы можем настроить элемент, например, прописав текст. Для текста элемента списка будем использовать переменную, которая содержит имя кота. Создав новый элемент, его необходимо добавить к родительскому элементу через appendChild().
function handleButtonClick3() < var textInput = document.getElementById("catNameInput3"); var catName = textInput.value; if(catName == "")< alert("Введите имя кота, пожалуйста"); >else < var ul = document.getElementById("catlist3"); var li = document.createElement("li"); li.innerHTML = catName; ul.appendChild(li); alert("Добавлено новое имя кота! " + catName); >> Новые способы
В последнее время стали использовать другой код. Например, используют const вместо var, вместо onclick — addEventListener.
Также вместо getElementById() можно использовать querySelector(). А в addEventListener использовать другой формат вызова функции.
.button < background-color: #33ae74; transition: background-color 0.5s ease-out; >.button.is-active Атрибут onclick
Также можно использовать готовый атрибут у кнопки onclick.
How to find the value of a button with JavaScript?
In this tutorial, we will learn how we can find the value of a button with JavaScript. Sometimes, we need to use the button tag inside the form tag, where we assign a particularly unique value to each associated with the element using the value attribute. Which later helps the developer to uniquely identify the elements while working with them in the back end. JavaScript provides us with the value property to get the value passed inside the value attribute
Let us discuss the value property in detail.
Button value Property
The button value property is used to get the value of the value attribute of the button.
Syntax
The following is the syntax to get value of value attribute of the button.
let varName = document.getElementById("id").value; Steps
- Step 1 − We first create a button inside a form with a value associated with value attribute.
- Step 2 − Next, we target the button element with its id and get the value of the value attribute using the value property.
- Step 3 − In the last step, we will display the value extracted from the value attribute on the user screen.
Let us understand it with the help of some program examples.
Example 1
The below example will illustrate the use of value property to get the value of value attribute of the button.
html> body> h3>Find the value of a button/h3> form> button type="submit" id="btn" value="submit_button">click me!/button> /form> p id="result">/p> script> let btn = document.getElementById("btn"); let val = btn.value; document.getElementById("result").innerHTML = "Value of the above button: " + val + ""; /script> /body> /html>
In this example, we have seen how we can use the value property to get the value inside the button. First, we grab the targeted element using its id in btn and then use the value property on it to get the value of the value attribute inside it.
Let us discuss one more example where we will assign the same value to the button tag as given inside the value attribute dynamically using JavaScript.
- Step 1 − In this step, we will define a button tag without any text inside it but with a value attribute associated with particular value.
- Step 2 − In second step, we will grab the element with its id the get the value of value attribute using the value property and then assign the same value to the button text using the innerHTML or innerText property of JavaScript_
- Step 3 − In the third step, we will display the value of value attribute and will match it with the text of button tag to confirm the assignment.
Example 2
The below example will explain how we can assign the inner text to the button similar to the value of value attribute using the value property.
html> body> h3>Find the value of a button with JavaScript/h3> form> button type="submit" id="btn" value="Submit_button">Submit_button/button> /form> p id="result">/p> script> let btn = document.getElementById("btn"); let val = btn.value; btn.innerHTML = val; document.getElementById("result").innerHTML = "Value of the button: " + val + ""; /script> /body> /html>
In the above example, we have seen how we can assign the text to the button similar to the value of value attribute dynamically using the value property of the JavaScript. In this example, after grabbing the element we store the value in a particular variable then assign that value as the text of button using the innerHTML property of JavaScript.
Let us discuss one more example where we will change the already given text of the button to the value of value attribute.
- Step 1 − In this step, we will define a button tag with a text inside it and also a value attribute associated with particular value.
- Step 2 − In second step, we will grab the element with its id the get the value of value attribute using the value property and then update the text of the button tag with the value we get, using the innerHTML or innerText property of JavaScript_
- Step 3 − In the third step, we will display the value of the value attribute and will match it with the updated text of the button tag to confirm whether the code is working or not.
Example 3
The below example will illustrate the use of value property to change the text of the button tag just by clicking a button.
html> body> h3>Find the value of a button with JavaScript/h3> form> button type="submit" id="btn" value="Submit" onclick="display(event)">click to change the text!/button> /form> p id="result">/p> script> let btn = document.getElementById("btn"); let val = btn.value; function display(event) event.preventDefault(); btn.innerHTML = val; > document.getElementById("result").innerHTML = "The value of the button: " + val + ""; /script> /body> /html>
In the above example, we have if you click the click to change text! Button it will automatically change the text of button to the value that is inside the value attribute of the button tag
In this tutorial, we have discussed about the value property of the JavaScript which is used to geth the value of value attribute inside any HTML tag. We also learnt, how we can change the text inside the button tag dynamically to the value of value attribute using the value property. We can change text of any tag using the methods discussed above.
Javascript получить значение button

Для отправки введенных данных на форме используются кнопки. Для создания кнопки используется либо элемент button :
С точки зрения функциональности в html эти элементы не совсем равноценны, но в данном случае они нас интересуют с точки зрения взаимодействия с кодом javascript.
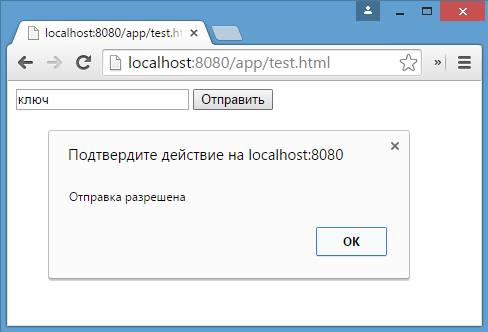
При нажатии на любой из этих двух вариантов кнопки происходит отправка формы по адресу, который указан у формы в атрибуте action , либо по адресу веб-страницы, если атрибут action не указан. Однако в коде javascript мы можем перехватить отправку, обрабатывая событие click
При нажатии на кнопку происходит событие click , и для его обработки к кнопке прикрепляем обработчик sendForm . В этом обработчике проверяем введенный в текстовое поле текст. Если его длина больше 5 символов, то выводим сообщение о недостимой длине и прерываем обычный ход события с помощью вызова e.preventDefault() . В итоге форма не отправляется.
Если же длина текста меньше шести символов, то также выводится сообщение, и затем форма отправляется.
Также мы можем при необходимости при отправке изменить адрес, на который отправляются данные:
function sendForm(e)< // получаем значение поля key var keyBox = document.search.key; var val = keyBox.value; if(val.length>5) < alert("Недопустимая длина строки"); document.search.action="PostForm"; >else alert("Отправка разрешена"); > В данном случае, если длина текста больше пяти символов, то текст отправляется, только теперь он отправляется по адресу PostForm , поскольку задано свойство action:
document.search.action="PostForm";
Для очистки формы предназначены следующие равноценные по функциональности кнопки:
При нажатию на кнопки произойдет очистка форм. Но также функциональность по очистке полей формы можно реализовать с помощью метода reset() :
function sendForm(e)< // получаем значение поля key var keyBox = document.search.key; var val = keyBox.value; if(val.length>5) < alert("Недопустимая длина строки"); document.search.reset(); e.preventDefault(); >else alert("Отправка разрешена"); > Кроме специальных кнопок отправки и очистки на форме также может использоваться обычная кнопка:
При нажатии на подобную кнопку отправки данных не происходит, хотя также генерируется событие click:
При нажатии на кнопку получаем введенный в текстовое поле текст, создаем новый элемент параграфа для этого текста и добавляем параграф в элемент printBlock.
How to get value of clicked button in JavaScript
If you are thinking about how to get the value of a button clicked by one person in JavaScript, then in this article you will learn how to get the value of a clicked button.
If you have a couple of button, then you can add the onclick event for each button.
Demo — Get the value of clicked button
button onclick="alert(this.innerText)" > button 1 /button> button onclick="alert(this.innerText)"> button 2 /button> button onclick="myFun(this)"> button 3 /button>
- I have created three button elements with onclick() event attribute.
- Inside the onclick() event, I have called alert() method to alert the button value.
If you have a lot of buttons, then the above approach is not elegant. So, in this case we need to create a forEach() method.
Get button value dynamically using forEach() method
let buttonList = document.querySelectorAll("button"); buttonList.forEach(function(i)< i.addEventListener("click", function(e)< alert(e.target.innerHTML); >) >) button>Button 1/button> button>Button 2/button> button>Button 3/button> button>Button 4/button> button>Button 5/button>
let buttonList = document.querySelectorAll("button"); buttonList.forEach(function(i)< >)
We passed an anonymous function to the forEach() method and included a parameter i that will represent each button.
buttonList.forEach(function(i)< i.addEventListener("click", function(e)< alert(e.target.innerHTML); >) >) Conclusion
In this article, you have learned how to get value of clicked button using javascript.