- Вложенные объекты — JS: Объекты
- Печать на экран
- Проверки в глубину
- Оператор опциональной последовательности
- Оператор нулевого слияния
- get (lodash)
- Открыть доступ
- Object Inside an Object in JavaScript
- Create Nested Objects in JavaScript
- How to use Nested Objects in JavaScript
- How to Create Nested Objects in JavaScript?
- How to Use Nested Objects in JavaScript?
- Conclusion
- About the author
- Syed Minhal Abbas
Вложенные объекты — JS: Объекты
Значением свойства объекта может быть всё, что угодно, включая другой объект или массив:
const user = name: 'Vasya', married: true, age: 25 >; // Добавим свойство friends со списком друзей user.friends = ['Kolya', 'Petya']; // Добавим свойство children со списком детей, // каждый ребёнок представлен отдельным объектом user.children = [ name: 'Mila', age: 1 >, name: 'Petr', age: 10 >, ]; // Добавим вложенный объект user.company = name: 'Hexlet' >; console.log(user); // => // // name: 'Vasya', // married: true, // age: 25, // friends: [ 'Kolya', 'Petya' ], // children: [ < name: 'Mila', age: 1 >, < name: 'Petr', age: 10 >], // company: // > Все то же самое можно определить сразу при создании объекта:
const user = name: 'Vasya', married: true, age: 25, friends: ['Kolya', 'Petya'], children: [ name: 'Mila', age: 1 >, name: 'Petr', age: 10 >, ], company: name: 'Hexlet' >, >; В этом случае обращение к вложенным элементам происходит по цепочке:
user.friends[1]; // 'Petya' user.children[0].name; // 'Mila' user.company.name; // 'Hexlet' // Или через квадратные скобки user['children'][0]['name']; // 'Mila' Печать на экран
В console.log() встроено одно ограничение. Если в объекте есть другие объекты на глубине больше второго уровня вложенности, то при выводе такого объекта на экран вместо объектов отобразится строка [Object] , а вместо массива — [Array] .
const obj = a: b: c: key: 'value' >, e: [1, 2] > > >; console.log(obj); // < a: < b: < c: [Object], e: [Array] >> > Для вывода таких объектов можно воспользоваться функцией преобразования в JSON:
console.log(JSON.stringify(obj)); // ,"e":[1,2]>>> // Или форматированный вывод console.log(JSON.stringify(obj, null, ' ')); // // "a": // "b": // "c": // "key": "value" // >, // "e": [ // 1, // 2 // ] // > // > // > Проверки в глубину
При работе с вложенными объектами резко усложняется задача проверки существования ключей. Приходится строить цепочку из условий до нужного свойства. Представьте, что нам нужно добраться до 4 уровня вложенности и мы не уверены в том, что существуют все промежуточные объекты:
// Добираемся до obj.one.two.three if (Object.hasOwn(obj, 'one')) if (Object.hasOwn(obj.one, 'two')) if (Object.hasOwn(obj.one.two, 'three')) // . > > > Так будет выглядеть решение в лоб. Однако, есть более удобный способ, речь о котором ниже.
Оператор опциональной последовательности
Если задача состоит в том, чтобы извлечь данные, а не просто проверить их существование, то можно пойти другим путем. В Javascript встроен оператор опциональной последовательности (optional chaining), который позволяет извлекать вложенные данные без проверок:
const obj = <>; obj?.one?.two?.three // undefined Этот оператор никогда не приводит к ошибке. Он работает на любых типах данных и всегда возвращает либо undefined , либо значение указанного свойства, если оно существует.
Оператор нулевого слияния
С помощью оператора нулевого слияния, можно не только получить значение цепочки любой вложенности, но и определить значение по умолчанию для него.
const obj = <>; obj?.one?.two?.three ?? 'defaultValue' // 'defaultValue' Значение по умолчанию возвращается только в том случае, когда слева undefined или null . В этом смысле данный оператор совсем не похож на логическое сравнение || :
const value = false; value ?? 'default'; // false value || 'default'; // 'default' get (lodash)
Пример выше перегружен символами и выглядит достаточно сложно. Как альтернативу можно использовать функцию get() библиотеки Lodash.
import _ from 'lodash'; const obj = <>; const value = _.get(obj, 'one.two.three', 'defaultValue'); // 'defaultValue' get() особенно удобен в случае динамических ключей. В таком случае вторым аргументом можно передать массив ключей:
Открыть доступ
Курсы программирования для новичков и опытных разработчиков. Начните обучение бесплатно
- 130 курсов, 2000+ часов теории
- 1000 практических заданий в браузере
- 360 000 студентов
Наши выпускники работают в компаниях:
Object Inside an Object in JavaScript

- Create Nested Objects in JavaScript
- Multiple Nesting in Javascript
This tutorial article will explain how we can create multiple objects inside another object in JavaScript.
A JavaScript Object is a collection of Key-Value pairs, and nested objects are objects that have other objects inside them as their property. Nesting is a widely used practice in programming as it provides the code with more enhanced details.
Each object has its own properties or keys, which are used to store the details of the object. A comma separates each property or key.
Let’s have a look at how we create an object and properties in Javascript.
const layer0 = layer1Item1: "Layer 1 Item 1 Text", layer1Item2: "Layer 1 Item 2 text", layer1Item3: "Layer 1 Item 3 Text", layer1Item4: "Layer 1 Item 4 text" > Here, if you can see, const layer0 is the name of the object. This is how we create an object in Javascript. Now within the object, as you can see, layer1Item1 , layer1Item2 , layer1Item3 and layer1Item4 are the properties of the object. These properties must be unique and the differentiating factors that distinguish an object from another.
Now, if you want to create an object within another object, the inner object is created as a property of the outer one, and this inner object can only be accessed using the outer object.
Create Nested Objects in JavaScript
const layer0 = layer1Item1: "Layer 1 Item 1 Text", layer1Item2: layer2Item1: "Layer 2 Item 2 Text", layer2Item2: false > >; In this example, layer1Item2 is a new object inside of another object. However, layer1Item1 is a property of the object, and layer1Item2 is an object. Both look similar because the newly created object is also created as a property of the outer object layer0 .
Now, if you want to access the inner object, you will write the name of the outer object, and after a dot, you will write the name of the inner object.
How to use Nested Objects in JavaScript
![]()
JavaScript can store data through key-value pairs. The key-value pairs are associated with the JavaScript objects. Objects contain properties that can be stored in nested objects. These nested objects are created within other objects and accessed through dot or bracket notation. Here, we will demonstrate the way to use nested objects in JavaScript. The outcomes of this post are as follows:
How to Create Nested Objects in JavaScript?
An object is the most essential part of any programming language to assign or modify properties in any program. Nested objects have their own importance that is present inside objects. These objects contain the properties of objects.
The following example code explains how a nested object is created in JavaScript:
console.log ( «An example to create nested objects in JavaScript» )
const data = {
id: 009,
email: ‘abc@linuxhint.com’ ,
contactInfo: {
name: ‘Harry’ ,
address: {
city: ‘Berlin’ ,
country: ‘Germany’
}
}
}
console.log ( data )
The description of the code is as follows:
- An object “data” is created that contains multiple properties, including “id”, “email”, “contactInfo”, “name”, “address”, “city” and “country”.
- The nested objects such as “contactInfo” and “address” can be retrieved through the dot operator.
- In the end, thelog() method is used to present all the object properties of “data”.
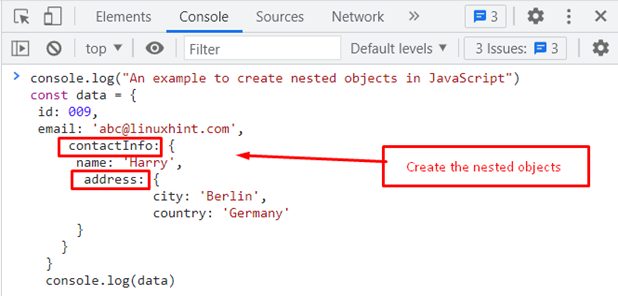
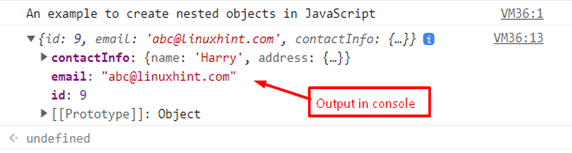
It is observed that nested objects “id”, “email” and “contactInfo” are displayed in the console window.
How to Use Nested Objects in JavaScript?
The nested objects are utilized to store the object’s properties with another object. The dot and square bracket notations are employed to access the properties of objects in JavaScript.
Mostly, the object properties are retrieved to use in any piece of code. The properties of the objects and nested objects are retrieved using one of the following syntaxes:
In the first syntax, the dot operator is used, while the second way is to access the property using bracket notation.
Let us practice the use of nested objects via the following example.
In this method, first nested objects are created, and after that, a specific nested object’s property is accessed via dot notation. The following example code addresses the issue:
const teacher = {
name: «Brown» ,
address: {
area: {
street: «oxford university road» ,
} ,
city: «London» ,
country: «England»
} ,
}
console.log ( teacher.address.area ) ;
- Firstly, a “teacher” object is initialized in which the “address” as a nested object is utilized.
- The “address” object contains the properties “area”, “city”, and “country” which can be accessed through dot as well as square bracket notation.
- In the end, the log() method is employed by passing the “teacher.address.area” as an argument.
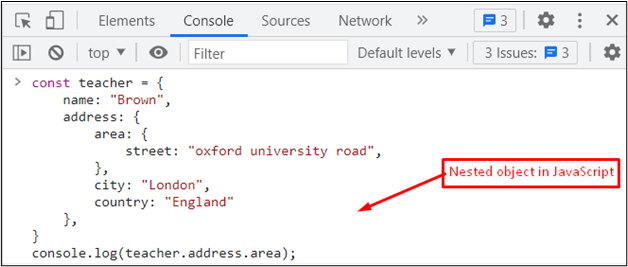

The output shows that the “street” object is accessed as a nested object and displays the value “oxford university road” in the console window.
Conclusion
Nested objects are utilized to store the properties of an object in another object. These objects can be accessed through dot as well as bracket notation. These nested objects are useful for storing the different properties and specifying the value based on user needs. This post has provided a way to create as well as use nested objects in JavaScript.
About the author
Syed Minhal Abbas
I hold a master’s degree in computer science and work as an academic researcher. I am eager to read about new technologies and share them with the rest of the world.