- Могу ли я публиковать изображения в массиве JavaScript
- 3 ответа
- Основной путь
- Более жесткий путь:
- Заметки
- Create an Array of Images in JavaScript (Tutorial)
- How Arrays of Images Work
- Simple Array of Images
- Array of Images With Image() Constructor
- Things to Know
- Pushing Images to the Array
- Cleaning Up the Array
- Leave a comment Cancel reply
- Document: images property
- Value
- Usage notes
- Examples
- Specifications
- Browser compatibility
- Found a content problem with this page?
- MDN
- Support
- Our communities
- Developers
Могу ли я публиковать изображения в массиве JavaScript
Я задаю несколько вопросов пользователю. В конце вопроса система показывает кучу предметов. Рядом с каждым элементом я хочу добавить изображение для элемента. Можете ли вы поместить изображение в массив? Я уже искал это, но большинство результатов слишком сложно понять. Мне было интересно, могу ли я поместить все рисунки в CSS, а затем изменить JavaScript на
var blue = ["question1button1" + "img/ads.jpg"];Почему бы не добавить URL-адрес изображения в массив, а затем создать тег img с помощью src элемента массива?
3 ответа
Хорошо, так что вы можете полностью сделать что-то подобное на JavaScript, просто не так, как вы пробовали в своем вопросе.
То, что я предполагаю, что вы пытаетесь сделать, — это отобразить кучу изображений на странице из значений в массиве. Вот один из способов сделать это:
Основной путь
Это создает массив, полный URL — адреса для изображений, а затем перебирает этот массив и каждый элемент добавляет HTML — код для этого изображения в images DIV, то есть он будет отображаться на странице. Я завернул это в функцию, чтобы ее можно было вызвать, когда нажата кнопка.
- function showImages() создает новую функцию, которая является оболочкой для нашего кода. Всякий раз, когда это выполняется, весь код внутри него будет запущен;
- На следующей строке мы создаем массив и помещаем его в переменную с именем urls . Этот массив содержит URL-адреса для трех изображений (мои используют заполнители, но вы заменяете их путями к реальным изображениям на вашем сайте);
- for (var i=0;i
- Затем, наконец, мы получим div, который мы объявили в HTML, найдя его на основе его уникального атрибута id ( document.getElementById(«images») ) и добавим HTML для изображения к свойству innerHTML , которое просто содержит все HTML, который находится внутри div .
Более жесткий путь:
Конечно, если вы хотите сделать это «правильным» способом, вы бы использовали объект JavaScript Image :
Этот код немного сложнее. Работа с JavaScript на странице основана на концепции DOM или Document Object Model. Идея здесь заключается в том, что вы создаете каждый узел изображения (тег изображения) отдельно (без отображения его на странице), а затем, когда он загружается, добавьте его в DOM. Я не буду объяснять это здесь, но вы можете посмотреть, как это работает, если вы хотите.
Заметки
Вы можете найти более подробную информацию обо всех этих языковых элементах в Интернете:
Create an Array of Images in JavaScript (Tutorial)
The best ways to create and use arrays of images in JavaScript.

In JavaScript, as in other programming languages, arrays are objects that allow you to store more than one data item under a single variable name.
Each data item you store in an array is assigned a unique index—a number that indicates where exactly in the array that data item is stored, if you will—starting with 0 (the first item has an index of 0, the second an index of 1, the third and index of 3, and so on).
Once you’ve stored the data items in your array, you can then use JavaScript’s vast library of methods to work with them. For example, you can find and filter values in an array, join the items in an array and turn them into a string, concatenate two arrays together, and many, many others.
With a little imagination and ingenuity, you can also create “arrays of images” for all kinds of use cases on the frontend.
How Arrays of Images Work
You can’t store image files in JavaScript. So your array of images would actually be an array of references to images hosted elsewhere.
Simple Array of Images
The simplest, most straightforward way to create an array of images is to declare an array object and push the URLs to your images to it.
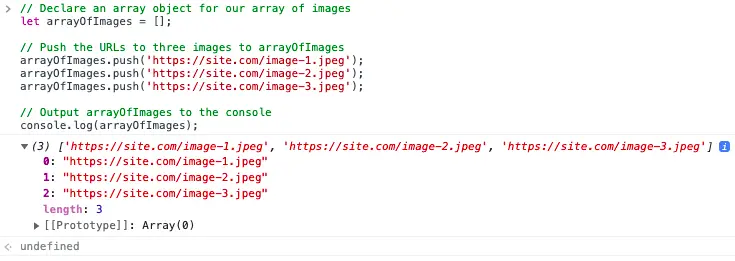
// Declare an array object for our array of images let arrayOfImages = []; // Push the URLs to three images to arrayOfImages arrayOfImages.push('https://site.com/image-1.jpeg'); arrayOfImages.push('https://site.com/image-2.jpeg'); arrayOfImages.push('https://site.com/image-3.jpeg'); // Output arrayOfImages to the console console.log(arrayOfImages);You can try this out right now by opening your browser’s console, copy/pasting the above code to it, and hitting the “Enter” key on your keyboard.
If you do, you will observe the following outputs:
Suppose you want to store more than just the URL to each image. You can create nested arrays that store arbitrary metadata such as the title, height, and width of the images.
// Declare an array object for our array of images let arrayOfImages = []; arrayOfImages.push(['https://site.com/image-1.jpeg','Title 1','768px','1024px']); arrayOfImages.push(['https://site.com/image-2.jpeg','Title 2','720px','1280px']); arrayOfImages.push(['https://site.com/image-3.jpeg','Title 3','1080px','1920px']); // Output arrayOfImages to the console console.log(arrayOfImages);If you copy/pasted the above code into your browser’s console and ran it, you’d see a structured list of images in your arrayOfImages array object.
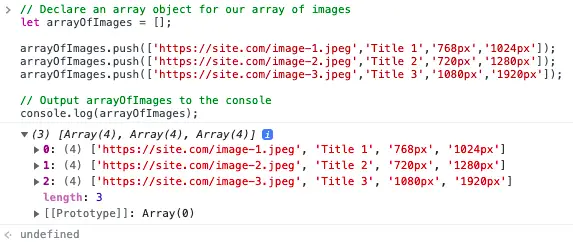
As long as you always store the URLs in Index 0, the titles in Index 1, and height in Index 2, and the width in Index 3, you’re going to have an array of images that you can reference, mutate, and reassign as needed.
Array of Images With Image() Constructor
If you’re doing this for a frontend application and your end goal is to show these images on the screen, consider using JavaScript’s Image() constructor instead.
The syntax of the Image() constructor is limited only to the width and the height of your image:
// Create HTMLImageElement let myImage = new Image(width, height);You can then assign HTMLImageElement properties , like the src attribute, to it:
// Create HTMLImageElement let myImage = new Image(width, height); // Assign it an src attribute myImage.src = 'https://site.com/example-1.jpeg';Once you’ve created your image object, you can then push it to arrayOfImages as usual:
// Declare an array object for our array of images let arrayOfImages = []; // Create image object and assign width and height let myImage = new Image('1024','768'); // Assign src attribute to image object myImage.src = 'https://site.com/example-1.jpeg'; // Push image object to arrayOfImages arrayOfImages.push(myImage); // Output arrayOfImages to the console console.log(arrayOfImages);Every time you use the Image() constructor, you create a new instance of an HTMLImageElement . You can these reference and manipulate that HTMLImageElement as you wish.
Once you’ve created your image objects and stored them in an array, inserting them into your HTML document is as simple as using the method you need and referencing the right index:
// Append an ![]() element to the tag document.body.appendChild(arrayOfImages[0]); // Insert an
element to the tag document.body.appendChild(arrayOfImages[0]); // Insert an ![]() element as the inner HTML of div#image-01 document.querySelector('div#image-01').innerHTML(arrayOfImages[0]);
element as the inner HTML of div#image-01 document.querySelector('div#image-01').innerHTML(arrayOfImages[0]);Things to Know
Pushing Images to the Array
There are two ways to push images to your array, and which one to use comes down to your implementation and requirements.
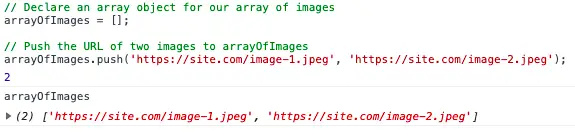
The easiest way to do this is with the Array.push() method, which adds one or multiple, comma-seprated, elements to the end of the array.
Once it is done, the Array.push() method returns the array’s new length:
// Declare an array object for our array of images arrayOfImages = []; // Push the URL of two images to arrayOfImages arrayOfImages.push('https://site.com/image-1.jpeg', 'https://site.com/image-2.jpeg'); console.log(arrayOfImages);For example, if you copy/pasted the above code into your browser’s console and executed it, this is what you would observe:
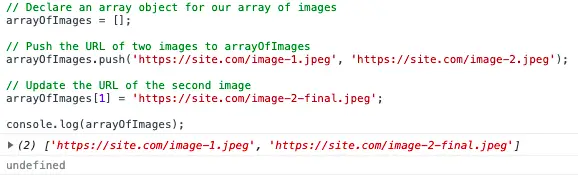
If you ought to store images in specific indices, or you want to overwrite the metadata for an image that’s already stored in your array, you can use the following method:
Suppose we want to overwrite the URL of the second image from our example above with an updated one. Our code would then look like this:
// Declare an array object for our array of images arrayOfImages = []; // Push the URL of two images to arrayOfImages arrayOfImages.push('https://site.com/image-1.jpeg', 'https://site.com/image-2.jpeg'); // Update the URL of the second image arrayOfImages[1] = 'https://site.com/image-2-final.jpeg'; console.log(arrayOfImages);Lo and behold, the second image’s URL is now updated:
Cleaning Up the Array
You can delete individual items from the array. For example, the code below will “empty” index 1 of arrayOfImages :
// Delete index 1 of arrayOfImages arrayOfImages[1] = '';Or you can delete all elements from the array altogether by redeclaring it as an empty array:
// Redeclare arrayofImages as an empty array arrayOfImages = '';It’s important to note that you cannot redeclare or reassign a constant, so your array of images must be declared using the var statement (for function scope) or the let statement (for block scope) for you to be able to “reset” it.
Leave a comment Cancel reply
- Create a Hash in Zapier With These Simple Steps April 2, 2023
- Google Tag Manager Workspaces, Explained March 25, 2023
- Do You Need SSL on a Domain With a 301 Redirect? March 14, 2023
- The Very Best Lightweight Browsers for Macs March 14, 2023
- The 3 Best JSON Editors for Macs March 13, 2023
We publish growth advice, technology how-to’s, and reviews of the best products for entrepreneurs, creators, and creatives who want to write their own story.
Maker’s Aid is a participant in the Amazon Associates, Impact.com, and ShareASale affiliate advertising programs.
These programs provide means for websites to earn commissions by linking to products. As a member, we earn commissions on qualified purchases made through our links.
To provide the best experiences, we and our partners use technologies like cookies to store and/or access device information. Consenting to these technologies will allow us and our partners to process personal data such as browsing behavior or unique IDs on this site and show (non-) personalized ads. Not consenting or withdrawing consent, may adversely affect certain features and functions.
Click below to consent to the above or make granular choices. Your choices will be applied to this site only. You can change your settings at any time, including withdrawing your consent, by using the toggles on the Cookie Policy, or by clicking on the manage consent button at the bottom of the screen.
The technical storage or access is strictly necessary for the legitimate purpose of enabling the use of a specific service explicitly requested by the subscriber or user, or for the sole purpose of carrying out the transmission of a communication over an electronic communications network.
The technical storage or access is necessary for the legitimate purpose of storing preferences that are not requested by the subscriber or user.
The technical storage or access that is used exclusively for statistical purposes. The technical storage or access that is used exclusively for anonymous statistical purposes. Without a subpoena, voluntary compliance on the part of your Internet Service Provider, or additional records from a third party, information stored or retrieved for this purpose alone cannot usually be used to identify you.
The technical storage or access is required to create user profiles to send advertising, or to track the user on a website or across several websites for similar marketing purposes.
Document: images property
The images read-only property of the Document interface returns a collection of the images in the current HTML document.
Value
An HTMLCollection providing a live list of all of the images contained in the current document. Each entry in the collection is an HTMLImageElement representing a single image element.
Usage notes
You can use either JavaScript array notation or the item() method on the returned collection to access the items in the collection. The following are equivalent:
= imageCollection.item(0); firstImage = imageCollection[0];
Examples
This example looks through the list of images and finds one whose name is «banner.gif» .
for (const image of document.images) if (image.src === "banner.gif") console.log("Found the banner"); > >
Specifications
Browser compatibility
BCD tables only load in the browser
Found a content problem with this page?
This page was last modified on Apr 7, 2023 by MDN contributors.
Your blueprint for a better internet.
MDN
Support
Our communities
Developers
Visit Mozilla Corporation’s not-for-profit parent, the Mozilla Foundation.
Portions of this content are ©1998– 2023 by individual mozilla.org contributors. Content available under a Creative Commons license.