- How to set CSS styles using JavaScript
- You might also like.
- Javascript createelement style class
- # Create an Element with Style attribute using JavaScript
- # Additional Resources
- Javascript createelement style class
- # Create a style tag using JavaScript
- # Create a style tag using insertAdjacentHTML
- # Additional Resources
How to set CSS styles using JavaScript
In my previous article, we looked at different ways to get style information from an HTML element using JavaScript. Today, you’ll learn how to apply CSS styles to HTML elements with JavaScript.
Let us say we have the following element:
div class="pizza">Hot, spicy, pizza 🍕div> Now, we want to change its text, background colors, and font style CSS properties using JavaScript. What should we do? There are multiple options available in JavaScript.
The easiest and straightforward way to change the CSS styles of an element with JavaScript is by using the DOM style property. All you need to do is fetch the element from DOM and change its inline styles:
const pizza = document.querySelector('.pizza') // change the text color to white pizza.style.color = 'white' // set background color to blue pizza.style.backgroundColor = 'blue' // change font style to italic pizza.style.fontStyle = 'italic' The style property uses the camel-case naming conventions for CSS properties and applies styles inline to the element:
div class="pizza" style="color: white; background-color: blue; font-style: italic;">Hot, spicy, pizza 🍕div> Another way is to create a
const style = document.createElement('style') Finally, append the style element to the DOM. To do this, get the
tag using document.head , and then call the appendChild() method on it to append the style element:document.head.appendChild(style) // create an element const style = document.createElement('style') // add CSS styles style.innerHTML = ` .pizza ` // append to DOM document.head.appendChild(style) The CSS Object Model is a set of APIs allowing the manipulation of CSS from JavaScript. It is much like the DOM, but for the CSS rather than the HTML. It allows users to read and modify [the] CSS style dynamically.
The CSSStyleSheet.insertRule() method inserts a new CSS rule to a stylesheet. Here is how you can use this method to add styles to the above HTML element:
// create an new style const style = document.createElement('style') // append to DOM document.head.appendChild(style) // insert CSS Rule style.sheet.insertRule(` .pizza `) It is not really required to create a new element. You can use existing elements as well as external stylesheets to add CSS rules using insertRule() . The insertRule() method works in all modern browsers, including Internet Explorer 9 and higher.
Constructable Stylesheets is a modern way of creating and distributing reusable styles when working with the Shadow DOM. Here is an example that creates a Constructable Stylesheets and appends it to the Shadow DOM:
// create a new shared stylesheet const sheet = new CSSStyleSheet() // add CSS styles sheet.replaceSync(` .pizza `) // apply the stylesheet to a document document.adoptedStyleSheets = [sheet] In this article, we looked at four ways to add CSS styles to an HTML element in JavaScript. So, which method should you use? It depends on what you want to achieve by dynamically changing the CSS. If you only want to modify CSS styles for a single element, it is better to use the style property. This property changes the inline styles for a specific HTML element without affecting global styles. If you want to apply a style to a set of HTML elements, create a new tag with the necessary CSS properties and append it to the document. Read Next: How to add multiple CSS styles using JavaScript ✌️ Like this article? Follow me on Twitter and LinkedIn. You can also subscribe to RSS Feed.
You might also like.
Javascript createelement style class
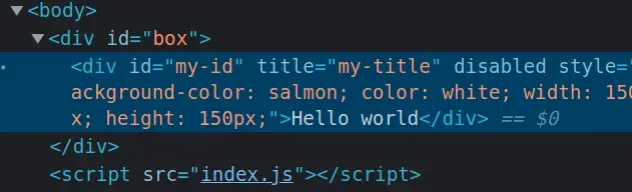
If I load the page from the example above, I can see that the attributes are applied to the element.
# Create an Element with Style attribute using JavaScript
To create an element with a style attribute:
- Use the document.createElement() method to create the element.
- Use the setAttribute() method to set the style attribute on the element.
- Add the element to the page using the appendChild() method.
Here is the HTML for the example.
Copied!DOCTYPE html> html lang="en"> head> title>bobbyhadz.comtitle> meta charset="UTF-8" /> head> body> div id="box">div> script src="index.js"> script> body> html>
And here is the related JavaScript code.
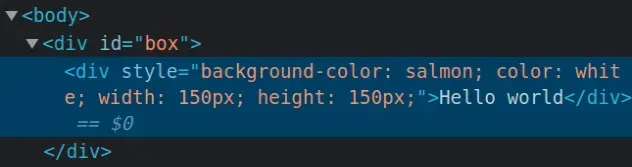
Copied!// ✅ Create element const el = document.createElement('div'); // ✅ Set Style Attributes on Element el.setAttribute( 'style', 'background-color: salmon; color: white; width: 150px; height: 150px;', ); // ✅ Alternatively, Set styles on Element // el.style.backgroundColor = 'salmon'; // el.style.color = 'white'; // el.style.width = '150px'; // el.style.height = '150px'; // ✅ Add text content to the element el.textContent = 'Hello world'; // ✅ Or set the innerHTML of the element // el.innerHTML = `Hello world`; // ✅ add element to DOM const box = document.getElementById('box'); box.appendChild(el);
We used the document.createElement method to create the element.
The only parameter we passed to the method is the type of element to be created ( div in the example).
The createElement method returns the newly created element.
We used the setAttribute method to set the style attribute on the element.
The setAttribute method takes 2 parameters:
- name - the name of the attribute whose value is to be set.
- value - the value to assign to the attribute.
If the attribute already exists, the value is updated, otherwise, a new attribute is added with the specified name and value.
Alternatively, you can use the style object to set styles on the element.
Copied!const el = document.createElement('div'); el.style.backgroundColor = 'salmon'; el.style.color = 'white'; el.style.width = '150px'; el.style.height = '150px';
When setting styles using the style property, multi-name words are camel-cased.
You can use the textContent property to set the element's text content or the innerHTML property to set the element's inner HTML markup.
You shouldn't use the innerHTML property with user-provided data without escaping it. This would leave your application open to cross-site scripting attacks.
You can use the appendChild method to add the element to the page.
The method adds a node to the end of the list of children of the element it was called on.
If I load the page from the example, I can see that the style attribute is successfully set on the element.
# Additional Resources
You can learn more about the related topics by checking out the following tutorials:
I wrote a book in which I share everything I know about how to become a better, more efficient programmer.
Javascript createelement style class
Last updated: Jan 12, 2023
Reading time · 3 min

# Create a style tag using JavaScript
To create a style tag:
- Use the document.createElement() method to create the style tag.
- Use the textContent property to assign styles to the tag.
- Add the style tag to the head using the appendChild() method.
Here is the HTML for the examples.
Copied!DOCTYPE html> html lang="en"> head> title>bobbyhadz.comtitle> meta charset="UTF-8" /> head> body> div id="box">Apple, Pear, Bananadiv> script src="index.js"> script> body> html>
And here is the related JavaScript code.
Copied!const style = document.createElement('style'); style.textContent = ` #box < width: 100px; height: 100px; background-color: salmon; color: white; >body `; document.head.appendChild(style);
We used the document.createElement to create a style element.
The only argument we passed to the method is a string that specifies the type of element to be created.
The createElement method returns the newly created element.
We used the textContent property to assign some styles to the element.
Notice that we used backticks `` (not single quotes) to be able to use a multi-line string when setting the element's text content.
The textContent property represents the text content of the element and its descendants. This is exactly what we need when adding styles to a style tag.
The document.head property returns the head element of the current document.
We called the appendChild method to append the style tag to the head element on the page.
If I open the page from the example, I can see that the style tag has been created successfully.

# Create a style tag using insertAdjacentHTML
You can also use the Element.insertAdjacentHTML method to create a style tag.
Copied!DOCTYPE html> html lang="en"> head> title>bobbyhadz.comtitle> meta charset="UTF-8" /> head> body> div id="box">Apple, Pear, Bananadiv> script src="index.js"> script> body> html>
And here is the related JavaScript code.
Copied!const style = ` #box < width: 100px; height: 100px; background-color: orange; color: white; >body `; document.head.insertAdjacentHTML('beforeend', style);
Make sure to wrap the contents of the style variable in backticks ``, not in single quotes.
We placed the style tag right before the closing head tag.
The insertAdjacentHTML() method takes the following 2 parameters:
- position - the position relative to the element where the HTML should be inserted. Can be one of the following:
- beforebegin - before the element itself.
- afterbegin - just inside the element, before its first child.
- beforeend - just inside the element, after its last child.
- afterend - after the element itself.
It should be noted that you shouldn't append HTML that is from user-generated input without escaping it.
# Additional Resources
You can learn more about the related topics by checking out the following tutorials:
I wrote a book in which I share everything I know about how to become a better, more efficient programmer.