- Fix Java was started but returned exit code=13 Error in Eclipse
- How to Fix Java was started but returned exit code=13 Error
- Блог о быдло разработке программного обеспечения
- пятница, 20 февраля 2015 г.
- Решение проблемы «Java was Started but Returned Exit Code=13» при запуске Eclipse
- Причина ошибки “Java was Started but Returned Exit Code=13”
- Как решить «Java was Started but Returned Exit Code=13 Error» в Eclipse
- Saved searches
- Use saved searches to filter your results more quickly
- DBeaver (portable) for 32bit Java under 64bit Win? #5678
- DBeaver (portable) for 32bit Java under 64bit Win? #5678
- Comments
- Java – Error while installing dbeaver – Java error code = 13
- Best Solution
- Related Solutions
Fix Java was started but returned exit code=13 Error in Eclipse
Eclipse is one of the best IDEs for Java and Android developers. There are many issues with Eclipse if it is not configured properly. One of the most common errors with Eclipse IDE is of the java exit code 13. It is common to get an error like Java was started but returned exit code=13.
For programming help you can checkout AssignmentOverflow.com
This Eclipse error is one of the most frustrating bugs to solve if you don’t know the correct method. Here I have enlisted some possible solutions for this error. You have to try all of them one by one.
If you want to hire a java developer, you can make use of online java test.
How to Fix Java was started but returned exit code=13 Error
You may get this error if the versions of java and eclipse do not match. If you have installed 64 bit java jdk on your machine and 32 bit Eclipse IDE or vice versa, then you may get this error.
So, ensure that you have installed both the softwares with their correct versions. If you installed different versions, you will have to uninstall the softwares and install them again with the same version.
There are cases when you want to keep both the 32 bit version and the 64 bit version installed in your machine due to compatibility issue.
When this is the scenario, you need to correctly mention the path of the system variables in the Environment Variable Settings. You have to select either 32 bit or 64 bit in both the softwares i.e., Eclipse and Java JDK.
Suppose you select 32 bit versions, you need to go to the C drive in the JDK Folder of 32 bit version. Once you do that, you can copy the path and set it in the Environment Variable section. You won’t get the same error again.
Another solution to this error is by copying the Eclipse folder in the C:/Program Files folder. For some this may work. However, if it does not work, you should try putting the Eclipse Folder in the C:/Program Files (x86) folder.
We hope that at least one of the above methods will work in your system. You may have to try all the three methods. One of them will surely solve your error message “java was started but returned exit code 13”.
There are a lot of compatibility issues with Java 1.8 and higher versions. So, if you are not able to solve the error with the above methods, you can degrade to java 1.7 or lower version and check if the error is solved or not.
If you have 32 bit and 64 bit versions installed at the same time, you need to set the Eclipse to one version of Java JDK. It should be explicitly set by the user, otherwise the default version of Java will be used which may cause this Error Code 13.
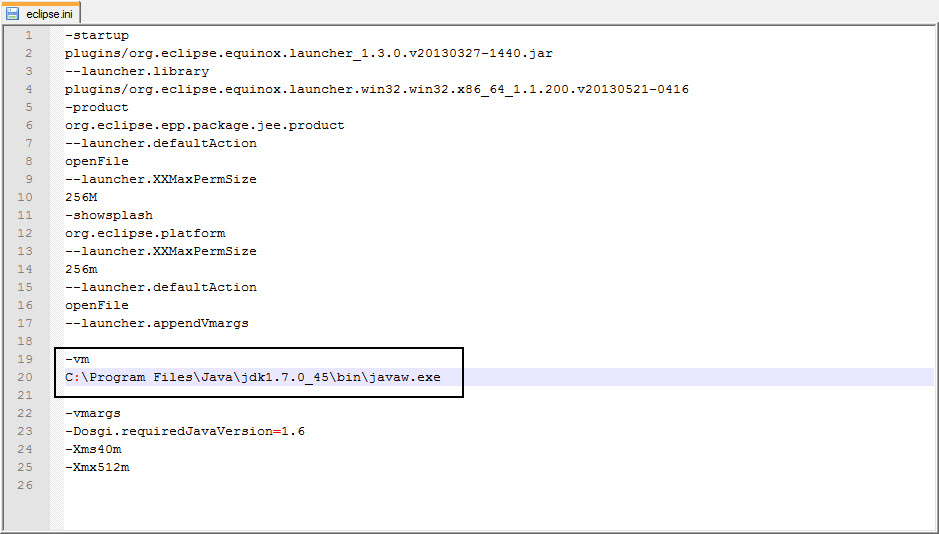
The solution to this the manipulation of the eclipse.ini file. The eclipse.ini is located in the Eclipse folder. Open that file with notepad editor in windows.
You need to add the following code before the line that includes -vmargs in the eclipse.ini file.
C:\Program Files\Java\jdk1.7.0_40-64\bin\javaw.exe
The second line may be different depending upon version of the java jdk installed in your machine. If you have a 32 bit JDK version, it may be found in Program Files(x86).
Few important points to remember while configuring eclipse.ini file:
1. The Java File’s Path must be Relative Path or Absolute Path. It should not just point to the Java Home Folder.
2. The -vm option and its path should be on a separate line.
3. The -vm option should be before -vmargs option.
Here is the screenshot of an eclipse.ini file.
Comment below if you are getting any difficulty to solve Java was started but returned exit code=13 error in eclipse. I will try to help you.
Блог о быдло разработке программного обеспечения
Блог о разработке программного обеспечения на java, Delphi, С# и баз данных.
пятница, 20 февраля 2015 г.
Решение проблемы «Java was Started but Returned Exit Code=13» при запуске Eclipse
После некоторых манипуляций с установленными JVM, при запуске Eclipse, появляется окно с ошибкой , текст которой начинается с «Java was Started but Returned Exit Code=13». Решения проблемы нашёл в заметке http://www.ashout.com/fix-java-started-returned-exit-code13-eclipse/ большое спасибо автору. У себя оставлю перевод.
Если вы получили ошибку “Java was Started but Returned Exit Code=13” во время установки Eclipse, то здесь вы поймете как решить её. Даже я столкнулся с этой проблемой в процессе установки Eclipse на операционной системе Windows. После поиска в Google я понял что многие сталкиваются с аналогичной проблемой в Eclipse. Если вы один из них, то здесь есть решение этой ошибки.
Причина ошибки “Java was Started but Returned Exit Code=13”
Прежде чем приступить к решению, давай те узнаем почему возникает эта ошибка. Если вы знаете почему возникает проблема, вы можете легко её решить.
Причина 1: Основная причина возникновения проблемы это установка разных версий 64 bit или 32 bit программного обеспечения. Это может быть Eclipse или Java.
Причина 2: Ошибка конфигурации в файле Eclipse.ini.
Причина 3: Специальные символы (#, !, @) в директории установки Eclipse.
Причина 4: Вы можете использовать последнюю версию Eclipse, но неправильную или не поддерживаемую версию Java Virtual Machine (JVM).
Выше описаны основные причины возникновения ошибки «Exit code =13» в Eclipse. Теперь мы узнаем как её решить.
Как решить «Java was Started but Returned Exit Code=13 Error» в Eclipse
Решение для причины 1: Проверьте версию операционной системы в которой вы работаете. Для проверки откройте окно «Компьютер» нажав клавиши Win+E или найдя его на рабочем столе или в кнопке пуск.
Теперь в левой панели найдите «Мой компьютер» выделите его и нажмите правой кнопкой мыши. В выпадающем меню выберите «Свойства». Когда вы нажмете на «Свойства», вы увидите окно системных свойств. В этом окне посмотрите свойство «Тип системы».
В «Тип системы» вы увидите какая у вас система 64-х разрядная или 32-х разрядная. То что вам и нужно было узнать.
Теперь вы знаете в какой операционной системе вы работаете.
После того как вы узнали какая операционная система, вы должны убедиться что скачали соответствующую версию Eclipse, а также Java.
Если вы закачали 32-х разрадную версию Java или Eclipse (на 64-х разрядной системе), вы получите ошибку «Exit code=13 error».
Пожалуйста дважды проверьте версию того, что вы закачали. Потому что во время установки не появится какая-либо ошибка несоответствия версии. Установка пройдёт гладко.
В моём случае я скачал 32-х разрядную версию Java и получил эту ошибку.
- -VM опция и его значение ней (путь) должны быть на разных строках
- Значение должно указывать полный абсолютный или относительный путь к выполняемым файлам Java(к каталогу bin), не к домашней директории Java.
- -VM Опция должна быть до -VMARGS, так как все значения после -VMARGS передаются непосредственно в JVM.
Решение для причины 3: У вас могут использоваться специальные символы #, !, @ в установочном каталоге Eclipse. Если ваш каталог с установленной Eclipse содержит специальные символы, тогда появится эта ошибка. Поэтому убедитесь что вы не используете специальные символы.
Пример
До исправления специальных симврлов
C:\# IDE\eclipse 3.7\
После исправления специальных символов в адресе
C:\IDE\eclipse 3.7\
и решения проблемы.
Решение для причины 4: Может быть вы используете последнюю версию Eclipse и не поддерживаемую версию Java.
Для проверки версии Java нужно открыть командную строку нажав win+R и введя cmd и нажмите Enter. Теперь в консоле введите java -version, что бы узнать версию Java.
Теперь определите поддерживает ли Eclipse данную версию или нет.
Вы можете открыть каталог “readme” в каталоге Eclipse и открыть readme_eclipse.html что бы посмотреть какие версии поддерживаются.
Я рекомендую вам скачать последнюю версию Java и Eclipse.
Надеюсь вы решили проблему «Java was Started but Returned Exit Code=13 Error» в Eclipse после этой заметки. Дайте знать почему у вас возникла эта ошибка в комментариях.
Saved searches
Use saved searches to filter your results more quickly
You signed in with another tab or window. Reload to refresh your session. You signed out in another tab or window. Reload to refresh your session. You switched accounts on another tab or window. Reload to refresh your session.
Have a question about this project? Sign up for a free GitHub account to open an issue and contact its maintainers and the community.
By clicking “Sign up for GitHub”, you agree to our terms of service and privacy statement. We’ll occasionally send you account related emails.
Already on GitHub? Sign in to your account
DBeaver (portable) for 32bit Java under 64bit Win? #5678
DBeaver (portable) for 32bit Java under 64bit Win? #5678
Comments
On my 64bit Win7 system (only) 32bit Java is installed. It works for a lot of Java programs.
Now I downloaded and extracted
When I doubleclick on dbeaver.exe I am getting an error popup
«Java was started but returned exit code 13»
It seems to my that DBeaver found a 64bit WindowsOS and hence thinks 64bit Java should be used.
How can I tell DBeaver to use 32bit Java?
On the other side if the Dbeaver package contains only 64bit Java version why does the package file name contain the string «win32.win32.x86» indicating 32bit version?
Where else can I download the pure 32bit DBeaver version?
The text was updated successfully, but these errors were encountered:
Java – Error while installing dbeaver – Java error code = 13
I am getting the below error when trying to open dbeaver. Java is up to date…any ideas?

Best Solution
I had the same problem this morning. There are two practical ways to solve it:
- Download the right version (probably DBeaver 64Bit version). You must actually find out which JRE-version your computer is running.
- Change the JVM DBeaver is using: Go to the DBeaver-directory and add the lines below on the top of the dbeaver.ini file. Be aware that the line break is important!
-vm C:/path/to/your/jdk/jdk-8u144-windows-x64/jre/bin/server/jvm.dll Related Solutions
Java – What are the differences between a HashMap and a Hashtable in Java
There are several differences between HashMap and Hashtable in Java:
- Hashtable is synchronized, whereas HashMap is not. This makes HashMap better for non-threaded applications, as unsynchronized Objects typically perform better than synchronized ones.
- Hashtable does not allow null keys or values. HashMap allows one null key and any number of null values.
- One of HashMap’s subclasses is LinkedHashMap , so in the event that you’d want predictable iteration order (which is insertion order by default), you could easily swap out the HashMap for a LinkedHashMap . This wouldn’t be as easy if you were using Hashtable .
Since synchronization is not an issue for you, I’d recommend HashMap . If synchronization becomes an issue, you may also look at ConcurrentHashMap .
Java – Is Java “pass-by-reference” or “pass-by-value”
Java is always pass-by-value. Unfortunately, when we deal with objects we are really dealing with object-handles called references which are passed-by-value as well. This terminology and semantics easily confuse many beginners.
public static void main(String[] args) < Dog aDog = new Dog("Max"); Dog oldDog = aDog; // we pass the object to foo foo(aDog); // aDog variable is still pointing to the "Max" dog when foo(. ) returns aDog.getName().equals("Max"); // true aDog.getName().equals("Fifi"); // false aDog == oldDog; // true >public static void foo(Dog d) < d.getName().equals("Max"); // true // change d inside of foo() to point to a new Dog instance "Fifi" d = new Dog("Fifi"); d.getName().equals("Fifi"); // true >In the example above aDog.getName() will still return «Max» . The value aDog within main is not changed in the function foo with the Dog «Fifi» as the object reference is passed by value. If it were passed by reference, then the aDog.getName() in main would return «Fifi» after the call to foo .
public static void main(String[] args) < Dog aDog = new Dog("Max"); Dog oldDog = aDog; foo(aDog); // when foo(. ) returns, the name of the dog has been changed to "Fifi" aDog.getName().equals("Fifi"); // true // but it is still the same dog: aDog == oldDog; // true >public static void foo(Dog d) < d.getName().equals("Max"); // true // this changes the name of d to be "Fifi" d.setName("Fifi"); >In the above example, Fifi is the dog’s name after call to foo(aDog) because the object’s name was set inside of foo(. ) . Any operations that foo performs on d are such that, for all practical purposes, they are performed on aDog , but it is not possible to change the value of the variable aDog itself.
For more information on pass by reference and pass by value, consult the following SO answer: https://stackoverflow.com/a/430958/6005228. This explains more thoroughly the semantics and history behind the two and also explains why Java and many other modern languages appear to do both in certain cases.