- [Solved] 5 Java Virtual Machine Errors and Quick Fix for JVM
- Quick Tips to Fix JAVA Virtual Machine Errors
- 1. Cannot create the Java Virtual Machine
- 2. OutofMemory Error
- 3. Trouble in opening the registry key
- 4. StackOverflowError
- 5. Internal and Unknown Error
- FIX: Could Not Create the Java Virtual Machine. (Solved)
- How to FIX: Could Not Create the Java Virtual Machine in Windows 10/11.*
- Method 1. Install the Correct version of JAVA version for Java IDE app*
- Method 2. Increase Allocated Memory for JAVA Apps.
- Method 3. Launch java.exe with Admin rights.
- Method 4. Completely Remove and Reinstall JAVA.
[Solved] 5 Java Virtual Machine Errors and Quick Fix for JVM
The best code is expected to throw errors which are easily fixed by the developers by formulating some quick tips and tricks.
While running the code on JAVA, you might have experienced different types of Virtual Machine Errors. You need to fix JAVA Virtual Machine errors to get you back your day without crashing the app.
Purpose of the Java Virtual Machine (JVM):
The Java virtual machine is mainly used for memory allocation, automatic garbage collection and byte-code interpretation to machine code.
Role of the Java Runtime Environment (JRE):
It is mandatory to install the Java Runtime Environment for the proper working of certain applications. The Java Virtual Machine is a crucial part of the JRE.
Instead of an executable file, a .class file is produced by compiling the java files which contains Java byte code and then interprets into machine-readable instructions.
Is JVM Platform Dependent?
The Java virtual machine is regarded as the platform independent. It does not depend on any singular operating system or hardware architecture for running the app hence providing a proper machine interface.
Note: JVM, JRE, and JDK are three different terms. If you are learning Java, you should know the difference between them.
Quick Tips to Fix JAVA Virtual Machine Errors
Often comes a time when you experience error messages while running JVM in situations like playing games, booting the computer or trying to open any Java-based applications.
Most Common Errors in JVM
Let us look after some quick fixes to resolve few common error messages.
1. Cannot create the Java Virtual Machine
We all have faced this error when trying to start java based games, for instance, Minecraft.
could not create the java virtual machine Windows
How to solve this error?
- Click on Control Panel
- Open System
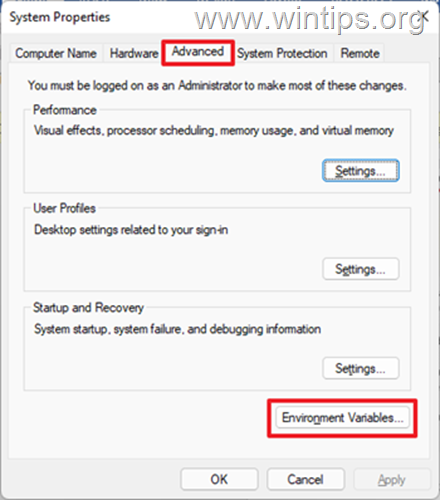
- Click Advanced Systems properties
- Go to environment variables
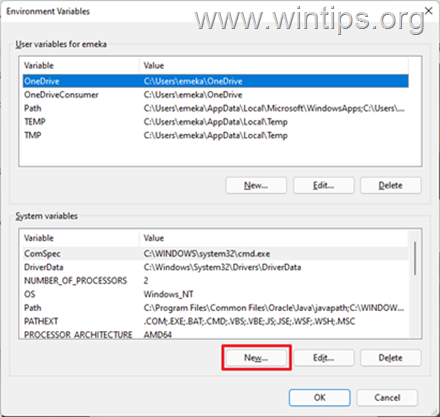
- Click ‘new’ in system variables
- Enter a new variable name – _JAVA_OPTIONS
- Then enter the variable value – Xmx512M
- Select OK
2. OutofMemory Error
It is quite popular among the DevOps community as there are other 8 types of OutofMemoryError that need to get recognized.
Every error is generated by variant reasons. Similar to this, there are different kinds of methods to solve them.
It becomes a tedious job to analyze Garbage Collection logs and Heap dumps; to overcome this.
What are the Free tools for finding Memory issues?
You can try your hands on free tools like GCeasy, HP Jmeter or IBM GC analyzer for Garbage collection logs.
There are HeapHero or Eclipse MAT for heap dumps.
3. Trouble in opening the registry key
Such errors can be encountered when working with java in command prompt.
How to resolve registry related issues?
- Search Windows\system32 folder
- Trash all the executable files along with java.exe, javaw.exe, and javaws.exe
- Reinstall your java runtime environment
4. StackOverflowError
How does StackOverflow error occur?
A thread’s stack has stored information related to the methods it allows to execute along with the primitive data type values, local variables, object pointers and return values.
All of these things consume a lot of memory and if the threads stack sizes grow beyond the allocated memory limit, then there are chances of java.lang.StackOverflowError to pop-up.
Typically this error occurs when a thread recursively invokes the same function again and again because of a bug that is present in the executing program.
To solve this, put some traces inside your code and see which function is getting called recursively.
5. Internal and Unknown Error
The internal error is said to be thrown by JVM due to three main reasons-
- fault in software which is implementing the virtual machine
- error in underlying host system software
- fault in the hardware.
Similarly, when the Java virtual machine is unable to report the actual error or an exception, it throws the Unknown Error. Like- Cannot access jar file
You may encounter this error while trying to open an application in the Java virtual machine.
How to resolve the internal or unknown error in JVM?
- Select ‘default programs’
- Click on ‘Associate a file type or protocol’ with a program
- Select ‘change program’ and click on ‘JAVA virtual machine launcher’
- Click ‘close’ to check if the issue is resolved or not.
- Try to uninstall or reinstall JAVA
We all have experienced different types of errors while working with the java virtual machine. In this article, we mentioned a few common ones which are faced by everyone and also suggested some tips and tricks for combating the situation.
Hope you are able to fix JAVA Virtual Machine errors. You can start learning and focusing on Java.
If you don’t find the solution to your problem, share the error message you are getting in the comment. We will try our best to resolve it.
FIX: Could Not Create the Java Virtual Machine. (Solved)
Java is one of the best development tools for creating games and applications and server-side programs. Games or apps written in Java need the Java Virtual Machine environment to run.
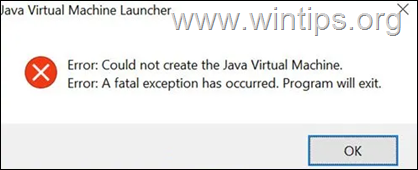
Games or applications developed with Java may crash unexpectedly or fail to open for various reasons, displaying the error «Could Not Create the Java Virtual Machine. Error: A fatal exception has occurred. Program will exit».
Below you will find several methods to resolve the Java Virtual Machine Launcher error «Could Not Create the Java Virtual Machine», in Windows 10/11 OS.
How to FIX: Could Not Create the Java Virtual Machine in Windows 10/11.*
* Suggestion: Before continuing with the following methods, try the following and see if the problem persists
-
- Install all Windows Updates.
- Press CTRL + SHIFT + ESC to open Task Manager and at Processes tab close all instances of Java Virtual Machine (right-click > End Task)
- 1. Install the Correct version of JAVA version for Java IDE app.
- 2. Increase Allocated Memory for JAVA Apps.
- 3. Launch JAVA with Admin rights.
- 4. Completely Remove and Reinstall JAVA.
Method 1. Install the Correct version of JAVA version for Java IDE app*
* Note: This method only applies to users using a JAVA IDE application for coding.
If you receive the mentioned error on a JAVA IDE application, you must ensure that the installed version of Java is compatible with the Java version (JRE or JDK) is running on JAVA IDE (Java Integrated Development Environment) application. So, proceed as follows:
Step 1. Check the JRE/JDK running version of JAVA IDE.
e.g. In the Eclipse IDE, check which version of the JRE or JDK it is running on by following the steps below:
1. From main menu, click Help > About Eclipse.
2. Click on Installation Details and choose the Configuration tab.
3. In the ‘Eclipse IDE Installation Details’ window, look at the line starting with -vm
4. The value at the line below will show you which JDK or JRE version on which Eclipse is running.- e.g.: If the path contains “jre6”, that means that Eclipse is running JRE version 6
- e.g.:If the path contains «jdk1.8.0_05« means that Eclipse is running JDK version 8.
Step 2. Check which version of JRE or JDK is installed on Windows.
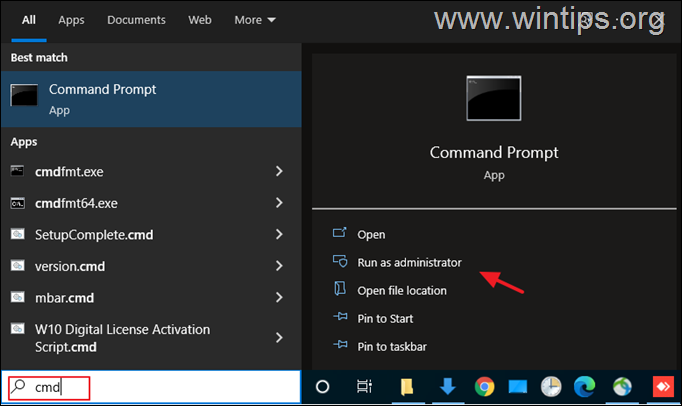
1. In the Search box type: cmd (or command prompt). Then select Run as administrator.
2. To find out the installed JAVA version give the following command and hit Enter:
3. If the IDE does not support the Java version on your device, proceed to install the correct version of Java. *
* Note: In some cases the installed JRE & JDK versions may be different. So, if you JAVA IDE application running on JDK, proceed and check also if the installed JDK matches the running JDK of the JAVA IDE app. To find out the installed JDK version on Windows, give the following command:
Method 2. Increase Allocated Memory for JAVA Apps.
Launching an application that exceeds the maximum memory size of the Java virtual machine could result in the error «Could Not Create the Java Virtual Machine». To work around this problem, go ahead and increase the allocated system memory that JAVA can use as follows:
1. Click on the Start menu and type in search bar: view advanced system settings. Then click Open.
2. In the ‘System Properties’ window, select the Advanced tab and click Environment Variables.
3. Below the System variables pane, select New.
4. Set the Variable name as _JAVA_OPTIONS and the Variable value as -Xmx1024M. Then, click OK twice to save the change and close all open windows. *
* Info: This will adjust the allocated memory for Java to 1GB (1024MB).
5. Restart your machine to apply the change.
6. Finally try to open your game or app on Java Virtual Machine. The problem should be gone.Method 3. Launch java.exe with Admin rights.
The Java error also appears when the user does not have the admin rights or permissions to launch certain executables. Configuring Java to always run as an Administrator could fix the problem.
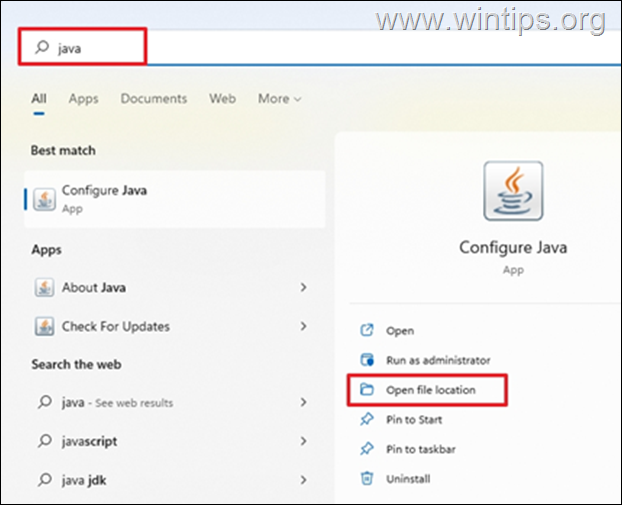
1. Press the Start menu and type Java in the search box.
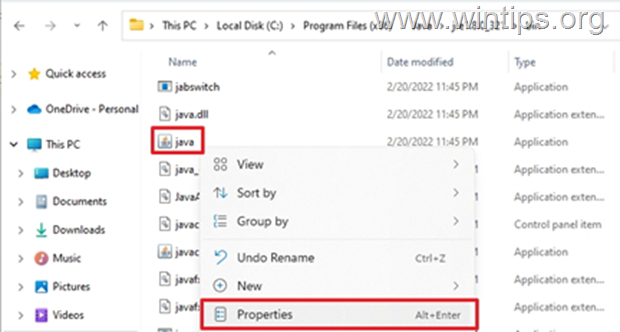
2. Click Open file location.3. In the File Explorer window, right-click the Java executable file and select Properties.
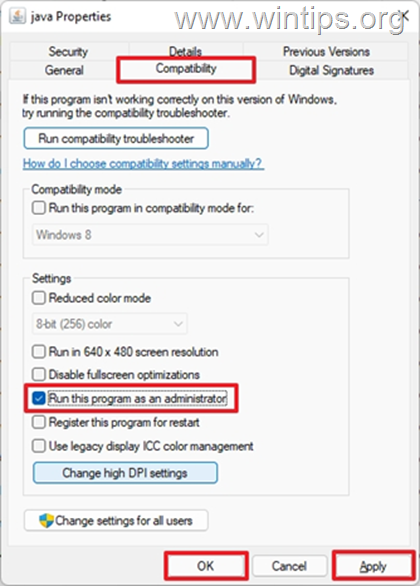
4. At ‘java Properties» window select the Compatibility tab and below the Settings pane, check the box Run this program as an administrator. Then click Apply and OK.
5. Finally, start the program that cannot run because of the «Could Not Create the Java Virtual Machine» error and see if the problem persists.
Method 4. Completely Remove and Reinstall JAVA.
In some cases, Java may be corrupted or missing components, causing games or applications you are trying to run to close. In this case, follow the instructions below to remove all versions of JAVA versions from your computer and reinstall it.
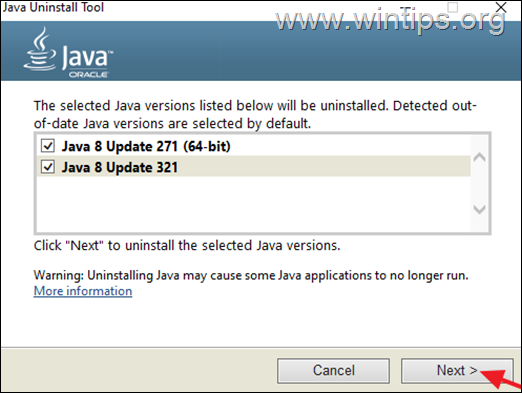
1. Download Java Uninstall tool.
2. Run the tool and select to remove all Java versions.3. After removal, proceed and delete the Java folder(s) from the following locations on disk (if exist):
4. Restart your computer.
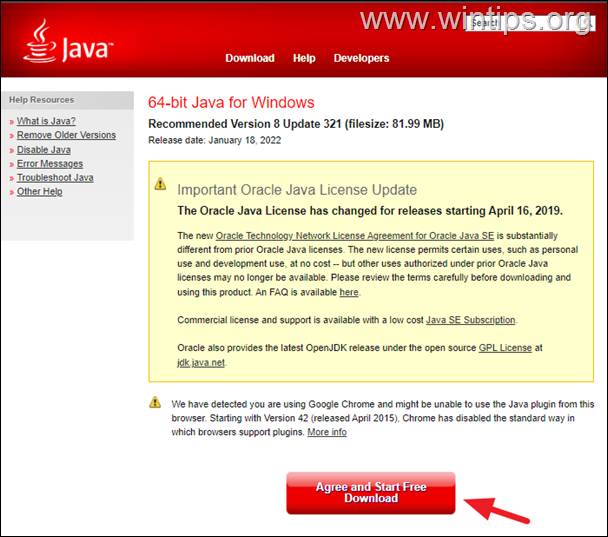
5. After reboot, visit Java official download page to download and install the latest version of Java.
That’s it! Which method worked for you?
Let me know if this guide has helped you by leaving your comment about your experience. Please like and share this guide to help others.


![image_thumb[8]](https://www.wintips.org/wp-content/uploads/2022/02/image_thumb8_thumb.png)
