- How to Check Java Version Installed on Linux
- Method 1: Check the Java Version On Linux
- Method 2: Find Version by Checking Path Where Java is Installed
- Method 3: Search for Java in the Installed Packages List
- How to Check Java Version on Mac or Windows
- Check Java Version on Mac
- Option 1: Check Java Version on Mac Using the GUI
- Option 2: Check Java Version on Mac Using the Terminal
- Check Java Version on Windows
- Option 1: Check Java Version on Windows Using GUI
- Option 2: Check Java Version on Windows Using Command Line
- Check Java Version Command in Linux
- Understanding Java
- What is Java?
- Why is Java Version Important?
- Checking Java Version in Linux
- Step 1: Open the Terminal
- Step 2: Enter the Java Version Command
- Step 3: Understanding the Output
- Troubleshooting Java Version Issues
- Java Command Not Found
- Debian/Ubuntu
- Arch Linux
- Fedora
- RHEL/CentOS
- Gentoo
- openSUSE
- Multiple Java Versions Installed
- Conclusion
How to Check Java Version Installed on Linux
How do I check my current Java version? There are several ways to check if Java is installed and which version is running on your system.
In this tutorial, learn how to check the Java version installed on Linux distros, including Ubuntu, CentOS, and Debian.
- A user account with sudo privileges
- Access to the command-line/terminal window
- A version of Java
Method 1: Check the Java Version On Linux
To check the Java version on Linux Ubuntu/Debian/CentOS:
2. Run the following command:
3. The output should display the version of the Java package installed on your system. In the example below, OpenJDK version 11 is installed.

Note: If the output indicates there is no such package on the system, you can install it with the help of one of our guides – How to install Java on Ubuntu or How to Install Java on CentOS.
You can also check the version of the primary Java compiler – javac (pronounced “java-see”) with the command:
![]()
Method 2: Find Version by Checking Path Where Java is Installed
There are two ways to find the path of the Java directory.
The first option includes running a single command:
update-alternatives --list javaThe system should respond with the path where Java is installed.
![]()
Note: This option may not work on CentOS systems. If you have issues finding the path of the Java directory with the command above, use the alternative outlined below.
Alternatively, you can use the whereis command and follow the symbolic links to find the Java path.
![]()
The output tells you that Java is located in /usr/bin/java.
2. List the content of the /usr/bin/java directory:
![]()
Inspecting the directory shows that /usr/bin/java is only a symbolic link for /etc/alternatives/java.
3. Just like in the previous step, list the content of the provided path by running:

Finally, the output displays /etc/alternatives/java is another symbolic link and that the real path of the Java directory is /usr/lib/jvm/java-11-openjdk-amd64/bin/java.
Method 3: Search for Java in the Installed Packages List
You can also prompt the system to list installed packages and search for Java, with its version number.
Find Java by listing all installed packages.
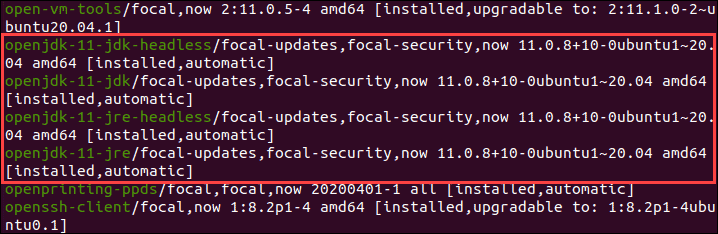
1. To generate a list of all installed packages, use the command:
2. Scroll up/down until you find the Java packages as shown in this example.
To avoid searching through all installed packages, list Java packages only. Prompt the system to list a specific software package. In this case, the package name is openjdk:
sudo apt list --installed | grep -i openjdk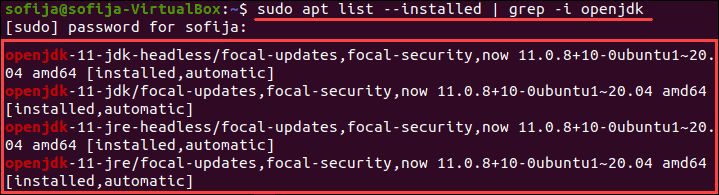
Note: CentOS users need to modify the commands for listing installed packages for their package manager. Use the commands: sudo yum list installed and sudo yum list installed | grep -i openjdk instead.
With this article, you have successfully checked the Java version installed on Linux. We also covered checking the Java path and searching for Java among the installed packages.
Once the Java version is confirmed, you can start developing anything from lightweight mobile to desktop applications.
How to Check Java Version on Mac or Windows
Java runs many of the applications that we use daily. Many applications cannot run on older versions of Java. Hence, it is essential to know which version is installed on your system.
In this tutorial, learn how to check the Java version on your Mac or Windows system.

- A system running macOS or Windows
- Access to the command-line/terminal window
- A version of Java installed
Check Java Version on Mac
You can find the version of Java on macOS by:
- using the GUI (Mac’s System Preferences)
- prompting for the version in the terminal window
Option 1: Check Java Version on Mac Using the GUI
To check the Java version on Mac without using the terminal by searching for the Java Control Panel in the System Preferences.
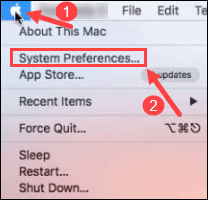
1. Click the Apple icon in the menu bar to open the drop-down menu and navigate to System Preferences.
2. A new window opens with various icons and settings. Find and click the Java icon to open the Java Control Panel.
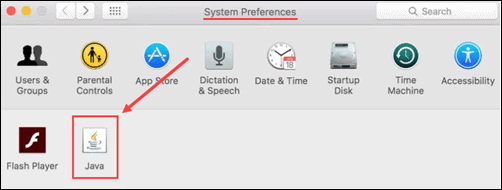
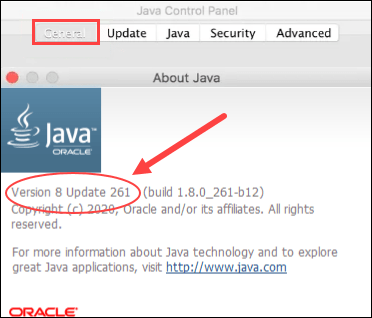
3. Once the Java Control Panel opens, click the About button. A new window with Java version information should appear.
Option 2: Check Java Version on Mac Using the Terminal
If you prefer using the terminal, checking the Java version is a simple one-command process.
1. First, open the terminal. To do so, click the Spotlight Search button in the top-right of the screen.

2. Type terminal in the search bar and open it by clicking on the icon in the search results.

3. Once in the command line, run the command: java -version . The output should display the Java version installed on your MacOS.

To check the version of the primary Java compiler – javac (pronounced “java-see”) use the command:
Note: If you have a Linux system, refer to How To Check Java Version Installed On Linux.
Check Java Version on Windows
To check the Java version on a Windows computer, you can use:
Option 1: Check Java Version on Windows Using GUI
To find the Java version on your Windows without opening a terminal window, use the Control Panel.
1. Open the Windows menu in the bottom-left corner and type control panel in the search bar.
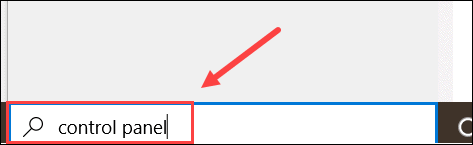
2. Find the Control Panel in the search results and click the icon to open it.

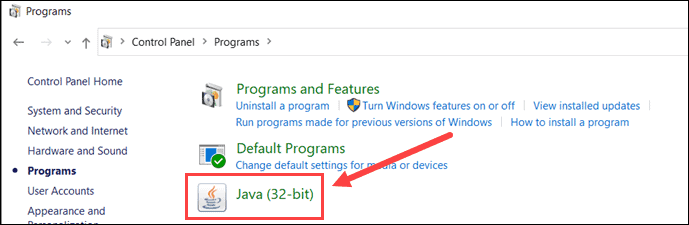
3. Move to the Programs directory.

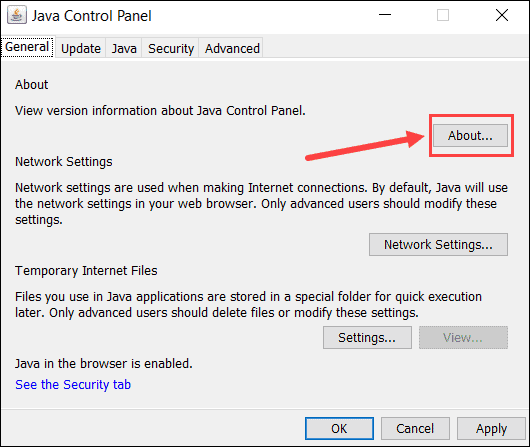
4. Find and click the Java icon to open the Java Control Panel.
5. Once the control panel opens, click the About button.
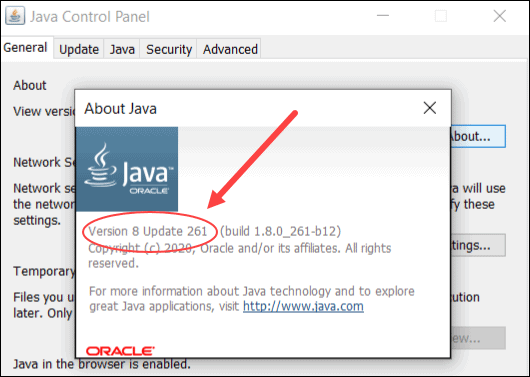
6. The About Java window should appear and display the Java version on your computer.
Option 2: Check Java Version on Windows Using Command Line
Another option to find the Java version on Windows is through the command line.
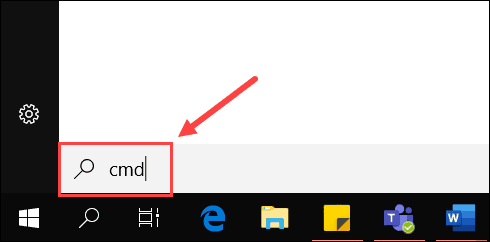
1. Open the Windows Start menu in the bottom-left corner and type cmd in the search bar.
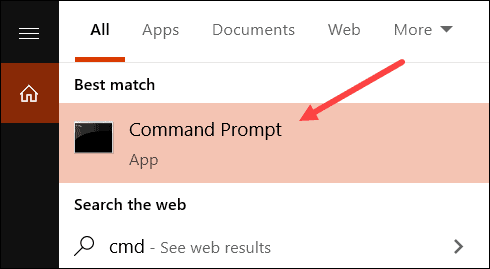
2. Then, open the Command Prompt once it appears in the search results.
3. A new window with the command prompt should appear. In it, type the command java -version and hit Enter. The output should display the Java version installed on your Windows system.

You can also check the version of the Java’s primary compiler, javac, with the command:
This article showed you how to check the version of Java installed on a macOS or Windows system.
Check Java Version Command in Linux

In the world of software development, Java is a widely used programming language. It’s crucial to know the version of Java installed on your Linux system for compatibility and debugging purposes. This guide will walk you through the process of checking your Java version using the command line in Linux. We’ll also delve into some common issues you might encounter and how to resolve them.
Understanding Java
What is Java?
Java is a high-level, class-based, object-oriented programming language that is designed to have as few implementation dependencies as possible. It is a general-purpose programming language intended to let application developers write once, run anywhere (WORA), meaning that compiled Java code can run on all platforms that support Java without the need for recompilation.
Why is Java Version Important?
Knowing the version of Java installed on your system is crucial for several reasons. It helps in debugging issues related to the Java Runtime Environment (JRE). It also aids in ensuring compatibility between your system and the software you’re trying to run. Some applications require a specific version of Java to function correctly, and knowing your Java version can save you from potential headaches down the line.
Checking Java Version in Linux
Step 1: Open the Terminal
Start by opening the terminal. If you’re on a server, you’re already there. If you’re using Linux, find the ‘Terminal’ in your applications menu or taskbar and open it. Don’t worry about which terminal you use, as most of our commands work in most of them.
Step 2: Enter the Java Version Command
Once you have the terminal open, you can check the Java version by entering the following command:
This command tells Java to output its version information. If Java is installed on your system, you should see output similar to the following:
java version "17.0.7" 2023-04-18 LTS Java(TM) SE Runtime Environment (build 17.0.7+8-LTS-224) Java HotSpot(TM) 64-Bit Server VM (build 17.0.7+8-LTS-224, mixed mode, sharing) In this example, we’re showing Java version 17.0.7. Your own system might show a different version, depending on what you have installed.
Step 3: Understanding the Output
The output of the java -version command provides several pieces of information:
- java version «17.0.7» 2023-04-18 LTS : This is the version of Java installed on your system. The “LTS” indicates that this is a Long-Term Support version, which means it will receive updates and security fixes for a longer period than non-LTS versions.
- Java(TM) SE Runtime Environment (build 17.0.7+8-LTS-224) : This is the runtime environment, which is the software layer on which your Java programs run.
- Java HotSpot(TM) 64-Bit Server VM (build 17.0.7+8-LTS-224, mixed mode, sharing) : This is the Java Virtual Machine (JVM), which is the platform that executes Java bytecode. The “mixed mode” indicates that the JVM is using both interpreted and compiled code for execution, while “sharing” means it’s using class data sharing to improve startup and footprint.
Troubleshooting Java Version Issues
Java Command Not Found
If you enter the java -version command and receive a message saying java: command not found , this means that Java is not installed on your system or the Java executable is not in your system’s PATH.
To resolve this issue, you can install Java by using the package manager for your specific Linux distribution. Here’s how to do it on various distributions:
Debian/Ubuntu
sudo apt install default-jdkArch Linux
Fedora
sudo dnf install java-latest-openjdkRHEL/CentOS
sudo yum install java-latest-openjdksudo dnf install java-latest-openjdkGentoo
emerge --ask dev-java/openjdkopenSUSE
zypper install java--openjdk Multiple Java Versions Installed
In some cases, you might have multiple versions of Java installed on your system. You can check this by entering the following command:
update-alternatives --config javaThis command lists all the Java versions installed on your system and allows you to choose which one to use by default. The output will look something like this:
There are 2 choices for the alternative java (providing /usr/bin/java). Selection Path Priority Status ------------------------------------------------------------ * 0 /usr/lib/jvm/java-11-openjdk-amd64/bin/java 1111 auto mode 1 /usr/lib/jvm/java-11-openjdk-amd64/bin/java 1111 manual mode 2 /usr/lib/jvm/java-8-openjdk-amd64/jre/bin/java 1081 manual modeIn this example, there are two versions of Java installed: Java 11 and Java 8. The asterisk (*) indicates the default version. You can change the default version by entering the selection number of the version you want to use.
Conclusion
Knowing how to check your Java version in Linux is a fundamental skill for any software developer or system administrator. It helps ensure compatibility between your system and the software you’re running, aids in debugging, and allows you to manage multiple Java versions if necessary. By following this guide, you should now be able to check your Java version and troubleshoot common issues.