- Compile and build applications with IntelliJ IDEA
- Compile a single file or class
- Change the compilation output locations
- Specify compilation output folders
- Build
- Build a module, or a project
- Rebuild
- Rebuild a module, or a project
- Background compilation (auto-build)
- Configure the background compilation
- Compile before running
- Configure a run/debug configuration
- Review compilation and build output
- Package an application into a JAR
- Create an artifact configuration for the JAR
- Build the JAR artifact
- Run a packaged JAR
- Create a run configuration
- Execute the run configuration
- Packaging the Application
- Creating an Artifact
- Создаем исполняемый jar в Intellij IDEA
Compile and build applications with IntelliJ IDEA
The IntelliJ IDEA compilation and building process compiles source files and brings together external libraries, properties files, and configurations to produce a living application. IntelliJ IDEA uses a compiler that works according to the Java specification.
You can compile a single file, use the incremental build for a module or a project, and rebuild a project from scratch.
If you have a pure Java or a Kotlin project we recommend that you use IntelliJ IDEA to build your project since IntelliJ IDEA supports the incremental build which significantly speeds up the building process.
However, IntelliJ IDEA native builder might not correctly build the Gradle or Maven project if its build script file uses custom plugins or tasks. In this case, the build delegation to Gradle or Maven can help you build your project correctly.
Compile a single file or class
- Open the needed file in the editor and from the main menu, select Build | Recompile ‘class name’ ( Ctrl+Shift+F9 ). Alternatively, in the Project tool window, right-click the class you need and from the context menu, select Recompile ‘class name’ . If errors occur during the compilation process, IntelliJ IDEA will display them in the Review compilation and build output along with warning messages.
Change the compilation output locations
When you compile your source code, IntelliJ IDEA automatically creates an output directory that contains compiled .class files.

Inside the output directory, IntelliJ IDEA also creates subdirectories for each of your modules.
The default paths for subdirectories are as follows:
At the project level, you can change the /out part of the output path. If you do so (say, specify some instead of /out ) but don’t redefine the paths at the module level, the compilation results will go to /production/ and /test/ .
At the module level, you can specify any desirable compilation output location for the module sources and tests individually.
Specify compilation output folders
- Open the Project Structure dialog ( File | Project Structure Ctrl+Alt+Shift+S ).
- In Project Settings , select Project and in the Project compiler output field, specify the corresponding path.
 For modules, select Modules , the module you need and the Paths tab. Change the location of the output folder under the Compiler output section.


Build
When you execute the Build command, IntelliJ IDEA compiles all the classes inside your build target and places them inside the output directory.
When you change any class inside the build target and then execute the build action, IntelliJ IDEA performs the incremental build that compiles only the changed classes. IntelliJ IDEA also recursively builds the classes’ dependencies.
Build a module, or a project
- Select a module or a project you want to compile and from the main menu, select Build | Build Project ( Ctrl+F9 ). IntelliJ IDEA displays the compilation results in the Review compilation and build output.
If you add a module dependency to your primary module and build the module, IntelliJ IDEA builds the dependent module as well and displays it in the output directory alongside the primary one. If the dependent module has its own module dependencies, then IntelliJ IDEA compiles all of them recursively starting with the least dependent module.

The way the module dependencies are ordered may be very important for the compilation to succeed. If any two JAR files contain classes with the same name, the IntelliJ IDEA compiler will use the classes from the first JAR file it locates in the classpath.
Rebuild
When you execute a rebuild command, IntelliJ IDEA cleans out the entire output directory, deletes the build caches and builds a project, or a module from scratch. It might be helpful, when the classpath entries have changed. For example, SDKs or libraries that the project uses are added, removed or altered.
Rebuild a module, or a project
- From the main menu, select Build | Rebuild Project for the entire project or Build | Rebuild ‘module name’ for the module rebuild. IntelliJ IDEA displays the build results in the Review compilation and build output.
When the Rebuild Project action is delegated to Gradle or Maven, IntelliJ IDEA doesn’t include the clean task/goal when rebuilding a project. If you need, you can execute the clean command before the rebuild using the Execute Before Rebuild option in the Gradle or Maven tool window.
Background compilation (auto-build)
You can configure IntelliJ IDEA to build your project automatically, every time you make changes to it. The results of the background compilation are displayed in the Problems tool window.
Configure the background compilation
- Press Ctrl+Alt+S to open the IDE settings and select Build, Execution, Deployment | Compiler .
- On the Compiler page, select Build project automatically . Now when you make changes in the class files, IntelliJ IDEA automatically performs the incremental build of the project. The automatic build also gets triggered when you save the file ( Ctrl+S ) or when you have the Save files automatically if application is idle for N sec. option selected in the System settings dialog.
Enabling the Build project automatically option also enables Build project in Settings | Tools | Actions on Save
When you have the Power Save Mode option ( File | Power Save Mode ) enabled in your project, the auto-build action is disabled, and you need to manually run the build ( Ctrl+F9 ).
Compile before running
By default, when you run an application, IntelliJ IDEA compiles the module where the classes you are trying to run are located.
If you want to change that behavior, you can do so in the Run/Debug Configurations dialog.
Configure a run/debug configuration
- From the main menu, select Run | Edit Configurations .
- In the dialog that opens, create a new or open an existing run configuration.
- Click the Modify options link.
- In the Add Run Options list, under the Before Launch section, select Add before launch task . The list of tasks becomes available and the Build will be selected. Click to disable it.

- If you need to add a new configuration action, click and from the list that opens, select the desired option. For example, if you select Build Project then IntelliJ IDEA will build the whole project before the run. In this case, the dependencies that were not included in the build with the Build action, will be accounted for. If you select the Build, no error check option, IntelliJ IDEA will run the application even if there are errors in the compilation results.


Review compilation and build output
IntelliJ IDEA reports compilation and building results in the Build tool window, which displays messages about errors and warnings as well as successful steps of compilation.

If you configured an auto-build, then IntelliJ IDEA uses the Problems tool window for messages. The window is available even if the build was executed successfully. To open it, click Auto-build on the status bar.

Double-click a message to jump to the problem in the source code. If you need to adjust the compiler settings, click .
Package an application into a JAR
When the code is compiled and ready, you can package your application in a Java archive (JAR) to share it with other developers. A built Java archive is called an artifact .
Create an artifact configuration for the JAR
- From the main menu, select File | Project Structure Ctrl+Alt+Shift+S and click Artifacts .
- Click , point to JAR , and select From modules with dependencies .
- To the right of the Main Class field, click and select the main class in the dialog that opens (for example, HelloWorld (com.example.helloworld) ). IntelliJ IDEA creates the artifact configuration and shows its settings in the right-hand part of the Project Structure dialog.
- Apply the changes and close the dialog.
Build the JAR artifact

- From the main menu, select Build | Build Artifacts .
- Point to the created .jar ( HelloWorld:jar ) and select Build . If you now look at the out/artifacts folder, you’ll find your .jar file there.
When you’re building a project, resources stored in the Resources root are copied into the compilation output folder by default. If necessary, you can specify another directory within the output folder to place resources.
Run a packaged JAR
To run a Java application packaged in a JAR, IntelliJ IDEA allows you to create a dedicated run configuration.
If you have a Gradle project, use Gradle to create and run the JAR file.
For Maven projects, you can use IntelliJ IDEA to run the JAR file. If you have a Spring Boot Maven project, refer to the Spring section.
Create a run configuration
- Press Ctrl+Shift+A , find and run the Edit Configurations action.
- In the Run/Debug Configurations dialog, click and select JAR Application .
- Add a name for the new configuration.
- In the Path to JAR field, click and specify the path to the JAR file on your computer.
- Under Before launch , click , select Build Artifacts in the dialog that opens. Doing this means that the JAR is built automatically every time you execute the run configuration.
Run configurations allow you to define how you want to run your application, with which arguments and options. You can have multiple run configurations for the same application, each with its own settings.
Execute the run configuration
- On the toolbar, select the created configuration and click to the right of the run configuration selector. Alternatively, press Shift+F10 if you prefer shortcuts. As before, the Run tool window opens and shows you the application output.
If the process has exited successfully, then the application is packaged correctly.
Packaging the Application
We can package the application into a Java ARchive file (JAR).
When the code is ready, we can package our application in a JAR. JAR files are often used to deploy an application to the production server. Once a JAR file has been built, it is called an artifact. Let’s take look at how to create artifacts in IntelliJ IDEA.
Creating an Artifact
- Press Cmd+; on macOS, or Shift+Control+Alt+S on Windows to bring up the Project Structure dialog.
- Select Artifacts from the left-hand menu and then press the + icon. Select JAR and then From modules with dependencies.

You don’t need to change anything for the Module, however you do need to say which class in your project has the main method. Click the browse button to navigate to your main method. IntelliJ IDEA will show you a list of classes in your project, you only have one so select that.

- Press OK to select your class. All the other defaults are fine for this tutorial, press OK. Now you can see your new JAR file defined in the Project Structure dialog.

- If it matches the above screenshot, press OK. You have now defined how to build the JAR file, but you haven’t actually built it yet. You need to build it with your build artifacts.
- Go to Build >Build Artifacts. You will only have one to choose from which is the one that we just defined.

- Press Enter to build the artifact. Your status bar at the bottom-left of the screen will show you when this has completed.

IntelliJ IDEA puts the artifact in a new folder in your out folder called HelloWorld_jar .

To make sure that this JAR file was created correctly you will want to run it. We’ll do this in the next step of this tutorial by using a run configuration.
Создаем исполняемый jar в Intellij IDEA

IntelliJ IDEA дает возможность быстро создавать исполняемый JAR-файл вашей программы, содержащий модули со всеми зависимостями.
Смотрим видео-инструкцию или следуем пунктам ниже:
Для того, чтобы создать JAR, необходимо проделать всего 3 пункта:
1. Нажмите кнопку ‘+’ в диалоговом окне Project Structure и выберите соответствующий пункт (Рисунок 1):

Рисунок 1 — Project Structure -> Artifacts -> Jar -> From modules with dependencies
2. Далее IntelliJ IDEA показывает диалог, позволяющий настроить новый артефакт (Рисунок 2):
Здесь нужно выбрать главный класс вашего проекта и нажать ОK
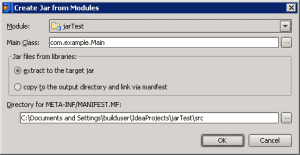
Рисунок 2 — Диалог создания нового артефакта JAR
3. После нажатия клавиши ОК, вы можете создать файл Jar с помощью пункта меню Build -> Build Artifact
По умолчанию все библиотеки будут извлечены в целевой Jar. Сам исполняемый файл будет сгенерирован в директории out -> artifacts вашего проекта (Рисунок 3)

Рисунок 3 — Месторасположение сгенерированного JAR файла
Все, теперь исполняемый файл можно запускать.