- How to Connect MySQL Database in Java Using Eclipse Step by Step
- How to Connect MySQL Database in Java Using Eclipse
- Downloading and Installing Eclipse
- Creating a Database and Table in MySQL
- Creating a Java Project in Eclipse
- Adding MySQL connector jar file in Eclipse
- Connecting Java Program with MySQL Database
- Which Jar contains java.sql.* ?
How to Connect MySQL Database in Java Using Eclipse Step by Step
Hello guys, Welcome to another tutorial, and in this tutorial, we will learn how to connect MySQL database in Java using Eclipse with simple and easy steps. Most of the time, whenever we try to connect our program to the database, we face a lot of problems, and even then, we cannot connect successfully. But if you follow this tutorial properly, you will be able to connect your Java program to the MySQL database using Eclipse quite easily.
So Let’s start our tutorial on how to connect MySQL database in Java using Eclipse.
How to Connect MySQL Database in Java Using Eclipse
- 1 How to Connect MySQL Database in Java Using Eclipse
- 1.1 Downloading and Installing Eclipse
- 1.2 Creating a Database and Table in MySQL
- 1.3 Creating a Java Project in Eclipse
- 1.4 Adding MySQL connector jar file in Eclipse
- 1.5 Connecting Java Program with MySQL Database
- 1.6 Inserting Data into The MySQL Database using Java
- 1.7 Updating Data in The MySQL Database using Java
- 1.8 How to Retrieve Data from MySQL Database in Java Using Eclipse
- 1.9 Deleting Data from the MySQL Database using Java
- 1.10 Conclusion
Downloading and Installing Eclipse
- The very First thing you need to do is to Download and Install Eclipse IDE on your system.
- Open your favorite browser and go to the official website of Eclipse www.eclipse.org.
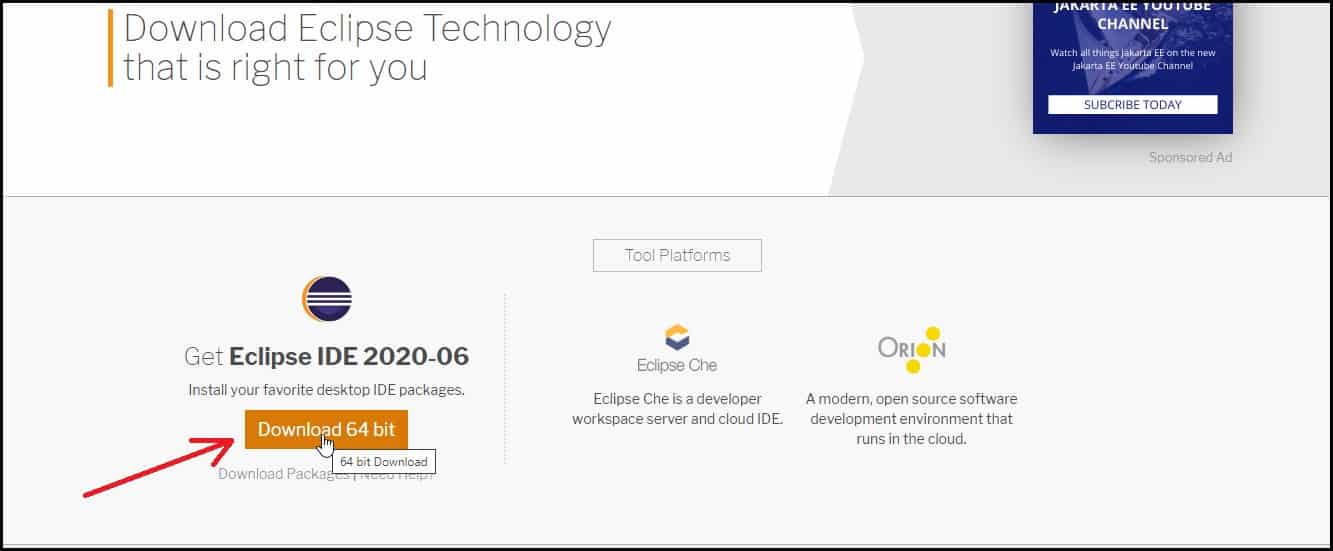
- When you enter the official website of the eclipse, you will see a download button in the top right corner. Click on that.
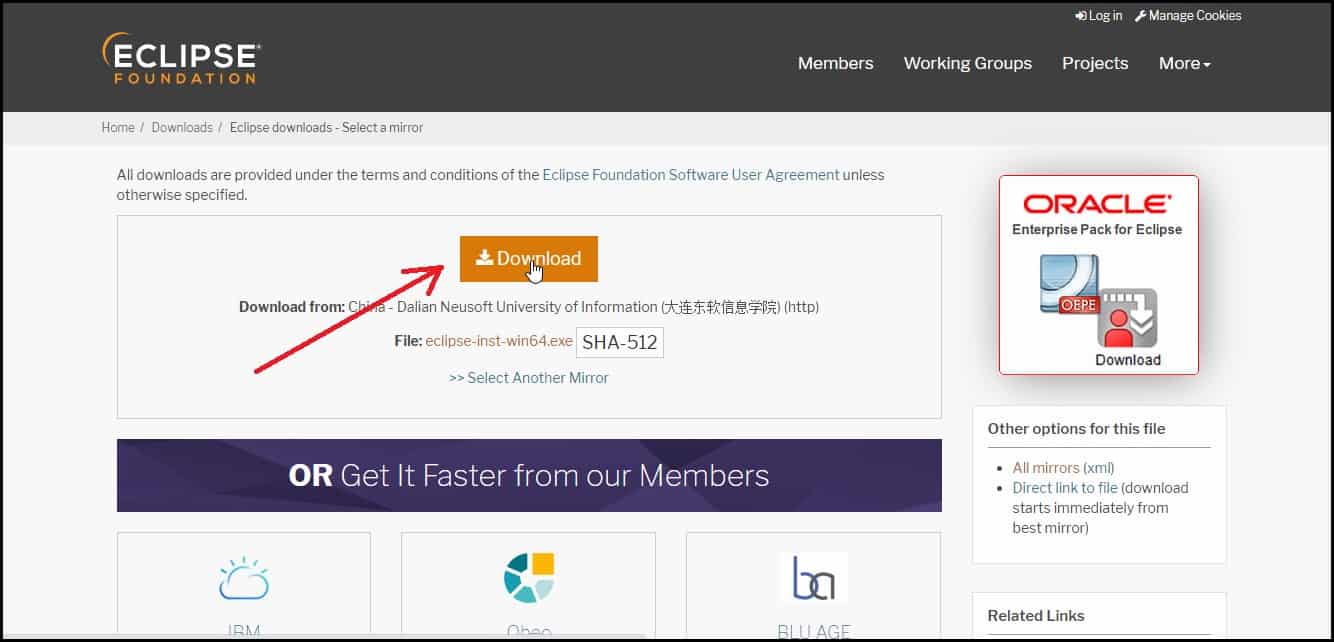
- After clicking on the Download Button, you will be redirected to another Web page. Click on the download button, as shown in the figure below.
- Now again, click on the Download button to download the executable eclipse file.
- After downloading the file, you need to install it in your system in the same way you install any application.
Creating a Database and Table in MySQL
- To create a database and table, you can either choose MySQL command-line client or MySQL workbench, which is nothing but a GUI version of the MySQL console where we can visually design, model, and generates databases.
- If you don’t know how to install MySQL workbench in your system, then you can follow this guide, How to install MySQL Workbench.
- To get to know how to download and Install MySQL in your system so that you can Use MySQL command-line client, you can follow this guide.
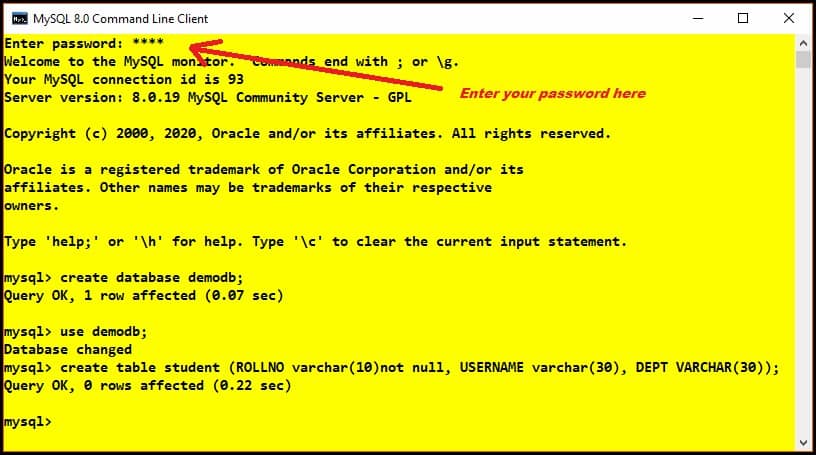
- I will use MySQL command-line client in this tutorial, open MySQL command-line client, and enter your password so that you can connect the MySQL database.
- This is the same password you provided while installing the MySQL database in your system.
- Now create a database named “demodb” and a table named “student” inside it with columns
- ROLLNO
- USERNAME
- DEPT
create table student ( ROLLNO varchar ( 10 ) not null , USERNAME varchar ( 30 ) , DEPT VARCHAR ( 30 ) ) ;
Creating a Java Project in Eclipse
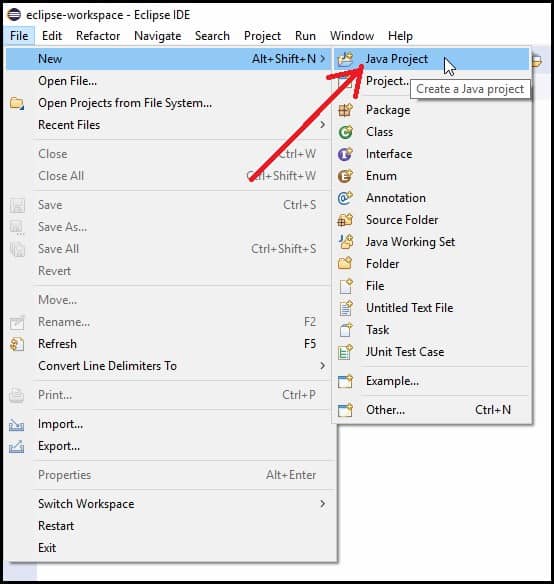
- Open Eclipse IDE and click on the Java Project under the new section of File Menu ( File>>New>>Java Project ).
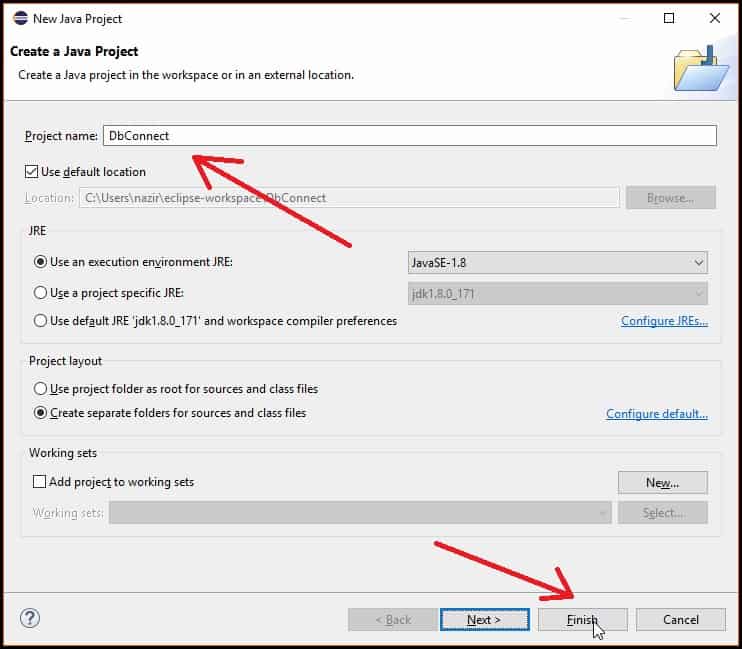
- Now give a name to your project (DbConnect in this example) and click on “Finish”.
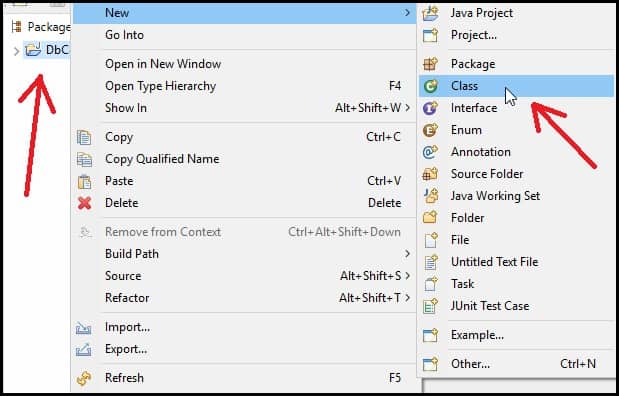
- Now right click on the project and create a new Java class (New>>Class).
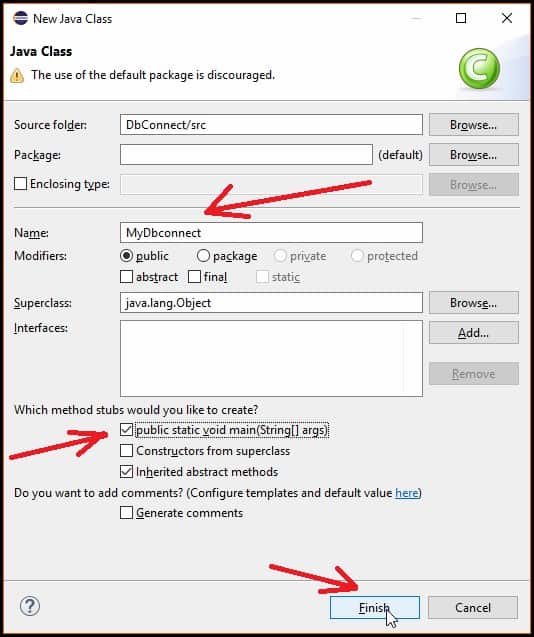
- Now give a name to your class(MyDbconnect in this Example), tick mark on the public static void main(String[] args), and then click on the Finish button as shown in the figure below.
Adding MySQL connector jar file in Eclipse
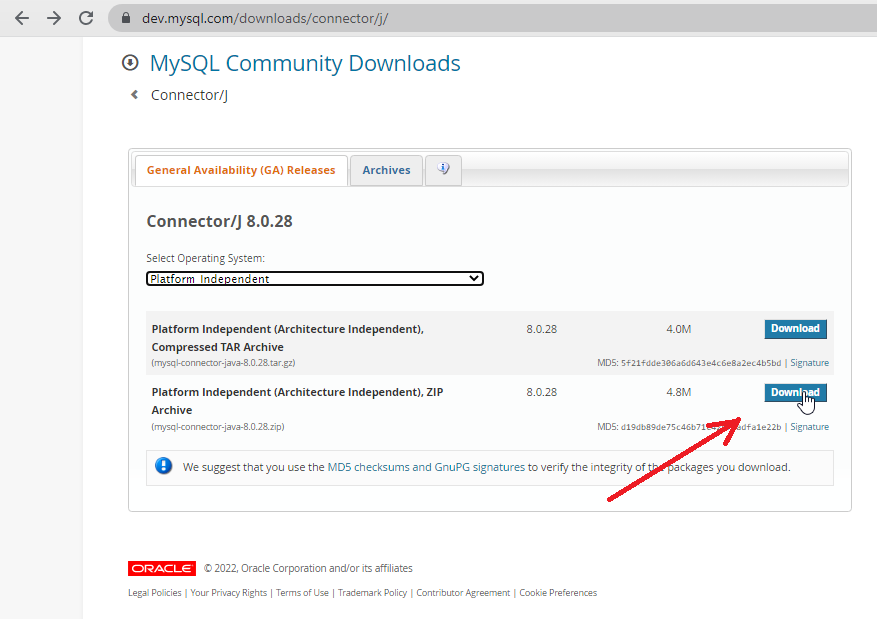
- In order to connect your java program with MySQL database, you need to include MySQL JDBC driver which is a JAR file, namely mysql-connector-java-8.0.28.jar. The version number in the Jar file can be different.
- You can download the latest version of MySQL connector from this link (MySQL Connector Java download) .
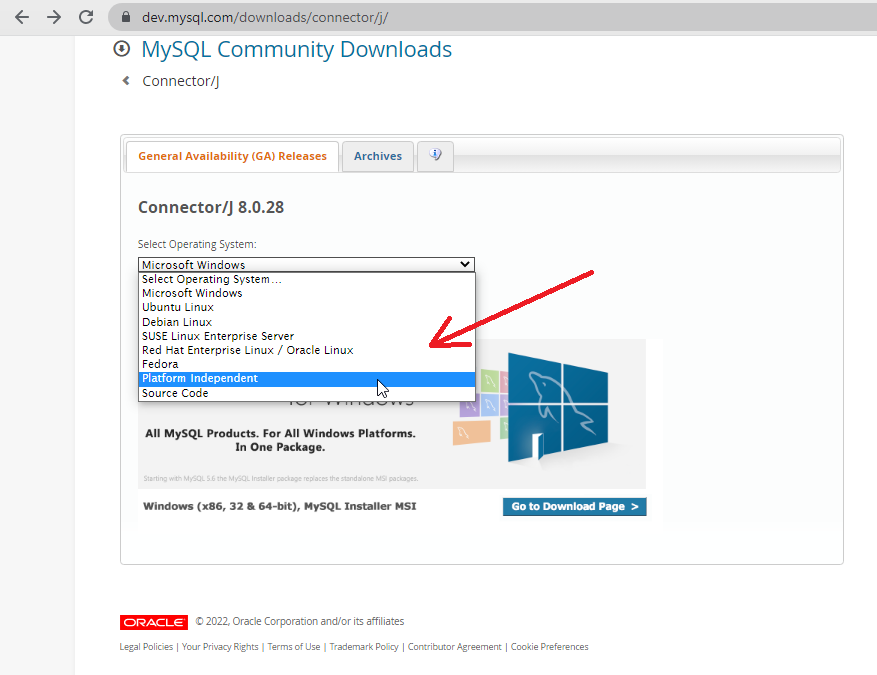
- After visiting the link, select platform independent from the drop-down menu as shown in the figure below.
- Then download the Platform Independent (Architecture Independent), ZIP Archive as shown below.
- Extract the zip archive and you will get the jar file.
- Next, you have to include this jar file into your program so that you will be able to connect your java program with MySQL database.
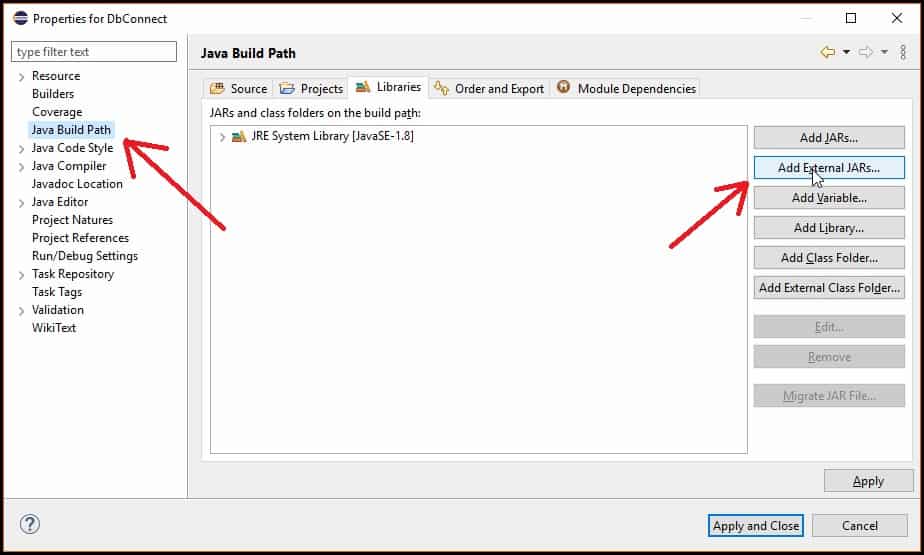
- Right-click on the project, go to the properties section then select Java Build Path and click on the Add External JARs button.
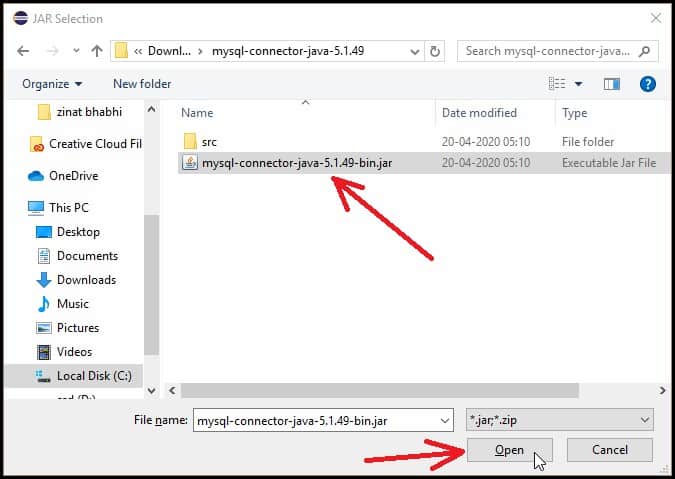
- After clicking on the button a pop-up window will appear where you have to select and open the jar file.
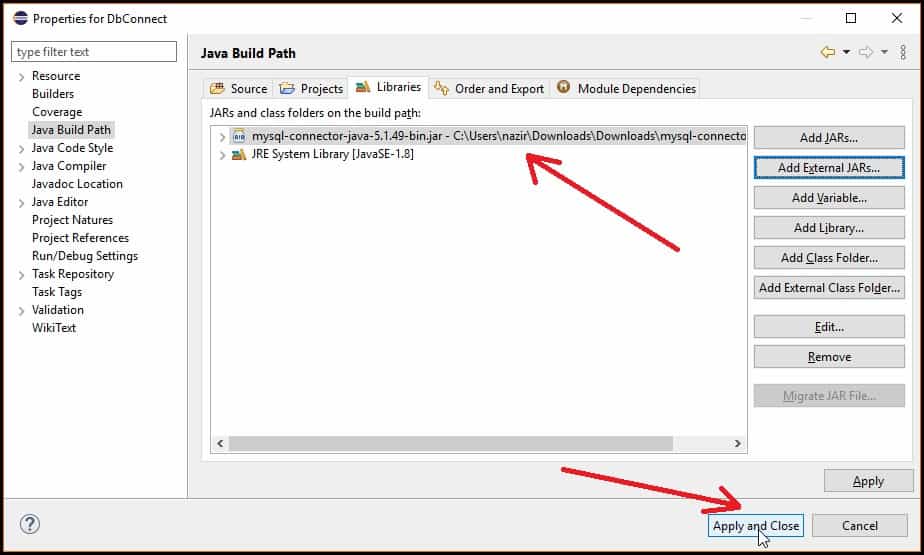
- You can see the added Jar file as shown in the figure below. Now click on the Apply and Close button.
Connecting Java Program with MySQL Database
Since you have already finished adding jar file, now you are ready to connect your Java program with MySQL Database. Let’s quickly take a look at the steps.
- Establish a connection using DriverManager.getConnection(String URL) and it returns a Connection reference.
- In String URL parameter you have to write like this jdbc:mysql://localhost:3306/demodb”, “root”, “root” where,
Which Jar contains java.sql.* ?
posted 22 years ago
I’ve installed Java2 1.3 development environments on Solaris several times without this problem, but I’m new to Win2k. Do I need J2EE?
When I compile my connection pool I’m told javac can’t find «Timer» which I think is part of java.sql. When I run JSP under Tomcat I’m that I have an illegal constant pool type, probably because it can’t compile the class.
I have jar tvf ‘d all the jars I can find. I don’t see java.sql. It isn’t part of lang is it?
The examples in Tomcat run just fine. So does MySQL from the command prompt.
I have compared my CLASSPATH to my Solaris machines (which run this code just fine). Here it is:
C:\java\lib;C:\java\lib\tools.jar;C:\java\lib\dt.jar;C:\java\jre\lib\rt.jar;C:\progra~1\apache~1\jakarta-tomcat\lib\servlet.jar;C:\Progra~1\Apache~1\Apache\beans;C:\Progra~1\Apache ~1\Apache\classes;C:\Progra~1\Apache~1\Apache\classes\mm.mysql-2.0.4-bin.jar;.
Here is the error report from tomcat:Internal Servlet Error:
javax.servlet.ServletException: javaservlets/jdbc/ConnectionPool (Illegal constant pool type)
at org.apache.jasper.servlet.JspServlet.service(JspServlet.java:399)
at javax.servlet.http.HttpServlet.service(HttpServlet.java:853)
at org.apache.tomcat.core.ServletWrapper.doService(ServletWrapper.java:404)
at org.apache.tomcat.core.Handler.service(Handler.java:286)
at org.apache.tomcat.core.ServletWrapper.service(ServletWrapper.java:372)
at org.apache.tomcat.core.ContextManager.internalService(ContextManager.java:797)
at org.apache.tomcat.core.ContextManager.service(ContextManager.java:743)
at org.apache.tomcat.service.connector.Ajp12ConnectionHandler.processConnection(Ajp12ConnectionHandler.java:166)
at org.apache.tomcat.service.TcpWorkerThread.runIt(PoolTcpEndpoint.java:416)
at org.apache.tomcat.util.ThreadPool$ControlRunnable.run(ThreadPool.java:498)
at java.lang.Thread.run(Thread.java:484)
Root cause:
java.lang.ClassFormatError: javaservlets/jdbc/ConnectionPool (Illegal constant pool type)
at java.lang.ClassLoader.defineClass0(Native Method)
at java.lang.ClassLoader.defineClass(ClassLoader.java:486)
at java.security.SecureClassLoader.defineClass(SecureClassLoader.java:111)
at java.net.URLClassLoader.defineClass(URLClassLoader.java:248)
at java.net.URLClassLoader.access$100(URLClassLoader.java:56)
at java.net.URLClassLoader$1.run(URLClassLoader.java:195)
at java.security.AccessController.doPrivileged(Native Method)
at java.net.URLClassLoader.findClass(URLClassLoader.java:188)
at java.lang.ClassLoader.loadClass(ClassLoader.java:297)
at sun.misc.Launcher$AppClassLoader.loadClass(Launcher.java:286)
at java.lang.ClassLoader.loadClass(ClassLoader.java:253)
at java.lang.ClassLoader.loadClassInternal(ClassLoader.java:313)
at com.instantjsp.Customer.(Customer.java:103)
at java.lang.Class.newInstance0(Native Method)
at java.lang.Class.newInstance(Class.java:237)
at java.beans.Beans.instantiate(Beans.java:207)
at java.beans.Beans.instantiate(Beans.java:51)
at ChampionWeb.Champion_00031._0002fChampionWeb_0002fChampion_00031_0002fHOME_00035_0002ejspHOME5_jsp_0._jspService(_0002fChampionWeb_0002fChampion_00031_0002fHOME_00035_0002ejspHOME5 _jsp_0.java:181)
at org.apache.jasper.runtime.HttpJspBase.service(HttpJspBase.java:119)
at javax.servlet.http.HttpServlet.service(HttpServlet.java:853)
at org.apache.jasper.servlet.JspServlet$JspServletWrapper.service(JspServlet.java:177)
at org.apache.jasper.servlet.JspServlet.serviceJspFile(JspServlet.java:318)
at org.apache.jasper.servlet.JspServlet.service(JspServlet.java:391)
at javax.servlet.http.HttpServlet.service(HttpServlet.java:853)
at org.apache.tomcat.core.ServletWrapper.doService(ServletWrapper.java:404)
at org.apache.tomcat.core.Handler.service(Handler.java:286)
at org.apache.tomcat.core.ServletWrapper.service(ServletWrapper.java:372)
at org.apache.tomcat.core.ContextManager.internalService(ContextManager.java:797)
at org.apache.tomcat.core.ContextManager.service(ContextManager.java:743)
at org.apache.tomcat.service.connector.Ajp12ConnectionHandler.processConnection(Ajp12ConnectionHandler.java:166)
at org.apache.tomcat.service.TcpWorkerThread.runIt(PoolTcpEndpoint.java:416)
at org.apache.tomcat.util.ThreadPool$ControlRunnable.run(ThreadPool.java:498)
at java.lang.Thread.run(Thread.java:484)posted 22 years ago
I’ve solved my own problem. Timer is not in any JARs. I was confusing it with Timer from javax.swing and with Time from java.util.Date. Timer is one of my own classes that I forgot to copy over when I set up this windows machine.
Well, that was my first post to javaranch. I hope the next one is a little more interesting. Sorry.

