- How to Uninstall Java for Windows 10
- 1. Introduction
- 1.1 Why should I uninstall Java versions which are old?
- 2. Why does Java not Uninstall the older version when I upgrade?
- 2.1 Why would I need to run multiple versions of Java?
- 3. How do I check which Java versions are installed on my system?
- 3.1 In the Program Files
- 3.2 Using the “where” command
- 4. How do I uninstall the Older versions of Java?
- 4.1 Using the Java uninstall tool
- 4.2 Uninstall through the Control Panel
- 4.3 OpenJDK uninstall
- 5. How to remove Java completely from my system?
- 6. Clearing the PATH variable
- 7. What if a Java uninstall fails?
- 8. Verify successful un-installation
- 8.1 Through the Control Panel
- 8.2 Using the java -version command
- 8.3 Using the where command
- 9. Summary
- Java Cleanup Tool: Best to Use in 2023
- You might also like:
- How to delete old versions of Java to stop hacking in Windows [Tip]
How to Uninstall Java for Windows 10
We will look at how to uninstall and remove Java completely from a Windows 10 system through tools. Invented by James Gosling, Java is an extremely popular, object-oriented programming language. The first version came out in 1996. Since then, there have been many versions of Java released. In this article, we will learn why and how to uninstall older versions of Java from a Windows 10 system.
1. Introduction
A new version of Java comes roughly every 6 months (prior to Java 8, this cycle was about 2-3 years). The newer versions contain fixes for issues in the earlier version, newer features, classes, and packages. Oracle recommends upgrading to the newer versions and uninstalling the older one.
1.1 Why should I uninstall Java versions which are old?
Before we see the steps to uninstall, we will first understand why keeping and using older versions of Java is dangerous.
We highly recommend that you uninstall all older versions of Java from your system.
Keeping old versions of Java on your system presents a serious security risk.
Uninstalling older versions of Java from your system ensures that Java applications will run with the latest security and performance improvements on your system. Oracle on Java.com
Every new Java version releases fixes related to security and bugs from the older version. Using an older version of Java poses serious security threats. Flashback which affected Apple Macs is the most dramatic example of the security threat of old Java versions.
2. Why does Java not Uninstall the older version when I upgrade?
Java lets you install more than one version of Java on a system. The user can choose which version to run their Java application with. So, Java itself does not uninstall the earlier versions while upgrading. However, Oracle does not recommend this as it leaves your system open to security leaks.
2.1 Why would I need to run multiple versions of Java?
- Java generally provides back-compatibility i.e. all the features that worked in the earlier version will work in the same way in the next version as well.
- However, at times, some features of java do not work the same way as the older version due to changes in the code.
- Also, some features may be deprecated in the newer version of Java. Example: Applets were deprecated in Java 9 and later removed from Java 11 onwards. So, if we have an application that relies on these deprecated/removed features, we will require an older version of Java.
- In some cases, some legacy applications specify that they require a certain version of Java to run. In this case, as well we would require an older version.
3. How do I check which Java versions are installed on my system?
We can check the installed Java versions using 2 methods.
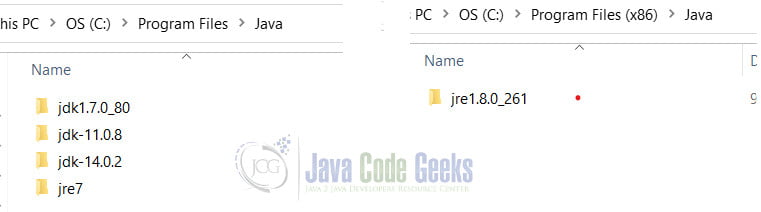
3.1 In the Program Files
- Open the Windows Explorer.
- Navigate to the path: C:/Program Files OR C:/Program Filesx86
- Check for the folder named: Java.
- In this folder, you will see the Java Development Kit (JDK) and/or Java Runtime Environment (JRE) installed on your system including the version numbers. For example I have Java version 7 ( jdk1.7.0_80 ), Java version 8 ( jre1.8.0_261 ), Java version 11 ( jdk-11.0.8 ) an Java version 14 ( jdk-14.0.2 ) installed on my system.
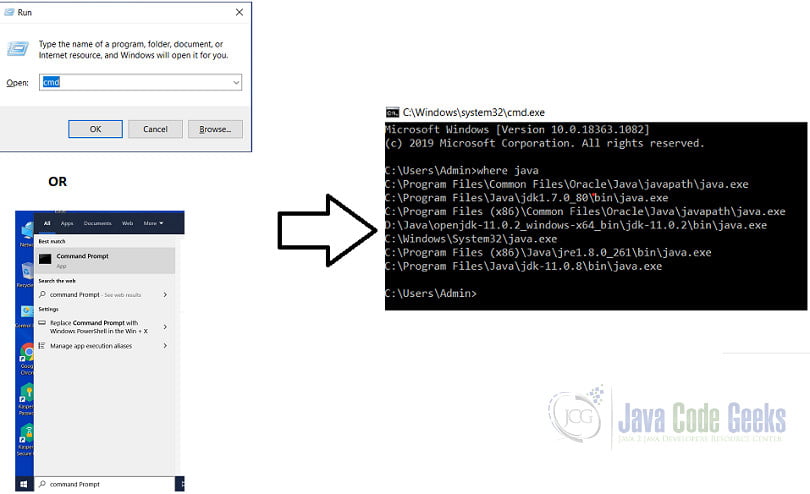
3.2 Using the “where” command
- Open the Command Prompt by typing cmd in the “Type here to search” box and click on the first option.
- Another way is to press the Windows icon + R on the keyboard to open run and then type cmd .
- Then type in where command. This will show the path all the different versions of java executables present in the system. (They need to be added to the classpath)
4. How do I uninstall the Older versions of Java?
There are 3 methods with which we can uninstall Java on our system.
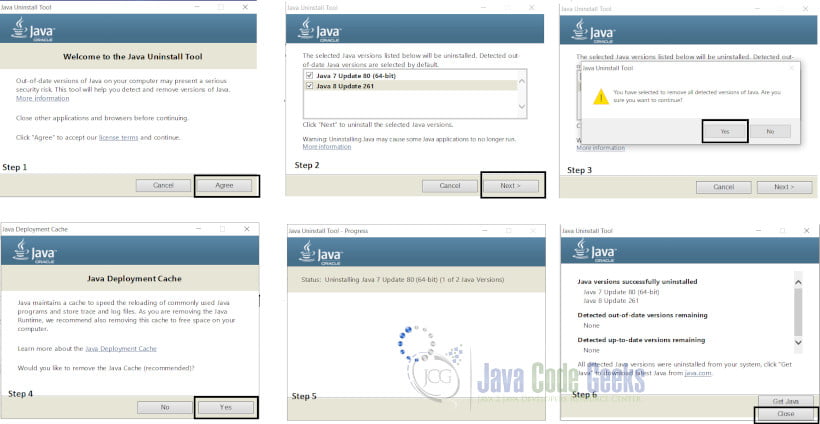
4.1 Using the Java uninstall tool
Oracle provides the Java uninstall tool for removing Older versions of Java in the system. Go to the page, accept the Terms and download the JavaUninstallTool.exe file. Once downloaded we need to run it and follow the steps in the tool. The output should be similar to the image.
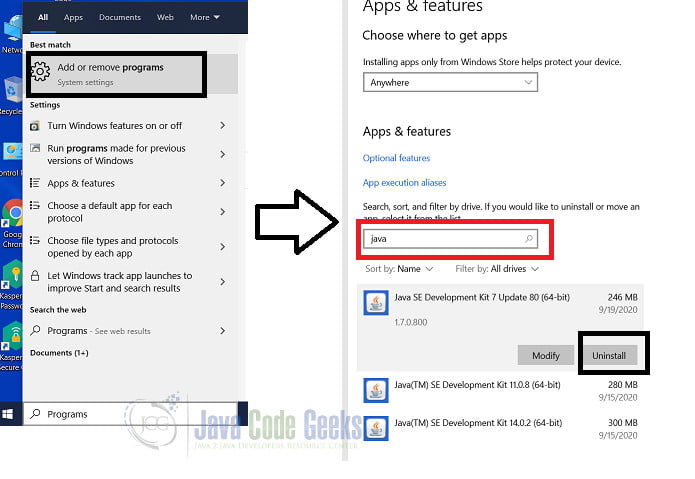
4.2 Uninstall through the Control Panel
- In the search box type “Programs”.
- Select the “Add or remove programs” option. This opens the path
- In the Search List, type Java. This should show you all the Java versions installed on the System.
- Click on the uninstall button for the version you want to uninstall.
4.3 OpenJDK uninstall
For uninstalling OpenJDK java installs, simply delete the extracted folder for Java.
5. How to remove Java completely from my system?
To remove all versions of Java installed on the system, repeat the steps for “Uninstall Java through the Control Panel.” That we have seen for removing older versions of Java. Repeat the steps for every installed version of Java. Example: On my system I would have to repeat twice because there are 2 versions Java version 11 and Java version 14 installed on my system.
If the Java versions installed are OpenJDK versions, delete the extracted folders.
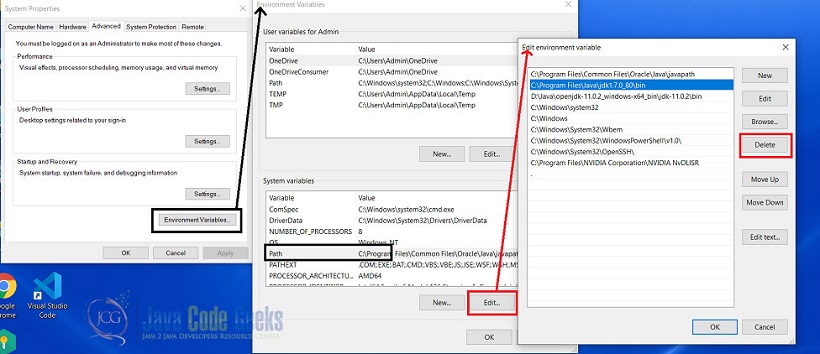
6. Clearing the PATH variable
- In the type box, type “Environment Variables” and select the first option.
- Open the Environment Variables and select the “PATH” variables from the System variables list and click on “Edit”.
- In the environment variables, remove all the Java Paths for the versions we have removed.
- Repeat the same steps for the PATH variable in the “User variables” as well.
7. What if a Java uninstall fails?
In the rare scenario that a Java uninstall fails for any reason, Oracle recommends using the Microsoft Utility to correct the registry entries. Alternatively, we can correct the registry entries manually too. For more details, please check here.
8. Verify successful un-installation
To check if we have uninstalled Java correctly we have three ways.
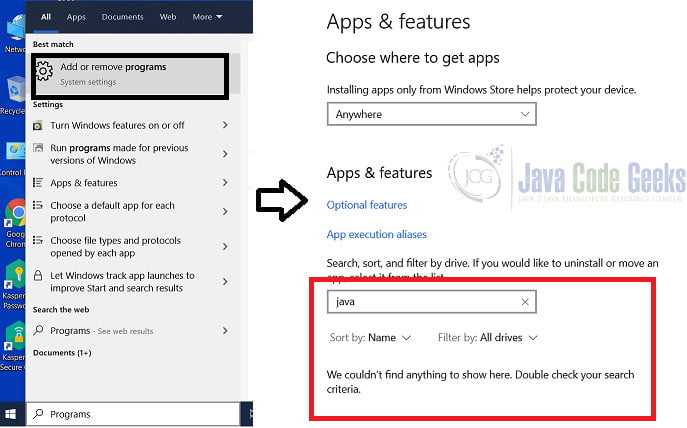
8.1 Through the Control Panel
- Type “Programs” in the search box.
- Select the “Add or remove programs” which opens the path: Control Panel\Programs\Programs and Features
- In the Search, type “Java”. It should not return any results.
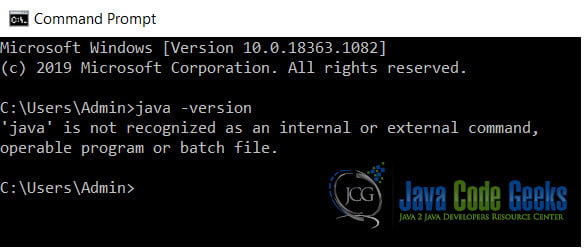
8.2 Using the java -version command
Open the Command Prompt and type in java -version command. It gives give a message : “Java is not recognized.” . This means that Java is not installed on our system.
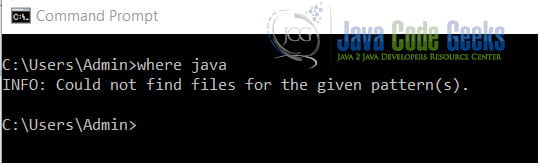
8.3 Using the where command
- The other way to check is using the where command in the Command Prompt.
- Open the Command Prompt by typing cmd in the “Type here to search” box and click on the first option.
- Another way is to press the “Windows icon” + R on the keyboard to open run and then type cmd .
- It should return an error message saying “Could not find the files for the given pattern(s)”.
9. Summary
In the article, we learned how and why to uninstall older versions of Java from a Windows system. We also learned how remove Java completely. Further, we can also Disable Java on web browsers used on the Windows system. Visit the Oracle Java page for instructions to disable java.
Java Cleanup Tool: Best to Use in 2023
Most internet users will have heard of Java or the Java Runtime Environment. This is not to be confused with Javascript which is actually something entirely different. Java is a programming language that was devloped by Sun Microsystems (now Oracle) back in the mid nineties. It is designed to run small applications, or “applets” which can then be embedded and executed from inside other applications. This is most often seen in web based applications such as on-line games and features inside web pages. Quite a few websites won’t function correctly without it installed on your system.
Do you have an Android phone? If so, you could be a little surprised to know that although Android is based on Linux, large parts of the Android operating system are also programmed in Java and most apps are made using the Java programming language.
As is the case with most software that is used on the internet like web browsers, security software and Windows itself, the Java Runtime Environment (JRE) is updated at regular intervals as well. Java is no different to other software and needs bugs fixing, code optimizing and security vulnerabilities repaired from time to time. The problem has always been with Java, that when you install a new version, the older version it replaces does not get automatically uninstalled and you are left with more than one version on your system.
This isn’t particularly good for security having the older versions still lingering on the computer, because they may have been replaced due to severe security issues.It’s not unusual to see several different Java versions still existing on the same machine and in some cases Java gets a bit confused with itself about which version it’s actually running, and in turn, this causes it to not function correctly. Then you have no option but to go through the removal process yourself to get rid of all the JavaRE installs.
The latest release of the Java Runtime Environment is always supposed to be compatible with previous versions, but Oracle say it’s not a problem to keep older versions for maximum compatibility. This does though, seem to cause more problems than it solves by keeping them around in my experience, and it’s likely to be a better idea to remove them.
A little utility to help you sort this out by removing the older and therefore redundant Java releases is JavaRa.
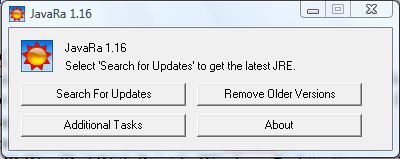
One of the primary tasks of JavaRa is to make sure you have the latest version of the Java Runtime Environment installed. When you click on the “Search for Updates” button, you have the choice of trying to update using your installed JavaRE’s jucheck.exe updater tool, or via the Java website.
The other main function of JavaRa is to purge the system of all old Java installation files leaving just the newest version. The “Remove older Versions” button does this and you will be showed a text log file on completion with information about what files and registry entries have been removed. This is obviously good for security, gives you a few Megabytes of free space, and removes some useless registry keys. Before you use this option, it is recommended to close any Internet Explorer windows currently open.
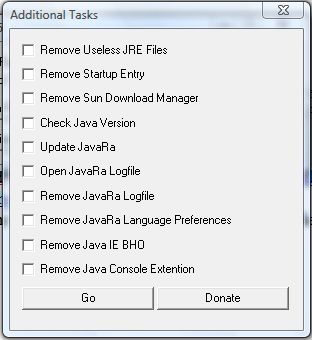
There is an “Additional tasks” button which hosts a few other options such as removing the Java entry from the Windows startup, removing the Sun/Oracle download manager which is included in JRE, checking the current Java installed version, and removing the Internet Explorer Browser Helper Object etc.
JavaRa is a small, portable and free utility that works with Windows XP, Windows Vista and Windows 7. Administrator privileges are required in Vista and 7 (right click, “Run as Administrator”).
You might also like:
![]() Copy Windows XP Installation Files to Local Hard Disk SourcePath
Copy Windows XP Installation Files to Local Hard Disk SourcePath ![]() How to Install Portable Java Runtime Environment on USB
How to Install Portable Java Runtime Environment on USB ![]() nLite – The Windows XP Installation Customizer
nLite – The Windows XP Installation Customizer  Windows USB Installation Tool: Best to Use in 2023
 ![]() Kaspersky Fatal Error During Installation: How to Fix it
Kaspersky Fatal Error During Installation: How to Fix it
How to delete old versions of Java to stop hacking in Windows [Tip]
Java is a widely used platform. The Java runtime files enable you to execute Java applets within your browser. As newer versions of Java are rolled out with regularity, you hard disk is most likely cluttered with files from redundant, or outdated, versions of the Java Runtime Environment ( JRE ) that don’t properly remove themselves upon each update. Keep reading this guide to learn how to delete old versions of Java from your computer.
To delete those redundant Java runtime files, check out the JavaRa software.
JavaRa is a freeware, and portable, tool that you can add to Windows to delete redundant Java versions. To begin, simply open this page and press the Download button to save the software’s Zip file. Then right-click the Zip and select Extract All to extract the file. Open the software’s window, in the shot below, from the extracted folder.
There click on the Remove older versions button. If Internet Explorer is open, close it before you select that option. Then it will delete Java runtime files, and set up a log file in your main hard drive folder.
For some further options, click the Additional Tasks button to open the window below. There you can select check boxes to remove JRE files, startup entries, JavaRa logfile , Java IE and the Java Console Extension. Then click Go to remove the selected items.
Now you can remove Java runtime clutter to free up disk space. The software is compatible with the Windows XP, Vista and 7 platforms.