- Understanding Java projects structures and how it all works
- Java Project Structure
- Key Takeaways
- Introduction of Java Project Structure
- How to Create a Java Project Structure in the Package?
- 1. Number of classes from Java source file
- 2. Java source file name
- 3. Number of class files same as the source file
- 4. Combined functioning
- How to Divide Your Classes?
- Qualified Class Name
- Importing Classes
- Conclusion
- Recommended Articles
- Java Project Development Basics
- Package management
- Project Creation
- Maven project
- Project structure
- Basic Maven Application
- Spring boot Web Application
Understanding Java projects structures and how it all works
While working in Java using Eclipse or any other IDE, we usually forget / don’t know how it works underneath the hood.
I tried to look up how to make a simple application using a nice directory structure in pure Java, all I could see was articles related to Maven and Gradle.
So, I tried to explore how this works using the command line. I was finally able to make it work by observing the Eclipse directory structure.
src ├── main │ └── java │ └── Main.java └── test └── java └── MainTest.javapackage main.java;import java.io.*;public class Main < public static int squareIt(int n) < return n * n; >>package test.java;import main.java.Main;class MainTest < public static void main(String[] args) < int n = 12; int sq = Main.squareIt(n); assert sq == (n * n) : "Incorrect"; System.out.println("n = " + n + " sq = " + sq); >># go to src directory and compile the Main class$ javac main/java/Main.java# Now that our Main class is compiled, we can import it into$ javac test/java/MainTest.java# Now we can run our test$ java test.java.MainTestLet’s try to make this a bigger project. When there are thousands of Java files, we can’t follow this approach, obviously. We should consider automating the process, and that too without using the names and paths of the file.
# find all java files and output the names to sources.txt$ find -name "*.java" > sources.txt# compile all!$ javac @sources.txtA JAR (Java ARchive) is a package file format typically used to aggregate many Java class files and associated metadata and resources (text, images, etc.) into one file for distribution. This can further be used in other projects.
JAR files are archive files that include a Java-specific manifest file. Let’s make one for ourselves. in this file we only write the name of the class we want our JAR file to run.
$ Main-Class: test.java.MainTest# get compiled files and now output to sources.txt$ find -name "*.class" > sources.txt# create jar$ jar cvfm Example.jar manifest.txt @sources.txt# get contents of jar$ jar tf Example.jarWhen it comes to automating builds, shell scripts can be very helpful. So, for this project, I wrote one. It looks like this:
# removing previously compiled filesrm -r */*/*.class# advanced:# find all java files and output the names to sources.txtfind -name "*.java" > sources.txt# compile all!javac @sources.txt# get compiled files and now output to sources.txtfind -name "*.class" > sources.txt# create jarjar cvfm Example.jar manifest.txt @sources.txt# get contents of jarjar tf Example.jar# run jarjava -jar Example.jarsrc├── main│ └── java│ └── Main.java├── manifest.txt├── run.sh└── test └── java └── MainTest.java- Take care while writing the package names.
- Compilation can be done using simple the path to the java file, but when running a java file, write the complete name of the class, eg. java test.java.MainTest .
- Linux is awesome!
Java Project Structure
The Java project structure defines how our project will be defined during implementation. A single Java project’s structure contains multiple subfolders. The data directory module is created based on the type of files. The Java source file structure specifies the source code file that follows the schema structure. The package Java is the core of the project’s structure.
Web development, programming languages, Software testing & others
Key Takeaways
- The config directory in the Java project structure contains the configuration data property files passed to the server.
- When we publish the project bundle, the files from this directory are extracted from the bundle and can be installed in the common directory.
Introduction of Java Project Structure
When creating the project structure in Java, we need to define the package name of the Java project. Java project contains multiple folders. The main folders of the Java project are config, resource, lib, and source folder. The source folder of the Java project structure contains the unit test source code of Java. The path of the source folder needs to follow the convention of Maven.
How to Create a Java Project Structure in the Package?
When writing the program in Java, we need to follow the steps. Any Java program contains the following structure as follows.
- Package statements – This is the mechanism of interfaces, sub-packages, and a group of classes.
- Import statement – This statement imports the class, interface, or packages.
- Definition of class – This is a user-defined prototype from which an object is created, and it will contain a passive entity.
The below syntax shows how we can follow the structure of Java code as follows. It will show the program structure.
Package name Import statement Class < // class definition >When creating the program in Java, we need to consider the following points below. It will show how we can write Java code.
1. Number of classes from Java source file
The Java program contains multiple classes. We can declare one type as public.
Explanation – In Java, we are creating several classes; from all the classes we need to create a single class as public. We can say that the Java code can either contain a single public class or no public class.
Proof of statement – In the below example, we are creating three classes in a single code as follows. We are compiling code in the Javac compiler.
class ABC < >class PQR < >class XYZ


2. Java source file name
We can give any name to the Java source file but not the public class.
Explanation – We can give any name to the Java source file if we have not declared any public class. If we have declared a public class in our code, we need to give it the same name as a public class.
Proof of statement – In the below example, we have declared the public class as ABC, so we need to give the same name as the public class as follows.
public class ABC < >class PQR < >class XYZ


In the example below, we declared the public class as ABC, but we saved the file with the name pqr. Then it will give the error as follows.
public class ABC < >class PQR < >class XYZ


3. Number of class files same as the source file
In Java same number of class, files are generated as that number of class files are declared.
Explanation – While compiling the Java code, the compiler creates the same number of files that class we have declared in our code.
Statement proof – In the below example, we have declared the four classes. Then we can see that a four-class file is created in the specified directory.
class ABC < >class PQR < >class XYZ < >class MNP


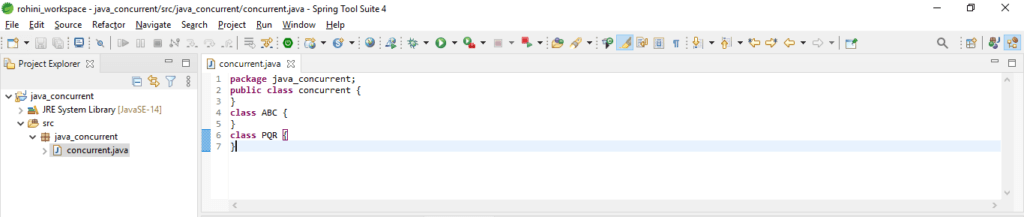
4. Combined functioning
We can understand the structure of Java code by using the following code.
package java_concurrent; public class concurrent < >class ABC < >class PQR
How to Divide Your Classes?
We can divide our classes in Java by using packages. The package is nothing but the collection of classes, representing the dictionary containing the interfaces and classes group. When we write the statement, it will import the classes into the io package. Java has multiple packages.
The package is useful in Java for arranging the related classes into the group. It will put all the interfaces and classes together. In Java, interfaces and classes perform the operations. The package hides the interfaces and classes in a separate directory. The below example shows how we can divide our courses as follows.
package java_concurrent; public class concurrent < private String stud_id; private String stud_name; public void sData (String stud_id, String stud_name) < this.stud_id = stud_id; this.stud_name = stud_name; >public String getId() < return stud_id; >public String getName() < return stud_name; >>Qualified Class Name
The qualified class name in Java contains the package from the java class it originated. An example of this fully qualified class name is an array list. The name of the eligible class name is obtained by using the getName() method.
We are using the getName method to get the fully qualified name of the java class. This method is used to get the qualified class name. After getting the class name, it will store the same into the class name. After storing it in the class name then, it will be displayed.
The below example shows how we can get the qualified class name as follows:
package java_concurrent; public class concurrent < public static void main(String[] args) throws Exception < Class cl = java.util.ArrayList.class; String cname = cl.getName (); System.out.println ("Qualified name: " + cname); >>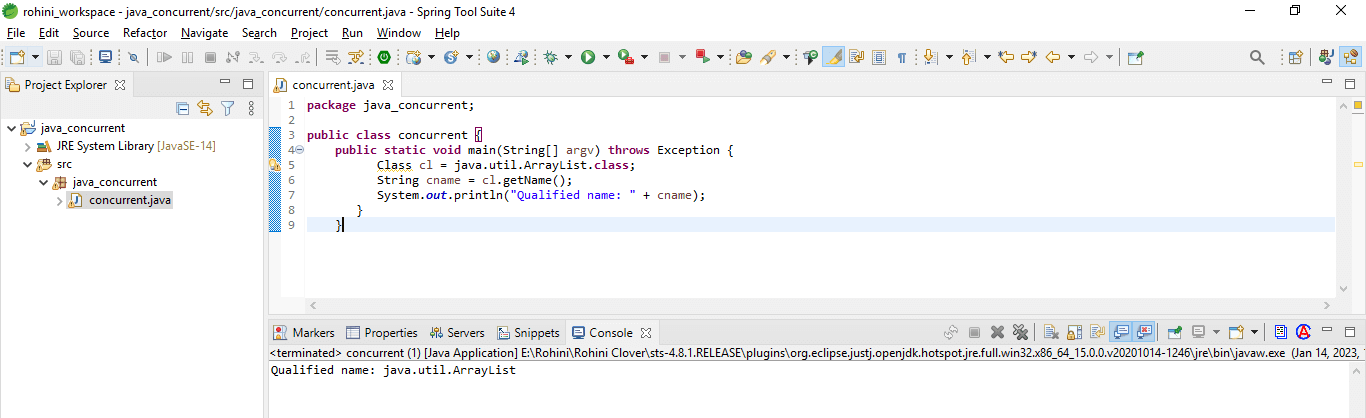
Importing Classes
We can import the classes in Java. Java class is used to store the elements which contain similar properties to it. We must define the syntax for importing the sort of static or class package. We can also import the custom class in Java. The below example shows how we can import the classes in Java.
package java_concurrent; public class concurrent < int abc; int pqr; void GFG1(int abc, int pqr) < this.abc = abc; this.pqr = pqr; >int add() < return this.abc + this.pqr; >>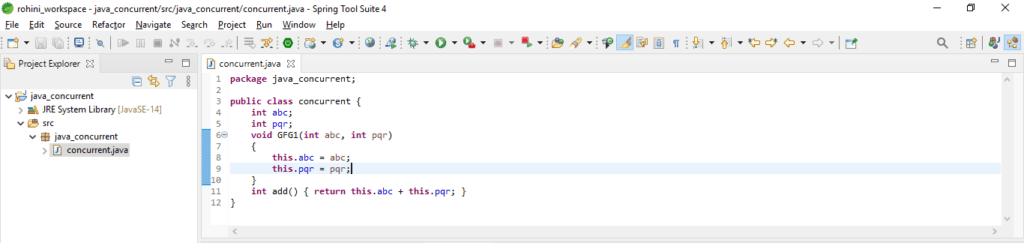
Conclusion
The source folder of the Java project structure contains the unit test source code and source files of Java. The path of the source folder needs to follow the convention of Maven. The module of the data directory is created as per the type of files. The Java source file structure defines the source code file following the schema structure.
Recommended Articles
We hope that this EDUCBA information on “Java Project Structure” was beneficial to you. You can view EDUCBA’s recommended articles for more information.
89+ Hours of HD Videos
13 Courses
3 Mock Tests & Quizzes
Verifiable Certificate of Completion
Lifetime Access
4.5
97+ Hours of HD Videos
15 Courses
12 Mock Tests & Quizzes
Verifiable Certificate of Completion
Lifetime Access
4.5
JAVA Course Bundle — 78 Courses in 1 | 15 Mock Tests
416+ Hours of HD Videos
78 Courses
15 Mock Tests & Quizzes
Verifiable Certificate of Completion
Lifetime Access
4.8
Java Project Development Basics
Java uses camelCase as the naming convention for variables, methods, and classes. But class names must be capitalized.
Package management
You can use Maven or Gradle for package (dependency) management.
Project Creation
Maven project
You can create a Maven project in the following way.
$ mvn archetype:generate \
-DgroupId=com.taogen.demo \
-DartifactId={project-name} \
-DarchetypeArtifactId=maven-archetype-quickstart \
-DarchetypeVersion=1.4 \
-DinteractiveMode=false
2. Create a Maven project in a IDE
Project structure
Basic Maven Application
java-project/
│
├── src/main/java/
│ └── com/taogen/javaproject/
│
├── src/main/resources/
│
├── src/test/java/
├── src/test/resources/
└── pom.xml
- src/main/java : Java source code
- com/taogen/javaproject : Base package path. It represents the domain name of your project website.
Spring boot Web Application
1
2
3
4
5
6
7
8
9
10
11
12
13
14
15
16
17
18
19
20
21
22
23
24
25
26
27
28
29
30
31
32
33
34
35
36
37
38
39
40
41
42
43
java-project/
│
├── src/main/java/
│ └── com/taogen/javaproject/
│ ├── modules/
│ │ └── user/
│ │ ├── controller/
│ │ │ └── UserController.java
│ │ ├── entity/ (or domain/)
│ │ │ └── User.java
│ │ ├── service/
│ │ │ ├── UserService.java
│ │ │ └── impl/
│ │ │ └── UserServiceImpl.java
│ │ ├── repository/ (or mapper/)
│ │ │ └── UserRepository.java
│ │ ├── vo/
│ │ └── dto/
│ ├── util/
│ ├── config/
│ ├── aspect/
│ ├── annotation/
│ ├── constant/
│ ├── enums/
│ ├── exception/
│ ├── filter/
│ └── task/
│
├── src/main/resources/
│ ├── static/
│ ├── templates/
│ ├── log4j2.xml
│ └── application.yml (or application.properties)
│
├── src/test/java/
├── src/test/resources/
│
├── .gitignore
├── .gitmessage
├── Dockerfile
├── pom.xml
├── LICENSE
└── README.md- src/main/java : Java source code
- modules/
- controller/ : HTTP request handlers.
- entity/ : JavaBeans, POJOs, or domain models.
- service/ : Business logic processing code.
- repository/ : Data access layer code for various persistence stores.
- dto/ : Data Transfer Objects, encapsulate values to carry data between processes or networks.
- vo/ : Value objects, a special type of objects that can hold values.
- static/ : Static files such as CSS, JavaScript, image, etc.
- templates/ : Template files such as JSP, FreeMarker, Thymeleaf, etc.
- log4j2.xml : Log configuration file.
- application.yml : Spring boot configuration file.
- modules/