- Saved searches
- Use saved searches to filter your results more quickly
- License
- OSSpk/Library-Management-System-JAVA
- Name already in use
- Sign In Required
- Launching GitHub Desktop
- Launching GitHub Desktop
- Launching Xcode
- Launching Visual Studio Code
- Latest commit
- Git stats
- Files
- README.md
- About
- Library Management System Project In Java With Source Code
- What is Library Management System Project in Java?
- About The Library Management System In Java
- Java program library system
- Abstract:
- Introduction:
- Explanation:
- Source Code:
Saved searches
Use saved searches to filter your results more quickly
You signed in with another tab or window. Reload to refresh your session. You signed out in another tab or window. Reload to refresh your session. You switched accounts on another tab or window. Reload to refresh your session.
📚 A sophisticated Library Management System designed in Java while following the concepts of decoupled layers (entities) and minimal code in interface (GUI).
License
OSSpk/Library-Management-System-JAVA
This commit does not belong to any branch on this repository, and may belong to a fork outside of the repository.
Name already in use
A tag already exists with the provided branch name. Many Git commands accept both tag and branch names, so creating this branch may cause unexpected behavior. Are you sure you want to create this branch?
Sign In Required
Please sign in to use Codespaces.
Launching GitHub Desktop
If nothing happens, download GitHub Desktop and try again.
Launching GitHub Desktop
If nothing happens, download GitHub Desktop and try again.
Launching Xcode
If nothing happens, download Xcode and try again.
Launching Visual Studio Code
Your codespace will open once ready.
There was a problem preparing your codespace, please try again.
Latest commit
Added Refactoring changes
Git stats
Files
Failed to load latest commit information.
README.md
📚 Library Management System -Java
A Library Management System made using the concepts of Object Oriented Analysis and Design. Minimal Code is written in the GUI and the entities are decoupled as well. The interface is console based. This project was designed during the course «Object Oriented Analysis and Design CS309».
The Class Diagram of the project is also provided along with the Database Schema file. The class diagram file can be opened using Star UML.

Note: After Refactoring, new Class «HoldRequestOperations» is added to the above structure which lies in between the HoldRequest class and Book class. This class removes the bidirectional dependency between HoldRequest and Book. More details mentioned here


The actors include the following:
After determining the actors, the second step in use case analysis is to determine the tasks that each actor will need to do with the system. Each task is called a use case because it represents one particular way the system will be used.
In other words, only those use cases are listed that actors will need to do when they are using the system to solve the customer’s problem.
- ❏ Search for items by title.
- ❏ . by author.
- ❏ . by subject.
- ❏ Place a book on hold if it is on loan to somebody else.
- ❏ Check the borrower’s personal information and list of books currently borrowed.
- ❏ All the Borrower use cases, plus
- ❏ Check out an item for a borrower.
- ❏ Check in an item that has been returned.
- ❏ Renew an item.
- ❏ Record that a fine has been paid.
- ❏ Add a new borrower.
- ❏ Update a borrower’s personal information (address, telephone number etc.).
- ❏ All of the Borrower and Checkout Clerk use cases, plus
- ❏ Add a new item to the collection.
- ❏ Delete an item from the collection.
- ❏ Change the information the system has recorded about an item.
- ❏ Add Clerk.
- ❏ Add Librarian.
- ❏ View Issued Books History.
- ❏ View All Books in Library.
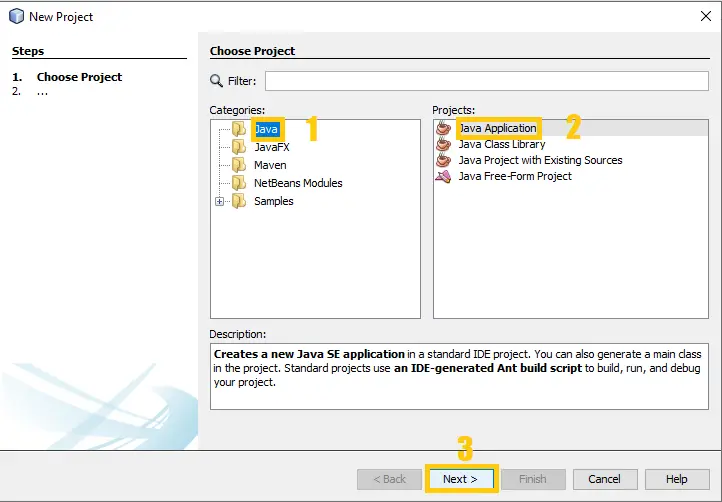
2- Open NetBeans IDE. Click on File -> Open Project and browse to the downloaded folder named «Project» and select it. It will load the NetBeans project.
3- Now everything is setup except the Java DB (Derby) Database of NetBeans. So, follow these steps to setup the database:
Step 1: In the Netbeans Window, there is a tab named «Services» on the left. Select it. Then right click on JavaDB > Properties and change database location to «Database» folder downloaded with this repository (its placed besides the «Project» folder).

Step 2: After that a database named LMS will show up under JavaDB tab. Now Right Click Databases > New Connection and select Java DB Network and click Next.

Step 3: Provide the following database crendentials in the next popup and click Next.
Host: localhost Port: 1527 Database: LMS User Name: haris Password: 123 
Step 4: Now just click Next for the rest of the windows. After all this the database connection is made. Make sure that you connect with the database before running the project by right clicking on the connection and selecting connect. Now you are ready to run the project!

The password for Administrative Functions is lib. The admin adds new clerks and librarian, then they both do the rest of the functions.
Hey there, I’m Haris — Maker of Things
Creator of Ultimate Facebook Scraper (one of the best software to collect Facebook data for research & analysis)
Stuck with some problem? Need help in solution development, guidance, training or capacity building? I am a Full Stack Engineer turned Project Manager with years of technical and leadership experience in a diverse range of technologies and domains. Let me know what problem you are facing at haris.muneer5@gmail.com and we can schedule a consultation meeting to help you get through it.
👨💻 Technical Skills & Expertise
- Development of Web Applications, Mobile Applications, and Desktop Applications
- Development of Machine Learning/Deep Learning models, and deployment
- Web Scraping, Browser Automation, Python Scripting
If you or your company use any of my projects, like what I’m doing or have benefited from my projects in any way then kindly consider backing my efforts.
For donations, you can follow these simple steps:
1) Free signup at TransferWise using this link: https://transferwise.com/invite/u/harism95. (Signing up through this link will save you from any transcation fee on the donation)
2) Select the amount e.g (15$) and choose the receiving/recipient’s currency to be PKR. It supports multiple payment options (credit card, debit card, wire transfer etc)
3) Then it will show my info as the recipient, select it. If my name isn’t shown, then type my email haris.muneer5@gmail.com in recipients.
4) Choose the reason for transfer to the one that suits you the most (in this case it could be ‘General expenses’) and in the reference section, you can mention ‘Support’
If you face any issue in sending donation then feel free to get in touch with me at haris.muneer5@gmail.com
Thank you for your contribution!
You can get in touch with us on our LinkedIn Profiles:
You can also follow my GitHub Profile to stay updated about my latest projects:
You can also follow my GitHub Profile to stay updated about my latest projects:
If you liked the repo then kindly support it by giving it a star ⭐ and share in your circles so more people can benefit from the effort.
If you find any bug in the code or have any improvements in mind then feel free to generate a pull request.
If you face any issue, you can create a new issue in the Issues Tab and I will be glad to help you out.
Copyright (c) 2018-present, harismuneer, MahamAmjad
About
📚 A sophisticated Library Management System designed in Java while following the concepts of decoupled layers (entities) and minimal code in interface (GUI).
Library Management System Project In Java With Source Code
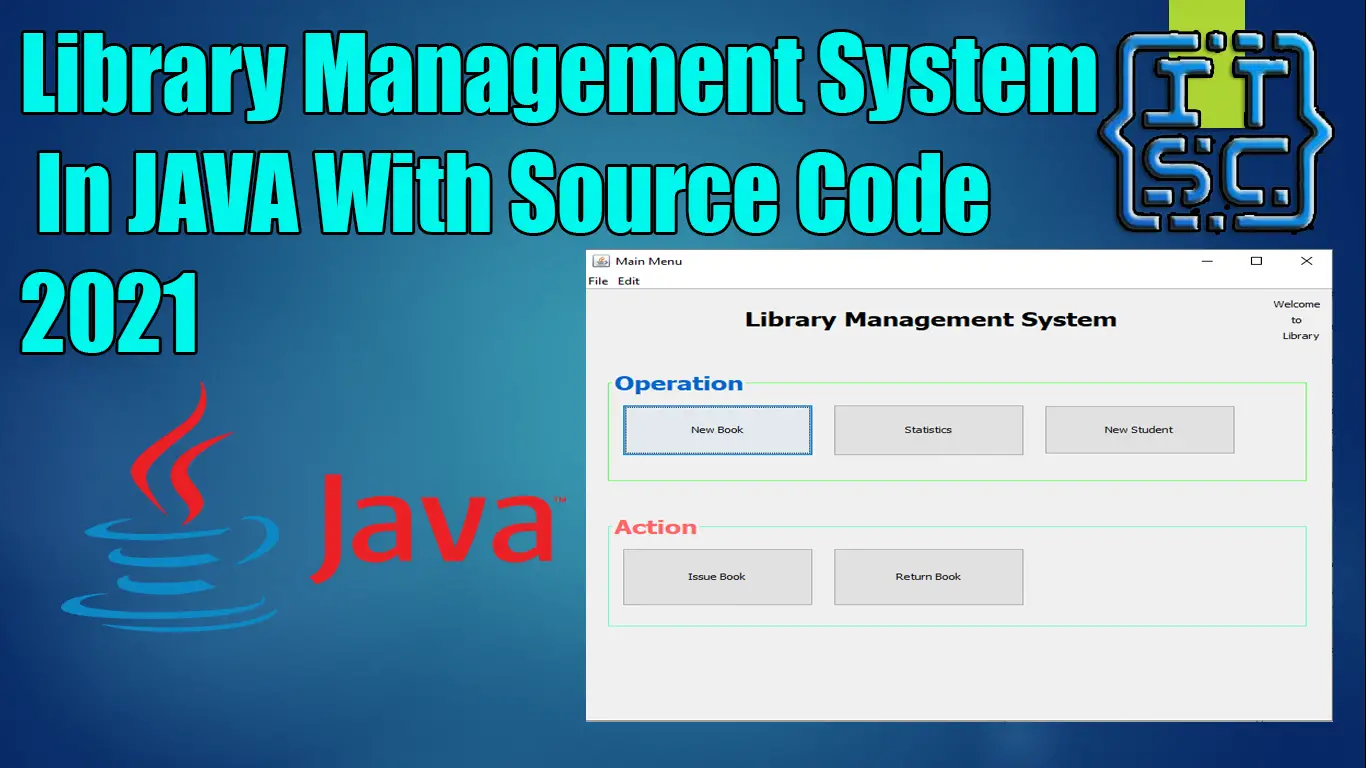
The Library Management System Project in Java is one of the many systems that have been made to meet the needs of modern libraries.
Library Management Systems are a great way to keep track of books, add them, update information about them, look for the right book, lend it out, and get it back when it’s time. Library Management System Project In Java With Source Code
What is Library Management System Project in Java?
In Java, the library management project is designed to organize and store information about books based on what students need. The system helps both the students and the person in charge of the library keep track of all the books that are there. It lets both the administrator and the student look for the book they want to read and borrow.
About The Library Management System In Java
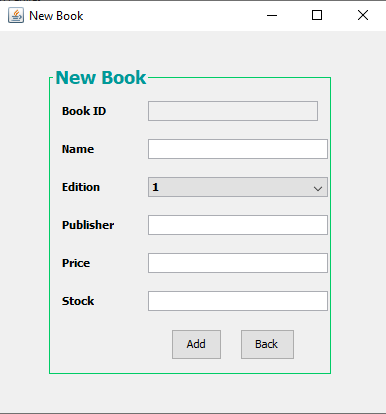
Library management system – New book
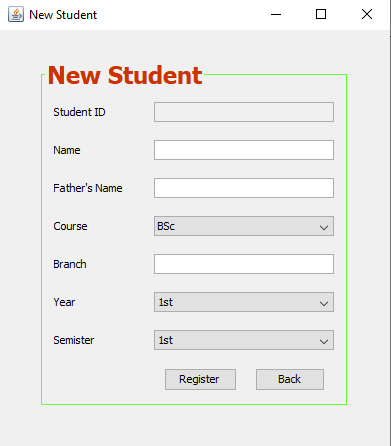
Library management system – Add new student
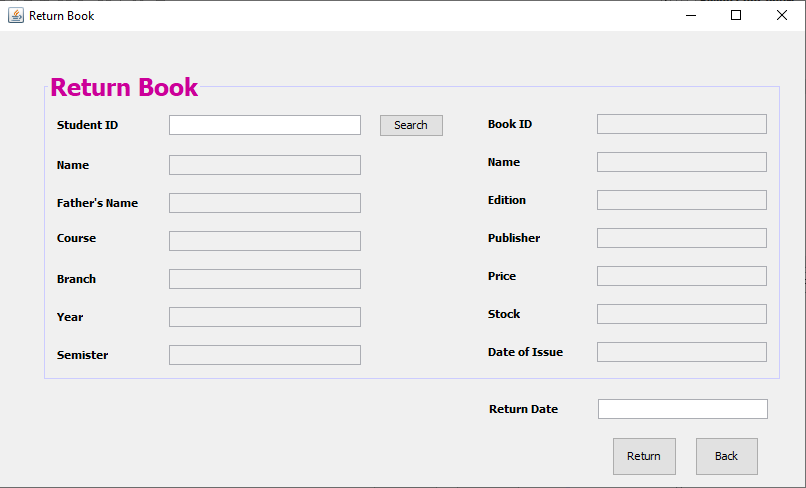
Library management system – Return book

Library management system – New account
Java program library system
Abstract:
library management system would be to create a separate class for handling the catalog of books, and another class for handling the individual books. This would allow for better organization and separation of concerns, as well as making the code more reusable. The Library class holds a list of all the books in the library and has methods for adding and removing books, as well as displaying all the books in the library. The LibraryManagementSystem class handles the user interface and communication between the Book and Library classes, using a Scanner object to get user input and controlling the overall flow of the program
Introduction:
Learning Management System, this project build on Java is a great way to update the record, monitor and add books, search for the required ones, taking care of the issue date and return date. It comes with basic features like creating a new record and updating and deleting it.
Explanation:
A Library Management System is a software application that helps to manage and organize the daily operations of a library. Before we begin, let’s first define the main components of our LMS. We will need to create a Book class that will hold information about each book in the library, including the title, author, ISBN, and availability status. Finally, you will create a LibraryManagementSystem class that will handle the user interface and communication between the Book and Library classes.
Book class will have four instance variables: T itle , A uthor , ISBN , and A vailability . These variables will hold the respective information about each book. We will also include a constructor that will take in the values for each variable and set them to the corresponding instance variables.
Source Code:
import java.util.ArrayList; import java.util.Scanner; class Book String title; String author; String ISBN; boolean availability; public Book(String title, String author, String ISBN, boolean availability) this.title = title; this.author = author; this.ISBN = ISBN; this.availability = availability; > > class Library ArrayList books; public Library() books = new ArrayList(); > public void addBook(Book book) books.add(book); > public void removeBook(String ISBN) for (Book book : books) if (book.ISBN.equals(ISBN)) books.remove(book); break; > > > public void displayBooks() for (Book book : books) System.out.println("Title: " + book.title); System.out.println("Author: " + book.author); System.out.println("ISBN: " + book.ISBN); System.out.println("Availability: " + book.availability); System.out.println(); > > > class LibraryManagementSystem public static void main(String[] args) Scanner scanner = new Scanner(System.in); Library library = new Library(); while (true) System.out.println("1. Add Book"); System.out.println("2. Remove Book"); System.out.println("3. Display Books"); System.out.println("4. Exit"); int choice = scanner.nextInt(); if (choice == 1) scanner.nextLine(); // to consume the newline character System.out.print("Enter title: "); String title = scanner.nextLine(); System.out.print("Enter author: "); String author = scanner.nextLine(); System.out.print("Enter ISBN: "); String ISBN = scanner.nextLine(); System.out.print("Enter availability: "); boolean availability = scanner.nextBoolean(); library.addBook(new Book(title, author, ISBN, availability)); > else if (choice == 2) scanner.nextLine(); // to consume the newline character System.out.print("Enter ISBN: "); String ISBN = scanner.nextLine(); library.removeBook(ISBN); > else if (choice == 3) library.displayBooks(); > else if (choice == 4) break; > > scanner.close(); > >
Next, we will create the Library class. This class will have an instance variable called book that will hold a list of all the books in the library. We will also include methods for adding and removing books from the list, as well as a method for displaying all the books in the library. Finally, we will create the LibraryManagementSystem class that will handle the user interface and communication between the Book and Library classes. This class will use a Scanner object to get user input and will include a main method that will handle the overall flow of the program.