- TJ is Blogging!
- Search This Blog
- How to set a background image to a jFrame?
- Labels
- Comments
- Post a Comment
- Popular posts from this blog
- Install Docker on Windows 11 with WSL Ubuntu 22.04
- JFrame background image
- 4 Answers 4
- How to set a background image in java
- Setting background image using Netbeans IDE
- Setting background image using Code
- Amit Rawat
- Latest posts by Amit Rawat (see all)
- Картинку на фон JFrame
- Решение
- Решение
TJ is Blogging!
Just another tech blog, also my personal blog. I’ll be posting interesting articles about tech, programming and tricks, dev life, and any timely topics.
Search This Blog
How to set a background image to a jFrame?
If you are using Netbeans IDE or windowbuilder in Eclipse to develop Swing GUIs, you might wanted to set background images to jFrames.
The easiest way is putting a jLabel to cover whole jFrame and set an image to it. It might be ok Absolute layout but if you are using something like SpringLayout this will not work. And also there might be problems with re-sizing the jFrame.
Instead of that what we are going to do is put a jPanel to cover up the whole jFrame and set a background image to it.
in Eclipse WindowBuilder
I have already installed WindowBuilder plugin in my Eclipse and created a java project.
And I have created a new jFrame form with WindowBuilder.
(If you are not familiar with eclipse and windowbuilder please google it and read first)

1: package org.jframebg; 2: import java.awt.BorderLayout; 3: import java.awt.EventQueue; 4: import javax.swing.JFrame; 5: import javax.swing.JPanel; 6: import javax.swing.border.EmptyBorder; 7: public class MyFrame extends JFrame < 8: private JPanel contentPane; 9: /** 10: * Launch the application. 11: */ 12: public static void main(String[] args) < 13: EventQueue.invokeLater(new Runnable() < 14: public void run() < 15: try < 16: MyFrame frame = new MyFrame(); 17: frame.setVisible(true); 18: >catch (Exception e) < 19: e.printStackTrace(); 20: >21: > 22: >); 23: > 24: /** 25: * Create the frame. 26: */ 27: public MyFrame() < 28: setDefaultCloseOperation(JFrame.EXIT_ON_CLOSE); 29: setBounds(100, 100, 450, 300); 30: contentPane = new JPanel(); 31: contentPane.setBorder(new EmptyBorder(5, 5, 5, 5)); 32: contentPane.setLayout(new BorderLayout(0, 0)); 33: setContentPane(contentPane); 34: >35: > 
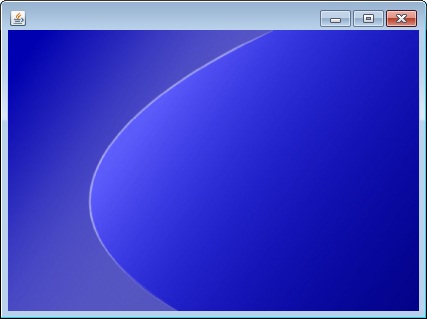
Adding the background image
In my project, I created a new package called images and placed my background image bg.jpg inside it.

Now let’s set up the image in jFrame !
We can see in the above code windowbuilder has already created a jPanel and added it to the jFrame for us.
8: private JPanel contentPane; 30: contentPane = new JPanel(); Now let’s modify that code a little bit.
What we are going to do is, override the paintComponent() method of the jPanel and draw the image in it.
Here in the line 33 , MyFrame should be the class name of the jFrame .
30: contentPane = new JPanel() < 31: public void paintComponent(Graphics g) < 32: Image img = Toolkit.getDefaultToolkit().getImage( 33: MyFrame.class.getResource("/images/bg.jpg")); 34: g.drawImage(img, 0, 0, this.getWidth(), this.getHeight(), this); 35: >36: >; And we have to import some classes as well.
import java.awt.Graphics; import java.awt.Image; import java.awt.Toolkit; Now the background image is done.
Here is our final code.
1: package org.jframebg; 2: import java.awt.BorderLayout; 3: import java.awt.EventQueue; 4: import java.awt.Graphics; 5: import java.awt.Image; 6: import java.awt.Toolkit; 7: import javax.swing.JFrame; 8: import javax.swing.JPanel; 9: import javax.swing.border.EmptyBorder; 10: public class MyFrame extends JFrame < 11: private JPanel contentPane; 12: /** 13: * Launch the application. 14: */ 15: public static void main(String[] args) < 16: EventQueue.invokeLater(new Runnable() < 17: public void run() < 18: try < 19: MyFrame frame = new MyFrame(); 20: frame.setVisible(true); 21: >catch (Exception e) < 22: e.printStackTrace(); 23: >24: > 25: >); 26: > 27: /** 28: * Create the frame. 29: */ 30: public MyFrame() < 31: setDefaultCloseOperation(JFrame.EXIT_ON_CLOSE); 32: setBounds(100, 100, 450, 300); 33: contentPane = new JPanel() < 34: public void paintComponent(Graphics g) < 35: Image img = Toolkit.getDefaultToolkit().getImage( 36: MyFrame.class.getResource("/images/bg.jpg")); 37: g.drawImage(img, 0, 0, this.getWidth(), this.getHeight(), this); 38: >39: >; 40: contentPane.setBorder(new EmptyBorder(5, 5, 5, 5)); 41: contentPane.setLayout(new BorderLayout(0, 0)); 42: setContentPane(contentPane); 43: > 44: > If you run the code, window will appear with your background. And no matter how you resize it, the background will also be resized with the window.

Same as above I have already created new java project and a jFrame in it.
And also I have placed my image in the images package.
First we set the layout of the jFrame to Free Design, which is the default layout.
Right click -> Set Layout -> Free Design

Then we add a jPanel over the jFrame.
And stretch it to cover up the whole surface of the jFrame.

Now again we are going to modify the code.
But if you look in the source tab, the auto generated code cannot be edited.
Here is how it look like the auto generated code where our jPanel instantiated.

Now let’s see how to modify the instantiated code of the jPanel :
Go back go the design go to the properties window of the jPanel.
Right click -> Properties
Click on the Code tab of the properties window and find the «Custom Creation code» in it.
Click on the tiny button in the right corner of «Custom Creation Code» property.
Then we will be prompted to add our own custom creation code for the jPanel.
Thus we can modify the code to override the paintComponent() method of the jPanel to draw the background image.

Here MyFrame is the class name of the jFrame.
Press ok and close out the properties window.
Now, if we check the auto generated code, it is changed to the new code we customized.

And don’t forget to import these classes.
import java.awt.Graphics; import java.awt.Image; import java.awt.Toolkit; import javax.swing.JPanel; Now run the file, you will get the background image that resize with the jFrame.
- Get link
- Other Apps
Labels
- Get link
- Other Apps
Comments

I am having an error on setContentPane. can you suggest me what mistake i might be doing?
Reply Delete
Post a Comment
Popular posts from this blog
Install Docker on Windows 11 with WSL Ubuntu 22.04
This is to install Docker within Ubuntu WSL without using the Windows Docker application. Follow the below steps. Install Ubuntu 22.04 WSL 1. Enable Windows Subsystem for Linux and Virtual Machine platform Go to Control Panel -> Programs -> Programs and Features -> Turn Windows features on or off 2. Switch to WSL 2 Open Powershell and type in the below command. wsl —set-default-version 2 If you don’t have WSL 2, download the latest WSL 2 package and install it. 3. Install Ubuntu Open Microsoft Store and search for Ubuntu. Select the version you intend to install. I’d use the latest LTS version Ubuntu 22.04. Click on the Get button. It will take a couple of minutes to download and install. 4. Open up the installed Ubuntu version that was installed. If you get an error like the below image, make sure to install the WSL2 Kernel update . If it’s an older Ubuntu version the error message would be something like the image below. Error: WSL 2 requires an update to its
- Get link
- Other Apps
JFrame background image
I am creating a simple GUI, and I want to have a background image (2048 X 2048) fill up the whole window and a square to the left top corner where the occasional 64 X 64 image can be loaded. How can this be done? I already know how to make the JFrame a set size, its the image loading I need help with.
Before one is able to submit such a post as mine, they are prompted to do just that. I did not find anything related so I continued on to write this. If I caused you an annoyance by posting this, I hope that is the greatest inconvenience you will have to face.
@Aaron, I’ve been over to the javaranch.com and to java-forums.org. They are nice over there. And they are competent too. The motto at the JavaRanch is «The JavaRanch, Friendly to Greenhorns». I’m interested in your question here, +1.
Please have a look at this answer, regarding how to load images in your project. And @Kaydell, please you too. Hope it helps 🙂
4 Answers 4
This is a simple example for adding the background image in a JFrame:
import javax.swing.*; import java.awt.*; import java.awt.event.*; class BackgroundImageJFrame extends JFrame < JButton b1; JLabel l1; public BackgroundImageJFrame() < setTitle("Background Color for JFrame"); setSize(400,400); setLocationRelativeTo(null); setDefaultCloseOperation(EXIT_ON_CLOSE); setVisible(true); /* One way ----------------- setLayout(new BorderLayout()); JLabel background=new JLabel(new ImageIcon("C:\\Users\\Computer\\Downloads\\colorful design.png")); add(background); background.setLayout(new FlowLayout()); l1=new JLabel("Here is a button"); b1=new JButton("I am a button"); background.add(l1); background.add(b1); */ // Another way setLayout(new BorderLayout()); setContentPane(new JLabel(new ImageIcon("C:\\Users\\Computer\\Downloads\\colorful design.png"))); setLayout(new FlowLayout()); l1=new JLabel("Here is a button"); b1=new JButton("I am a button"); add(l1); add(b1); // Just for refresh :) Not optional! setSize(399,399); setSize(400,400); >public static void main(String args[]) < new BackgroundImageJFrame(); >> @Aaron, I believe that rather than calling setSize() twice to refresh the window, it is better to always call setVisible(true) last of all and the windows will be drawn properly.
I’ve studied Nambi’s code and learned something, but I changed the code, improving it I believe. Here is a link to my version of the code, with comments: gist.github.com/kaydell/6565219
Use pack over set size and let the layout manager deal with it. Call setVisible last to ensure that the frame paints itself properly the first time.
The best way to load an image is through the ImageIO API
BufferedImage img = ImageIO.read(new File("/path/to/some/image")); There are a number of ways you can render an image to the screen.
You could use a JLabel . This is the simplest method if you don’t want to modify the image in anyway.
JLabel background = new JLabel(new ImageIcon(img)); Then simply add it to your window as you see fit. If you need to add components to it, then you can simply set the label’s layout manager to whatever you need and add your components.
If, however, you need something more sophisticated, need to change the image somehow or want to apply additional effects, you may need to use custom painting.
First cavert: Don’t ever paint directly to a top level container (like JFrame ). Top level containers aren’t double buffered, so you may end up with some flashing between repaints, other objects live on the window, so changing it’s paint process is troublesome and can cause other issues and frames have borders which are rendered inside the viewable area of the window.
Instead, create a custom component, extending from something like JPanel . Override it’s paintComponent method and render your output to it, for example.
protected void paintComponent(Graphics g)
Take a look at Performing Custom Painting and 2D Graphics for more details
How to set a background image in java
Having the plain background makes the project look old fashion. So I am writing this post to tell how to set a background image in a java project.
Firstly I discuss how it will be done on an IDE like Netbeans and then how it will be done using code.
Setting background image using Netbeans IDE
Create a JFrame form file and set the layout of the JFrame to Absolute Layout.

Now add a JLabel to store the image, which will act as the background later.
Click here to know how to add an image in java.

After adding the image and resizing it to the desired size(it should be of the JFrame size).
You can add other components to it but you will notice that it will not be visible as you add it to the JFrame.

Actually, it is behind the JLabel on which the image is set. So to get the component in front of the JLabel, we have to move the JLabel to the back.
To do that left click on the image JLabel then select «Move Down». Now the component will be visible.

This way you can create a JFrame having any number of components with a cool background.


Now let’s see how it will be done using code.
Setting background image using Code
Using this method is quite easy and smooth. You just have to add a small code snippet and you are good to go.
Use this code to put a background image on the JFrame.
setContentPane(new JLabel(new ImageIcon("F:\\spiderlab\\netbeans data\\Projects\\spiderlabweb\\src\\spiderlabweb\\pic.png"))); setLayout(new FlowLayout()); JButton b = new JButton("hello spider"); add(b); pack(); Include the code in the constructor of JFrame.

And then you can add components on to the JFrame.

Amit Rawat
I love to work on new projects and also work on my ideas. My main field of interest is Web Development.
Latest posts by Amit Rawat (see all)
Картинку на фон JFrame
Доброго времени суток!
Есть класс наследник JFrame, подскажите, как установить на фон формы картинку?
Добавлено через 1 час 36 минут
что никто не знает?
Фон в JFrame
Как сделать свой фон (картинка) в JFrame. Желательно пример кода и комментарии в нем.
Прозрачный фон у фрейма JFrame
Есть код: import java.awt.Color; import java.awt.Font; import java.awt.Graphics; import.
Как задать фон окна JFrame
Как задать фон окна JFrame package окно.входа.в.систему; import java.awt.Color; import.
Java. Не рисует картинку на JFrame
На фрейме есть кнопка, при нажатии на которую увеличивается count и вызывается repaint: private.

Сообщение было отмечено как решение
Решение
1. Делаете свою панель, у которой переопределяете paintComponent и отрисовываете там картинку.
2. Устанавливаете эту панель как contentPane в Вашем наследнике JFrame
3. Все элементы интерфейса кладете на эту панель.
Полтора часа — это слишком небольшой срок, чтобы начинать проявлять нетерпение. Те, кто знают — они, как правило, не сидят на форуме круглые сутки.
Сообщение было отмечено как решение
Решение
1 2 3 4 5 6 7 8 9 10 11 12 13 14 15 16 17 18 19 20 21 22 23 24 25 26 27 28 29 30 31 32 33 34 35 36 37 38 39 40 41 42 43 44 45 46 47 48
import java.awt.*; import java.io.File; import java.io.IOException; import javax.imageio.ImageIO; import javax.swing.*; public class MyG { public static void main(String[] args) { Fr f = new Fr(); f.setVisible(true); } } class Fr extends JFrame{ JLabel lbl; JButton b; JTextArea ta; public Fr(){ setTitle("Window"); setDefaultCloseOperation(EXIT_ON_CLOSE); setBounds(100, 100, 500, 450); setResizable(false); setContentPane(new BgPanel()); Container cont = getContentPane(); lbl = new JLabel("Label"); lbl.setFont(new Font("Arial", Font.BOLD, 24)); b = new JButton("Button"); ta = new JTextArea(5,32); cont.setLayout(new FlowLayout()); cont.add(lbl); cont.add(b); cont.add(ta); } } class BgPanel extends JPanel{ public void paintComponent(Graphics g){ Image im = null; try { im = ImageIO.read(new File("D:\\Tests\\fon.jpg")); } catch (IOException e) {} g.drawImage(im, 0, 0, null); } }