- JUnit: Java unit test framework
- Example Java Class to Test:
- JUnit unit test source:
- Ant file to compile and run a JUnit test:
- Configure Jenkins:
- Configure Build Project:
- Configure Build Project JUnit reporting:
- How to compile and run JUnit tests in command line
- 1. Compile JUnit tests in command line
- 2. Run JUnit tests in command line
- 3. Run JUnit tests by Maven in command line
- Other JUnit Tutorials:
- About the Author:
- Add comment
- Comments
JUnit: Java unit test framework
JUnit is a Java test framework for classes. JUnit has integrated support for many Java IDEs and continuous integration systems like Jenkins.
Related YoLinux Tutorials:
This tutorial assumes that you have Java installed on your system.
For more on installing Java and setting up your classpath see the YoLinux.com Java tutorial.
Download a prebuilt JUnit jar file: http://www.junit.org eg. junit-4.9b2.jar
- Linux: /opt/java/lib/ or /usr/java/latest/lib/
- MS/Windows: C:\Java\lib\ or C:\Program Files\Java\jdk1.6.0_26\lib\
Add the JUnit jar file to your Java class path (environment variable or set in ant build script).
In this tutorial we will be using an ANT build script.
The build path used in this example is as follows:
ProjectX/build.xml /src/com/megacorp/projx/util/Addition.java | /Multiply.java /test/src/com/megacorp/projx/JUnit/AllTests.java /test/src/com/megacorp/projx/util/Addition_Test.java | | /Multiply_Test.java | /htmlreports/index.html (generated by JUnit) | | /com/megacorp/projx/JUnit/ (unit test reports end up here) / /data/TEST-com.megacorp.projx.JUnit.AllTests.xml (generated by JUnit)
- JUnit can generate reports in various formats. HTML reports are directly viewable in a browser with links to the individual reports. XML output is often used as an iinterface with other systems like Jenkins.
- The unit test source mimics the source tree and class names.
Example Java Class to Test:
package com.megacorp.projx.util; import java.text.*; public class Addition < public static int twoValues(int x, int y) < return x + y; >>
package com.megacorp.projx.util; import java.text.*; public class Multiply < public static int twoValues(int x, int y) < return x * y; >>
JUnit unit test source:
- Class to specify tests to run: AllTests.java
- Classes to perform the unit tests:
- Addition_Test.java
- Multiply_Test.java
package com.megacorp.projx.JUnit; import org.junit.runner.RunWith; import org.junit.runners.Suite; import com.megacorp.projx.util.Addition_Test; import com.megacorp.projx.util.Multiply_Test; @RunWith(Suite.class) @Suite.SuiteClasses() public class AllTests < // Empty, since the annotations include all of the necessary configuration >
package com.megacorp.projx.util; import java.io.IOException; import java.io.PrintWriter; import junit.framework.TestCase; import com.megacorp.projx.util.Addition; import com.megacorp.projx.util.Multiply; public class Addition_Test extends TestCase < private int x = 0; private int y = 0; // Stuff to do before test protected void setUp() < x = 4; y = 5; >// Stuff to do after test protected void tearDown() < x = 0; y = 0; >public void testAddition() < System.out.println("Test use of Addition class"); int z = Addition.twoValues(x,y); System.out.println(" Result: " + z); assertEquals(9,z); // The test >>package com.megacorp.projx.util; import java.io.IOException; import java.io.PrintWriter; import junit.framework.TestCase; import com.megacorp.projx.util.Addition; import com.megacorp.projx.util.Multiply; public class Multiply_Test extends TestCase < private int x = 0; private int y = 0; protected void setUp() < x = 4; y = 5; >protected void tearDown() < x = 0; y = 0; >public void testMultiply() < System.out.println("Test use of Multiply class"); int z = Multiply.twoValues(x,y); System.out.println(" Result: " + z); assertEquals(20,z); >>Ant file to compile and run a JUnit test:
Builds, tests, and runs projx /src"/> /test/src"/> /test/htmlreports"/> /test/data"/>" /> "/> "/> " todir="$"/> [bash JUnit]$ ant clean Buildfile: /home/user1/JUnit/build.xml clean: BUILD SUCCESSFUL Total time: 0 seconds [bash JUnit]$ ant test Buildfile: /home/user1/JUnit/build.xml compile: [javac] Compiling 2 source files to /home/user1/JUnit/src compile-test: [javac] Compiling 3 source files to /home/user1/JUnit/test/src test: [junit] Running com.megacorp.projx.JUnit.AllTests [junit] Testsuite: com.megacorp.projx.JUnit.AllTests [junit] Test use of Addition class [junit] Result: 9 [junit] Test use of Multiply class [junit] Result: 20 [junit] Tests run: 2, Failures: 0, Errors: 0, Time elapsed: 0.019 sec [junit] Tests run: 2, Failures: 0, Errors: 0, Time elapsed: 0.019 sec [junit] [junit] ------------- Standard Output --------------- [junit] Test use of Addition class [junit] Result: 9 [junit] Test use of Multiply class [junit] Result: 20 [junit] ------------- ---------------- --------------- [junitreport] Processing /home/user1/JUnit/test/htmlreports/TESTS-TestSuites.xml to /tmp/null1813236 [junitreport] Loading stylesheet jar:file:/opt/apache-ant-1.8.2/lib/ant-junit.jar ! /org/apache/tools/ant/taskdefs/optional/junit/xsl/junit-frames.xsl [junitreport] Transform time: 315ms [junitreport] Deleting: /tmp/null1813236 BUILD SUCCESSFUL Total time: 1 second

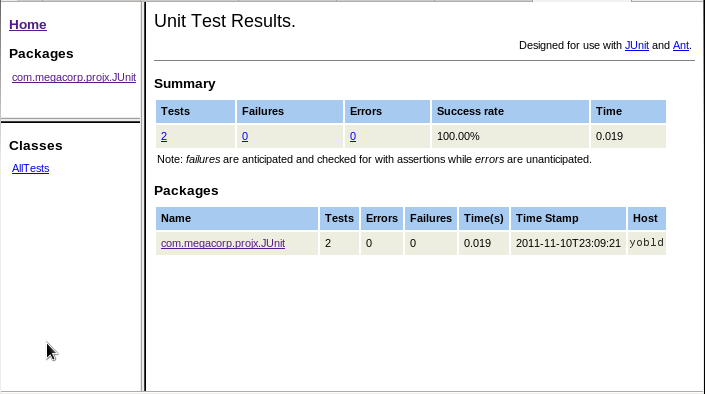
JUnit HTML Results Report:
View JUnit results with browser by opening file ./test/htmlreports/index.htmlJenkins configuration to run JUnit:
Configuration
Using Maven to build your project and JUnit tests will define the directory paths used and the Jenkins configuration. Unlike Ant which explicitly directs the build and test process, Maven implicitly controls the process using its own conventions including the directory paths used to place your code.
ProjectX/pom.xml /src/main/java/com/megacorp/projx/util/Addition.java | /Multiply.java /src/test/java/com/megacorp/projx/JUnit/AllTests.java /src/test/java/com/megacorp/projx/util/Addition_Test.java | | /Multiply_Test.java
Note that Maven controls the build process with pom.xml
4.0.0 JUnit Test Example POM com.megacorp.projectx ProjectX 1.0.0 jar org.apache.maven.plugins maven-surefire-plugin 2.20 true 1.8 1.8 2.3.2 UTF-8 4.12 junit junit $ test Maven has implicit targets which are steps in its «Lifecycle». The targets are executed in the following order:
Maven Target Description validate validate the project is correct and all necessary information is available compile compile the source code of the project test test the compiled source code using a suitable unit testing framework. These tests should not require the code be packaged or deployed package take the compiled code and package it in its distributable format, such as a JAR. verify run any checks on results of integration tests to ensure quality criteria are met install install the package into the local repository, for use as a dependency in other projects locally deploy done in the build environment, copies the final package to the remote repository for sharing with other developers and projects. The target is inclusive of all prior to it. Thus «mvn install» will execute targets alidate, compile, package, verify and install.
Build the project: mvn install
Note that Maven downloads all maven and build dependancies and will take a while on the first build (thus an internet connection will be required). Dependencies will be downloaded and stored in ~/m2/.
The results are a JAR file a JUnit results:
ProjectX/target/ProjectX-1.0.0.jar |target/surefire-reports/. xml (test results)
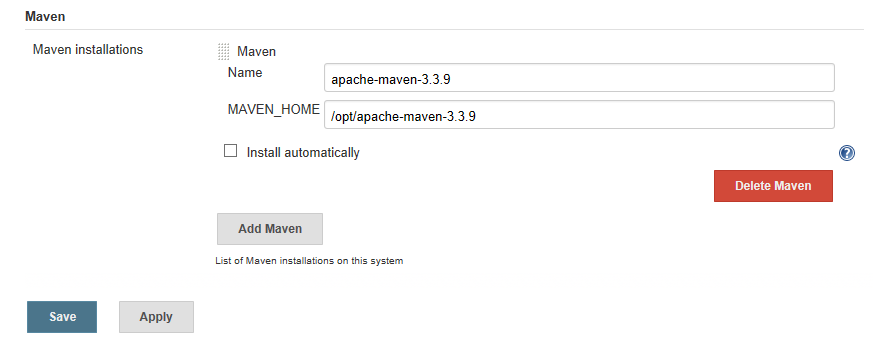
Configure Jenkins:
Configure Jenkins to use your Maven installation. Select «Jenkins» + «Global Tool Configuration»:
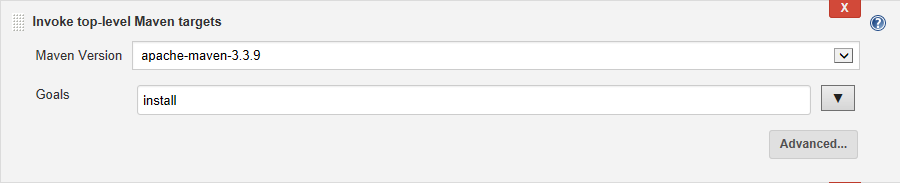
Configure Build Project:
Use the Jenkins Maven plug-in rather than executing Maven as a shell command. The Maven plug-in is Maven aware and will post-process JUnit results for use with Jenkins. Select your Jenkins project and «Configure»:
Configure Build Project JUnit reporting:
Test results will be put into the following directory structure:
For more on Jenkins, see the YoLinux tutorial on Jenkins and Java
For more on Maven, see the YoLinux tutorial on building Java applications with Maven
JUnit testing including J2EE. Covers JUnit framework and extensions.
The industry standard. Need I say more?
The industry standard. Need I say more?
How to compile and run JUnit tests in command line
JUnit is one of the most popular unit testing frameworks for Java so all IDEs and build tools have great support for Unit, including Eclipse and NetBeans. Creating and running JUnit tests in Eclipse is quick and easy, as described in JUnit Tutorial for beginner with Eclipse, and sometimes you also need to compile and run unit tests from command line, e.g. for quick testing regression of a change without opening the IDE.
1. Compile JUnit tests in command line
To compile test classes, the JUnit JAR file must be present in the classpath. Use the -cp option with javac command to specify JUnit JAR file:
javac -cp ;. TestClass1.java TestClass2.java
Note that in this command, the classpath must include the dot to denote the current directory that contains Java source files. And the test classes are separated by spaces.
For example, the following command compiles 2 test classes UserDAOTest.java and ProductDAOTest.java with JUnit 4:
javac -cp junit-4.12.jar;. UserDAOTest.java ProductDAOTest.java
Here, the JUnit JAR file junit-4.12.jar is in the same directory as the test classes. You can download JUnit JAR file here.
2. Run JUnit tests in command line
To run the test classes in command line, you have to specify JUnit JAR file and Hamcrest library JAR file (JUnit depends on it) in the classpath. You can download Hamcrest JAR file here. In the options for java command, specify the main class is org.junit.runner.JUnitCore followed by the names of the test classes (without .java extension). Here’s the syntax:
java -cp ;;. org.junit.runner.JUnitCore TestClass1 TestClass2
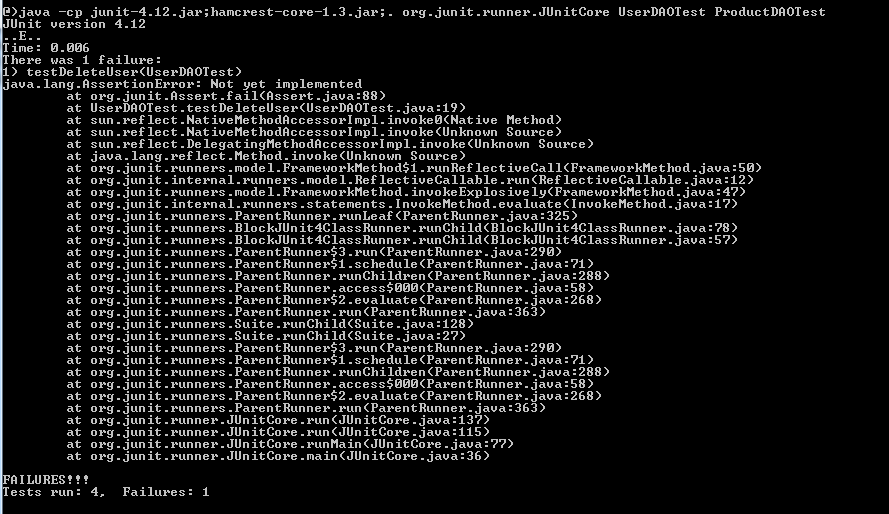
java -cp junit-4.12.jar;hamcrest-core-1.3.jar;. org.junit.runner.JUnitCore UserDAOTest ProductDAOTest
or if there’s a test failed:
3. Run JUnit tests by Maven in command line
If your Java project is Maven-based, you can execute tests in the command prompt by specifying the goal test when running Maven, for example:
mvn test mvn clean test mvn clean compile test
Other JUnit Tutorials:
About the Author:
Nam Ha Minh is certified Java programmer (SCJP and SCWCD). He started programming with Java in the time of Java 1.4 and has been falling in love with Java since then. Make friend with him on Facebook and watch his Java videos you YouTube.
Add comment
Comments
CodeJava.net shares Java tutorials, code examples and sample projects for programmers at all levels.
CodeJava.net is created and managed by Nam Ha Minh — a passionate programmer.Copyright © 2012 — 2023 CodeJava.net, all rights reserved.