- Layouts и абсолютное позиционирование в Java Swing
- How to Use Panels
- An Example
- Setting the Layout Manager
- Adding Components
- The Panel API
- Examples That Use Panels
- JPanel basic tutorial and examples
- 1. Creating a new JPanel
- 2. Setting a layout manager for JPanel
- 3. Adding components to JPanel
- 4. Adding JPanel to a parent container
- 5. Customizing appearance for JPanel
- 6. JPanel Sample application
- Other Java Swing Tutorials:
- About the Author:
Layouts и абсолютное позиционирование в Java Swing
Создание приложения на Java Swing включает в себя создание графического интерфейса пользователя. Для этого в распоряжение разработчика библиотека Java Swing предоставила достаточно большой набор компонентов. Чтобы расположить компоненты так, как хочет разработчик необходимо воспользоваться менеджерами компоновки (layout managers) или абсолютным позиционированием.
Абсолютное позиционирование – задание точного положения и размера компонентов. При использовании определенного layout manager разработчик «точно» не указывает расположение компонентов и их размер. Сейчас посмотрим, как работать с абсолютным позиционированием.
Рассмотрим пример. У нас есть контейнер JPanel, на котором мы хотим разместить некоторые компоненты. Размер и расположение каждого компонента хотим задать точно по пикселям. Что для этого необходимо сделать?
Сначала нужно сказать контейнеру о том, что мы не будем использовать layout manager. Для этого вызываем метод setLayout у контейнера и передаем туда в качестве параметра null.
JPanel panel = new JPanel();
panel.setLayout(null);
Далее необходимо создать компонент, который мы хотим разместить на контейнере и при помощи метода setBounds задать у компонента его координаты и размеры. Метод имеет четыре параметра. Первые два параметра соответственно X и Y координаты самой левой верхней точки компонента, вторая пара чисел – размеры: ширина и высота.
JButton button = new JButton(“Button”);
Button.setBounds(5, 5, 100, 30);
Посмотрим тестовое приложение.
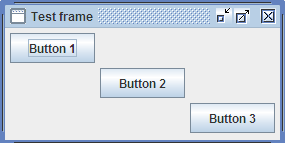
Создаем панель. Устанавливаем ей layout в null. Затем создаем кнопки, говорим им, где они будут располагаться и какой размер будут иметь через setBounds и добавляем на панель.
import javax.swing.JButton;
import javax.swing.JFrame;
import javax.swing.JPanel;
public class TestFrame extends JFrame
public TestFrame() super(«Test frame»);
createGUI();
>
public void createGUI() setDefaultCloseOperation(JFrame.EXIT_ON_CLOSE);
JPanel panel = new JPanel();
panel.setLayout(null);
JButton button1 = new JButton(«Button 1»);
button1.setBounds(5, 5, 85, 30);
panel.add(button1);
JButton button2 = new JButton(«Button 2»);
button2.setBounds(95, 40, 85, 30);
panel.add(button2);
JButton button3 = new JButton(«Button 3»);
button3.setBounds(185, 75, 85, 30);
panel.add(button3);
setPreferredSize(new Dimension(285, 145));
>
public static void main(String[] args) javax.swing.SwingUtilities.invokeLater(new Runnable() public void run() JFrame.setDefaultLookAndFeelDecorated(true);
TestFrame frame = new TestFrame();
frame.pack();
frame.setLocationRelativeTo(null);
frame.setVisible(true);
>
>);
>
>
How to Use Panels
The JPanel class provides general-purpose containers for lightweight components. By default, panels do not add colors to anything except their own background; however, you can easily add borders to them and otherwise customize their painting. Details can be found in Performing Custom Painting.
In many types of look and feel, panels are opaque by default. Opaque panels work well as content panes and can help with painting efficiently, as described in Using Top-Level Containers. You can change a panel’s transparency by invoking the setOpaque method. A transparent panel draws no background, so that any components underneath show through.
An Example
The following picture shows a colored version of the Converter application, which is discussed in more detail in Using Models.
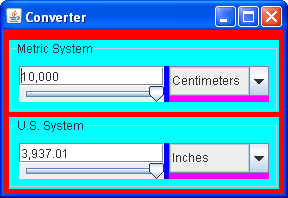
The Converter example uses panels in several ways:
- One JPanel instance colored red in the preceding snapshot serves as a content pane for the application’s frame. This content pane uses a top-to-bottom BoxLayout to lay out its contents, and an empty border to put 5 pixels of space around them. See Using Top-Level Containers for information about content panes.
- Two instances of a custom JPanel subclass named ConversionPanel colored cyan are used to contain components and coordinate communication between components. These ConversionPanel panels also have titled borders, which describe their contents and enclose the contents with a line. Each ConversionPanel panel uses a left-to-right BoxLayout object to lay out its contents.
- In each ConversionPanel , a JPanel instance colored magenta is used to ensure the proper size and position of the combo box. Each of these JPanel instances uses a top-to-bottom BoxLayout object (helped by an invisible space-filling component) to lay out the combo box.
- In each ConversionPanel , an instance of an unnamed JPanel subclass colored blue groups two components (a text field and a slider) and restricts their size. Each of these JPanel instances uses a top-to-bottom BoxLayout object to lay out its contents.
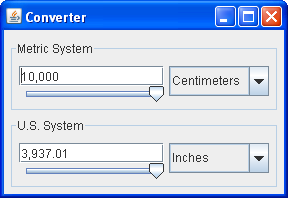
Here is what the Converter application normally looks like.
As the Converter example demonstrates, panels are useful for grouping components, simplifying component layout, and putting borders around groups of components. The rest of this section gives hints on grouping and laying out components. For information about using borders, see How to Use Borders.
Setting the Layout Manager
Like other containers, a panel uses a layout manager to position and size its components. By default, a panel’s layout manager is an instance of FlowLayout , which places the panel’s contents in a row. You can easily make a panel use any other layout manager by invoking the setLayout method or by specifying a layout manager when creating the panel. The latter approach is preferable for performance reasons, since it avoids the unnecessary creation of a FlowLayout object.
Here is an example of how to set the layout manager when creating the panel.
JPanel p = new JPanel(new BorderLayout()); //PREFERRED!
This approach does not work with BoxLayout , since the BoxLayout constructor requires a pre-existing container. Here is an example that uses BoxLayout .
JPanel p = new JPanel(); p.setLayout(new BoxLayout(p, BoxLayout.PAGE_AXIS));
Adding Components
When you add components to a panel, you use the add method. Exactly which arguments you specify to the add method depend on which layout manager the panel uses. When the layout manager is FlowLayout , BoxLayout , GridLayout , or SpringLayout , you will typically use the one-argument add method, like this:
aFlowPanel.add(aComponent); aFlowPanel.add(anotherComponent);
When the layout manager is BorderLayout , you need to provide an argument specifying the added component’s position within the panel. For example:
aBorderPanel.add(aComponent, BorderLayout.CENTER); aBorderPanel.add(anotherComponent, BorderLayout.PAGE_END);
With GridBagLayout you can use either add method, but you must somehow specify grid bag constraints for each component.
For information about choosing and using the standard layout managers, see Using Layout Managers.
The Panel API
The API in the JPanel class itself is minimal. The methods you are most likely to invoke on a JPanel object are those it inherits from its superclasses JComponent , Container , and Component . The following tables list the API you are most likely to use, with the exception of methods related to borders and layout hints. For more information about the API that all JComponent objects can use, see The JComponent Class.
Examples That Use Panels
Many examples contained in this lesson use JPanel objects. The following table lists a few.
| Example | Where Described | Notes |
|---|---|---|
| Converter | This section | Uses five panels, four of which use BoxLayout and one of which uses GridLayout . The panels use borders and, as necessary, size and alignment hints to affect layout. |
| ListDemo | How to Use Lists | Uses a panel, with its default FlowLayout manager, to center three components in a row. |
| ToolBarDemo | How to Use Tool Bars | Uses a panel as a content pane. The panel contains three components, laid out by BorderLayout . |
| BorderDemo | How to Use Borders | Contains many panels that have various kinds of borders. Several panels use BoxLayout . |
| BoxLayoutDemo | How to Use BoxLayout | Illustrates the use of a panel with Swing’s BoxLayout manager. |
JPanel basic tutorial and examples
JPanel is a Swing’s lightweight container which is used to group a set of components together. JPanel is a pretty simple component which, normally, does not have a GUI (except when it is being set an opaque background or has a visual border).
In this article, we summarize the common practices when working with JPanel in Swing. At the end, we will create a sample program looks like this:
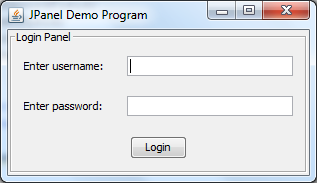
Table of content:
1. Creating a new JPanel
The JPanel class resides in the package javax.swing and it’s a subclass of the javax.swing.JComponent class.
- Normally we create new JPanel object as simple as follows:
JPanel newPanel = new JPanel();
public class UserDetail extends JPanel < // code to add components to the panel >
JPanel newPanel = new JPanel(true); // enable double buffering JPanel newPanel = new JPanel(false); // disable double buffering
JPanel newPanel = new JPanel(new GridBagLayout()); JPanel newPanel = new JPanel(new BorderLayout());
// use grid bag layout and no double buffering: JPanel newPanel = new JPanel(new GridBagLayout(), false);
2. Setting a layout manager for JPanel
- We can call the method setLayout(LayoutManager) to specify a layout manager for the panel (after the panel is created):
JPanel newPanel = new JPanel(); newPanel.setLayout(new GridBagLayout());
// NOT recommended: JPanel newPanel = new JPanel(); // a FlowLayout manager is created by default newPanel.setLayout(new GridBagLayout()); // RECOMMENDED: JPanel newPanel = new JPanel(new GridBagLayout());
// exception: JPanel newPanel = new JPanel(); newPanel.setLayout(new BoxLayout(newPanel, BoxLayout.X_AXIS));
3. Adding components to JPanel
To add GUI components such as JLabel, JTextField, JButton. to the panel, we use the add() method. There are different versions of the add() method, so which method to be used is depending on the layout manager of the panel.
- Use the add(Component) method for the following layout managers: FlowLayout , BoxLayout , GridLayout , or SpringLayout . For example:
JLabel label = new JLabel("Enter username:"); JTextField userName = new JTextField(20); newPanel.add(label); newPanel.add(userName); JPanel newPanel = new JPanel(new BorderLayout()); JLabel label = new JLabel("Enter username:"); JTextField userName = new JTextField(20); newPanel.add(label, BorderLayout.NORTH); newPanel.add(userName, BorderLayout.SOUTH); GridBagConstraints constraints = new GridBagConstraints(); constraints.anchor = GridBagConstraints.WEST; constraints.insets = new Insets(10, 10, 10, 10); constraints.gridx = 0; constraints.gridy = 0; newPanel.add(labelUsername, constraints);
JPanel wizardPanel = new JPanel(new CardLayout()); wizardPanel.add("Step1", step1Panel); wizardPanel.add("Step2", step2Panel); 4. Adding JPanel to a parent container
The panel cannot stand alone. It must be added to a parent container such as a JFrame or another JPanel . For example:
frame.add(newPanel); anotherPanel.add(newPanel);
5. Customizing appearance for JPanel
Normally, a JPanel does not render its own GUI. However we can set its background color, transparent background or border when necessary.
newPanel.setBackground(Color.CYAN);
newPanel.setOpaque(false); // make transparent background
newPanel.setBorder(BorderFactory.createBevelBorder(BevelBorder.RAISED));
newPanel.setBorder(BorderFactory.createEtchedBorder());
newPanel.setBorder(BorderFactory.createLineBorder(Color.RED));
newPanel.setBorder(BorderFactory.createTitledBorder( BorderFactory.createEtchedBorder(), "Login Panel"));
6. JPanel Sample application
We created the following program to demonstrate the typical usages of JPanel in a Swing application. The program uses a JPanel to group some labels, textfields and a button to form a login panel as follows:

As you can notice, the panel used in this program has a titled border “Login Panel”. Here is complete source code of the program:
package net.codejava.swing.jpanel; import java.awt.GridBagConstraints; import java.awt.GridBagLayout; import java.awt.Insets; import javax.swing.BorderFactory; import javax.swing.JButton; import javax.swing.JFrame; import javax.swing.JLabel; import javax.swing.JPanel; import javax.swing.JPasswordField; import javax.swing.JTextField; import javax.swing.SwingUtilities; import javax.swing.UIManager; /** * This program demonstrates how to use JPanel in Swing. * @author www.codejava.net */ public class SwingJPanelDemo extends JFrame < private JLabel labelUsername = new JLabel("Enter username: "); private JLabel labelPassword = new JLabel("Enter password: "); private JTextField textUsername = new JTextField(20); private JPasswordField fieldPassword = new JPasswordField(20); private JButton buttonLogin = new JButton("Login"); public SwingJPanelDemo() < super("JPanel Demo Program"); // create a new panel with GridBagLayout manager JPanel newPanel = new JPanel(new GridBagLayout()); GridBagConstraints constraints = new GridBagConstraints(); constraints.anchor = GridBagConstraints.WEST; constraints.insets = new Insets(10, 10, 10, 10); // add components to the panel constraints.gridx = 0; constraints.gridy = 0; newPanel.add(labelUsername, constraints); constraints.gridx = 1; newPanel.add(textUsername, constraints); constraints.gridx = 0; constraints.gridy = 1; newPanel.add(labelPassword, constraints); constraints.gridx = 1; newPanel.add(fieldPassword, constraints); constraints.gridx = 0; constraints.gridy = 2; constraints.gridwidth = 2; constraints.anchor = GridBagConstraints.CENTER; newPanel.add(buttonLogin, constraints); // set border for the panel newPanel.setBorder(BorderFactory.createTitledBorder( BorderFactory.createEtchedBorder(), "Login Panel")); // add the panel to this frame add(newPanel); pack(); setLocationRelativeTo(null); >public static void main(String[] args) < // set look and feel to the system look and feel try < UIManager.setLookAndFeel(UIManager.getSystemLookAndFeelClassName()); >catch (Exception ex) < ex.printStackTrace(); >SwingUtilities.invokeLater(new Runnable() < @Override public void run() < new SwingJPanelDemo().setVisible(true); >>); > > You can download the code as well as an executable jar file of this program in the attachments section.
Other Java Swing Tutorials:
About the Author:

Nam Ha Minh is certified Java programmer (SCJP and SCWCD). He started programming with Java in the time of Java 1.4 and has been falling in love with Java since then. Make friend with him on Facebook and watch his Java videos you YouTube.