- Working with Manifest Files: The Basics
- Understanding the Default Manifest
- Modifying a Manifest File
- Setting an Application’s Entry Point
- Adding Classes to the JAR File’s Classpath
- Setting Package Version Information
- Sealing Packages within a JAR File
- Enhancing Security with Manifest Attributes
- Additional Information
- Working with JAR and Manifest files In Java
Working with Manifest Files: The Basics
JAR files support a wide range of functionality, including electronic signing, version control, package sealing, and others. What gives a JAR file this versatility? The answer is the JAR file’s manifest.
The manifest is a special file that can contain information about the files packaged in a JAR file. By tailoring this «meta» information that the manifest contains, you enable the JAR file to serve a variety of purposes.
This lesson will explain the contents of the manifest file and show you how to work with it, with examples for the basic features:
Understanding the Default Manifest
When you create a JAR file, a default manifest is created automatically. This section describes the default manifest.
Modifying a Manifest File
This section shows you the basic method of modifying a manifest file. The later sections demonstrate specific modifications you may want to make.
Setting an Application’s Entry Point
This section describes how to use the Main-Class header in the manifest file to set an application’s entry point.
Adding Classes to the JAR File’s Classpath
This section describes how to use the Class-Path header in the manifest file to add classes in other JAR files to the classpath when running an applet or application.
Setting Package Version Information
This section describes how to use the package version headers in the manifest file.
Sealing Packages within a JAR File
This section describes how to seal packages within a JAR file by modifying the manifest file.
Enhancing Security with Manifest Attributes
This section describes how to use manifest attributes to increase the security of an applet or Java Web Start application.
Additional Information
A specification of the manifest format is part of the on-line JDK documentation.
Working with JAR and Manifest files In Java
Whenever a developer wants to distribute a version of his software, then all he want is to distribute a single file and not a directory structure filled with class files. JAR files were designed for this purpose. A JAR file can contain both class files and other file types like sound and image files which may be included in the project. All the files in a JAR file are compressed using a format similar to zip.
Creating a JAR file – more Options
A jar file is created using jar tool. The general command looks somewhat like this:
jar options jar-file [manifest-file] file1 file2 file3 .
- jar – file : name of jar file on which you want to use jar tool.
- file1, file2, file3 : files which you want to add inside a jar file. manifest-file is the name of file which contains manifest of that jar file, giving manifest-file as an argument is entirely optional.
- c : Creates a new or empty archive and adds files to it. If any of the specified file name are directories, then the jar program processes them recursively.
- C : Temporarily changes the directory.
- e : Creates an entry point in the manifest.
- f : Specifies the JAR file name as the second command-line argument. If this parameter is missing, jar will write the result to standard output (when creating a JAR file)or read it from standard input(when extracting or tabulating a JAR file).
- i : Creates an index file.
- m : Adds a manifest file to the JAR file. A manifest is a description of the archive contents and origin. Every archive has a default manifest, but you can supply your own if you want to authenticate the contents of the archive.
- M : Does not create a manifest file for the entries.
- t : Displays the table of contents.
- u : Updates an existing JAR file.
- v : Generates verbose output.
- x : Extract files. If you supply one or more file names, only those files are extracted Otherwise, all files are extracted.
- 0 : Stores without zip compression.
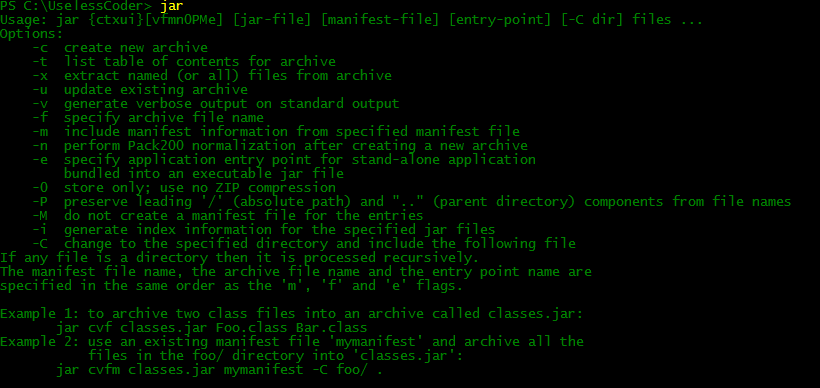
The options of jar command are almost similar to that of UNIX tar command. In windows you can also get help about various options of jar command just by typing jar in cmd and then pressing enter, the output will be somewhat similar to this:
For creating a JAR file which have two classes server.class and client.class and a Jpeg image logo.jpeg, one need to write following command :
jar cvf chat.jar server.class client.class logo.jpeg
The output of above command will be somewhat like this:

It’s a better practice to use -v option along with jar command as you will get to know how the things are going on.
Manifest File
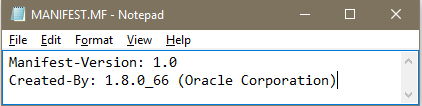
Each JAR file contains a manifest file that describe the features of the archive. Each JAR file have a manifest file by default. Default manifest file is named as MANIFEST.MF and is present in the META-INF subdirectory of archive. Although the default manifest file contains just two entries, but complex manifest files can have way more. Here, is what a default manifest file looks like –
The entries of manifest files are grouped into sections. Each section have two entries section name and its value. We will see a bit later how these sections can really help us in controlling the properties of our archive. Manifest file can also be updated by using the m option of jar command. But there are certain things which need to kept in mind while updating manifest file otherwise you may get the following creepy message.
java.io.IOException: invalid manifest format
Things to keep in mind while handling Manifest files:
- You should leave space between the name and value of any section in manifest file, like Version:1.1 is in valid section instead write Version: 1.1 that space between colon and 1.1 really matters a lot.
- While specifying the main class you should not add .class extension at the end of class name. Simply specify the main class by typing:
Now let’s come back and update the contents of our chat.jar archive. To update the manifest file we simply need to write the following command:
jar uvfm chat.jar manifest.txt
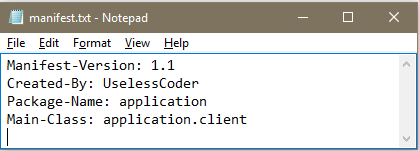
Here manifest.txt is the new manifest file, which has following contents:
The output of above command will be somewhat like this:
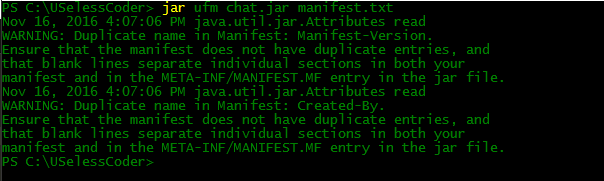
Here we are getting two warnings because we are trying to overwrite to previously present entries.
Executable Jar Files
You can use the e option of jar command to specify the entry point of your program, ie. class which you normally want to invoke when launching your Java application.
To create chat.jar file having client class as main class you need to write following command –
jar cvfe chat.jar client client.class server.class logo.jpeg
The output of above command will be somewhat like this:

Remember not to add .class extension after the name of class which you want to set main class.
Alternatively you can add a Main-Class entry in the manifest file and then update it. For the above example you just need to add this entry:
With main class being set one can simply run a jar program by writing following command –
Depending on operating system configuration, users may even be able to launch application by double clicking the JAR file icon.
Package Sealing
Finally, we are going to discuss about package sealing in Java. We can seal a package in Java to ensure that no further classes can add themselves to it. You may want to seal a package if you use a package visible classes, methods and fields in your code. Without package sealing, other classes can add themselves to the same package and thereby gain access to package visible features.
- To achieve package sealing all one need to do is to put all classes of that package into a JAR file.
- By default the packages in a jar file are not sealed but one can change the global default by adding few lines in manifest file.
- Let’s again consider the case of our chat.jar archive, now the package of classes client.class and server.class is application and we want to seal this package all we need to do is to add following line in the manifest file and update it.
Name: application Sealed: true
This is all from my side on how to work with JAR files. Stay Tuned!!
This article is contributed by Abhey Rana(UselessCoder). If you like GeeksforGeeks and would like to contribute, you can also write an article using contribute.geeksforgeeks.org or mail your article to contribute@geeksforgeeks.org. See your article appearing on the GeeksforGeeks main page and help other Geeks.
Please write comments if you find anything incorrect, or you want to share more information about the topic discussed above.