- How to set JAVA_HOME in Windows 11/10
- Setting JAVA_HOME in Windows 11/10
- Set JAVA_HOME environment variable & update the system path
- Check JAVA_HOME configuration setup using CMD
- How to Set JAVA_HOME Environment Variable in Windows 10
- Prerequisites: Install Java on Windows
- How to Set JAVA_HOME Environment Variable in Windows?
- Conclusion
- About the author
- Rafia Zafar
- Setting the JAVA_HOME Variable in Windows
- Set the JAVA_HOME Variable
- Set the JAVA_HOME variable via the command line
- How to set java path in windows 10
- Why do you need JAVA_HOME?
- How to set JAVA_HOME in Windows 10?
- Set java path in window 10
How to set JAVA_HOME in Windows 11/10
In Unix terminology, an Environment variable is a string that holds information such as drive name, pathname, filename, etc. JAVA_HOME is an environment variable which addresses to the directory where Java Runtime Environment or Java Development Kit is installed in the system. To be precise, say if you have installed Java in the path C:\Program Files\Java\jdk1.8.0_121 on your computer, then your Java_Home is C:\Program Files\Java\jdk1.8.0_121. Basically, JAVA_Home is simply an exemplary used by Java-based programs like Apache Tomcat and other app server tools to find where Java is placed in the system.
These third-party programs make use of the environment variables that point to the directory of JDK or JRE. In simple words, it makes easy for the programs to locate the directory executable like javac in the computer. If you are not using these third-party programs, then it may not be mandatory for users to set up JAVA_Home in your system. In this article, we will explain in detail how to set JAVA_HOME as the environment variable in Windows 10.
Setting JAVA_HOME in Windows 11/10
Set JAVA_HOME environment variable & update the system path
Download and install Java from the official site – java.com.
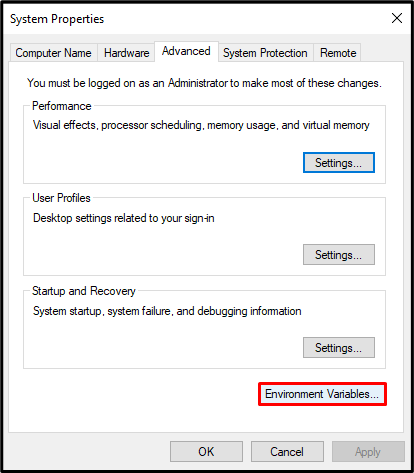
After installation, Go to Start menu and type Advanced system settings.
Click on View advanced system settings from the list to open System Properties.
Go to Advanced tab and click on Environment Variables button.
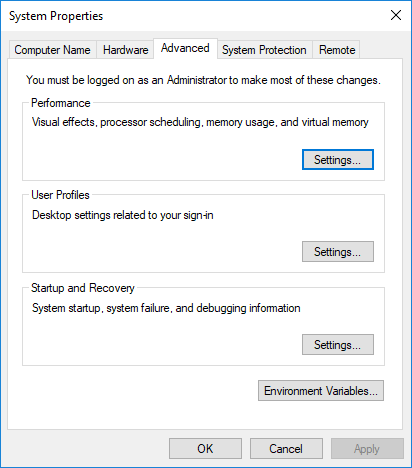
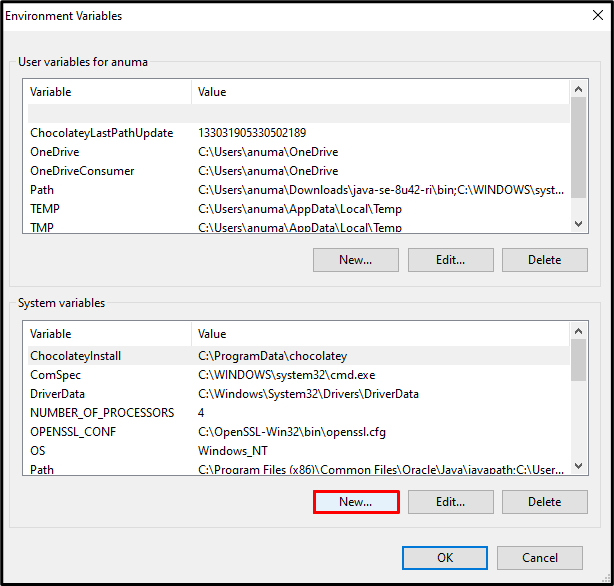
In the Environment Variable window, click on New button under the System variable.
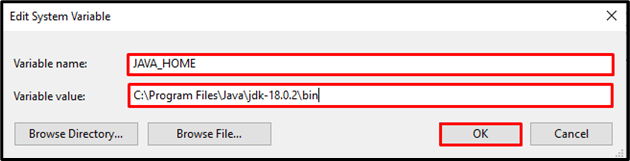
In the Edit System Variable, give the Variable name as JAVA_HOME and Variable value as the path to your JDK directory.
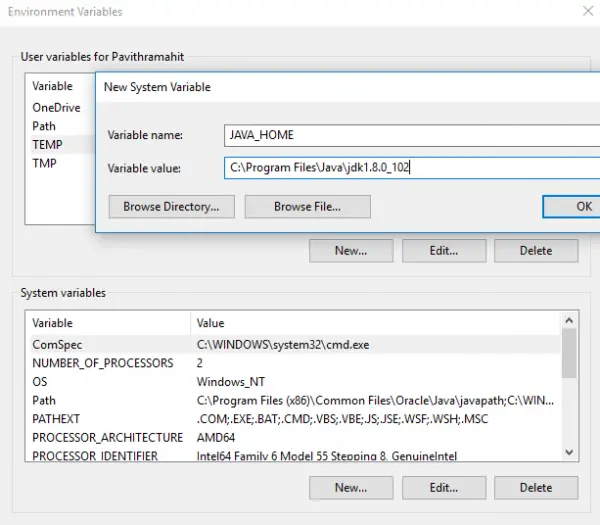
Click on OK.
Now go back to the Environment Variable window and select Path under the System variable.
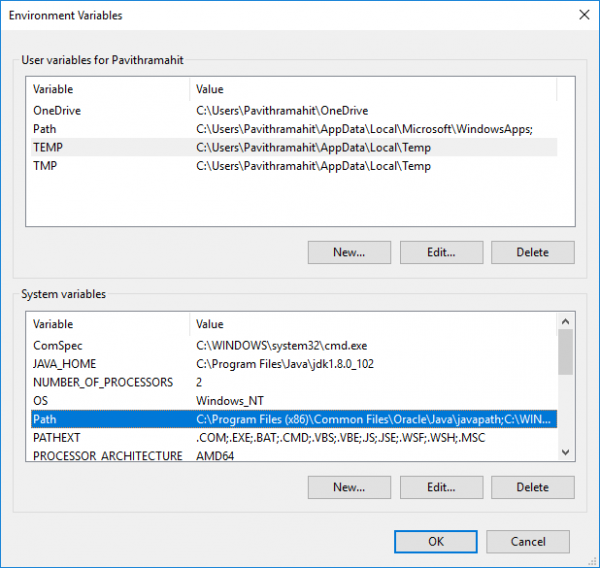
Click on Edit button to open Edit environment variable window.
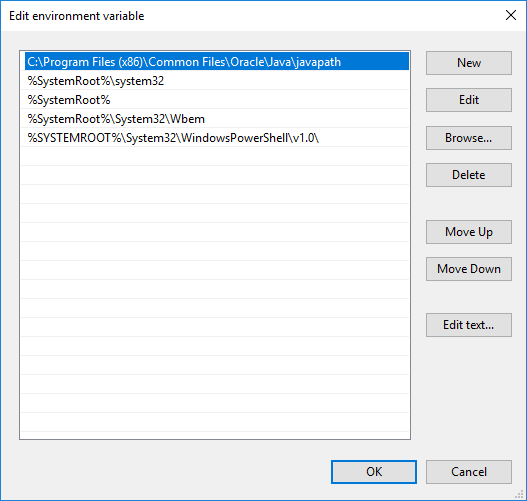
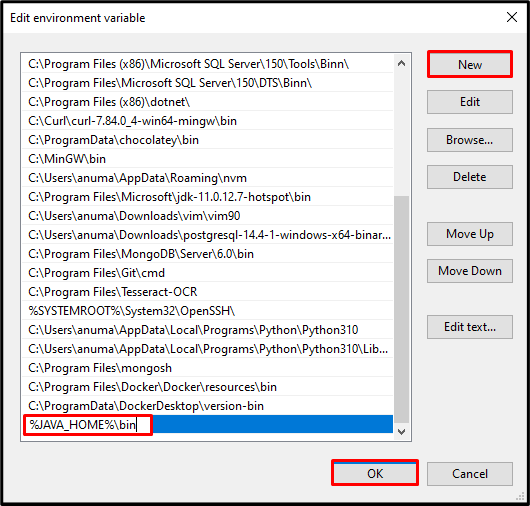
Click on New button and type %JAVA_HOME%\bin.
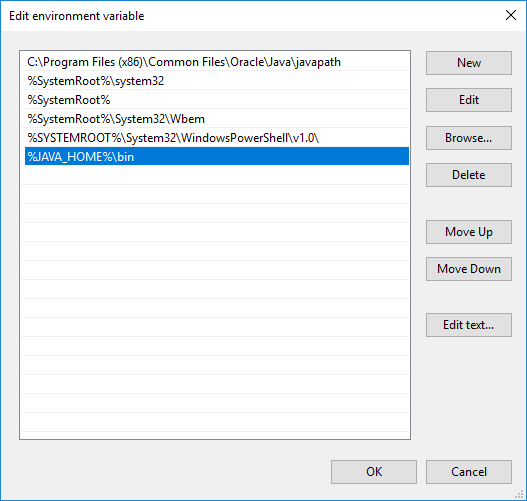
Click OK to apply the changes.
Check JAVA_HOME configuration setup using CMD
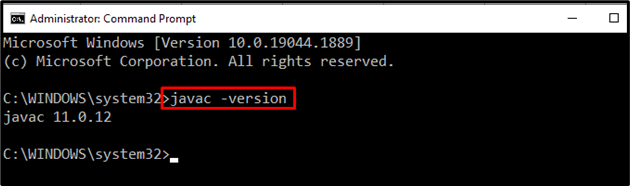
To test your configuration, open Command prompt.
Type echo %JAVA_HOME% and hit Enter. This should print the directory of the JDK which the JAVA_HOME is pointing. Instead, if you see a space, it means you have failed in setting up environment variable.

Next Type javac -version which should print the version of Java compiler.
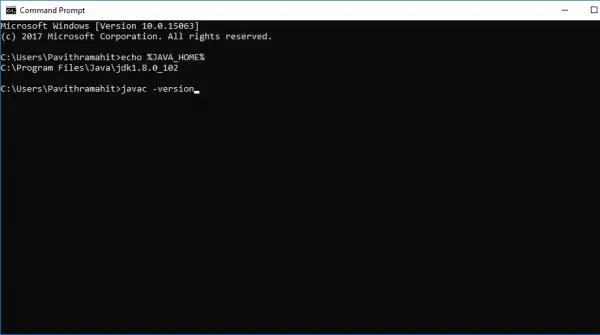
If not it will print a message that the javac is not recognized as an internal or external command. This means the path variable is not set correctly.
How to Set JAVA_HOME Environment Variable in Windows 10
![]()
Java is a modern, well-liked, general-purpose coding language introduced by Sun Microsystems in 1995. It also supported a multi-threading environment in which many small tasks within an application are executed as threads. Various Java-based programs like Tomcat require the location of the Java Development Kit (JDK) on your system. This direction is provided using the JAVA_HOME which is an environment variable used to point toward the installation directory of JDK.
Here, we will demonstrate the approach to set the JAVA_HOME in Windows.
Prerequisites: Install Java on Windows
JAVA_HOME refers to the directory where the JDK is placed. Prior to setting the JAVA_HOME environment, your system must have JDK. Here, we have added a link to our article:
How to Set JAVA_HOME Environment Variable in Windows?
The environment variables are the space where the information about software and programs are stored such as packages, and program location, and also include Windows program information. It provides the environment in which stored or set programs can interact with the operating system. Follow the below-given guide to set up the “HOME_JAVA” environment variable.
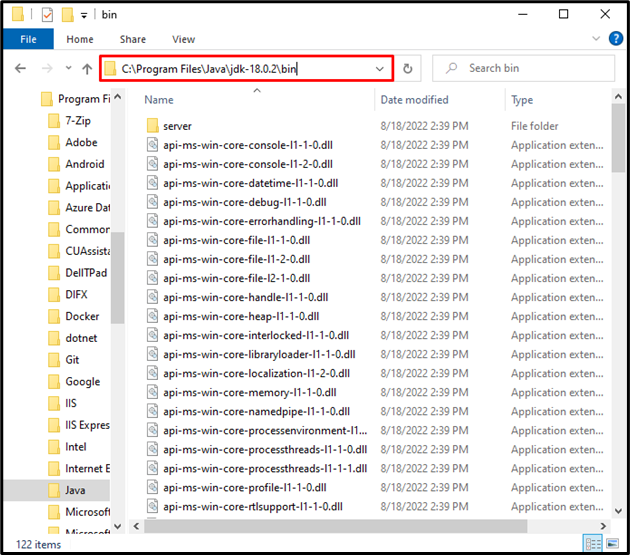
Step 1: Open Java Installation Directory
By default, Java JDK is installed in “Program Files”. If you have changed the installation location, navigate to the directory where the Java and JDK is installed. Then, open the “bin” directory of JDK. After that, copy the path from the “Address” bar. Otherwise, follow the below provided path to access the bin folder:
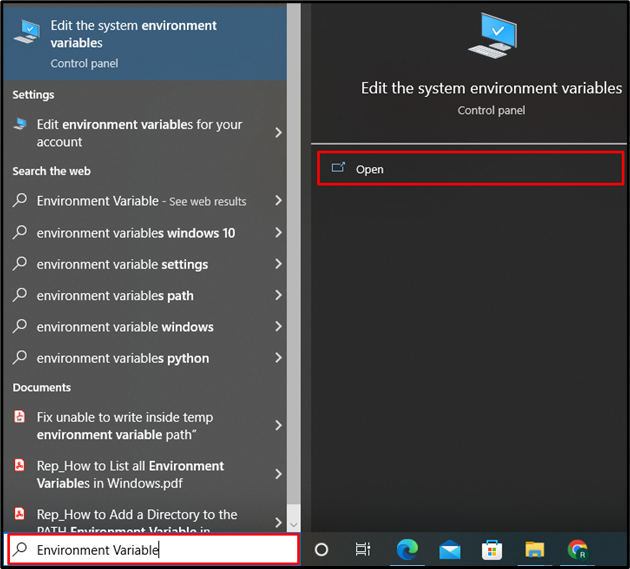
Step 2: Open Environment Variables Settings
Next, make a search for “Environment Variable” in the “Startup” menu and open the displayed setting:
Step 3: Set JAVA_HOME Environment Variables
Click on the “Environment Variables” button to set JAVA_HOME environment variable:
Next, press the “New” button from the “System variables” panel:
Upon doing so, the “New System Variable” wizard will appear on the screen. Set the “Variable Name” as “JAVA_HOME” and in “Variable value” paste the copied path here. Then, hit the “OK” button:
Step 4: Set Path Environment Variable
In order to use Java from the Windows command line, set the Path environment variable. To do so, select the “Path” property from the “System variable” panel and press the “Edit” button:

Next, click on the “New” button and type “%HOME_JAVA%\bin” in the displayed field. Then, hit on the “OK”:
Step 5: Verify Setting of Environment Variable
In the next step, verify whether we have successfully set Environment Variable JAVA_HOME or not. For this purpose, first, open the Window Command prompt from the Startup menu:
Check out the Java version using provided command:
You can see that we have successfully set the environment variable JAVA_HOME in Windows:
We have learned the method to install java and how to set the environment variable JAVA_HOME in Windows.
Conclusion
To set the JAVA_HOME environment variable, you need to install Java on your system. Next, open the directory where you have installed JDK and copy the “bin” directory path from the “Address” bar. After that, open the Control Panel “Environment Variable” settings and set the new environment variable by clicking on the “New” button, then set the Variable name as “JAVA_HOME” and paste the copied path into the Variable value. In this article, we have demonstrated the technique to add JAVA_HOME to the environment variable in Windows 10.
About the author
Rafia Zafar
I am graduated in computer science. I am a junior technical author here and passionate about Programming and learning new technologies. I have worked in JAVA, HTML 5, CSS3, Bootstrap, and PHP.
Setting the JAVA_HOME Variable in Windows
To install Confluence manually on Windows, you will need to set an environment variable to point Confluence to the your Java installation directory.
This information is only relevant if you’re installing Confluence manually on a Windows server. If you’re using the installer, you don’t need to do this.
In most cases you should set the JRE_HOME environment variable, but if it is not set, Confluence will use JAVA_HOME.
Related pages
Set the JAVA_HOME Variable
To set the JRE_HOME or JAVA_HOME variable:
- Locate your Java installation directory
If you didn’t change the path during installation, it’ll be something like C:\Program Files\Eclipse Adoptium\jdk-11.0.17.8-hotspot\ or C:\Program Files\Java\jdk-17.0.4.1\ You can also type where java at the command prompt.

Windows 7 – Right click My Computer and select Properties >Advanced
Windows 8 – Go to Control Panel >System >Advanced System Settings
Windows 10 – Search for Environment Variables then select Edit the system environment variables
- JAVA_HOME if you installed the JDK (Java Development Kit)
or - JRE_HOME if you installed the JRE (Java Runtime Environment)
You’ll need to close and re-open any command windows that were open before you made these changes, as there’s no way to reload environment variables from an active command prompt. If the changes don’t take effect after reopening the command window, restart Windows.
Set the JAVA_HOME variable via the command line
If you would prefer to set the JAVA_HOME (or JRE_HOME) variable via the command line:
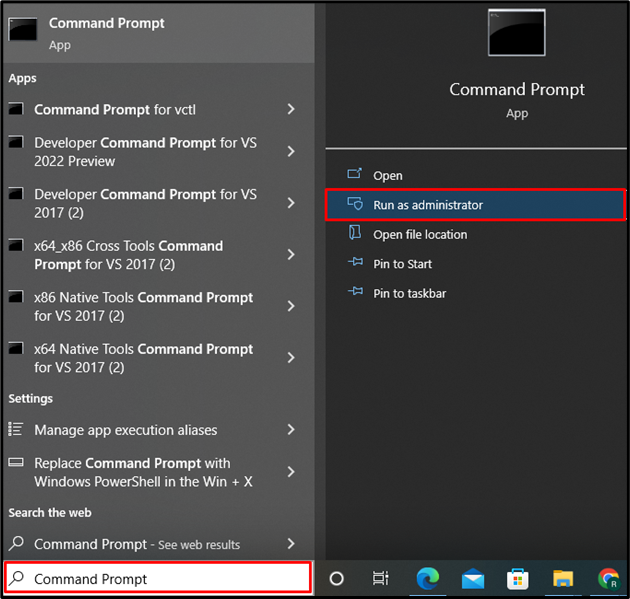
- Open Command Prompt (make sure you Run as administrator so you’re able to add a system environment variable).
- Set the value of the environment variable to your JDK (or JRE) installation path as follows:
setx /m JAVA_HOME "C:\Program Files\Java\jdk11.0.17.8"How to set java path in windows 10
JAVA_HOME is environment variable which contains installation directory of Java development kit(JDK) or Java Runtime environment(JRE). This environment variable is setup at operating system level.
Why do you need JAVA_HOME?
JAVA_HOME environment variable points to directory where java is installed on your system, so many java based applications such as TOMCAT use JAVA_HOME environment variable to locate java executables.
How to set JAVA_HOME in Windows 10?
- Locate JDK on your machine.
- If you are using 64-bit java, then it will be in C:\Program Files\Java\
- If you are using 32-bit java, then it will be in C:\Program Files (x86)\Java\
- Open windows search, type environment and click on Edit the system environment variables .

- In System properties dialog, go to Advanced tab and click on button Enviroment Variables .

- In System variables, click NEW. button to add JAVA_HOME environment variable.
- Provide variable name as JAVA_HOME and value as Java installation directory.


Set java path in window 10
Now let’s see how to set java in path environment variable in windows 10.
- In System variable window, locate Path and click on Edit. .
- Double click on the empty row and add %JAVA_HOME%\bin .
Here, % symbol is used to locate JAVA_HOME environemt variable and \bin provides location for java.exe and h= javac.exe - Close the command prompt and launch again.
- Check java version as below:


That’s all about How to set java path in windows 10.