Hibernate / JPA One-to-Many Mappings
Hibernate one to many mapping is made between two entities where the first entity can have a relation with multiple instances of the second entity but the second can be associated with only one instance of the first entity. It is a 1 to N relationship.
For example, in any company, an employee can register for multiple bank accounts but one bank account will be associated with one and only one employee. In this hibernate one to many mapping annotation examples, we will learn to make such mappings in the database using hibernate.
We should use one to many mapping to create 1..N relationship between entities or objects.
For example, as discussed above, we have to write two entities i.e. EmployeeEntity and AccountEntity such that multiple accounts can be associated with a single employee, but one single account can not be shared between two or more employees.
This problem can be solved in two different ways.
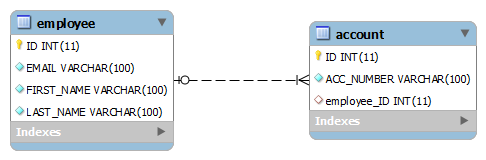
- One is to have a foreign key column in the ACCOUNT table i.e. EMPLOYEE_ID . This column will refer to the primary key of Employee table. This way no two accounts can be associated with multiple employees. Obviously, the account number needs to be unique for enforcing this restriction.
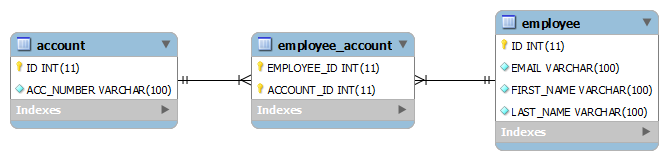
- The second approach is to have a link table. Let’s say the table name is EMPLOYEE_ACCOUNT . This table will have two columns i.e. EMP_ID that will be a foreign key referring to the primary key in EMPLOYEE table and similarly ACCOUNT_ID which will be a foreign key referring to the primary key of ACCOUNT table.
2. Using Foreign Key Association
We are designing a unidirectional relationship where when we delete an employee then account are deleted as well. But when we delete an account (one of many) then employee is unaffected.
Let’s first see the schema design.
Then we write the entity classes.
@Entity @Table(name = "EMPLOYEE") public class EmployeeEntity implements Serializable < @Id @GeneratedValue(strategy = GenerationType.IDENTITY) @Column(name = "ID") private Integer employeeId; @OneToMany(cascade=CascadeType.ALL) @JoinColumn(name="EMPLOYEE_ID") private Setaccounts; //Other fields, getters, setters are hidden for brevity >@Entity @Table(name = "ACCOUNT") public class AccountEntity implements Serializable < @Id @GeneratedValue(strategy = GenerationType.IDENTITY) @Column(name = "ID") private Integer accountId; //Other fields, getters, setters are hidden for brevity >Let’s test the relationship and monitor the CREATE queries.
create table Employee ( ID integer generated by default as identity, EMAIL varchar(100) not null, FIRST_NAME varchar(100) not null, LAST_NAME varchar(100) not null, primary key (ID) ) create table ACCOUNT ( ID integer generated by default as identity, ACC_NUMBER varchar(100) not null, EMPLOYEE_ID integer, primary key (ID) ) alter table if exists ACCOUNT add constraint FKmyqrmihkv5isa3tjsj01x65sr foreign key (EMPLOYEE_ID) references EmployeeAccountEntity account1 = new AccountEntity(); account1.setAccountNumber("Account detail 1"); AccountEntity account2 = new AccountEntity(); account2.setAccountNumber("Account detail 2"); AccountEntity account3 = new AccountEntity(); account3.setAccountNumber("Account detail 3"); //Add new Employee object EmployeeEntity employee = new EmployeeEntity(); employee.setEmail("demo-user-first@mail.com"); employee.setFirstName("demo-one"); employee.setLastName("user-one"); Set accountList = new HashSet(); accountList.add(account1); accountList.add(account2); accountList.add(account3); employee.setAccounts(accountList); //Save Employee session.persist(employee);Hibernate: insert into Employee (ID, EMAIL, FIRST_NAME, LAST_NAME) values (default, ?, ?, ?) Hibernate: insert into ACCOUNT (ID, ACC_NUMBER) values (default, ?) Hibernate: insert into ACCOUNT (ID, ACC_NUMBER) values (default, ?) Hibernate: insert into ACCOUNT (ID, ACC_NUMBER) values (default, ?) Hibernate: update ACCOUNT set EMPLOYEE_ID=? where update ACCOUNT set EMPLOYEE_ID=? where update ACCOUNT set EMPLOYEE_ID=? where aria-hidden="true" height="16" version="1.1" viewbox="0 0 16 16" width="16">
This approach uses the @JoinTable annotation to create a link table that stores the associations between account and employee entities.
Lets see how the database schema will look like:
On EmployeeEntity, we will add the @OneToMany annotation along with @JoinTable definition. This is the owning side.
@Entity @Table(name = "EMPLOYEE") public class EmployeeEntity implements Serializable < @Id @GeneratedValue(strategy = GenerationType.IDENTITY) @Column(name = "ID") private Integer employeeId; @OneToMany(cascade = CascadeType.ALL, orphanRemoval = true) @JoinTable(name = "EMPLOYEE_ACCOUNT", joinColumns = <@JoinColumn(name = "EMPLOYEE_ID", referencedColumnName = "ID")>, inverseJoinColumns = <@JoinColumn(name = "ACCOUNT_ID", referencedColumnName = "ID")>) private Set accounts; //Other fields, getters, setters are hidden for brevity >If we want to create a bi-directional relationship then we need to use @ManyToOne association on the child side.
@Entity @Table(name = "EMPLOYEE") public class EmployeeEntity implements Serializable < @Id @GeneratedValue(strategy = GenerationType.IDENTITY) @Column(name = "ID") private Integer employeeId; @OneToMany(mappedBy = "person", cascade = CascadeType.ALL, orphanRemoval = true) @JoinTable(name = "EMPLOYEE_ACCOUNT", joinColumns = <@JoinColumn(name = "EMPLOYEE_ID", referencedColumnName = "ID")>, inverseJoinColumns = <@JoinColumn(name = "ACCOUNT_ID", referencedColumnName = "ID")>) private Set accounts; //Other fields, getters, setters are hidden for brevity > @Entity @Table(name = "ACCOUNT") public class AccountEntity implements Serializable < @Id @GeneratedValue(strategy = GenerationType.IDENTITY) @Column(name = "ID") private Integer accountId; @ManyToOne private EmployeeEntity employee; //Other fields, getters, setters are hidden for brevity >Now, it’s time to test the code. I have written the following code to test the above entities.
AccountEntity account1 = new AccountEntity(); account1.setAccountNumber("123-345-65454"); AccountEntity account2 = new AccountEntity(); account2.setAccountNumber("123-345-6542222"); //Add new Employee object EmployeeEntity emp = new EmployeeEntity(); emp.setEmail("demo-user@mail.com"); emp.setFirstName("demo"); emp.setLastName("user"); Set accounts = new HashSet<>(); accounts.add(account1); accounts.add(account2); emp.setAccounts(accounts); //Save Employee session.persist(emp);Hibernate: insert into Employee (EMAIL, FIRST_NAME, LAST_NAME, ID) values (?, ?, ?, ?) Hibernate: insert into ACCOUNT (ACC_NUMBER, ID) values (?, ?) Hibernate: insert into ACCOUNT (ACC_NUMBER, ID) values (?, ?) Hibernate: insert into EMPLOYEE_ACCOUNT (EMPLOYEE_ID, ACCOUNT_ID) values (?, ?) Hibernate: insert into EMPLOYEE_ACCOUNT (EMPLOYEE_ID, ACCOUNT_ID) values (?, ?)In this hibernate @OneToMany mapping annotation example using list, we learned to create 1..N relationships between two entities using foreign key association and join table techniques.
@OneToMany
А так выглядит таблица task, которая содержит задачи для сотрудников:
| id | emploee_id | name | deadline |
|---|---|---|---|
| 1 | 1 | Исправить багу на фронтенде | 2022-06-01 |
| 2 | 2 | Исправить багу на бэкенде | 2022-06-15 |
| 3 | 5 | Купить кофе | 2022-07-01 |
| 4 | 5 | Купить кофе | 2022-08-01 |
| 5 | 5 | Купить кофе | 2022-09-01 |
| 6 | (NULL) | Убрать офис | (NULL) |
| 7 | 4 | Наслаждаться жизнью | (NULL) |
| 8 | 6 | Наслаждаться жизнью | (NULL) |
В этой таблице есть всего 4 колонки:
- id – уникальный номер задания (и строки в таблице).
- employee_id – ID сотрудника из таблицы employee, на которого назначена задача.
- name – название и описание задачи.
- deadline – время до которого нужно выполнить задачу.
На одну запись таблицы employee могут ссылаться много строк таблицы task. Такая связь на уровне таблиц называется один-ко-многим (one-to-many).
Связь на уровень Java-классов
И наши классы, класс Employee :
@Entity @Table(name="user") class Employee
И класс EmployeeTask в его изначальном виде:
@Entity @Table(name="task") class EmployeeTask
Аннотация @OneToMany
Мы можем организовать связь Entity-классов по-другому.
Помнишь аннотацию @ElementCollection , с помощью которой мы в родительском классе создавали коллекцию дочерних объектов? Что-то похожее можно сделать с помощью аннотации @OneToMany . Только в этот раз изменениям подвергнется класс Employee :
@Entity @Table(name="user") class Employee < @Column(name="id") public Integer id; @OneToMany(cascade = CascadeType.ALL) @JoinColumn(name = "employee_id") private Settasks = new HashSet(); > С помощью аннотации @OneToMany мы указали, что объект Employee может хранить у себя много объектов EmployeeTask . Также с помощью аннотации @JoinColumn мы указали, в какой колонке таблицы task хранится id объекта Employee .
При этом класс EmployeeTask обычно не содержит поля, которое ссылается на колонку employee_id. Пример:
@Entity @Table(name="task") class EmployeeTask
Поле employee_id считается служебным и его значением управляет Hibernate.
Примеры запросов
Если ты хочешь добавить какому-то работнику некоторый task, то тебе нужно написать код типа такого:
EmployeeTask task1 = new EmployeeTask(); task1.description = "Сделать что-то важное"; session.persist(task1); EmployeeTask task2 = new EmployeeTask(); task2.description = "Ничего не делать"; session.persist(task2); session.flush(); Employee director = session.find(Employee.class, 4); director.tasks.add(task1); director.tasks.add(task2); session.update(director); session.flush(); Сначала мы создаем два объекта EmployeeTask , сохраняем их в базу и вызываем метод flush() , чтобы выполнилась операция INSERT и у объектов появились ID.
Затем находим в базе директора, берем у него поле tasks и добавляем ему две задачи. Затем сохраняем директора в базу. После этого в базе у новых task в колонке employee_id появится значение 4 – id директора в таблице employee.
Важно! Таблицы в базе одни и те же для аннотаций @ManyToOne и @OneToMany . А вот Java-классы для этих таблиц – разные.