- Java EE 7 Essentials by Arun Gupta
- Chapter 16. Build an End-to-End Application
- Introduction
- Software Requirements
- Problem Statement
- Saved searches
- Use saved searches to filter your results more quickly
- eliasnogueira/java-e2e-test-example
- Name already in use
- Sign In Required
- Launching GitHub Desktop
- Launching GitHub Desktop
- Launching Xcode
- Launching Visual Studio Code
- Latest commit
- Git stats
- Files
- README.md
- About
- Complete End to End Java Tutorial with Singleton Object Employee, Crunchify Java POJO and Detailed TestCase
- Let’s get started
- Step-1
- Step-2
- Step-3
- Step-4
- Step-5
- CrunchifyObject.java
- CrunchifySingleton.java
- CrunchifyObjectTest.java
- Result:
Java EE 7 Essentials by Arun Gupta
Get full access to Java EE 7 Essentials and 60K+ other titles, with a free 10-day trial of O’Reilly.
There are also live events, courses curated by job role, and more.
Chapter 16. Build an End-to-End Application
Introduction
This chapter provides self-paced instructions for building a typical three-tier end-to-end application using the following Java EE 7 technologies:
- Java Persistence API 2.1
- Java API for RESTful Web Services 2.0
- Java Message Service 2.0
- JavaServer Faces 2.2
- Contexts and Dependency Injection 1.1
- Bean Validation 1.1
- Batch Applications for the Java Platform 1.0
- Java API for JSON Processing 1.0
- Java API for WebSocket 1.0
- Java Transaction API 1.2
Software Requirements
You need to download and install the following software:
- JDK 7
- NetBeans 7.4 or higher (All or Java EE version)Figure 16-1 shows a preview of the downloads page and highlights the exact Download button to click.

Problem Statement
This hands-on lab builds a typical three-tier Java EE 7 web application that allows customers to view the show times for a movie in a seven-theater cineplex and make reservations. Users can add new movies and delete existing movies. Customers can discuss the movie in a chat room. Total sales from each showing are calculated at the end of the day. Customers also accrue points for watching movies.
Figure 16-2 shows the key components of the application. The User Interface initiates all the .
Get Java EE 7 Essentials now with the O’Reilly learning platform.
O’Reilly members experience books, live events, courses curated by job role, and more from O’Reilly and nearly 200 top publishers.
Saved searches
Use saved searches to filter your results more quickly
You signed in with another tab or window. Reload to refresh your session. You signed out in another tab or window. Reload to refresh your session. You switched accounts on another tab or window. Reload to refresh your session.
An complete example of a pipeline focusing on API and UI (mobile and web) tests.
eliasnogueira/java-e2e-test-example
This commit does not belong to any branch on this repository, and may belong to a fork outside of the repository.
Name already in use
A tag already exists with the provided branch name. Many Git commands accept both tag and branch names, so creating this branch may cause unexpected behavior. Are you sure you want to create this branch?
Sign In Required
Please sign in to use Codespaces.
Launching GitHub Desktop
If nothing happens, download GitHub Desktop and try again.
Launching GitHub Desktop
If nothing happens, download GitHub Desktop and try again.
Launching Xcode
If nothing happens, download Xcode and try again.
Launching Visual Studio Code
Your codespace will open once ready.
There was a problem preparing your codespace, please try again.
Latest commit
Git stats
Files
Failed to load latest commit information.
README.md
Automatically Testing an End-to-End Java Application
HTML files that you must to put in your application server. service.js file on js folder is pointing to a local API. If you need to change the server and port, changhe this on the file: http://localhost:4567/api/v1/person/:id
The backend app is running on a MySQL server, so you need to create the database before any execution throught database.sql file.
The mobile front-end built on Android Studio. The app is pointing to the local service, but here the IP address is not localhost, it is 10.0.3.2 and you can change it on APIEndpointsInterface.java class. Just notice that this IP adress works locally only on Genymotion emulator. For Android AVD you must set the IP 10.0.2.2 or your computer IP if you run on a real device.
The backend app. It’s a REST service created with Java Spark. This is a CRUD app with MySQL database
The test project that contains all the test scripts for API, Web and Mobile Tests
Repositiry for two presentations at JavaOne 2017
- Java Test Automation for REST, Web, and Mobile [CON6070]
- Trust Your Pipeline: Automatically Testing an End-to-End Java Application [CON6121]
About
An complete example of a pipeline focusing on API and UI (mobile and web) tests.
Complete End to End Java Tutorial with Singleton Object Employee, Crunchify Java POJO and Detailed TestCase
In this Java Tutorial we will go over all detailed steps required for you to use Singleton pattern in your Enterprise Project. We use Singleton object to push required data at runtime and we use the same Singleton object to retrieve data at runtime. You could access Singleton object from anywhere. If you want to learn more about Singleton Pattern the follow this Singleton tutorial.
Let’s get started
Step-1
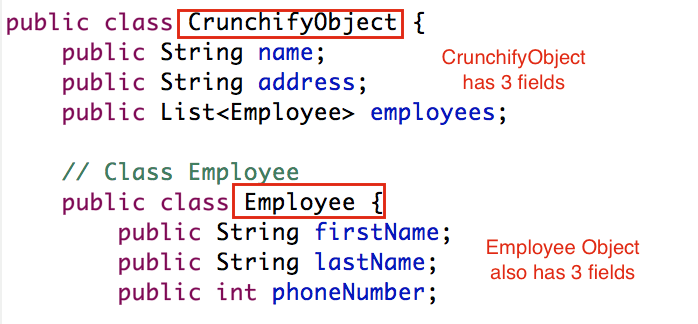
Create simple Crunchify Object POJO: CrunchifyObject.java
Step-2
Create all setters and getters.
Step-3
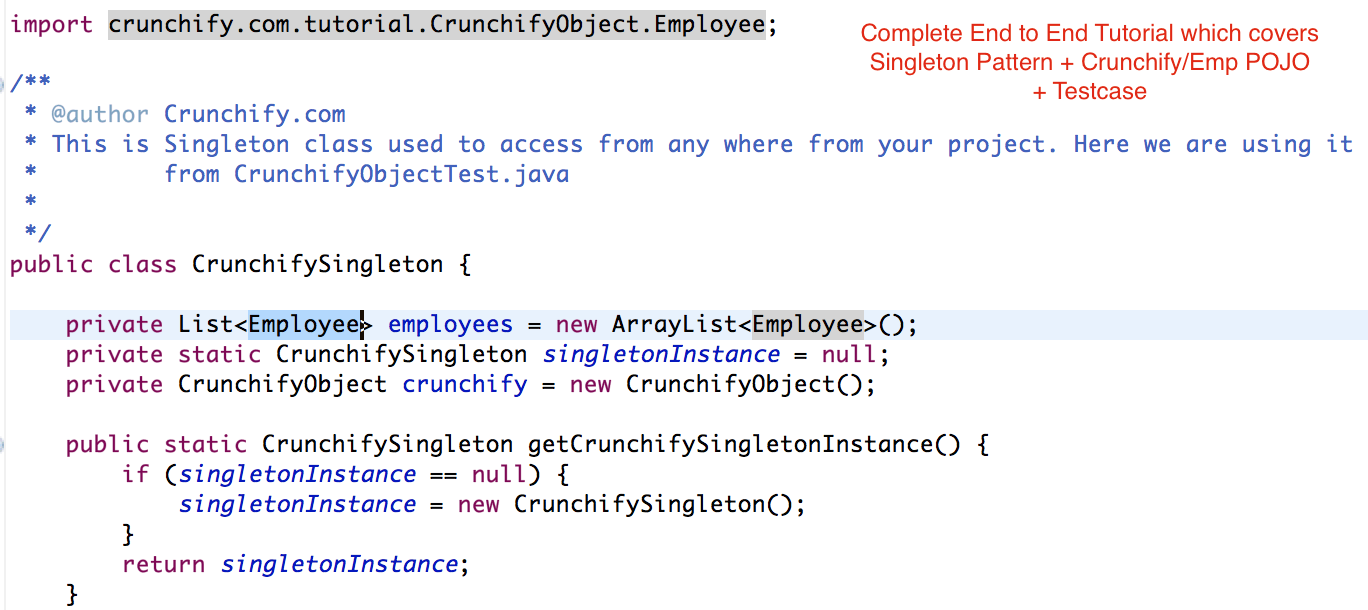
Create Singleton Class: CrunchifySingleton.java
Step-4
Write all utility methods into Singleton class
Step-5
Finally create Test Class: CrunchifyObjectTest.java
You need below JSON dependency:
CrunchifyObject.java
package crunchify.com.tutorial; import java.util.List; /** * @author Crunchify.com * This is simple CrunchifyObject POJO contains another class "Employee" as a field */ public class CrunchifyObject < public String name; public String address; public Listemployees; public String getName() < return name; >public void setName(String name) < this.name = name; >public String getAddress() < return address; >public void setAddress(String address) < this.address = address; >public List getEmployees() < return employees; >public void setEmployees(List employees) < this.employees = employees; >// Class Employee public class Employee < public String firstName; public String lastName; public int phoneNumber; public String getFirstName() < return firstName; >public void setFirstName(String firstName) < this.firstName = firstName; >public String getLastName() < return lastName; >public void setLastName(String lastName) < this.lastName = lastName; >public int getPhoneNumber() < return phoneNumber; >public void setPhoneNumber(int phoneNumber) < this.phoneNumber = phoneNumber; >> >
CrunchifySingleton.java
package crunchify.com.tutorial; import java.util.ArrayList; import java.util.HashMap; import java.util.List; import java.util.Map; import org.json.JSONArray; import org.json.JSONObject; import crunchify.com.tutorial.CrunchifyObject.Employee; /** * @author Crunchify.com * This is Singleton class used to access from any where from your project. Here we are using it * from CrunchifyObjectTest.java * */ public class CrunchifySingleton < private Listemployees = new ArrayList(); private static CrunchifySingleton singletonInstance = null; private CrunchifyObject crunchify = new CrunchifyObject(); public static CrunchifySingleton getCrunchifySingletonInstance() < if (singletonInstance == null) < singletonInstance = new CrunchifySingleton(); >return singletonInstance; > public void addEmployee(Employee employee) < synchronized (employees) < employees.add(employee); >> public List getEmployee() < return employees; >public void addCrunchify(CrunchifyObject crunchify) < synchronized (crunchify) < this.crunchify = crunchify; >> public String getCrunchifyObject() < JSONObject obj = new JSONObject(); obj.put("name", crunchify.getName()); obj.put("address", crunchify.getAddress()); JSONArray employeeJson = new JSONArray(); for (Employee emp : employees) < MapemployeeData = new HashMap(); employeeData.put("firstName", emp.getFirstName()); employeeData.put("lastName", emp.getLastName()); employeeData.put("phoneNumber", emp.getPhoneNumber() + ""); employeeJson.put(employeeData); > obj.put("employees", employeeJson); return obj.toString(); > > CrunchifyObjectTest.java
package crunchify.com.tutorial; import crunchify.com.tutorial.CrunchifyObject.Employee; /** * @author Crunchify.com * This is test class used to create all required objects and use Singleton object to push and * retrieve value at runtime. You could use the same singleton object from anywhere in your enterprise project */ public class CrunchifyObjectTest < static CrunchifySingleton instance = CrunchifySingleton.getCrunchifySingletonInstance(); public static void main(String[] args) < populateAndSaveDataFromSingletonObject(); retrieveDataFromSingletonObject(); >private static void retrieveDataFromSingletonObject() < String result = instance.getCrunchifyObject(); System.out.println(result); >private static void populateAndSaveDataFromSingletonObject() < // Create CrunchifyObject CrunchifyObject crunchifyObj = new CrunchifyObject(); crunchifyObj.setName("Crunchify.com"); crunchifyObj.setAddress("NYC - US"); // Create Employee1 Employee emp1 = crunchifyObj.new Employee(); emp1.setFirstName("Mike"); emp1.setLastName("Rose"); emp1.setPhoneNumber(1222222222); // Create Employee2 Employee emp2 = crunchifyObj.new Employee(); emp2.setFirstName("app"); emp2.setLastName("shah"); emp2.setPhoneNumber(1333333333); // Create Employee3 Employee emp3 = crunchifyObj.new Employee(); emp3.setFirstName("Dexter"); emp3.setLastName("My"); emp3.setPhoneNumber(1444444444); // Add all Employee Object to CrunchifySingleton object instance.addEmployee(emp1); instance.addEmployee(emp2); instance.addEmployee(emp3); // Add Employees to CrunchifyObject crunchifyObj.setEmployees(instance.getEmployee()); // Now finally add CrunchifyObject to same CrunchifySingleton object which will use to retrieve all data instance.addCrunchify(crunchifyObj); >> Result:
If you liked this article, then please share it on social media. Have a question or suggestion? Please leave a comment to start the discussion.