- MySql JDBC Driver & How to Connect
- What is the JDBC URL?
- MySql JDBC Driver
- Solving Common Connectivity Issues
- Enable Remote Access on MySql Server
- MySql Installation Tips
- Connect to MySql using DbSchema
- Saved searches
- Use saved searches to filter your results more quickly
- License
- mysql/mysql-connector-j
- Name already in use
- Sign In Required
- Launching GitHub Desktop
- Launching GitHub Desktop
- Launching Xcode
- Launching Visual Studio Code
- Latest commit
- Git stats
- Files
- README.md
- Connect Java to a MySQL database
MySql JDBC Driver & How to Connect
JDBC drivers are Java library files with the extension ‘.jar‘, used by Java applications to connect to the database. Usually they are provided by the same company which developed the database software. DbSchema is an MySql Client which already includes the MySql JDBC driver. DbSchema can configure the MySql JDBC URL and test the connectivity.
What is the JDBC URL?
The URL is a string (text) with a specific format containing information about the host where the database is running, the port, username, database name, etc. The URL format is specific to each driver. Any wrong character in the URL may make the database connectivity fail. Therefore we recommend installing DbSchema and try to get connected, and you will find the JDBC URL in the connection dialog.
MySql JDBC Driver
- Required File(s): mysql-connector-java-nn-bin.jar
- Java Driver Class: com.mysql.jdbc.Driver
- URL: jdbc:mysql://HOST[:PORT][/DB]
- Website: MySQL
Solving Common Connectivity Issues
Enable Remote Access on MySql Server
- On the server type in the command prompt or terminal mysql -u root -p The mysql console should start.
- List the databases using show databases
- View the configured grants using select * from db;
- Enable remote access for a user foo using GRANT ALL ON foo.* TO bar@’202.54.10.20′ IDENTIFIED BY ‘PASSWORD’; Here you have to edit the user ( put your user instead of foo ), the IP of the client machine and the root password.
MySql Installation Tips
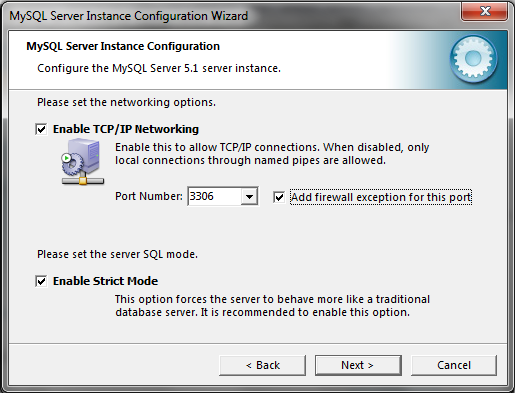
Install MySql from http://www.mysql.com. During installation go for a detailed install, and when you are prompted for the user password check the ‘Enable root access from remote machines’. Enabling this you will be allowed to connect to MySql from another computer. Remember the password you set here, it will be requested when connecting to the database as user root.
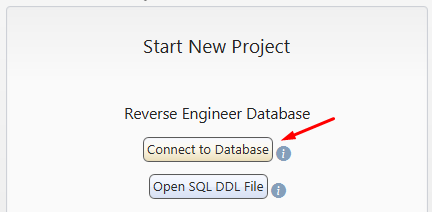
Connect to MySql using DbSchema
DbSchema is using JDBC Drivers to connect to the database. Installing the application you can easy set up a connection. DbSchema will build the JDBC URL for you.
- 1 Download DbSchema. DbSchema has a free community edition. No email or registration is required.
- 2 Choose to connect to the database, and choose MySql.

- 3 At this point, DbSchema already downloads the JDBC driver into this folders:
- C:\Users\YourUser\.DbSchema\drivers\MySql (Windows) or
- /Users/YourUser/.DbSchema/drivers/MySql (Linux and MacOS).
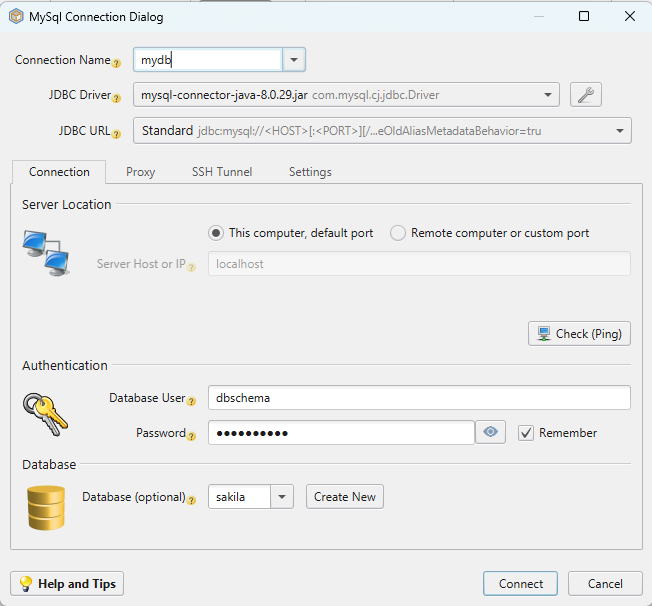 At this point, DbSchema already downloads the JDBC driver into this folders:
 In the Connection Dialog, select the driver and the JDBC URL template. For databases using multiple possibilities to connect, may exists multiple templates. Choose if the database is running on the current machine or a different port. If is running on a different machine (remote), you need to find the host name. Hover the Host info label using the mouse to get instructions.
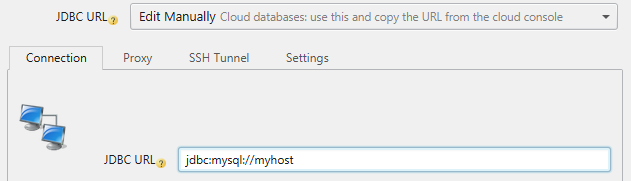 In the URL combo there is an option to ‘Manually Edit the URL’. Select this option to see the generated JDBC URL.
 After connecting, DbSchema will create the first diagrams (layouts). Double-click any table header or column to edit.
 Activate the SQL Editor from the menu to edit and execute queries. For a detailed list of features, please read the DbSchema Quick Tour.
Saved searches
Use saved searches to filter your results more quickly
You signed in with another tab or window. Reload to refresh your session. You signed out in another tab or window. Reload to refresh your session. You switched accounts on another tab or window. Reload to refresh your session.
License
mysql/mysql-connector-j
This commit does not belong to any branch on this repository, and may belong to a fork outside of the repository.
Name already in use
A tag already exists with the provided branch name. Many Git commands accept both tag and branch names, so creating this branch may cause unexpected behavior. Are you sure you want to create this branch?
Sign In Required
Please sign in to use Codespaces.
Launching GitHub Desktop
If nothing happens, download GitHub Desktop and try again.
Launching GitHub Desktop
If nothing happens, download GitHub Desktop and try again.
Launching Xcode
If nothing happens, download Xcode and try again.
Launching Visual Studio Code
Your codespace will open once ready.
There was a problem preparing your codespace, please try again.
Latest commit
Change-Id: I0f02187ec1d966d3fac526a53ba768eb1f00aeec
Git stats
Files
Failed to load latest commit information.
README.md
MySQL provides connectivity for client applications developed in the Java programming language with MySQL Connector/J, a driver that implements the Java Database Connectivity (JDBC) API and also MySQL X DevAPI.
MySQL Connector/J 8.1 is a JDBC Type 4 driver that is compatible with the JDBC 4.2 specification. The Type 4 designation means that the driver is a pure Java implementation of the MySQL protocol and does not rely on the MySQL client libraries.
The driver also contains an implementation of MySQL X DevAPI, an application programming interface for working with MySQL as a Document Store through CRUD-based, NoSQL operations.
For more information, please visit the official MySQL Connector/J documentation.
Please refer to the README and LICENSE files, available in this repository, and the Legal Notices in the MySQL Connector/J documentation for further details.
Getting the Latest Release
MySQL Connector/J is free for usage under the terms of the specified licensing and it runs on any operating system that is able to run a Java Virtual Machine.
MySQL Connector/J can be installed from pre-compiled packages that can be downloaded from the MySQL Connector/J download page. Installing MySQL Connector/J only requires obtaining the corresponding JAR file from the downloaded bundle or installer and including it in the application’s CLASSPATH.
According to how you use MySQL Connector/J, you may also need to install the following third-party libraries on your system for it to work:
- Protocol Buffers (protobuf-java) is required for using X DevAPI
- Oracle Cloud Infrastructure SDK for Java (oci-java-sdk) is required to support OCI AIM authentication
- Simple Logging Facade API (slf4j-api) is required for using the logging capabilities provided by the default implementation of org.slf4j.Logger.Slf4JLogger by MySQL Connector/J
Alternatively, MySQL Connector/J can be obtained automatically via Maven’s dependency management by adding the following configuration in the application’s Project Object Model (POM) file:
dependency> groupId>com.mysqlgroupId> artifactId>mysql-connector-jartifactId> version>8.1.0version> dependency>
MySQL Connector/J’s own Project Object Model (POM) file specifies a transitive dependency to Protocol Buffers (protobuf-java) since it is required for using X DevAPI. However, if you do not use the X DevAPI features, you may also want to add a dependency exclusion to avoid linking the unneeded sub-library. For example:
dependency> groupId>com.mysqlgroupId> artifactId>mysql-connector-jartifactId> version>8.1.0version> exclusions> exclusion> groupId>com.google.protobufgroupId> artifactId>protobuf-javaartifactId> exclusion> exclusions> dependency>
This driver can also be complied and installed from the source available in this repository. Please refer to the MySQL Connector/J documentation for detailed instructions on how to do it.
This repository contains the MySQL Connector/J source code as per the latest release. No changes are made in this repository between releases.
There are a few ways to contribute to the MySQL Connector/J code. Please refer to the contributing guidelines for additional information.
- MySQL Connector/J Developer Guide.
- MySQL Connector/J X DevAPI Reference.
- MySQL Connector/J, JDBC and Java forum.
- #connectors channel in MySQL Community Slack. (Sign-up required if you do not have an Oracle account.)
- @MySQL on Twitter.
- MySQL Blog.
- MySQL Connectors Blog archive.
- MySQL Newsletter.
- MySQL Bugs Database.
For more information about this and other MySQL products, please visit MySQL Contact & Questions.
Connect Java to a MySQL database
Here’s a step by step explanation how to install MySQL and JDBC and how to use it:
- Download and install the MySQL server. Just do it the usual way. Remember the port number whenever you’ve changed it. It’s by default 3306 .
- Download the JDBC driver and put in classpath, extract the ZIP file and put the containing JAR file in the classpath. The vendor-specific JDBC driver is a concrete implementation of the JDBC API (tutorial here). If you’re using an IDE like Eclipse or Netbeans, then you can add it to the classpath by adding the JAR file as Library to the Build Path in project’s properties. If you’re doing it «plain vanilla» in the command console, then you need to specify the path to the JAR file in the -cp or -classpath argument when executing your Java application.
java -cp .;/path/to/mysql-connector.jar com.example.YourClass
CREATE DATABASE javabase DEFAULT CHARACTER SET utf8 COLLATE utf8_unicode_ci; CREATE USER 'java'@'localhost' IDENTIFIED BY 'password'; GRANT ALL ON javabase.* TO 'java'@'localhost' IDENTIFIED BY 'password'; jdbc:mysql://hostname:port/databasename
- hostname : The hostname where MySQL server is installed. If it’s installed at the same machine where you run the Java code, then you can just use localhost . It can also be an IP address like 127.0.0.1 . If you encounter connectivity problems and using 127.0.0.1 instead of localhost solved it, then you’ve a problem in your network/DNS/hosts config.
- port : The TCP/IP port where MySQL server listens on. This is by default 3306 .
- databasename : The name of the database you’d like to connect to. That’s javabase .
So the final URL should look like:
jdbc:mysql://localhost:3306/javabase
String url = "jdbc:mysql://localhost:3306/javabase"; String username = "java"; String password = "password"; System.out.println("Connecting database. "); try (Connection connection = DriverManager.getConnection(url, username, password)) < System.out.println("Database connected!"); >catch (SQLException e) If you get a SQLException: No suitable driver , then it means that either the JDBC driver wasn’t autoloaded at all or that the JDBC URL is wrong (i.e. it wasn’t recognized by any of the loaded drivers). Normally, a JDBC 4.0 driver should be autoloaded when you just drop it in runtime classpath. To exclude one and other, you can always manually load it as below:
System.out.println("Loading driver. "); try < Class.forName("com.mysql.jdbc.Driver"); System.out.println("Driver loaded!"); >catch (ClassNotFoundException e) - IP address or hostname in JDBC URL is wrong.
- Hostname in JDBC URL is not recognized by local DNS server.
- Port number is missing or wrong in JDBC URL.
- DB server is down.
- DB server doesn’t accept TCP/IP connections.
- DB server has run out of connections.
- Something in between Java and DB is blocking connections, e.g. a firewall or proxy.
To solve the one or the other, follow the following advices:
- Verify and test them with ping .
- Refresh DNS or use IP address in JDBC URL instead.
- Verify it based on my.cnf of MySQL DB.
- Start the DB.
- Verify if mysqld is started without the —skip-networking option .
- Restart the DB and fix your code accordingly that it closes connections in finally .
- Disable firewall and/or configure firewall/proxy to allow/forward the port.
Note that closing the Connection is extremely important. If you don’t close connections and keep getting a lot of them in a short time, then the database may run out of connections and your application may break. Always acquire the Connection in a try-with-resources statement. Or if you’re not on Java 7 yet, explicitly close it in finally of a try-finally block. Closing in finally is just to ensure that it get closed as well in case of an exception. This also applies to Statement , PreparedStatement and ResultSet .
That was it as far the connectivity concerns. You can find here a more advanced tutorial how to load and store fullworthy Java model objects in a database with help of a basic DAO class.
Using a Singleton Pattern for the DB connection is a bad approach. See among other questions: Is it safe to use a static java.sql.Connection instance in a multithreaded system?. This is a #1 starters mistake.