- Java Swing | JWindow with examples
- Как создать графический интерфейс на Java
- Подключение библиотеки Swing
- Создание окна
- Добавление компонентов
- Обработка событий
- JFrame basic tutorial and examples
- 2. Setting layout manager
- 3. Adding child components to JFrame
- 4. Specifying window closing behavior for JFrame
- 5. Showing JFrame on screen
- 6. Handling window events for JFrame
- 7. Customizing JFrame’s appearance
- 8. JFrame demo program
- Other Java Swing Tutorials:
- About the Author:
Java Swing | JWindow with examples
JWindow is a part of Java Swing and it can appear on any part of the users desktop. It is different from JFrame in the respect that JWindow does not have a title bar or window management buttons like minimize, maximize, and close, which JFrame has. JWindow can contain several components such as buttons and labels.
Constructor of the class are:
- JWindow() : creates an empty Window without any specified owner
- JWindow(Frame o) :creates an empty Window with a specified frame as its owner
- JWindow(Frame o) : creates an empty Window with a specified frame as its owner
- JWindow(Window o) : creates an empty Window with a specified window as its owner
- JWindow(Window o, GraphicsConfiguration g) : creates an empty window with a specified window as its owner and specified graphics Configuration.
- JWindow(GraphicsConfiguration g) :creates an empty window with a specified Graphics Configuration g.
Commonly used methods
- setLayout(LayoutManager m) : sets the layout of the Window to specified layout manager
- setContentPane(Container c) : sets the ContentPane property of the window
- getContentPane() : get the container which is the ContentPane for this Window
- add(Component c): adds component to the Window
- isVisible(boolean b): sets the visibility of the Window, if value of the boolean is true then visible else invisible
- update(Graphics g) : calls the paint(g) function
- remove(Component c) : removes the component c
- getGraphics() : returns the graphics context of the component.
- getLayeredPane() : returns the layered pane for the window
- setContentPane(Container c) :sets the content pane for the window
- setLayeredPane(JLayeredPane l) : set the layered pane for the window
- setRootPane(JRootPane r) : sets the rootPane for the window
- setTransferHandler(TransferHandler n) : Sets the transferHandler property, which is a mechanism to support transfer of data into this component.
- setRootPaneCheckingEnabled(boolean enabled) : Sets whether calls to add and setLayout are forwarded to the contentPane.
- setRootPane(JRootPane root) :Sets the rootPane property of the window.
- setGlassPane(Component glass) : Sets the glassPane property of the window.
- repaint(long time, int x, int y, int width, int height): Repaints the specified rectangle of this component within time milliseconds.
- remove(Component c): Removes the specified component from the window.
- isRootPaneCheckingEnabled() : Returns whether calls to add and setLayout are forwarded to the contentPane or not .
- getTransferHandler() : returns the transferHandler property.
- getRootPane() : Returns the rootPane object for this window.
- getGlassPane() : Returns the glassPane object for this window.
- createRootPane() : Called by the constructor methods to create the default rootPane.
- addImpl(Component co, Object c, int i) : Adds the specified child Component to the window.
The following programs will illustrate the use of JWindow
1. program to create a simple JWindow
Как создать графический интерфейс на Java
Изучите основы создания графического интерфейса на Java с использованием библиотеки Swing в нашей доступной и информативной статье!
Создание графического интерфейса является важным аспектом любого приложения, поскольку это позволяет пользователям взаимодействовать с программой. В этой статье мы рассмотрим основы создания графического интерфейса на Java с использованием библиотеки Swing.
Подключение библиотеки Swing
Для начала работы с Swing вам нужно импортировать соответствующие пакеты. Вот основные пакеты, которые вы должны импортировать в своем коде:
import javax.swing.*; import java.awt.*;
Создание окна
Первым шагом в создании графического интерфейса является создание окна приложения. В Swing это делается с помощью класса JFrame . Вот пример создания окна:
Здесь мы создаем объект JFrame с заголовком «Мое первое окно», устанавливаем операцию закрытия окна (выход из приложения), размер окна и делаем его видимым.
Добавление компонентов
Теперь, когда у нас есть окно, мы можем добавить в него различные компоненты, такие как кнопки, текстовые поля и метки. Вот пример добавления кнопки и метки на окно:
Здесь мы создали объекты JButton и JLabel и добавили их на окно с использованием менеджера компоновки BorderLayout .
Обработка событий
Чтобы сделать ваш интерфейс интерактивным, необходимо обрабатывать события, такие как нажатие кнопок или ввод текста. Для этого вы можете использовать интерфейс ActionListener . Вот пример обработки нажатия кнопки:
Здесь мы добавили ActionListener к кнопке и использовали лямбда-выражение для обработки события нажатия кнопки. В результате появляется диалоговое окно с сообщением «Кнопка нажата!».
В заключение, создание графического интерфейса на Java с использованием библиотеки Swing включает в себя несколько основных этапов: подключение библиотеки, создание окна, добавление компонентов и обработка событий. Надеюсь, что эта статья помогла вам разобраться с основами создания графических интерфейсов на Java. Удачи вам в изучении и практике! 😉
JFrame basic tutorial and examples
In the code above we create a frame window entitled “Demo program for JFrame”.
2. Setting layout manager
frame.setLayout(new GridBagLayout());
frame.setLayout(new GridLayout());
frame.setLayout(new CardLayout());
frame.setLayout(new FlowLayout());
NOTE: the call setLayout(layout) is equivalent to this call:
frame.getContentPane().setLayout(layout);
3. Adding child components to JFrame
- We can use the method add(Component) to add a component to the frame’s content pane. For example, adding a text field:
JTextField textFieldUserName = new JTextField(50); frame.add(textFieldUserName);
frame.getContentPane().add(Component);
add(textFieldUserName, BorderLayout.CENTER);
GridBagConstraints constraint = new GridBagConstraints(); constraint.gridx = 1; constraint.gridy = 0; // set other constraints. JTextField textFieldUserName = new JTextField(20); add(textFieldUserName, constraint);
The method setJMenuBar(JMenuBar) is used to add a menu bar to the frame. The following example code adds a menu bar with a File > Exit menu:
JMenuBar menuBar = new JMenuBar(); JMenu menuFile = new JMenu("File"); JMenuItem menuItemExit = new JMenuItem("Exit"); menuFile.add(menuItemExit); menuBar.add(menuFile); // adds menu bar to the frame frame.setJMenuBar(menuBar); 4. Specifying window closing behavior for JFrame
We can specify which action will be executed when the user clicks on the frame’s close button:
frame.setDefaultCloseOperation(JFrame.DO_NOTHING_ON_CLOSE);
frame.setDefaultCloseOperation(JFrame.HIDE_ON_CLOSE);
frame.setDefaultCloseOperation(JFrame.DISPOSE_ON_CLOSE);
frame.setDefaultCloseOperation(JFrame.EXIT_ON_CLOSE);
5. Showing JFrame on screen
frame.setSize(300, 200); frame.setVisible(true);
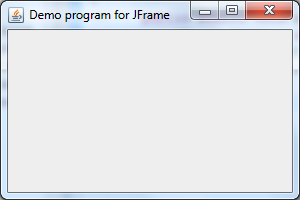
Image:
It is recommended to instantiate and showing the frame in the Swing event dispatcher thread (EDT) like this:
SwingUtilities.invokeLater(new Runnable() < @Override public void run() < new SwingJFrameDemo().setVisible(true); >>);
frame.setLocationRelativeTo(null);
frame.setExtendedState(JFrame.MAXIMIZED_BOTH);
frame.setLocation(new java.awt.Point(100, 100));
frame.setBounds(100, 100, 300, 400);
frame.setBounds(new java.awt.Rectangle(100, 100, 300, 400));
6. Handling window events for JFrame
The interface java.awt.event.WindowListener defines various window events to which we can listen if interested. The method addWindowListener(WindowListener) of JFrame class is used to add a window listener for the frame.
- Listen to window events by implementing the WindowListener interface: In this way, have the frame class implements the WindowListener interface and overrides all its methods, like the following example:
public class FrameDemo extends JFrame implements WindowListener < public FrameDemo() < super("Frame Demo"); // initialization code. setSize(300, 400); addWindowListener(this); setVisible(true); >public void windowActivated(WindowEvent event) < System.out.println("The window has been activated"); >public void windowClosed(WindowEvent event) < System.out.println("The window has been closed"); >public void windowClosing(WindowEvent event) < System.out.println("About to close the window"); >public void windowDeactivated(WindowEvent event) < System.out.println("The window has been deactivated"); >public void windowDeiconified(WindowEvent event) < System.out.println("The window has been restored"); >public void windowIconified(WindowEvent event) < System.out.println("The window has been minimized"); >public void windowOpened(WindowEvent event) < System.out.println("The window has been opened"); >> In case we want to listen to only one (or more, but not all) events, we can create a listener class that extends from the WindowAdapter class and override only the interested event methods:
class MyWindowListener extends WindowAdapter < // overrides only one method: public void windowClosing(WindowEvent event) < System.out.println("About to close the window"); >> Then add this listener for the frame as follows:
MyWindowListener listener = new MyWindowListener(); frame.addWindowListener(listener);
Or we can use anonymous class syntax like this:
addWindowListener(new WindowAdapter() < public void windowClosing(WindowEvent event) < System.out.println("About to close the window"); >>); 7. Customizing JFrame’s appearance
Image icon = new javax.swing.ImageIcon("images/android.png").getImage(); frame.setIconImage(icon); Here the image android.png is placed under directory images which is relative to the application’s directory.
Image:
The icon image is in the classpath or in jar files:
String iconPath = "/net/codejava/swing/jframe/android.png"; Image icon = new ImageIcon(getClass().getResource(iconPath)).getImage(); frame.setIconImage(icon);
frame.getContentPane().setBackground(Color.GREEN);
If the frame is undecorated, its border, title bar and window buttons are all removed, only keep its content pane visible.
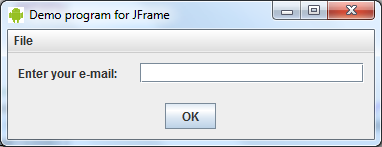
8. JFrame demo program
To demonstrate the techniques mentioned in this article and for your reference, we create a Swing program looks like the following:
On clicking the close button, a confirm message dialog appears:
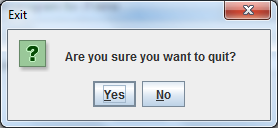
If “Yes” is selected, the program exits, otherwise the frame remains visible on screen.
You can download this demo program’s source code and executable jar file in the attachments section.
Other Java Swing Tutorials:
About the Author:

Nam Ha Minh is certified Java programmer (SCJP and SCWCD). He started programming with Java in the time of Java 1.4 and has been falling in love with Java since then. Make friend with him on Facebook and watch his Java videos you YouTube.