- How To Enable Java in Firefox: 3 Methods
- Enable Java in Firefox
- Method 1: Allowing Java Content on a Website
- Method 2: Enabling All Java Content
- Other Warnings
- Start With Steps 1-5
- Customize the Add-ons
- Method 3: Enabling JavaScript
- Final Thoughts
- Firefox (Mac OS X)
- A plugin is needed to display the content
- The plugin is disabled
- The plugin is blocked
- The Java applet does not upload files
- SecurityException and a warning message
- Application Blocked by Security Settings — expired certificate
How To Enable Java in Firefox: 3 Methods
Java is a very important programming language that many websites and applications use with more being created daily. That being said, it is important to have Java installed or enabled on Firefox. If you want to turn on Java support in Firefox, there are basically three ways to do it. You can allow Java content on a per-website basis, enable all Java content, or enable Javascript.
There are a couple more things you want to remember about Java as well. First off, it is free to download, so there will be no associated costs there. Secondly, it isn’t just used on websites. For example, this important programming language is also used in all of the following:
- Laptops
- Data Centers
- Game Consoles
- Scientific Supercomputers
- Cell Phones
- Internet
So as you can see, making sure that Java is running and updated properly on your Firefox browser is very important. Therefore, it’s common for users to make sure it’s running properly.
Let’s take a look at three ways to easily enable Java in Firefox.
Enable Java in Firefox

You can enable both Java and JavaScript in the desktop version of Firefox.
Method 1: Allowing Java Content on a Website
1. Launch the Firefox web browser. Click or double-click the Firefox app icon, which resembles an orange fox around a blue globe. You can find it in your Applications folder on a Mac, or on your Start menu on Windows.
2. Go to a site that uses Java. If there’s a particular site that you want to access using Java, you need to go there first to get the rest of the prompts.
3. Now wait for the Java prompt to appear. You will see a link in the middle of the page (or the Java content area) that says “Activate Java” or something very similar to that.
4. Click the “Activate Java” link. It should be on or near the Java content that you want to load.
5. Click “Allow Now” when prompted. It should appear on the upper-left side of the Firefox window. This will reload the website with the Java content enabled.
Notes: If you see a message that says Java is “unsupported”, “disabled”, “not installed”, or something similar instead of the “Activate Java” link, you cannot run the site in question on Firefox. Also, if you are able to run Java, you can also click Allow and Remember to place the site on Firefox’s “Allowed” list.
Method 2: Enabling All Java Content
Note: Before we get started on this method, you need to understand the limitations of it. Due to security issues, current versions of Firefox do NOT support Java, nor will future versions.
To enable Java content, you will have to install an old, 32-bit version of Firefox and then manually add the Java plugin. This is possible on Windows computers, but Firefox for Mac defaults to 64-bit, making it impossible to install Java for Firefox on a Mac.
Other Warnings
- Closing and re-opening Firefox may result in Firefox updating, which will render Java unusable.
- Using an old version of Firefox increases the risk of contracting a computer virus or running into malware.
- And certainly, you can never update your old version of Firefox, as doing so will remove your Java support.
However, if you still want to proceed, use the following steps.
Start With Steps 1-5
1. Open the Java website. Go to https://java.com/en/download/ in a browser. You will need to download and install Java before you can install it as a plugin in Firefox.
2. Download and install Java. To do this:
- Click Free Java Download
- Click Agree and Start Free Download
- Double-click the downloaded Java setup file.
- Click Yes when prompted.
- Click Install at the bottom of the Java window.
3. Open the Firefox 51 download page. Go to https://ftp.mozilla.org/pub/firefox/releases/51.0b9/in a browser. This is where you can download the last version of Firefox that supported Java.
4. Select a 32-bit link. Click the firefox-51.0b9.win32.sdk.zip link near the bottom of the list of links on this page.
5. Open the downloaded ZIP folder. Double-click the ZIP folder to do so.
6. Extract the ZIP folder’s contents. To do this:
- Click the Extract tab at the top of the window.
- Or, click extract all in the resulting toolbar.
- Click Extract at the bottom of the pop-up window.
7. Open the extracted folder. Double-click the firefox-51.0b9.win32.sdk folder (not the ZIP one) to open it.
8. Open the firefox-sdk folder. It’s the only folder in the window.
9. Open the bin folder. Double-click this folder, which is near the top of the window, to do so.
10. Scroll down and double-click the Firefox app icon. It’s near the middle of the page. This will prompt the Firefox 51 app to open.
11. Disable automatic updates. Type about:config into the Firefox address bar and press Enter, then do the following:
- Click I accept the risk! when prompted.
- Click the search bar at the top of the page.
- Type in app.update.auto
- Double-click the app.update.auto result to change its value from “true” to “false”.
- Be sure to click Not now or Ask later if ever prompted to update.
- Click the hamburger menu. It’s in the upper-right side of the window. A menu will appear.
Customize the Add-ons
12. Click Add-ons. This puzzle piece-shaped icon is on the menu. Doing so will open the Add-Ons page.
13. Click the Plugins tab. It’s on the left side of the page.
14. Find the “Java(TM) Platform” option. You’ll usually find this option near the bottom of the page.
15. Click the “Ask to Activate” dropdown box. It’s to the right of the “Java(TM) Platform” heading. A dropdown menu will appear.
16. Click Always Activate. This option is in the dropdown menu. Doing this activates Java for any website that you visit in this version of Firefox. However, be careful not to update Firefox at all.
Note: If you accidentally update Firefox or an update gets pushed through, you can reinstall Firefox 51 by deleting the firefox-51.0b9.win32.sdk folder (not the ZIP version), opening the ZIP folder of the same name and re-extracting it, and then re-opening the Firefox 51 app from within the bin folder.
Method 3: Enabling JavaScript
1. Launch the Firefox web browser. Click or double-click the Firefox app icon, which resembles an orange fox around a blue globe. You can find it in your Applications folder on a Mac, or on your Start menu on Windows.
2. Go to the configuration page. Type in about:config and press Enter to do so.
3. Click I accept the risk! when prompted. It’s a blue button in the middle of the page.
4. Search for the JavaScript option. Click the search bar, then type in javascript.enabled to search for the matching result.
5. Review the JavaScript value. If you see “true” below the “value” heading that’s on the right side of the page, JavaScript is currently enabled; this is the default Firefox setting.
Note: If you see “false” below the “value” heading, proceed.
6. Change the JavaScript value to “true” if necessary. Double-click javascript.enabled near the top of the page. You should see the status below the “value” heading change to “true.”
There you go. Three methods of enabling Java in Firefox.
Final Thoughts
Java is slowly being phased out across many browsers. However, a lot of websites still rely on it to function properly. Until those sites catch up and implement newer technology, you’ll probably need to enable Java in Firefox manually.
Such as it is with technology…always moving forward and advancing to the next greatest thing.
Subsequently, please make sure that you always have the latest versions of your browsers running, no matter what type of browser you use. This ensures safety, security, and best performance.
Firefox (Mac OS X)
If you use the FireFox browser, you may deal with several problems while loading a page with Java Uploader or Downloader.
When you are faced with any difficulties, first you should visit the www.java.com/verify web page and ensure that you have the latest Java version by following the update instructions that will appear on the screen.
If the problem still occurs, you may need to deal with one of the following issues:
The article below describes solutions for all these problems.
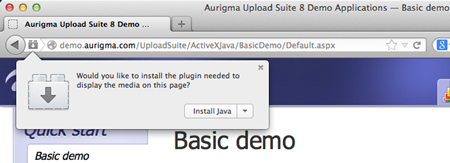
A plugin is needed to display the content
While opening a page with Java Uploader or Downloader, you may see the following warning message and the popup dialog which will appear after clicking the button selected with the red rectangle:
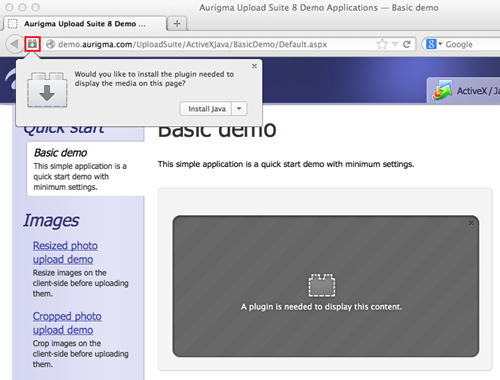
The message means that a proper version of Java plugin is not installed. Before Firefox can run Java applets you need to install and enable the Java plug-in as the following steps describe:
- Click the Install Java button in the popup dialog:
 Alternatively, you can visit the https://www.java.com/en/download/mac_download.jsp page to download the Java.
 - Follow instructions on the Java downloading and installation page.
- After the Java has installed, you need to restart your browser.
- If the Java applet does not still works and you see the same warning message, this means that the Java content is disabled in the browser. You should open the Java control Panel → Security tab and set the Enable Java content in the browser checkbox:
 Alternatively, you can visit the https://www.java.com/en/download/mac_download.jsp page to download the Java.
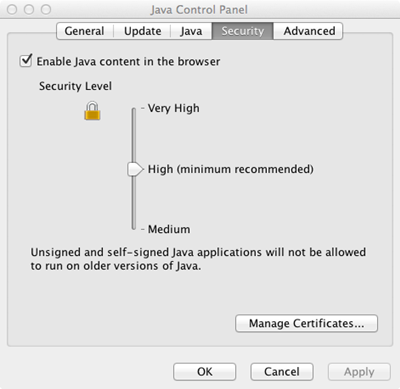
The plugin is disabled
When you open a page with the Java applet you may see the following message:
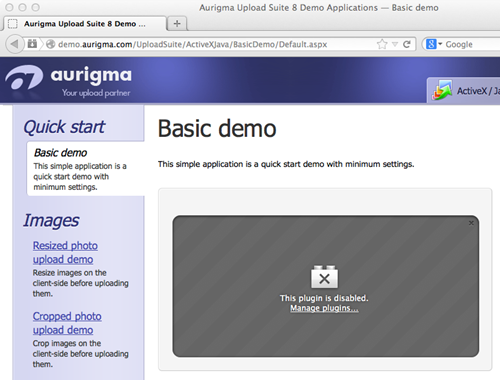
In that case you need to enable the Java plug-in in the Add-ons Manager tab as the following steps describe:
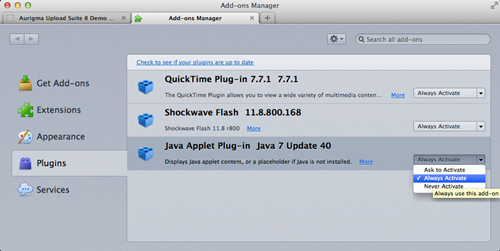
- Open the Add-ons Manager tab and select the Plugins panel.
- Choose the Java applet plug-in.
- Select Always Activate in its dropdown menu:
- Restart the page.
The plugin is blocked
Firefox version 26 blocks Java software on all websites by default. Thus if you see the dialog box which asks for permission to activate the Java applet, or no message at all, click the plugin icon in the address bar and choose Allow and Remember in the popup dialog. This will allow the plugin to launch:

When you click Allow and Remember Firefox adds the current webpage to an internal whitelist, whereby the Java applet will run automatically in the future without further intervention. If you click the Allow now button, you will encounter this problem again when visiting other web pages that use Java.
The Java applet does not upload files
If a web page with Java Uploader or Downloader displays correctly, but does not upload or download chosen files, this may mean two things:
- You are using outdated Java (below Oracle’s security baseline).
- Java security settings are set too high.
The first thing you should try is to make sure that you have the latest Java. You can do it on http://www.java.com/verify.
If you have the latest Java but it still does not work, check your security level:
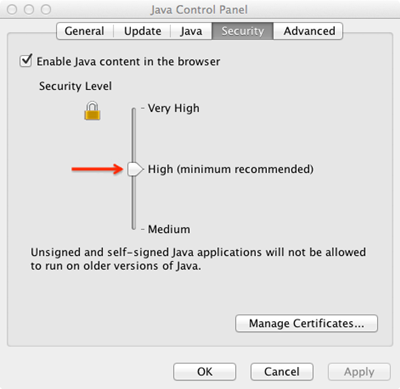
- Open Control Panel → Programs → Java
- In the Java Control Panel choose the Security tab and move the security level cursor to High or lower:
- Click the Ok button and restart your browser
SecurityException and a warning message
While opening a page with Java Uploader or Downloader you may see the following security dialog with the warning message in the yellow box:
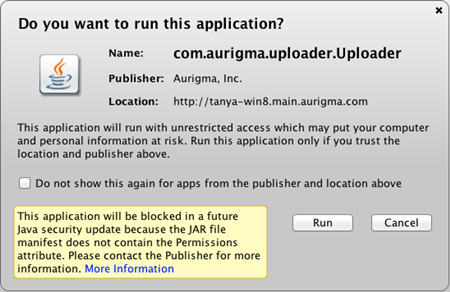
And after you run the applet, you see the SecurityException message instead of the uploader.
This means that the web page uses the old version of Upload Suite or File Downloader. You should report this security dialog as a potential problem to the support team of the website you are working with.
Application Blocked by Security Settings — expired certificate
While opening a page with Java Uploader or Downloader you may see the error message saying «Your security settings have blocked an application signed with an expired or not-yet-valid certificate from running»:
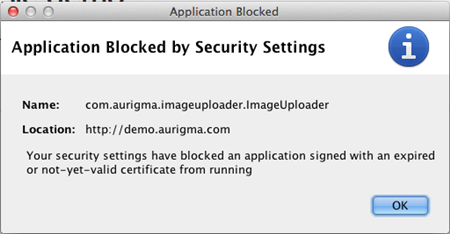
This message means that an outdated version of the uploader is used on the website.
The best solution is to contact the website owners and let them know about the problem so that they updated their copy of the uploader. However if you need to upload files urgently, the following temporary solutions are possible:
- Switch to Internet Explorer. An alternative ActiveX-based uploader is typically used on Internet Explorer and it is not affected by this issue.
- Reduce Java security level to Medium. Open Control Panel → Programs → Java and change the slider to Medium. Don’t forget to restart the browser.
Reducing the security level may make your computer more vulnerable and it is not recommended until emergency. It is recommended to return the security level back to High after the upload is complete.
If you have «no valid license key» message, no need to buy or download anything from Aurigma! Contact the website developer support team to resolve the problem.