Java build path configuration

Using Module Dependencies, Part 2

Developer.com content and product recommendations are editorially independent. We may make money when you click on links to our partners. Learn More.

Module dependency refers to one module being dependent on or requiring another module. Module dependencies were introduced in the Declaring Dependency on Other Modules section in the article “Developing a Module with Java 9 in Eclipse IDE, Part 1.” In the first of two articles, “Using Module Dependencies, Part 1,” we created two Java projects for two modules, a main module and a dependency module. We couldn’t have created both modules in one Java project because the Eclipse IDE does not support multiple modules in a single project. Having created two projects, in this continuation article we shall export each project to a separate JAR file. Exporting and using a module as a JAR file is discussed in an earlier tutorial, “Using a Java 9 Module as a JAR File.” Adding multiple modules in a single JAR is not currently supported, but is planned for a future Java version. In this article, we shall discuss configuring the two Java projects and running the main module application to demonstrate module dependency. This article has the following sections:

Setting the Build Path of the Main Java Project

The two Java projects previously developed have errors, as indicated by the red markers in Figure 1. The errors are indicated because the two modules are defined in separate projects and the dependency project is not in the build path of the main project.

Читайте также:  Html рамка вокруг формы

Java Projects with Errors

Figure 1: Java Projects with Errors

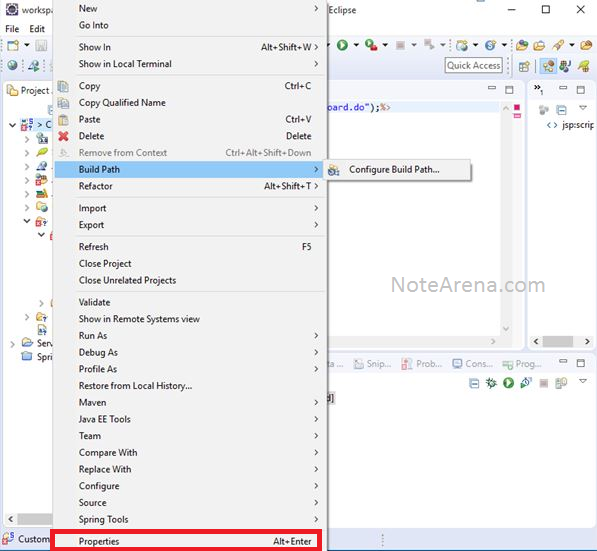
In this section, we shall configure the build path for the MainModule project to add the HelloJavaModule project to the build path. Right-click MainModule in Package Explorer and select Build Path>Configure Build Path, as shown in Figure 2.

Package Explorer data-lazy-src=

Java Build Path

Figure 3: Java Build Path

Select the Projects tab and select Modulepath, as shown in Figure 4. Click Add…

Java Build Path data-lazy-src=

Figure 6: Java project HelloJavaModule added to Modulepath

The errors and red markers get removed from the MainModule project, as shown in Figure 7.

Errors removed from MainModule

Figure 7: Errors removed from MainModule

Exporting the Main Java Project to a JAR File

Adding the HelloJavaModule project to the build path of the MainModule project only removes the build/compile time errors. For runtime, we would need to export each of the modules to a JAR file and add the JAR files to the runtime module path for when the project is run. The JAR files would need to be exported to the same folder so that we are able to configure the module path without referring to modules across projects. As mentioned before, a multi-module JAR is not yet supported but is planned to be supported in a later version of Java.

To export the MainModule project to a JAR file, right-click MainModule in Package Explorer and select Export, as shown in Figure 8.

Package Explorer data-lazy-src=

Figure 10: JAR File Specification

Select the default JAR Packaging Options (see Figure 11) and click Next.

Selecting Packaging Options

Figure 11: Selecting Packaging Options

Next, customize the JAR Manifest Specification, which includes selecting the class of the application entry point. Click Browse for the Main class, as shown in Figure 12.

Main Class data-lazy-src=

In this section, we shall export the dependency project HelloJavaModule to a JAR file in the same directory as the main module JAR is exported to. To export the HelloJavaModule project to a JAR file, right-click the project in Package Explorer and select Export (see Figure 16).

Package Explorer data-lazy-src=

Figure 18: JAR File Specification for Dependency JAR

Select the default JAR Packaging Options, as shown in Figure 19, and click Next.

Selecting Packaging Options

Figure 19: Selecting Packaging Options

Next, customize the JAR Manifest Specification. Because the dependency project does not include a class for an application entry point, keep the Main class field as empty, as shown in Figure 20, and click Finish.

No Main Class for Dependency Project

Figure 20: No Main Class for Dependency Project

The helloJavaModule.jar gets exported to the MainModule/modules directory, as shown in Package Explorer in Figure 21.

Exported JAR helloJavaModule.jar

Figure 21: Exported JAR helloJavaModule.jar

Adding a Run Configuration

To run the main module Java application, we need to create a run configuration for the MainModule project. Right-click MainModule in Package Explorer and select Properties, as shown in Figure 22.

Package Explorer data-lazy-src=

Figure 24: Selecting Configuration Type as Java Application

In the configuration wizard, specify a name (MainModuleConfig) in the Name field and with the Project selected as MainModule click Search… for the Main class, as shown in Figure 25.

Setting Launch Configuration Properties

Figure 25: Setting Launch Configuration Properties

In Select Main Type, select the main.module.MainModule type (see Figure 26) and click OK.

Selecting Main Type

Figure 26: Selecting Main Type

With the Main class selected, click the Arguments tab to select the VM args next, as shown in Figure 27.

Selecting Arguments Tab

Figure 27: Selecting Arguments Tab

Add the following VM arguments to the VM arguments field, as shown in Figure 28.

--module-path modules/helloJavaModule.jar;modules/mainmodule.jar -m mainModule/main.module.MainModule

The --module-path arg sets the module path to the two JARs for the two modules. The -m arg sets the module. Click Apply, as shown in Figure 28.

Applying Run Configuration Settings

Figure 28: Applying Run Configuration Settings

Click OK, as shown in Figure 29, to complete the run configuration.

Completing Run Configuration

Figure 29: Completing Run Configuration

A new run configuration, MainModuleConfig, gets created, as shown in Figure 30. Click Apply and Close in the Properties window.

Applying Properties for MainModule Project

Figure 30: Applying Properties for MainModule Project

Running the Main Module Java Application

Next, we shall test whether the main module invokes the dependency module by running the main module application. Right-click MainModule.java in Package Explorer and select Run As>Java Application (see Figure 31).

Package Explorer data-lazy-src=

In two articles, we discussed using module dependencies in Java 9.

Источник

How to set build path in eclipse IDE?

A proper build path is required for compiling and building a java project. In Eclipse IDE, the build path is a crucial element for Java development. It defines the dependencies and resources required to compile and run your code. By setting the build path correctly, you can optimize your project dependencies, manage the classpath efficiently, and avoid runtime errors. In this article, we will show you how to set the build path in Eclipse IDE for your Java projects.

Method 1:
1. Right Click on your project folder, Choose Build Path > Configure Build Path

How to set build path in eclipse IDE?

Right Click on your project folder, Choose Property > Java Build Path

How to set build path in eclipse IDE?2

For both cases, you will find the same options panel like:

How to set build path in eclipse IDE?3

2. Select “JRE System Library” and select Edit from the right side bar

3. Choose the right Version of java installed

And hit finish and Refresh the project

1. Step 1 is the Same as the previous method

2. Select the Libraries Tab and delete any arbitrary library present there.
3. Click on Add Library option, Select JRE System Library, and click Next.

4. Select the option Workspace default JRE and click Finish.

Right-click on the project and select Refresh.

See our all the courses and lessons. Also, see code examples in our GitHub repository.

Follow us on social media

Источник

Оцените статью