Java application start class

Приложение JavaFX по сути представляет класс, который унаследован от класса javafx.application.Application . Объект этого класса проходит ряд этапов жизненного цикла. Все эти этапы представлены методами класса Application, которые вызываются автоматически средой JavaFX:
- init() : инициализирует приложение до его запуска. Стоит отметить, что метод не должен использоваться для создания графического интерфейса или отдельных его частей.
- start(Stage stage) : здесь собственно и определяется графический интерфейс.
- stop() : вызывается после закрытия приложения, например, после того, как пользователь нажал на крестик в правом верхнем углу
В итоге весь процесс работы приложения выглядит следующим образом:
- Запускает исполняемая среда JavaFX (если она не запущена)
- Она вызывает конструктор класса, который расширяет класс Application, тем самым создавая экземпляр данного класса
- Затем среда JavaFX вызывает метод init()
- Вызывается метод start(javafx.stage.Stage) , в который среда JavaFX передает созданный объект Stage. Таким образом, приложение начинает работать
- Далее среда ожидает, пока либо в приложении не будет вызван программным способом метод Platform.exit() , либо пока не будет закрыто последнее окно программы
- После завершения работы приложения среда JavaFX вызывает метод stop()
Все эти методы мы можем переопределить в главном классе приложения. Но, как правило, определяется один метод start() , в котором определяются настройки графического интерфейса. Но, к примеру, переопределим все методы:
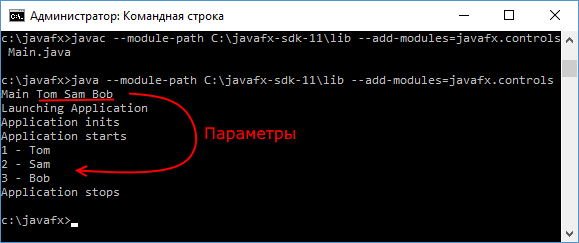
import javafx.application.Application; import javafx.stage.Stage; import java.util.List; public class Main extends Application < public static void main(String[] args) < System.out.println("Launching Application"); launch(args); >@Override public void init() throws Exception < System.out.println("Application inits"); super.init(); >@Override public void start(Stage stage) < System.out.println("Application starts"); // получаем переданные параметры Application.Parameters params = getParameters(); ListunnamedParams = getParameters().getUnnamed(); int i =0; for(String param: unnamedParams) < i++; System.out.printf("%d - %s \n", i, param); >stage.show(); > @Override public void stop() throws Exception < System.out.println("Application stops"); super.stop(); >> В данном случае просто выводим на консоль индикацию о вызове метода.
Фактически работа любой программы на Java начинается с метода main , который является входной точкой в приложение. В этом методе вызывается метод launch(args) . При запуске в метод launch мы можем передать аргументы в виде массива строк. Например, мы можем взять те значения, которые получает метод main через командную строку/терминал. Затем эти аргументы мы можем получить через getParameters, например, в методе start.
Затем среда создает объект класса Main, вызывает у него последовательно методы init и start. После вызова в методе start метода stage.show() нам отобразится окно приложения.
Закрытие окна приведет к вызову метода stop. И таким образом приложение завершит свое выполнение.
Пример запуска приложения:
Launcher thread и application thread
Стоит отметить, что ни метод init, ни конструктор класса, который наследуется от Application, не подходит и не должен использоваться для создания графического интерфейса. Почему? Потому что и метод init, и конструктор запускаются в потоке, который называется потоком запуска или launcher thread.
А создание, а также изменение графического интерфейса должно производиться в потоке приложения или application thread. Именно в таком потоке и запускается метод start (а также метод stop).
Lesson: A Closer Look at the «Hello World!» Application
Now that you’ve seen the «Hello World!» application (and perhaps even compiled and run it), you might be wondering how it works. Here again is its code:
The «Hello World!» application consists of three primary components: source code comments, the HelloWorldApp class definition, and the main method. The following explanation will provide you with a basic understanding of the code, but the deeper implications will only become apparent after you’ve finished reading the rest of the tutorial.
Source Code Comments
/** * The HelloWorldApp class implements an application that * simply prints "Hello World!" to standard output. */ class HelloWorldApp < public static void main(String[] args) < System.out.println("Hello World!"); // Display the string. > > Comments are ignored by the compiler but are useful to other programmers. The Java programming language supports three kinds of comments:
/* text */ The compiler ignores everything from /* to */ . /** documentation */ This indicates a documentation comment (doc comment, for short). The compiler ignores this kind of comment, just like it ignores comments that use /* and */ . The javadoc tool uses doc comments when preparing automatically generated documentation. For more information on javadoc , see the Javadoc™ tool documentation . // text The compiler ignores everything from // to the end of the line.
The HelloWorldApp Class Definition
/** * The HelloWorldApp class implements an application that * simply displays "Hello World!" to the standard output. */ class HelloWorldApp public static void main(String[] args) < System.out.println("Hello World!"); // Display the string. >> As shown above, the most basic form of a class definition is:
The keyword class begins the class definition for a class named name , and the code for each class appears between the opening and closing curly braces marked in bold above. Chapter 2 provides an overview of classes in general, and Chapter 4 discusses classes in detail. For now it is enough to know that every application begins with a class definition.
The main Method
/** * The HelloWorldApp class implements an application that * simply displays "Hello World!" to the standard output. */ class HelloWorldApp < public static void main(String[] args) System.out.println("Hello World!"); //Display the string. > > In the Java programming language, every application must contain a main method whose signature is:
public static void main(String[] args)
The modifiers public and static can be written in either order ( public static or static public ), but the convention is to use public static as shown above. You can name the argument anything you want, but most programmers choose «args» or «argv».
The main method is similar to the main function in C and C++; it’s the entry point for your application and will subsequently invoke all the other methods required by your program.
The main method accepts a single argument: an array of elements of type String .
public static void main(String[] args)
This array is the mechanism through which the runtime system passes information to your application. For example:
Each string in the array is called a command-line argument. Command-line arguments let users affect the operation of the application without recompiling it. For example, a sorting program might allow the user to specify that the data be sorted in descending order with this command-line argument:
The «Hello World!» application ignores its command-line arguments, but you should be aware of the fact that such arguments do exist.
System.out.println("Hello World!"); uses the System class from the core library to print the «Hello World!» message to standard output. Portions of this library (also known as the «Application Programming Interface», or «API») will be discussed throughout the remainder of the tutorial.
Java application start class
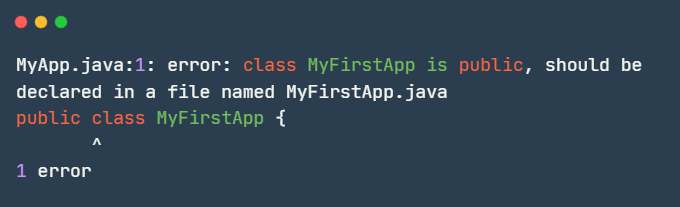
Она означает, что в строке 1 файла MyApp.java объявляется публичный класс с именем MyFirstApp, а значит и находиться он должен в файле с таким же именем.
2) Теперь нарушим еще одно правило, написав имя класса и файла с маленькой буквы, назвав их myFirstApp. Запустив программу, видим, что отобразилось сообщение Write once, run anywhere.
Можно сделать вывод, что писать имя файла и класса с большой буквы является лишь договоренностью всех программистов друг с другом. Это сделано для того, чтобы в коде не путать имена переменных (начинаются с маленькой буквы. О них мы поговорим в другой статье) с именами классов.
3) Попробуем изменить имя метода main, например, на Main. Запустив программу, увидим следующую ошибку:
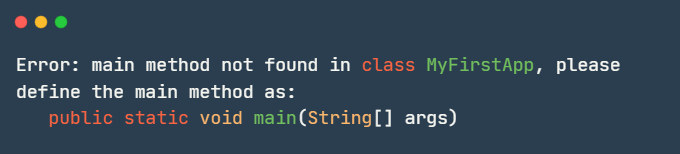
JVM не смогла запустить программу т. к. не нашла метод main (с маленькой буквы). О чем и свидетельствует ошибка Error: main method not found.
4) Вернем методу его первоначальное имя, но удалим слова public static и снова запустим. Возникнет та же самая ошибка, что и в предыдущем пункте, связанная с тем, что при запуске программы не был найден метод main, записанный по всем правилам.
Самостоятельно попробуйте удалять разные части программы и смотреть, какие при этом будут возникать ошибки.