- How to Fix the XAMPP Localhost index.php Error [Ultimate Guide]
- What does XAMPP Localhost index.php Error mean?
- What Causes the XAMPP Localhost index.php Error?
- How to Fix the XAMPP Localhost index.php Error (2 Simple Solutions)
- Solution #1: Rename index.php to index.txt
- Solution #2: Change the DocumentRoot Directory in XAMPP
- To Sum It Up
- Frequently Asked Questions
- Http localhost xampp index php
- Школа Продающих Сайтов
- A5.ru: конструктор сайтов
- Локальный сервер XAMPP – установка
How to Fix the XAMPP Localhost index.php Error [Ultimate Guide]
XAMPP is an excellent open-source software that lets you install WordPress on your local machine to test new features, debug errors, and experiment with different configurations.
However, sometimes things don’t go as smoothly as you expect. One of the common errors that many XAMPP users encounter is when they try to access localhost/xampp/index.php in their browser and get an error message instead.
Encountering this error can be frustrating and perplexing, particularly if you’re unsure about its causes and solutions. That’s why we’ve created this ultimate guide to help you understand and resolve the XAMPP localhost index.php error.
In this article, you’ll learn:
- What does the XAMPP localhost index.php error mean?
- What causes the XAMPP localhost index.php error?
- How to fix the XAMPP localhost index.php error using two simple solutions?
So, let’s dive in and get your XAMPP server running smoothly!
What does XAMPP Localhost index.php Error mean?
When you see XAMPP Localhost index.php error message, it means an obstacle prevents your XAMPP server from accessing the index.php file, which serves as the default file when accessing the localhost URL.
The index.php file is a special file that serves as the entry point to your website. It contains the code that tells the browser what to display when someone visits your site.
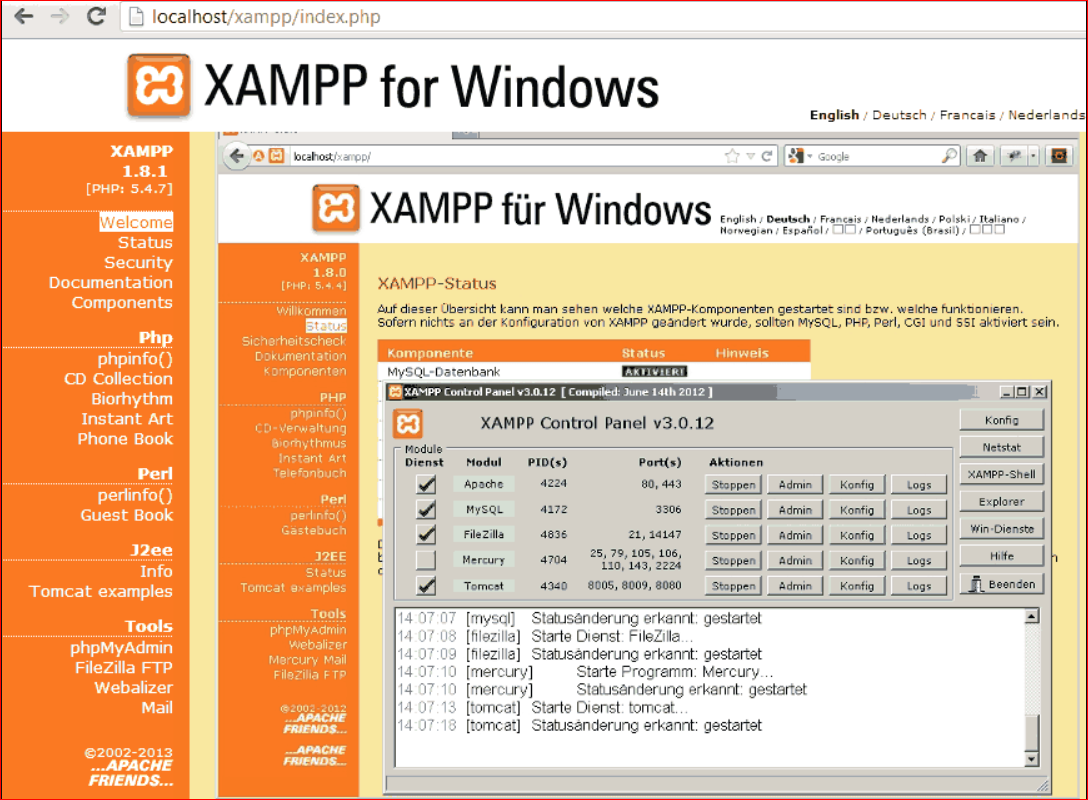
When you install XAMPP, it creates a folder called htdocs in the C:\Xampp directory. This folder stores all your web files, such as HTML, CSS, PHP, images, etc. The htdocs folder also contains an index.php file that redirects you to the XAMPP dashboard when you visit “localhost/xampp/index.php” in your browser, which looks something like this:
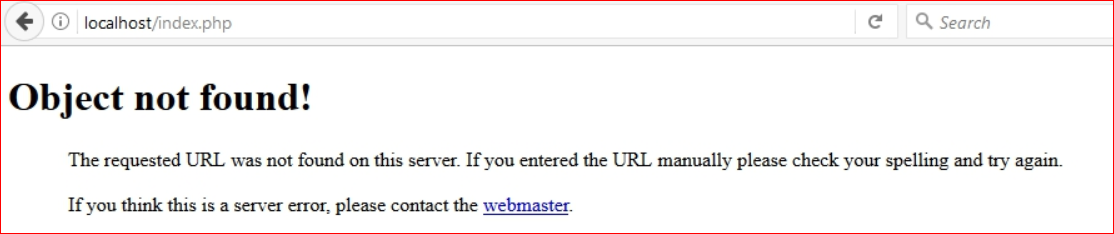
However, sometimes when you try to access localhost/xampp/index.php in your browser, instead of seeing the XAMPP dashboard, you see an error message, as shown in the image below:
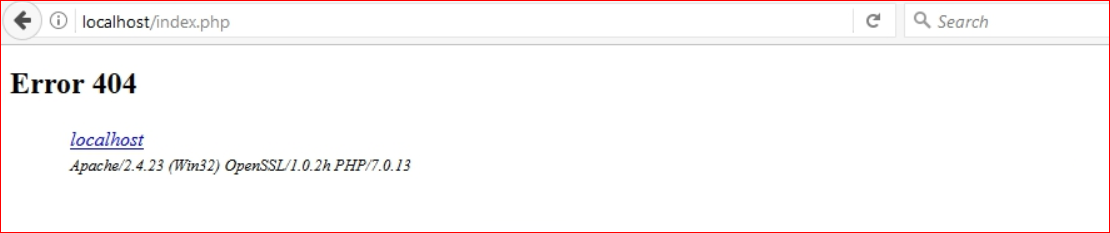
Or sometimes, you see an error message which looks like this:
You can get these error messages for a number of reasons. That’s why it’s crucial to identify the exact cause in your setup to find the appropriate solution.
What Causes the XAMPP Localhost index.php Error?
Understanding the reason behind the XAMPP Localhost index.php error is crucial. Because depending on the cause of the error, you may see different error messages in your browser. Here are some of the most common causes of why XAMPP Localhost index.php error occurs in the first place:
- Missing, Deleted, or Moved index.php File: Sometimes, you accidentally delete, rename, or move it to another folder inside or outside the htdocs folder. As a result, the server fails to locate it when attempting to access the localhost URL.
- Incorrectly Typed or Typo in the URL: If you forget to add a slash (/) at the end of the URL or misspell any part of it, the XAMPP server will not be able to find the index.php file. For example, if you type localhost/xampindex.php instead of localhost/xampp/index.php.
- Corrupted or Modified XAMPP Configuration Files: The XAMPP configuration files, such as httpd.conf or php.ini, play a crucial role in the proper functioning of the server. If these files become corrupted or you modify them incorrectly, they can disrupt the accessibility of the index.php file, which ultimately leads to a XAMPP localhost index.php error.
No matter what the cause is, it is clear that you can’t access your local web server. But don’t worry! There are some simple solutions, which we will show you in the following section, that can help you fix this issue and get back to your work.
How to Fix the XAMPP Localhost index.php Error (2 Simple Solutions)
Two ways to fix the XAMPP localhost index.php error are renaming the index.php file to index.txt or changing the DocumentRoot directory in XAMPP. Both solutions are easy to implement and can solve the problem in most cases.
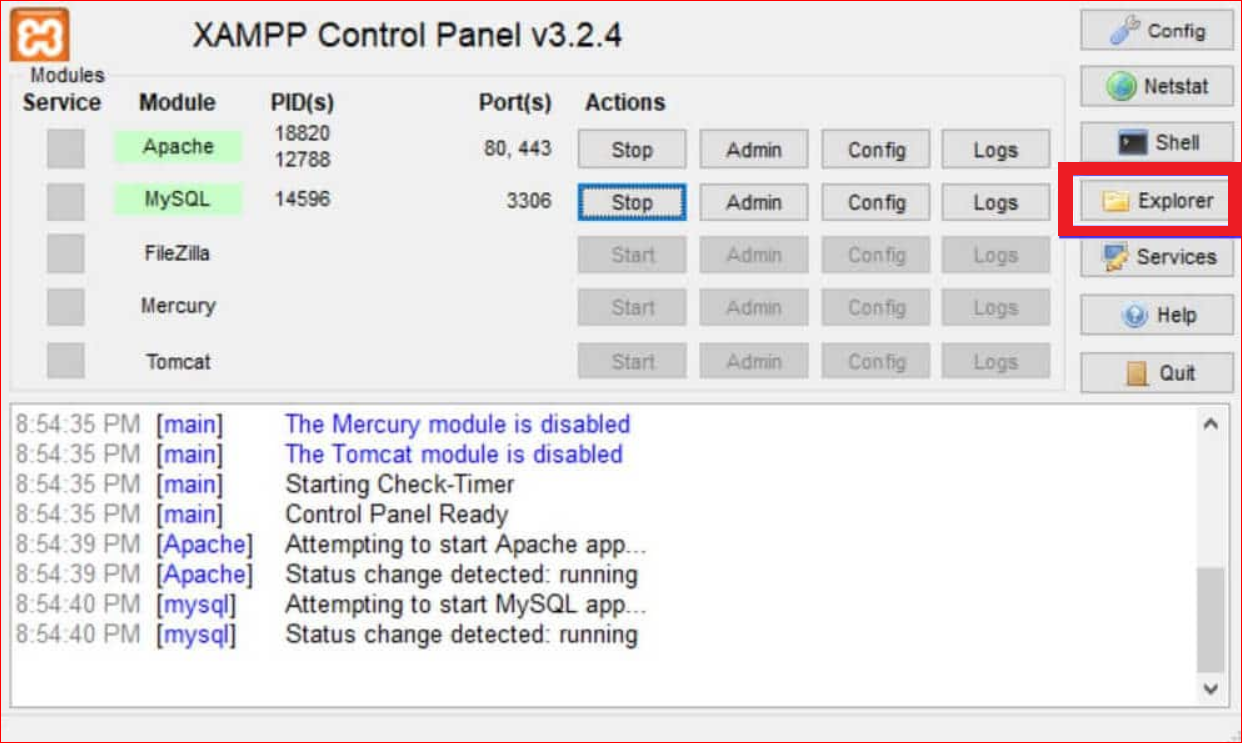
However, before you try any of these solutions, ensure your XAMPP server is functioning correctly. To do that, open the XAMPP control panel from your Start menu or desktop shortcut and check if Apache and MySQL are running. They should have green indicators next to them like this:
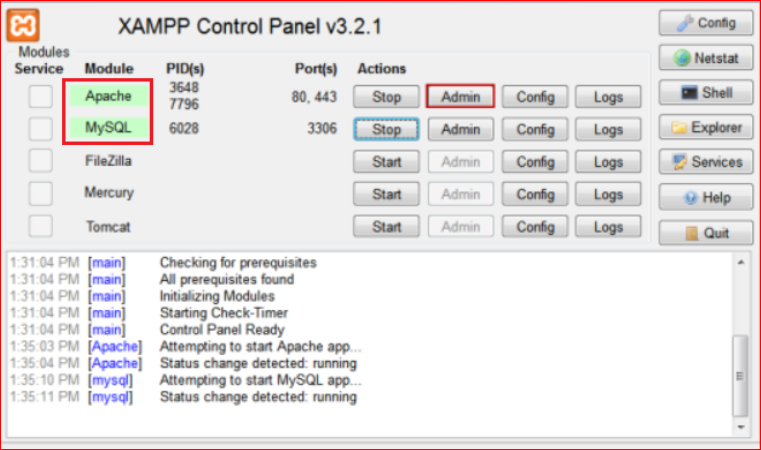
If they are not running, click the “Start” buttons located in the “Actions” column. Or, if they are already running but displaying red indicators or error messages, click the “Stop” buttons to start them again.
However, if everything is fine with your XAMPP server, then proceed with one of these solutions:
Solution #1: Rename index.php to index.txt
This solution involves changing the file extension of the index.php file from .php to .txt. This way, the browser will treat it as a plain text file instead of a PHP script and display its contents without encountering any errors.
Follow the below steps to rename the index.php file to index.txt using XAMPP Control Panel:
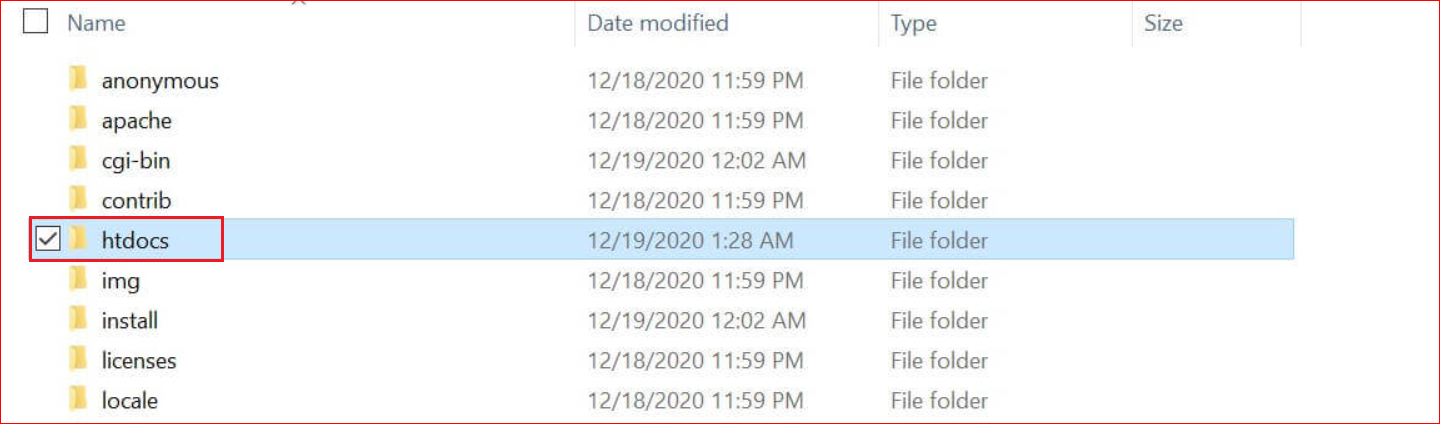
Step #1: Open the XAMPP Contro Panel and click the Explorer button on the right., which will take you directly to the XAMPP folder.
Step #2: Once inside the XAMPP folder, find the htdocs subfolder, where you will find the index.php file. If you use the Windows operating system, the file might be labeled simply as “index” because extensions are typically hidden by default.
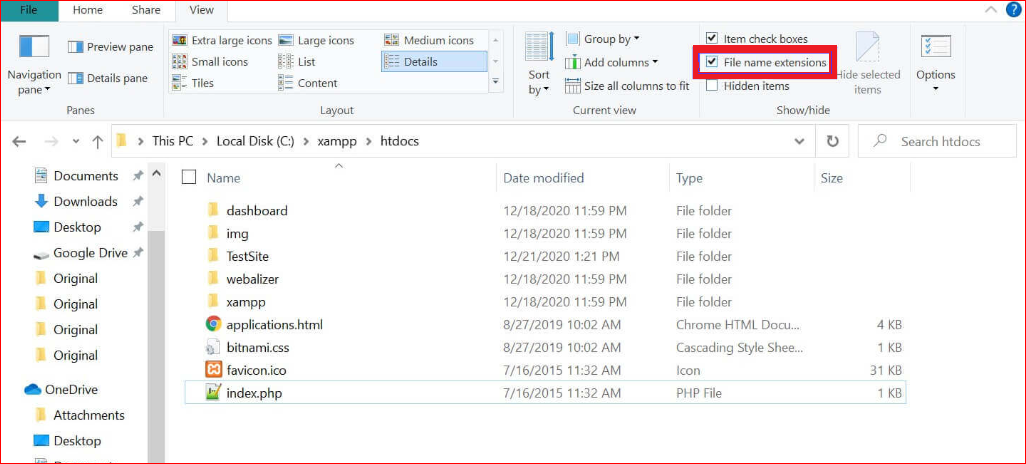
Step #3: Check the box next to “File name extensions.” in the File Explorer ribbon to make file extensions visible. Enabling this option will display the file extensions to make renaming easier.
Step #4: Right-click the index.php (or index) file and choose the Rename option from the context menu. Delete the “php” extension and replace it with “txt”. If you receive a prompt asking if you want to change the file name, select Yes to proceed with renaming.
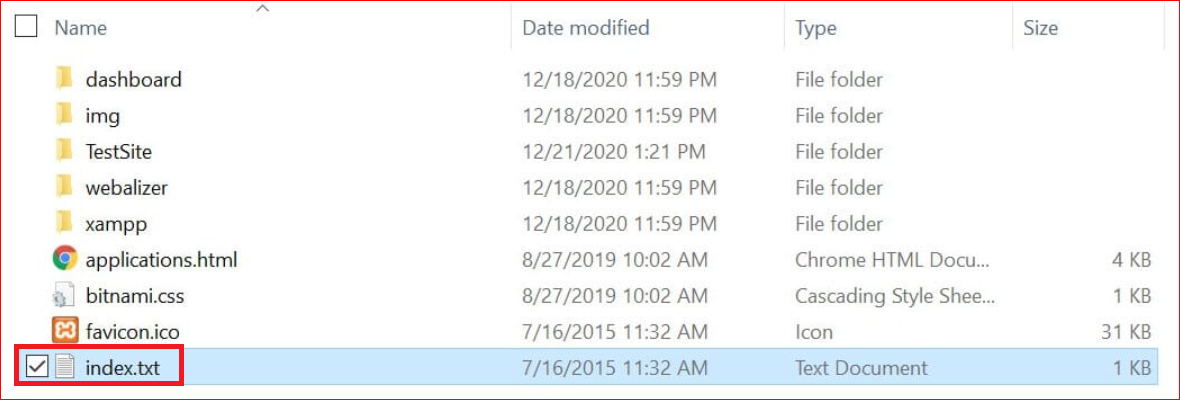
That’s it! Now open your browser and navigate to “localhost” You should see the list of directories you created.
Solution #2: Change the DocumentRoot Directory in XAMPP
After changing the “index” file extension, if you are still facing the same issue. The next step is to edit the httpd.conf file in XAMPP to change its DocumentRoot directive to point to where your index.php file is located.
By default, XAMPP uses C:\Xampp\htdocs as its DocumentRoot directory. However, for some reason, if your index.php file is not in this folder or has been moved somewhere else, then XAMPP will not be able to find it and will show an error message instead.
Here are the steps to change the DocumentRoot Directory in XAMPP by editing the httpd.conf file:
Step #1: Open the XAMPP Control Panel and click the Explorer button on the right.

Step #2: Navigate to the appropriate directory to locate the httpd-vhosts.conf file:
- On Windows, you can find the file at: “C:\xampp\apache\conf\extra\httpd-vhosts.conf”
- On Mac, follow this path: “~/.bitnami/stackman/machines/xampp/volumes/root/etc/extra/httpd-vhosts.conf”
Once you have reached the desired directory, open the httpd-vhosts.conf file using a text editor such as Notepad, TextEdit, etc.
Step #3: Within the httpd-vhosts.conf file, locate the “VirtualHost” sections and look for the line labeled “DocumentRoot.” If the path specified in this line ends at “htdocs,” it signifies the source of the issue. You need to change it by adding the path of your project so that it points to the folder corresponding to your project.
For instance, the original content of the file might seem like this:

Step #4: On the “DocumentRoot” line, you should now enter the name of the folder containing your website’s files, usually under the “htdocs” folder. After making the necessary adjustments, the modified document should look something like as follows:

Now, make sure to save the changes to the file. Then, try to reload localhost/xampp/index.php to check if the issue has been resolved.
To Sum It Up
In this ultimate guide, we explored the XAMPP Localhost index.php error and its possible causes and provided two simple solutions to fix it. You can overcome this error by temporarily renaming the index.php file to index.txt or changing the DocumentRoot directory in XAMPP’s configuration and continuing working on your web development projects seamlessly.
However, if you are still encountering this error or cannot fix it yourself, don’t hesitate to contact us for expert assistance. At WPExperts, we offer all services related to WordPress and WooCommerce. We also provide WordPress support with a team of WordPress experts who can help you with any technical issues or questions you may have.
So what are you waiting for? Feel free to reach out to our team. We’re here to help you make your WordPress development journey successful.
Frequently Asked Questions
The XAMPP localhost directory is typically located in the “htdocs” folder within your XAMPP installation directory. On Windows, the default path is “C:\xampp\htdocs.” This is where you can store your web files, such as HTML, CSS, PHP, images, etc., that can be accessed through the localhost URL.
To fix a 404 error on localhost, you can try the following steps:
1. Verify that the file or directory you are trying to access exists in the specified location.
2. Check the URL for any typos or incorrect paths.
3. Ensure that the file or directory has proper permissions for the webserver to access.
4. Restart the Apache server in XAMPP to refresh the configurations.
5. If you use custom URLs or virtual hosts, ensure the configurations are correctly set up in the httpd-vhosts.conf file.
There could be various reasons why your XAMPP localhost is not working, including Apache or MySQL service errors, port conflicts, firewall blocking, Apache and PHP configuration issues, or software conflicts.
Http localhost xampp index php

- Школа Продающих Сайтов
Школа Продающих Сайтов

A5.ru: конструктор сайтов
Локальный сервер XAMPP – установка
Ну что же, в прошлой статье, мы рассмотрели, где и как скачать инсталляционный файл для установки на компьютер локального сервера XAMPP.
Для того, чтобы установить Локальный сервер XAMPP на компьютер, запускаем скаченный файл.
Открывается окно выбора языка, оставляем английский и жмем “ОК”.
После приветствия, программа установщик предложит выбрать путь к папке, в которую Локальный сервер XAMPP будет установлен. Ничего не меняем, оставим путь, предложенный программой – C:\xampp.
В следующем окне программа предлагает создать ярлыки на рабочем столе, и в меню “Пуск”, оставляем эти опции включенными.
Здесь же, программой установки будет предложено создать службы для запуска сервера Apache и MySQL. Эти службы будут запускаться с загрузкой Windows. Эти опции активировать не будем.
Продолжаем установку локального сервера, нажав на кнопку “Install”. После распаковки и копирования файлов, выходит окно, которое сообщает, что локальный сервер XAMPP установлен, нам осталось кликнуть по кнопке “Finish”.
После установки, на рабочем столе и в меню пуск будет создан ярлык для запуска контрольной панели локального сервера:
Запустим панель управления локального сервера.
Локальный сервер XAMPP, управляется кнопками “Start”. Так, например, чтобы запустить сервер Apache, жмем соответствующую кнопку “Start” напротив сервиса Apache в контрольной панели локального сервера:

То же самое касается сервиса MySQL и других служб и сервисов. После нажатия на кнопку, сервис запускается и под названием сервиса появляется зеленая подсветка, а название кнопки “Start” меняется на “Stop”:

Думаю, понятно, что для перезапуска служб, достаточно воспользоваться соответствующей кнопкой службы, а для администрирования службы необходимо нажать кнопку “Admin”.
Теперь давайте рассмотрим, как создавать сайты на локальном сервере XAMPP.
В начале отметим, что после установки локального сервера на компьютер, программой установки на диске C была создана папка – xampp. В данной папке находится папка: htdocs.
Так вот, все создаваемые сайты на локальном сервере, должны лежать в этой папке. То есть, локальный путь к папкам сайтов будет следующий:
Для примера, давайте на локальном сервере xampp, создадим сайт с доменным именем test12.ru
Для этого, нам достаточно создать в директории htdocs папку с именем нового домена test12.ru:
Все файлы нашего нового сайта, соответственно должны храниться в папке домена — test12.ru.
Теперь еще один важный момент — для того, чтобы открыть сайт test12.ru в браузере, к нему в необходимо обратиться по адресу:
На мой взгляд, наличие в пути к сайту директории localhost нам мешать не будет, такое обращение к сайту лишь напомнит нам, что мы работаем на локальном сервере.
Кстати, если мы зайдем на страницу https://localhost/xampp/, то мы получим доступ к странице состояния и режимов локального сервера xampp.
Давайте вернемся к тестированию созданного нами тестового сайта test12.ru.
Чтобы сайт заработал, необходимо, чтобы в корне сайта, то есть в папке C:\xampp\htdocs\test12.ru, находился индексный файл.
Давайте добавим в эту папку индексный файл index.php, следующего содержания: