- Tips for creating an HTML email signature for Mac Mail
- Table of contents
- Why are email signatures for Apple Mail important?
- How to add a Calendly link to your email signature
- 3 Steps to add an HTML signature to Apple Mail
- 1. Create an email signature
- 3. Test your new signature
- Manually add an HTML signature
- Automatic signatures for Mac Mail users
- Keep signatures consistent across your organization
- Use the right image size
- Professional email signature examples for Mac Mail
- Conclusion
- Create your first email signature with Bybrand
- How to Make an HTML Signature for Mail in Mac OS X
- How to Create and Set an HTML Signature for Mail in Mac OS X
Tips for creating an HTML email signature for Mac Mail
Adding an email signature to Mac Mail is an excellent way to improve your communications and grow your brand. Although it may seem simple, the right email signature can add a lot of value to your email messages.
Any Apple email clients trying to figure out how to add an HTML signature need to know that the process is actually really easy. With the right signature generator, you can effortlessly create a professional signature and add it to your Apple device.
Table of contents
Follow this guide to learn how.
Why are email signatures for Apple Mail important?
Adding an email signature to your Apple Mail account can have many important benefits. Email signatures enhance your communications and help to enforce your brand.
They display important information for your email recipients – like contact details, social media links, or a link to your website. These elements can help you promote your brand, as well as gain some useful actions from your email contacts – like driving traffic to your website.
When you add a signature to your emails, you can put helpful information in them. This could include things like an appointment calendar to set up a meeting with you, a link promoting an event, or sharing an important piece of content in your email signature. These elements help you use your email signature for marketing.
See also

How to add a Calendly link to your email signature
The great thing about using an HTML email signature is that it can be interactive. You can create a professional signature and add hyperlinks over things like your company logo, social media icons, and more. Your email signature is no longer just informative, but it can include CTAs and help you achieve a purpose.
With the right email signature generator, creating a professional email signature and adding it to your Apple mail account is super easy. Once you’ve set this in place, you can enjoy a whole new world of benefits from your email communications.
3 Steps to add an HTML signature to Apple Mail
Adding a new signature to your email account may seem like a complex task if you’ve never done it before, but it’s actually super simple.
You don’t need to know how to write HTML code or have any technical or design knowledge. You just need the right tool to create signatures for you.
Here are the steps you can follow to add an HTML signature to your Apple Mail email account.
1. Create an email signature
First, you’ll need to create the signature that you’re going to add to your email account. This includes creating the signature design and accessing the HTML file.
You can easily do this with an email signature generator like Bybrand. All you need to do is choose a template that you’d like to use for your email account, and customize it with your own details.
Simply drag and drop in the editor to change the images and move around the design. Update your contact information, insert your website URL, and add any hyperlinks you want to include in the signature.
Video example:
Save your signature and close the window.
3. Test your new signature
Now all you need to do is test if your HTML signature is working.
To do this, simply create a new message and see if your signature appears – which it should. You can always send a test email to yourself or a friend to ensure all of the elements load and work correctly.
Success! You have created and added a signature to your Apple email client.
Manually add an HTML signature
Having your signature automatically added to Apple Mail using the process above is by far the easiest solution. However, if you don’t automatically add one with a signature generator, you can manually add the HTML code from a free email signature generator to Mac Mail.
Note that for 1 or 3 employees, the step below may be an easy task. However, for many employees using the Mac Mail app, you’ll want to use a method to add the signature automatically – skip to the next step.
To do this, you’ll need to follow these steps or watch this video tutorial.
- Create an HTML signature and generate the HTML file
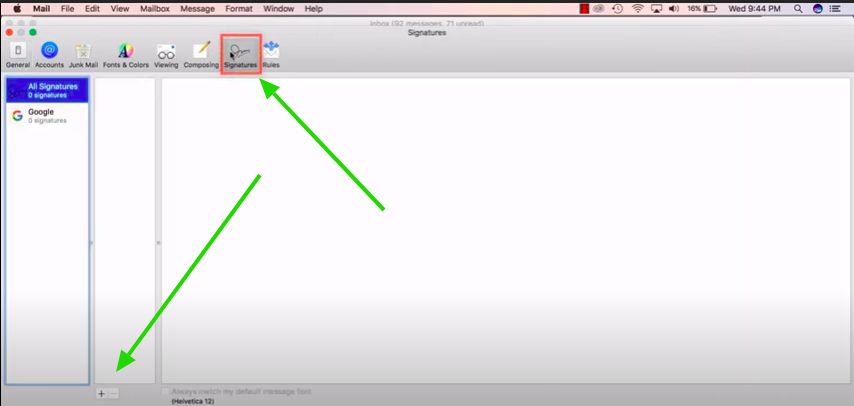
- Go to “Preferences” and select the “Signatures” tab on the pop-up menu
- Choose which account you’re creating the signature for
- Select the (+) icon
- Add a signature name
- Close Mac Mail completely
- Open Finder and select “Go“
- On the drop-down menu, go to “Library”
- Find your Mail folder, and you’ll see a folder labeled according to your OS version (eg. V8)
- In this folder, go to “MailData”
- Then go to the “Signatures” folder
- Select the signature file you created earlier in Mac Mail and open it with a text editor
- Now you’ll see the HTML code for a signature. Paste the code for the HTML signature you created over the code in this file.
- At the top of the window, click on the arrow to access the drop-down menu. Check the “Locked” box so that Apple doesn’t overwrite your custom HTML signature code.
- Close the file and open Apple Mail.
- Create a new email, and you’ll see your new email signature in the email.
Automatic signatures for Mac Mail users
Alternatively, you can bulk-send signatures to Mac Mail users. Using Bybrand’s manager and Bulk-send feature, you can select a group of users using Mac Mail and send individual instructions to each. Finally, each employee can manually paste the signature using the above step.
This Bulk-send method saves a lot of time managing email signatures for a large team.

Keep signatures consistent across your organization
Using email signatures across your entire company is a great idea, but this only works if you’re able to maintain consistency across these emails.
The best way to do this is to use a company-wide email signature management tool. This makes it a lot easier to create, manage and update email signatures for an entire organization.
Use the right image size
Unfortunately, Apple Mail doesn’t support image size settings via HTML. This means you’ll need to crop the image in your signature to be the exact size you need.
The good news is that using a signature editor like Bybrand lets you access a feature where you can facilitate the exact crop size. This makes it easy to ensure your images and logo are displayed properly.
![]()
Professional email signature examples for Mac Mail
The simplest Mac Mail signature example is adding your name, title, and contact information to the end of emails. In addition, you can add your company logo, brand colors, and other branding elements, such as quotes or website links.
No matter your professional email signature type, it’s important to use it consistently in all your emails. So, to make sure your Mac Mail HTML signature looks professional, here are some templates to help you get started:


Conclusion
Using an email signature generator to add an HTML signature to Mac Mail is a much more straightforward process than manually adding one. It’s also best if you’re wanting to add HTML email signatures for Mac Mail across your team or company.
Once your expected signature is in place, you’ll be able to reap many new benefits from your email communications. This could include driving more traffic to your site, gaining social media followers, or simply adding more context to your emails and making them feel more professional.
The templates above can do that for you.
Still, confused about how you can automatically add an email signature to your Apple Mail?

Create your first email signature with Bybrand
Bybrand offers the ability to generate, administer, and distribute essential email signatures for your employees.
How to Make an HTML Signature for Mail in Mac OS X
![]()
Many users like to set a signature to be automatically included in their outbound emails, and for those who like to have a stylized and somewhat interactive email signature, they’ll want to create what’s called an HTML signature. An HTML signature allows for different text styling like bolds, italics, font sizes, and, perhaps most relevant to many, the inclusion of things like a phone number or links to websites and social addresses.
For Mac users who would like to create and set an HTML signature, the process is really quite simple in the Mail app of Mac OS. You can actually create however many signatures you want, and even set different signatures for different email accounts. We’ll walk through how to make and set a simple HTML signature in Mail on the Mac.
How to Create and Set an HTML Signature for Mail in Mac OS X
This is the same in all versions of Mail app for Mac OS:
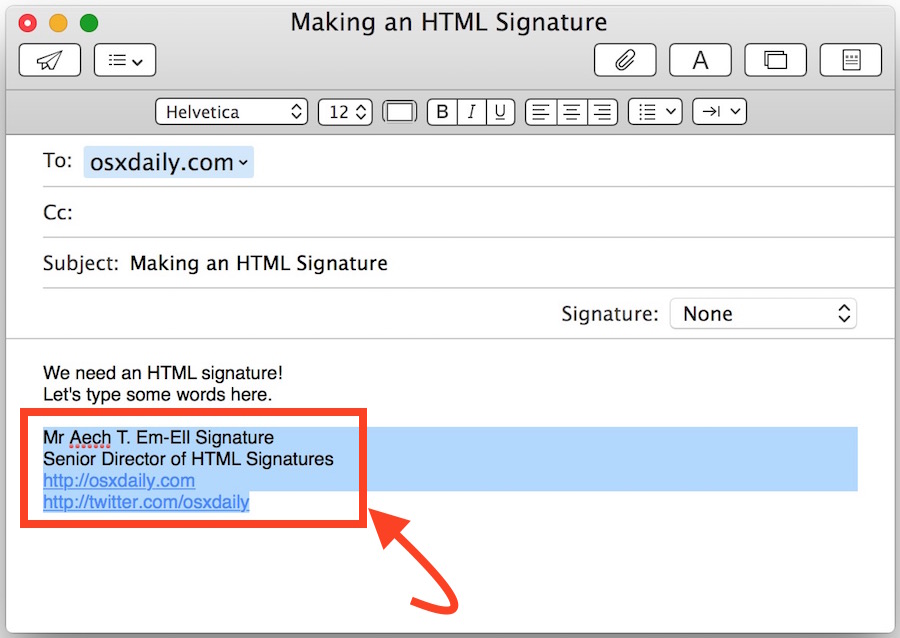
- From the Mac Mail app, create a new email message – this is simply for the sake of creating the HTML signature and it won’t be sent
- In the body of the email, type out your desired signature and style it as necessary – bold, font sizes, italics, phone number, links to websites or social profiles, etc (note that typing out links in modern versions of Mail app will automatically turn them into HTML links)
- Select all of the signature and copy it to your clipboard with Command+C, then discard the email you just made to create the signature
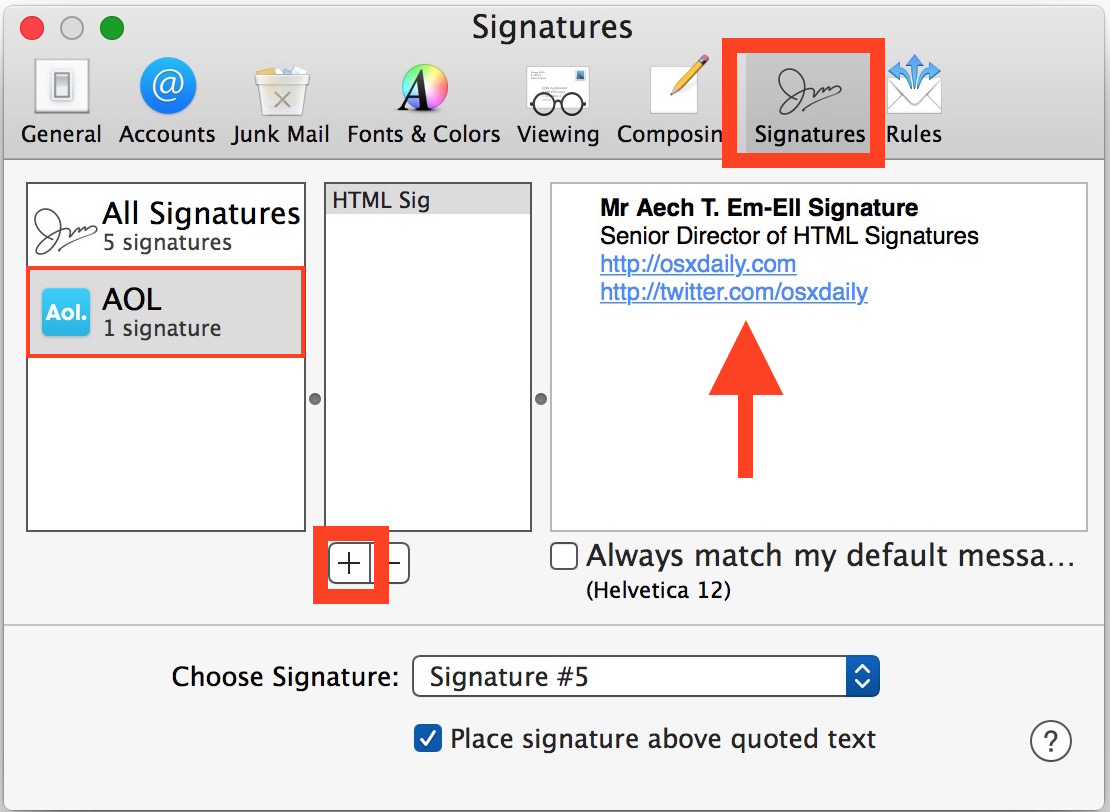

The chosen HTML signature will now appear in every new email message that is created or replied to from that Mac, unless specified otherwise.
If you create multiple signatures, you’ll find them available to access and use independently through the “Signature” dropdown menu alongside the Subject field of a mail message.
You can create as many signatures as you want, and you can also create different signatures for different email accounts, the latter of which is particularly good idea if you have multiple email accounts set up on a Mac and you want to keep a personal signature separate from a work signature, for example. Some desktop users also may find the brevity signatures pretending to be an iPhone to be useful, particularly if you’re wrangling many emails on a regular basis (and aren’t we all?).
By the way, now that you’ve created an HTML signature in the Mac Mail app, you can easily transfer and set the HTML signature on the iPhone or iPad too by simply emailing yourself, copying the signature, and pasting it into the appropriate Mail Signature preference section. Do note that setting custom signatures on the iPhone and iPad will replace the default “Sent from my iPhone” signature that appears on emails sent from your mobile device, unless you specifically add that to the signature itself.