- Border Radius on an Outline in CSS
- Top comments (0)
- Read next
- 🔥🤯 Amazing Food Order hero section using HTML, CSS and JS.
- Using Mixins with SCSS to Create Breakpoints
- A Beginner’s Guide to Building Web Applications with AWS Amplify
- Validating Base64 Images by Size in Laravel: A How-to Guide
- Trending on DEV Community Hot
- outline
- Try it
- Constituent properties
- Syntax
- Values
- Description
- Accessibility concerns
- Formal definition
- Все о свойстве border
- Основы
- Border-Radius
- Несколько границ
- Изменение углов
- CSS фигуры
- Создание Speech Bubble
- Итог
Border Radius on an Outline in CSS
Yesterday I was fiddling with my blog, adding a button to copy code blocks to the clipboard. While I was doing that I figured I’d also add a border to both proper code blocks and to inline code blocks. Something to make them stand out a little more. Initially I considered using an outline , rather than border . So that it didn’t take up pixels as the site uses box-sizing: border-box . However, I discovered that outline doesn’t really allow you to set a radius. There was no outline-radius like there is border-radius . After a bit of searching I came across this post, which has some solutions and workarounds. Someone noted that there was a Firefox only option: -moz-outline-radius . A later answer noted that as of April 2021 in Firefox you could use border-radius but it was the only browser that supported it. So I dutifully tried it out, and yes it did work. But then I noticed that it was also working in Safari Technology Preview Release 163 & Chrome 110! Unfortunately Safari 16.3 (Desktop) doesn’t support it. One possible bug I noticed while experimenting was that Safari TP would ignore the outline style dashed if border-radius was set. Safari TP would instead make the outline solid. Codepen with example: See the Pen Untitled by Robert McGovern (@tarasis) on CodePen. The results, as you can see below, are rather different between Safari TP v163, Chrome 110.0.5481.100, and Firefox Developer Edition 111.0b3 (64-bit) Safari TP v163 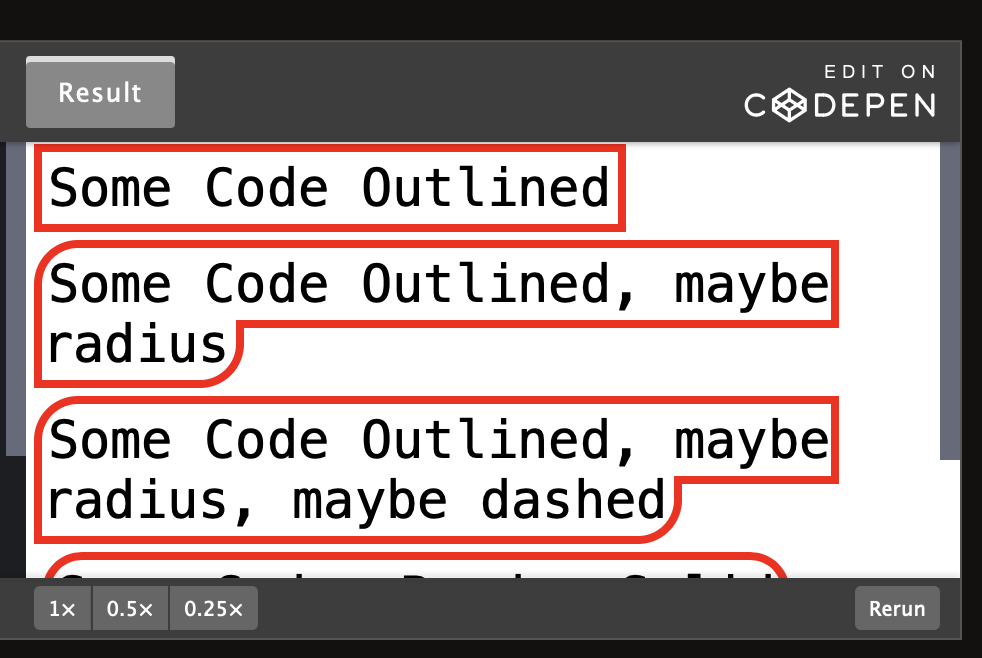 Chrome 110.0.5481
 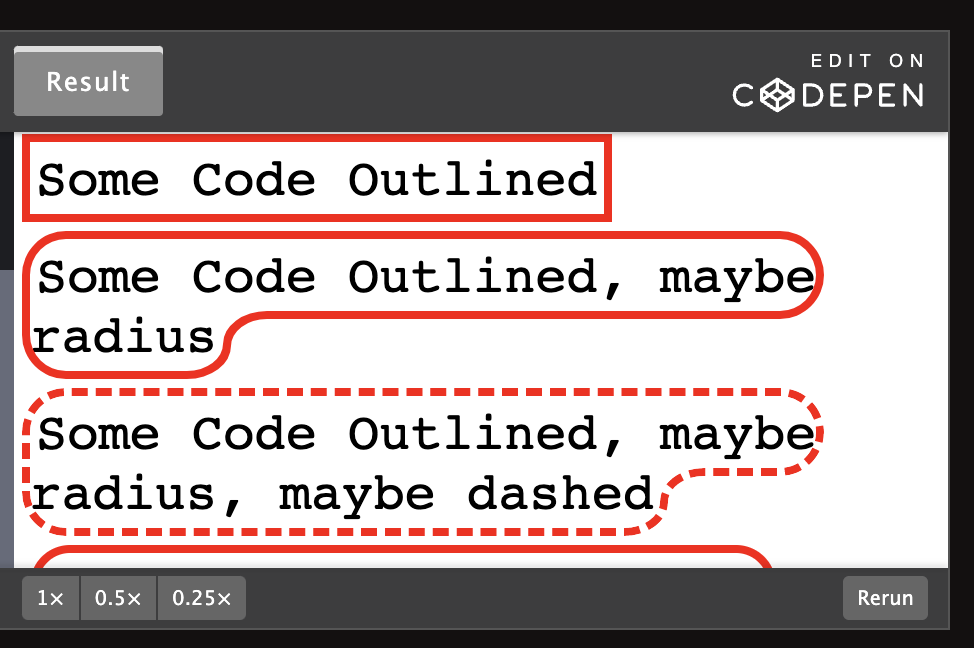 Firefox Developer Edition 111.0b3
 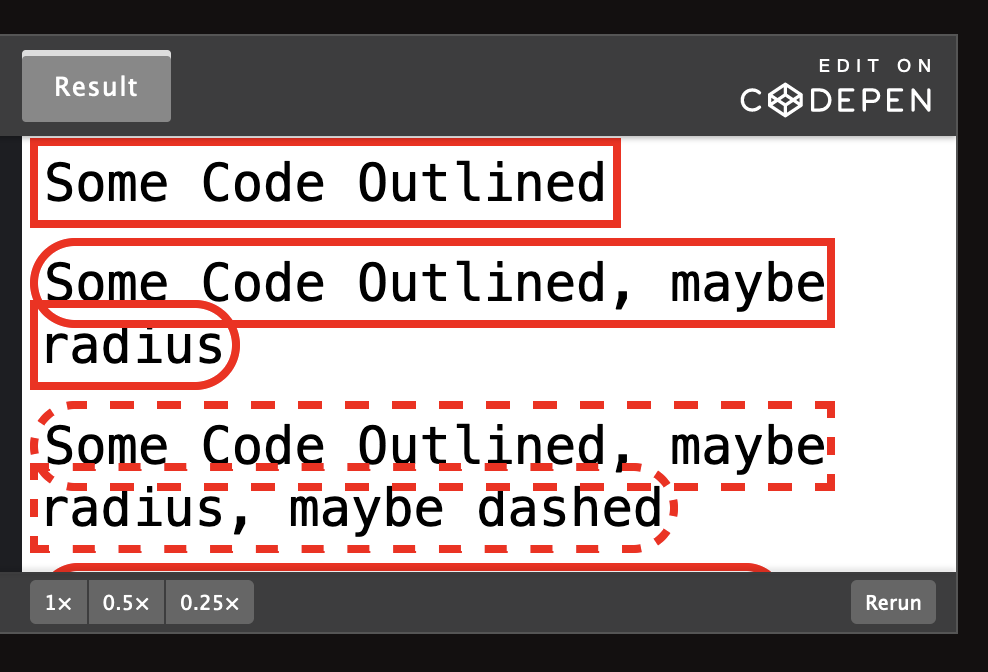 Aside, this is my first dev.to post / crosspost with my blog. Be gentle 🙂
Top comments (0)
Read next
🔥🤯 Amazing Food Order hero section using HTML, CSS and JS.
Using Mixins with SCSS to Create Breakpoints
A Beginner’s Guide to Building Web Applications with AWS Amplify
Validating Base64 Images by Size in Laravel: A How-to Guide
Former programmer & stay at home dad. Currently fiddling with Swift & Objective-C and learning HTML/CSS/JavaScript.
Trending on DEV Community Hot


Once suspended, tarasis will not be able to comment or publish posts until their suspension is removed.
Once unsuspended, tarasis will be able to comment and publish posts again.
Once unpublished, all posts by tarasis will become hidden and only accessible to themselves.
If tarasis is not suspended, they can still re-publish their posts from their dashboard.
Once unpublished, this post will become invisible to the public and only accessible to Robert McGovern.
They can still re-publish the post if they are not suspended.
Thanks for keeping DEV Community safe. Here is what you can do to flag tarasis:
tarasis consistently posts content that violates DEV Community’s code of conduct because it is harassing, offensive or spammy.
Unflagging tarasis will restore default visibility to their posts.
DEV Community — A constructive and inclusive social network for software developers. With you every step of your journey.
Built on Forem — the open source software that powers DEV and other inclusive communities.
Made with love and Ruby on Rails. DEV Community © 2016 — 2023.
We’re a place where coders share, stay up-to-date and grow their careers.
outline
The outline CSS shorthand property sets most of the outline properties in a single declaration.
Try it
Constituent properties
This property is a shorthand for the following CSS properties:
Syntax
/* style */ outline: solid; /* color | style */ outline: #f66 dashed; /* style | width */ outline: inset thick; /* color | style | width */ outline: green solid 3px; /* Global values */ outline: inherit; outline: initial; outline: revert; outline: revert-layer; outline: unset;
The outline property may be specified using one, two, or three of the values listed below. The order of the values does not matter. As with all shorthand properties, any omitted sub-values will be set to their initial value.
Note: The outline will be invisible for many elements if its style is not defined. This is because the style defaults to none . A notable exception is input elements, which are given default styling by browsers.
Values
Sets the color of the outline. Defaults to invert for browsers supporting it, currentcolor for the others. See outline-color .
Sets the style of the outline. Defaults to none if absent. See outline-style .
Sets the thickness of the outline. Defaults to medium if absent. See outline-width .
Description
Outline is a line outside of the element’s border. Unlike other areas of the box, outlines don’t take up space, so they don’t affect the layout of the document in any way.
There are a few properties that affect an outline’s appearance. It is possible to change the style, color, and width using the outline property, the distance from the border using the outline-offset property, and corner angles using the border-radius property.
An outline is not required to be rectangular: While dealing with multiline text, some browsers will draw an outline for each line box separately, while others will wrap the whole text with a single outline.
Accessibility concerns
Assigning outline a value of 0 or none will remove the browser’s default focus style. If an element can be interacted with it must have a visible focus indicator. Provide obvious focus styling if the default focus style is removed.
Formal definition
- outline-color : invert , for browsers supporting it, currentColor for the other
- outline-style : none
- outline-width : medium
- outline-color : For the keyword invert , the computed value is invert . For the color value, if the value is translucent, the computed value will be the rgba() corresponding one. If it isn’t, it will be the rgb() corresponding one. The transparent keyword maps to rgba(0,0,0,0) .
- outline-width : an absolute length; if the keyword none is specified, the computed value is 0
- outline-style : as specified
- outline-color : a color
- outline-width : a length
- outline-style : by computed value type
Все о свойстве border
Все знакомы с css параметром border, но есть ли вещи, которые мы не знаем о нем?
Основы
border-width: thick; border-style: solid; border-color: black;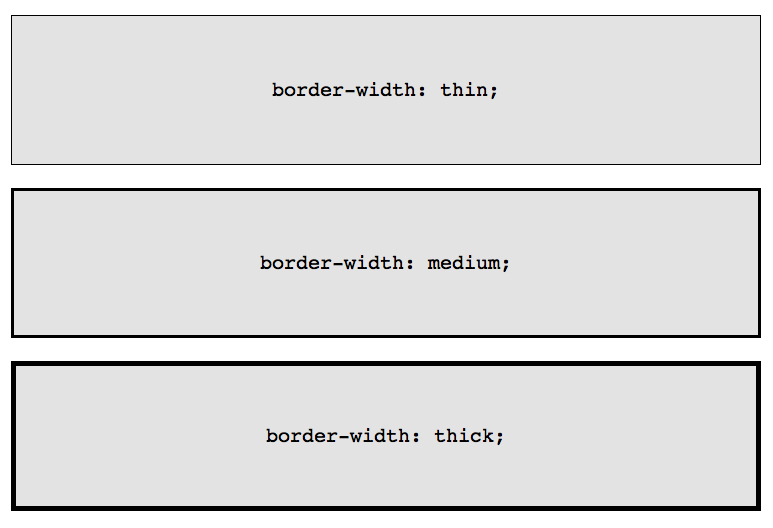
Например у параметра border-width есть три параметра: thin, medium, thick:
Если необходимо менять цвет границы при наведении на объект:
Border-Radius
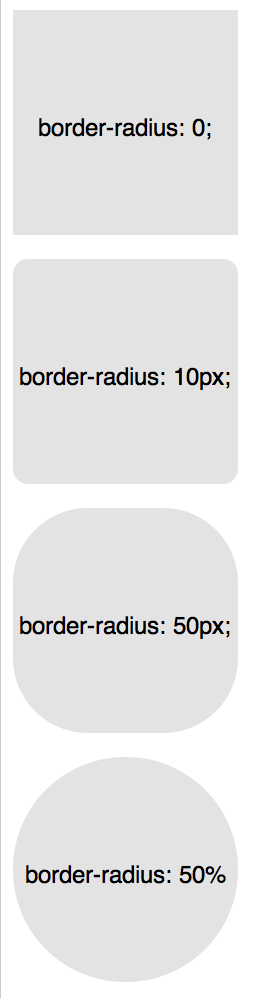
border-radius — это новый параметр CSS3 для отображения закругленных углов, который корректно работает во всех современных браузерах, за исключением Internet Explorer 8 (и более старых версий).
Для каждого угла можно назначить свое закругление:
border-top-left-radius: 20px; border-top-right-radius: 0; border-bottom-right-radius: 30px; border-bottom-left-radius: 0;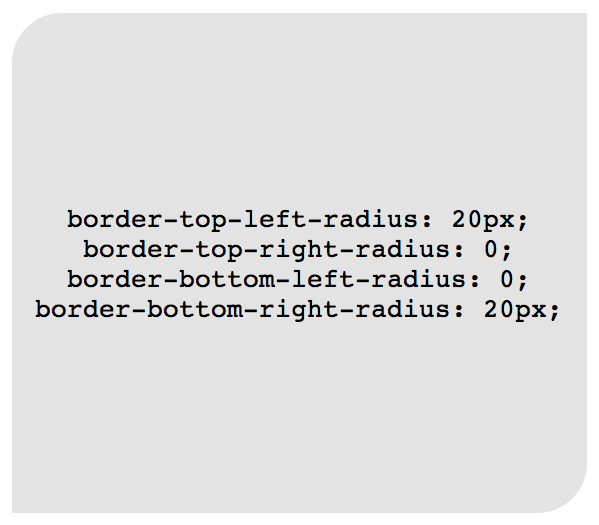
В приведенном примере необязательно назначать «0» border-top-right-radius и border-bottom-left-radius, если они не наследуют значения, которые должны быть изменены.
Всю конструкцию можно сжать в одну строку:
/* top left, top right, bottom right, bottom left */ border-radius: 20px 0 30px 0;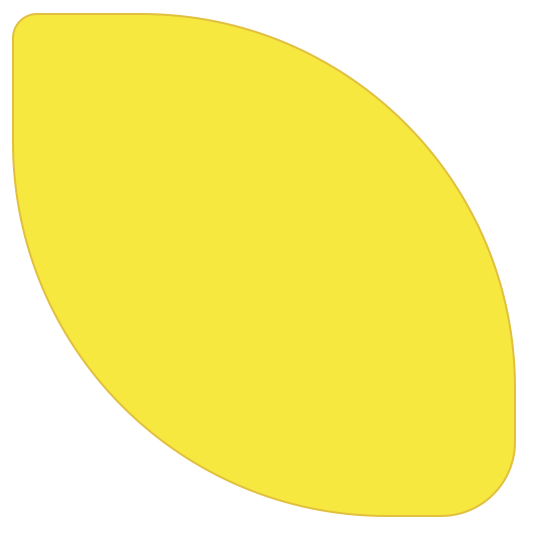
Здесь описаны самые простые и популярные примеры применения параметра border. Перейдем к более сложным.
Несколько границ
Border-Style
solid, dashed, and dotted — самые популярные значения параметра border-style, но давайте рассмотрим другие, например, groove and ridge.
border: 20px groove #e3e3e3;border-color: #e3e3e3; border-width: 20px; border-style: groove;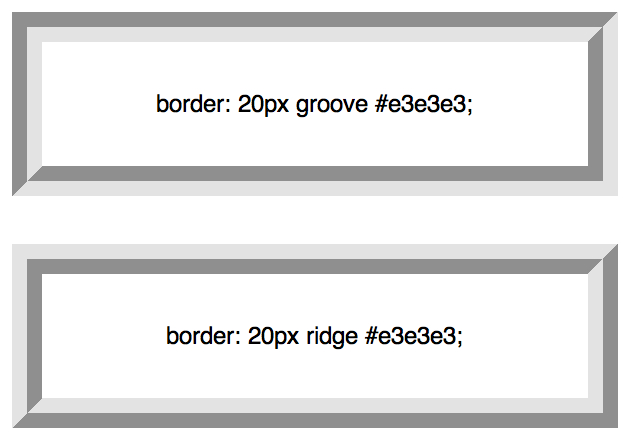
Outline

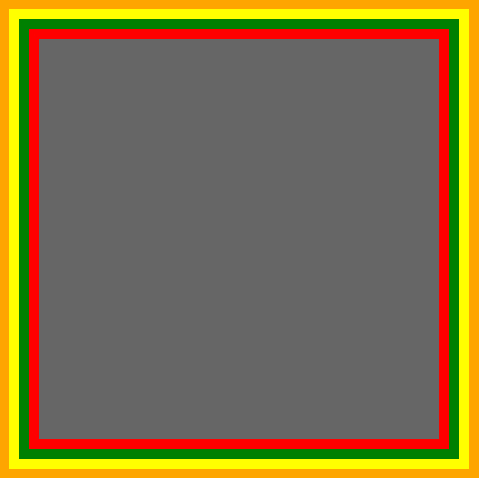
Этот способ отлично работает, но ограничен созданием двойной рамки. Если вам необходимо отобразить несколько границ элемента, то необходимо использовать другую технику.
Псевдоэлементы
.box < width: 200px; height: 200px; background: #e3e3e3; position: relative; border: 10px solid green; >/* Create two boxes with the same width of the container */ .box:after, .box:before < content: ''; position: absolute; top: 0; left: 0; bottom: 0; right: 0; >.box:after < border: 5px solid red; outline: 5px solid yellow; >.box:before

Возможно это не самое элегантное решение, однако оно работает
Box-Shadow
Изменение углов
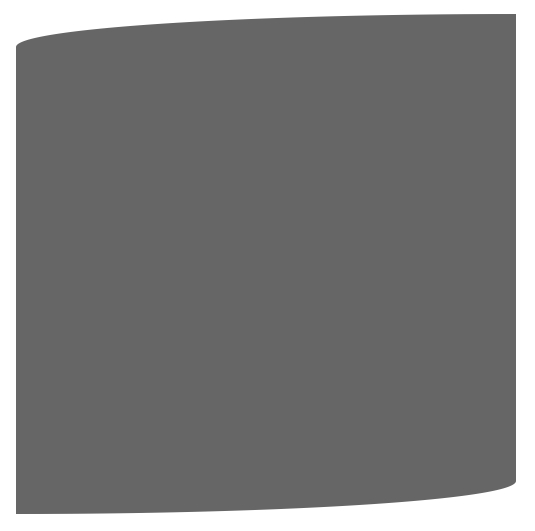
border-radius: 50px / 100px; /* horizontal radius, vertical radius */border-top-left-radius: 50px 100px; border-top-right-radius: 50px 100px; border-bottom-right-radius: 50px 100px; border-bottom-left-radius: 50px 100px;Эта техничка бывает полезна, если необходимо имитировать искривление, а не закругление. Например, так можно получить эффект скрученной бумаги:
CSS фигуры
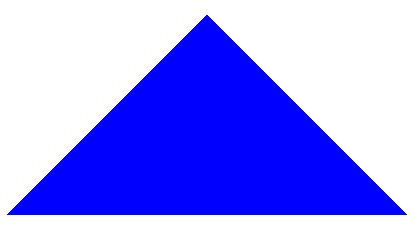
Наиболее частым примером использования CSS фигур является отображение стрелок. Чтобы понять, как это работает, необходимо разобраться с использованием отдельного border-color для каждой стороны и установкой значения «0» для width и height:
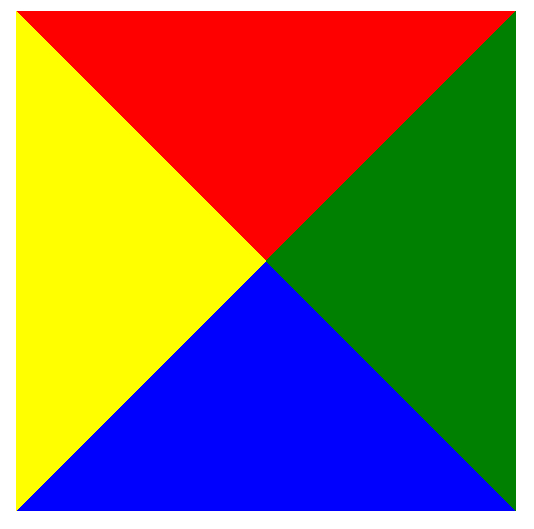
А теперь оставляем только синий треугольник:
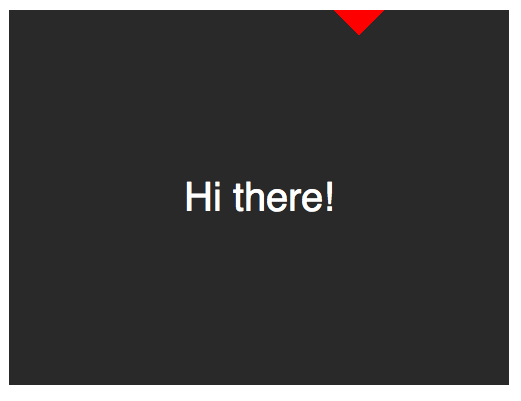
Создание Speech Bubble
Теперь нужно расположить стрелку-треугольник в нужном месте. Вот наш цветной квадратик:
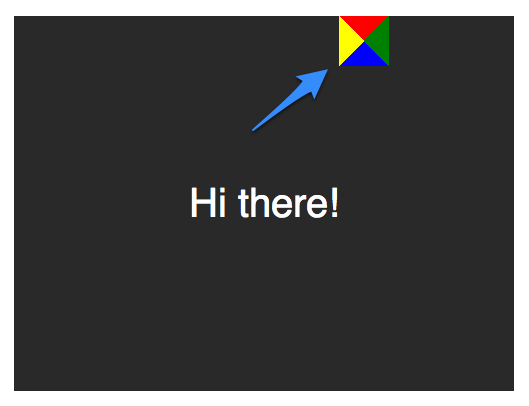
Оставляем только четверть квадратика:
Теперь перемещаем ниже и закрашиваем:
.speech-bubble < /* … other styles */ border-radius: 10px; >.speech-bubble:after < content: ''; position: absolute; width: 0; height: 0; border: 15px solid; border-top-color: #292929; top: 100%; left: 50%; margin-left: -15px; /* adjust for border width */ >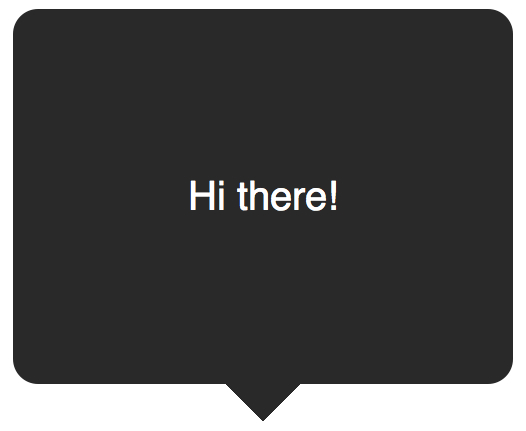
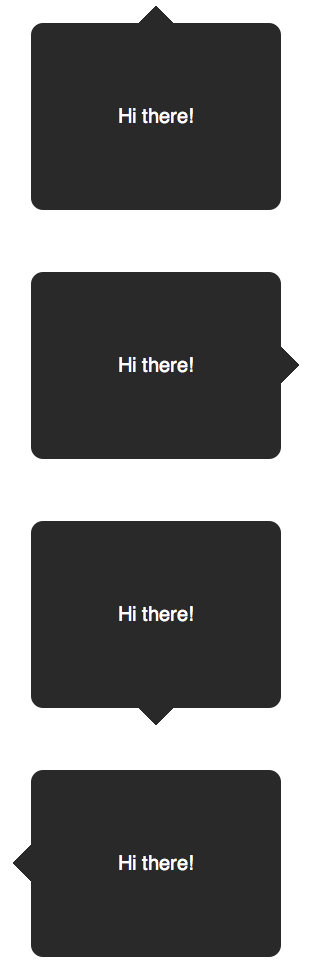
Примеры применения:
/* Speech Bubbles Usage: Apply a class of .speech-bubble and .speech-bubble-DIRECTIONHi there*/ .speech-bubble < position: relative; background-color: #292929; width: 200px; height: 150px; line-height: 150px; /* vertically center */ color: white; text-align: center; border-radius: 10px; font-family: sans-serif; >.speech-bubble:after < content: ''; position: absolute; width: 0; height: 0; border: 15px solid; >/* Position the Arrow */ .speech-bubble-top:after < border-bottom-color: #292929; left: 50%; bottom: 100%; margin-left: -15px; >.speech-bubble-right:after < border-left-color: #292929; left: 100%; top: 50%; margin-top: -15px; >.speech-bubble-bottom:after < border-top-color: #292929; top: 100%; left: 50%; margin-left: -15px; >.speech-bubble-left:after
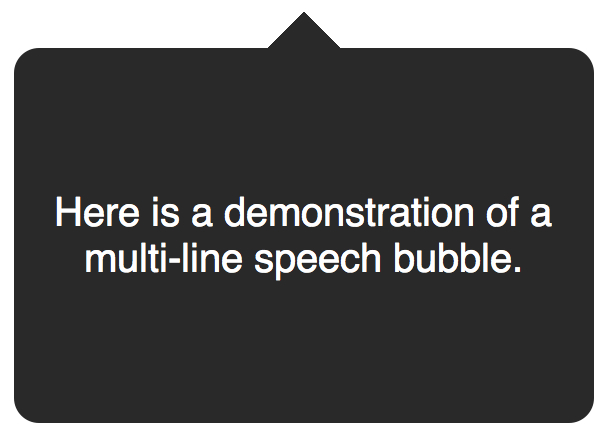
Вертикальное центрирование текста
минус использования line-height при вертикальном центрировании в ограничении текста одной строкой. Для решения этой проблемы, можно применить display: table к нашему Speech Bubble и display: table-cell к тексту:
.speech-bubble < /* other styles */ display: table; >.speech-bubble p
Еще один пример нестандартного использования границ:
Итог
Использование параметра border не ограничивается одним лишь «1px solid black», с помощью границ можно создавать различные фигуры, причем достаточно один раз написать CSS-класс и применять его к множеству элементов на странице.