- CSS Gradients
- CSS Linear Gradients
- Syntax
- Example
- Example
- Example
- Using Angles
- Syntax
- Example
- Using Multiple Color Stops
- Example
- Example
- Using Transparency
- Example
- Repeating a linear-gradient
- Example
- Градиент поверх фоновой картинки в CSS
- Первый вариант
- Второй вариант
- Демонстрация.
- Photoshop или CSS?
- HTML разметка
- The Forest
- where nature and people
- CSS код
- Градиент поверх картинки
- Позиционирование текста
- Примеры градиентов
- Комментарии ( 0 ):
- How to Add Both a Background Image and CSS3 Gradient to the Same Element
- Solutions with CSS properties
- Example of using several backgrounds on the same element:
- Result
- Example of combining a background-image and gradient on the same element with several background images:
- Example of displaying the image above the gradient:
- Example of combining a background image and gradient with the background property:
- Example of combining the background image and gradient:
CSS Gradients
CSS gradients let you display smooth transitions between two or more specified colors.
CSS defines three types of gradients:
- Linear Gradients (goes down/up/left/right/diagonally)
- Radial Gradients (defined by their center)
- Conic Gradients (rotated around a center point)
CSS Linear Gradients
To create a linear gradient you must define at least two color stops. Color stops are the colors you want to render smooth transitions among. You can also set a starting point and a direction (or an angle) along with the gradient effect.
Syntax
Direction — Top to Bottom (this is default)
The following example shows a linear gradient that starts at the top. It starts red, transitioning to yellow:
Example
Direction — Left to Right
The following example shows a linear gradient that starts from the left. It starts red, transitioning to yellow:
Example
Direction — Diagonal
You can make a gradient diagonally by specifying both the horizontal and vertical starting positions.
The following example shows a linear gradient that starts at top left (and goes to bottom right). It starts red, transitioning to yellow:
Example
Using Angles
If you want more control over the direction of the gradient, you can define an angle, instead of the predefined directions (to bottom, to top, to right, to left, to bottom right, etc.). A value of 0deg is equivalent to «to top». A value of 90deg is equivalent to «to right». A value of 180deg is equivalent to «to bottom».
Syntax
The following example shows how to use angles on linear gradients:
Example
Using Multiple Color Stops
The following example shows a linear gradient (from top to bottom) with multiple color stops:
Example
The following example shows how to create a linear gradient (from left to right) with the color of the rainbow and some text:
Example
Using Transparency
CSS gradients also support transparency, which can be used to create fading effects.
To add transparency, we use the rgba() function to define the color stops. The last parameter in the rgba() function can be a value from 0 to 1, and it defines the transparency of the color: 0 indicates full transparency, 1 indicates full color (no transparency).
The following example shows a linear gradient that starts from the left. It starts fully transparent, transitioning to full color red:
Example
Repeating a linear-gradient
The repeating-linear-gradient() function is used to repeat linear gradients:
Example
A repeating linear gradient:
Градиент поверх фоновой картинки в CSS

На этом уроке мы не просто познакомимся с градиентами, но и узнаем, как их можно применять на практике. Вариантов применения градиентов в веб-дизайне, несчетное количество, но нас не интересует все и сразу. Будем двигаться постепенно и начнем мы с популярного дизайнерского приёма – это наложения градиента поверх большой фоновой картинки, используя CSS стили.
Сейчас вы наверное задумались, а зачем вообще что-то накладывать на картинку и почему в CSS, если есть Photoshop?
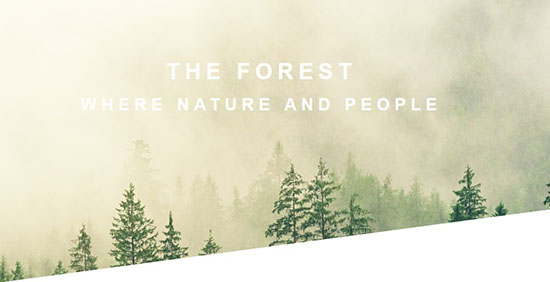
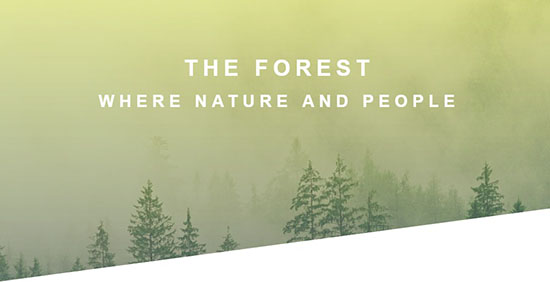
На первую половину вопроса я отвечу, демонстрируя два изображения. На первом нет наложения градиента, а на втором – используется градиент. Что смотрится интереснее по дизайну?
Первый вариант
Второй вариант
Ответ очевиден. В первом варианте, из-за более широкой палитры цветов, тяжелее читается текст, да и зрительное восприятие неправильно расставляет акценты. Мы смотрим на верхушки деревьев, но вряд ли это главный посыл дизайнера.
Во втором варианте градиенты используются и в качестве тонирующего слоя, убираются резкие цветовые переходы, задний фон никак не отвлекает от текста.
Демонстрация.
Photoshop или CSS?
Ответ будет разный, смотря, о ком мы говорим? Дизайнер рисует свой макет в Photoshop, вынося градиенты на отдельный слой. Верстальщик, анализируя макет, должен решить – объединять ли слой картинки с градиентом и сохранить их в одном jpg/png/gif файле или градиенты верстать на CSS?
Здесь нет чёткого правила, но одно мы знаем точно, что если по замыслу дизайнера, предполагается делать анимированный фон, то без CSS/JS уже не обойтись. И конечно не надо забывать, что картинка с градиентом будет больше весить, поэтому если градиент простой, то лучше написать его кодом.
Переходим к написанию кода примера и как всегда начинаем с разметки.
HTML разметка
Тег header будет служить контейнером для фоновой картинки, а тег div с классом header_box – контейнером для двух заголовков.
The Forest
where nature and people
CSS код
В теге header опишем все свойства сразу для двух заголовков, поскольку стилизуем мы их одинаково и сознательно помещаем одну фразу в заголовки разных уровней. Здесь мы решаем вопрос переноса строки и вторая часть фразы меньше в размерах, так как находиться в теге h2. Разбивание одной фразы – это хороший дизайнерский приём, опять же делает фразу более значимой.
header font-family: sans-serif;
font-weight: 400;
font-size: 16px;
line-height: 1.7;
color: #fff;
text-transform: uppercase;
letter-spacing: 7px;
>
Кроме стилизации текста, в теге header лежит наш градиент вместе с фоновой картинкой. Свойство cover растягивает картинку на всю ширину и высоту хедера.
Градиент поверх картинки
Для справки: Градиенты бывают линейные и радиальные, линейный тянется по прямой линии, от одного цвета к другому, как правило их используют для заполнения фигур с углами (прямоугольники, квадраты). Радиальный градиент тянется из центра окружности к краям и он хорошо подходит округлым фигурам (круг, овал), на сайтах это обычно кнопки.
Итак, у нас линейный градиент (linear-gradient), тянущийся снизу вверх (to top), от светлого-зеленого оттенка к темно-зеленому (rgba и цифры).
background-image: linear-gradient (to top, rgba (89,106,114, 0.6), rgba (206,220,23, 0.4)), url (fog.jpg);
Последние две цифры – 0.6/0.4 регулируют степень прозрачности градиента, без этих цифр, мы вообще не увидели бы картинки, а один сплошной градиент.
Градиент по высоте заполняет первый экран на 95 процентов, просто так лучше смотрится скошенная линия снизу.
Это не фотошоп, в реальности фотография целиковая, это мы виртуально её подрезали с помощью свойства clip-path. Пара цифр обозначает координаты X и Y, по которым строится кривая, маскирующая все лишнее. Данное свойство не поддерживается IE и Edge.
clip-path: polygon(0 0, 100% 0, 100% 70%, 0 100%);
Позиционирование текста
Для текста мы создали специальный блок, с позиционировали его относительно окна браузера ровно посередине.
.header_box position: absolute;
top: 35%;
left: 50%;
transform: translate(-50%, -50%);
text-align: center;
>
Примеры градиентов
Оттуда можно скопировать код цвета и вставить в Photoshop или сразу в ваш CSS код.

![]()
Создано 12.09.2018 10:45:08
Копирование материалов разрешается только с указанием автора (Михаил Русаков) и индексируемой прямой ссылкой на сайт (http://myrusakov.ru)!
Добавляйтесь ко мне в друзья ВКонтакте: http://vk.com/myrusakov.
Если Вы хотите дать оценку мне и моей работе, то напишите её в моей группе: http://vk.com/rusakovmy.
Если Вы не хотите пропустить новые материалы на сайте,
то Вы можете подписаться на обновления: Подписаться на обновления
Если у Вас остались какие-либо вопросы, либо у Вас есть желание высказаться по поводу этой статьи, то Вы можете оставить свой комментарий внизу страницы.
Порекомендуйте эту статью друзьям:
Если Вам понравился сайт, то разместите ссылку на него (у себя на сайте, на форуме, в контакте):
- Кнопка:
Она выглядит вот так: - Текстовая ссылка:
Она выглядит вот так: Как создать свой сайт - BB-код ссылки для форумов (например, можете поставить её в подписи):
Комментарии ( 0 ):
Для добавления комментариев надо войти в систему.
Если Вы ещё не зарегистрированы на сайте, то сначала зарегистрируйтесь.
Copyright © 2010-2023 Русаков Михаил Юрьевич. Все права защищены.
How to Add Both a Background Image and CSS3 Gradient to the Same Element
CSS gradients are used for styling elements. They display smooth transitions between two or more defined colors. But have you ever tried to combine a CSS3 gradient and background image on the same element? If no, then this snippet is for you.
Solutions with CSS properties
You can combine a background-image and CSS3 gradient on the same element by using several backgrounds.
In our example below, we set the height and width of our and add a background. Then, we set the background image fallback using the “url” value of the background-image property. Finally, we set a background image and gradient for browsers that can deal with them. Also, set the background-size to «100%».
Example of using several backgrounds on the same element:
html> html> head> title>Title of the document title> style> div < height: 150px; width: 150px; background: lightgreen; background-image: url("/build/images/emojin-01.svg");/* fallback */ background-image: url("/build/images/emojin-01.svg"), linear-gradient(lightgreen, lightblue); background-size: 100%; > style> head> body> div> div> body> html>Result
You can get a similar result by setting multiple background images. The first defined background image will be on the top, and the last defined one will be on the bottom.
In the following example, we use the «inline-block» value of the display property for our and set its background and background-size . Then, we add background images.
Example of combining a background-image and gradient on the same element with several background images:
html> html> head> title>Title of the document title> style> span < display: inline-block; height: 150px; width: 150px; background: #eb01a5; background-size: contain; background-image: url("/build/images/emojin-01.svg"), linear-gradient(pink, purple); background-image: url("/build/images/emojin-01.svg"), -webkit-gradient(linear, left top, left bottom, from(pink), to(purple)); background-image: url("/build/images/emojin-01.svg"), -moz-linear-gradient(top, pink, purple); > style> head> body> span> span> body> html>If you want the image to be displayed above the gradient, put the URL before the gradient.
Example of displaying the image above the gradient:
html> html> head> title>Title of the document title> style> .background-gradient < background: url('/build/images/logo-color-w3.png') no-repeat, -moz-linear-gradient(135deg, #6ec575 0, #3b8686 100%); background: url('/build/images/logo-color-w3.png') no-repeat, -webkit-gradient(135deg, #6ec575 0, #3b8686 100%); background: url('/build/images/logo-color-w3.png') no-repeat, -webkit-linear-gradient(135deg, #6ec575 0, #3b8686 100%); background: url('/build/images/logo-color-w3.png') no-repeat, -o-linear-gradient(135deg, #6ec575 0, #3b8686 100%); background: url('/build/images/logo-color-w3.png') no-repeat, -ms-linear-gradient(135deg, #6ec575 0, #3b8686 100%); background: url('/build/images/logo-color-w3.png') no-repeat, linear-gradient(135deg, #6ec575 0, #3b8686 100%); height: 500px; width: 500px; background-position: center; > style> head> body> div class="background-gradient"> div> body> html>In the next example, we set the width and height of the and specify both the background-image and gradient through the background property.
Example of combining a background image and gradient with the background property:
html> html> head> title>Title of the document title> style> div < width: 100%; height: 100px; background: url("/build/images/logo-color-w3.png") no-repeat left top, linear-gradient(#F7CFB6, #F08E86); > style> head> body> div> div> body> html>In our last example, we combine the background image and gradient in the same way but use the «center» value. Also, we set the background-size to its «contain» value.
Example of combining the background image and gradient:
html> html> head> title>Title of the document title> style> div < width: 100%; height: 100px; background: url("/build/images/emojin-01.svg") no-repeat center, linear-gradient(135deg, lightgreen 0, lightblue 100%); background-size: contain; > style> head> body> div> div> body> html>