- Comment Box in HTML & CSS Code
- Comment Box HTML Code
- The CSS Styles
- The JavaScript for Displaying Comments
- What’s an “Action Page”?
- Add Comments the Easy Way
- Конструируем форму для комментариев
- Шаг первый: ревизия полей
- Шаг второй: контролы
- Шаг третий: Web 2.0
- Шаг четвертый: визуальный редактор
- Шаг пятый: контекст или как сделать форму легче
- Постскриптум: что еще можно доработать
- How to create a simple comment box on a web page using HTML, CSS, and JavaScript
- HTML
- CSS
- JavaScript
- Conclusion
- About the author
- Shehroz Azam
Comment Box in HTML & CSS Code
This tutorial explains how to create a simple comment box input in HTML, CSS, and JavaScript. Basically, it is a frontend functionality (that can be handled in both jQuery and Vue JS) to quickly append a comment to the webpage. Further, it can be submitted to the server through JSON to publish a comment in real-time.
You can use this simple project for appending strings to the page in comment forms, to-do lists, or feedback forms in HTML. Similarly, you can use this technique in any web project to quickly append the text to the page. Before starting with coding I would suggest checking the demo page to check the comment form in action.
This comment form only appends the comment text to a specific div element without actually publishing it on the page. So, the entered text will be lost after refreshing the page. You have to submit (and store) the comment to the server for permanent.
Comment Box HTML Code
In HTML, create a section with an id «app» and place a textarea (for comment input) and p element for comment output.
The CSS Styles
After creating the HTML structure, now it’s time to style it using CSS. So, target the very first element «container» class and define its max-width of 640px. Similarly, define the background, margin, and padding properties as follows:
Now, target the «comment» class and display it as a block element. Likewise, specify min-height, border, and padding properties for commentClicked the class ad described below:
You can style the textarea/comment box according to your needs. Anyhow, the basic styles of the comment input are given below:
The «primaryContained» class defined the style for the comment submit button. Specify its background color, padding, box-shadow, and border-radius property as follows. You can set the custom color and font-size in order to customize it.
Target the button class with a hover pseudo-selector in order to define the hover styles. There you can set a different background color that will show on the hover event. You can also set the 3D button hover effect if you want to make a mindblowing hover effect for your comment form.
button.primaryContained:hover
The JavaScript for Displaying Comments
You can handle the comment string in both jQuery and Vue JS to submit and append the comment. So, load the jQuery and Vue JavaScript libraries by adding the following CDN link to your HTML page.
Finally, initialize the comment append function in the jQuery document ready function and done.
$(document).ready(function()< $(".primaryContained").on('click', function()< $(".comment").addClass("commentClicked"); >);//end click $("textarea").on('keyup.enter', function()< $(".comment").addClass("commentClicked"); >);//end keyup >);//End Function new Vue(< el: "#app", data:< title: 'Add a comment', newItem: '', item: [], >, methods: < addItem ()< this.item.push(this.newItem); this.newItem = ""; >> >); Note: The example provided above about creating an HMTL comment box is required an action page to process the content of the comment box when the user clicks on submit button.
What’s an “Action Page”?
An “action page” in web development is a web page that processes the data submitted by the user through a form. In the context of the content you provided earlier, an action page would be the page that receives and processes the contents of the comment box after the user clicks the “Submit” button.
Typically, an action page would contain a server-side script, such as PHP or Python, that processes the form data and performs some action with it, such as saving it to a database or sending it in an email.
Add Comments the Easy Way
There are free scripts available online that can help you create an action page to process the contents of a comment box submitted by users on your website. However, creating an action page can be complex, so using a pre-made script can be a simpler solution.
One such solution is HTMLCommentBox.com, which provides an easy way to add a comments section to your website by copying and pasting code. However, to moderate comments, you’ll need to log in using a Google account.
The advantage of using a pre-made script like this is that it’s free and easy to use. But keep in mind that you may have less control over how the script handles user comments. You can customize the comments section to some extent, but the level of control may be limited.
Ultimately, the decision to create your own script or use a pre-made one is up to you. There are also other pre-made guestbook scripts available online that you could consider, such as those from Matt’s Script Archive or JsWidget.com.
That’s all! I hope you have successfully created a simple comment box using HTML, CSS, and JS. If you have any questions or suggestions, let me know by commenting below.
Muhammad Asif
Muhammad Asif is a Front End Developer and Editor Staff at Codeconvey.com. He enjoys experimenting with new CSS features and helping others learn about them.
Конструируем форму для комментариев
Хотелось бы изложить свое мнение по поводу темы затронутой в топике «Идеальное комментирование» (автор dezmaster). У меня появились свои идеи, как сделать более удобной эту форму регистрации:
Я, разумеется, не претендую на идеал, но сотни заполненных подобных форм позволяют мне высказать несколько мыслей.
Для начала предлагаю четче поставить задачу: необходимо сделать простую в использовании форму анонимного комментирования для сайта общего назначения. Под анонимностью я подразумеваю, что пользователь не зарегистрирован на этом сайте.
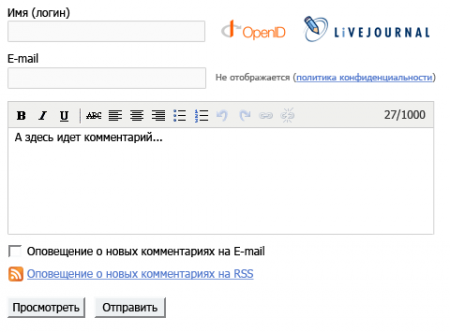
Шаг первый: ревизия полей
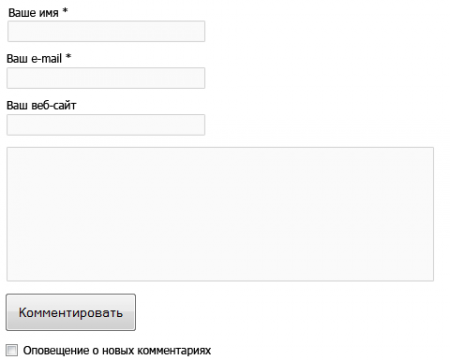
Проведем ревизию полей для заполнения и их необходимсть. Первое поле «Имя», не является обязательным. У некоторых сайтов анонимные комментарии вообще являются частью культуры. Убираем звездочку и подправляем метку (это понадобиться в дальнейшем). Аналогично поступаем с полем «E-mail». Поле «Веб-сайт» не является критически важным, во-первых, не у всех есть сайты и даже блоги, а, во-вторых, сайт автора не редко относиться к теме комментария, в противном случае его можно указать в теле комментария. Удаляем это поле.
Переставлять поля ввода местами не стоит, ведь на всех остальных сайтах они идут в таком же порядке.
Шаг второй: контролы
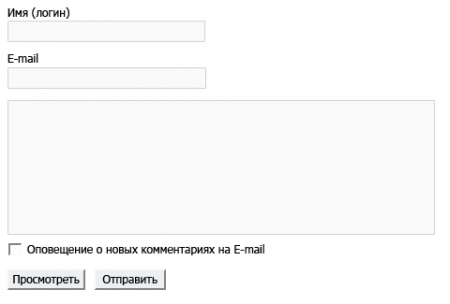
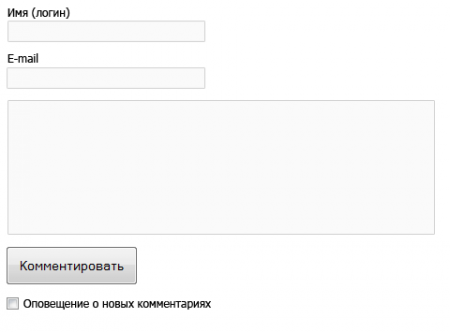
Делаем контролы стандартными, даже если они в результате «хуже смотрятся», но пользователь к ним привык. Я вставил контролы моего браузера и ОС. Также необходимо вставить кнопку «Просмотреть», и сменить название у кнопки «Комментировать» на стандартное в данном случае «Отправить», хотя второй момент немного спорный.
Опять теперь расположим кнопки в самом низу формы, как это обычно бывает. Для этого поднимем чекбокс над ними и сделаем более ясную метку.
Шаг третий: Web 2.0
Веб-два-ноль уже на дворе, так что и мы не останемся в стороне. Сделаем поддержку для логина через OpenID и ЖЖ. Первый вариант — просто разместить соответсвующие логотипы (с поясняющим тултипом) справа от поля для логина и спрашивать пароль при вводе соответствующего логина (например, abcdef@livejournal.com). Пароль придется справшивать через JS, чтобы не создавать поле ввода пароля, ненужное для тех, кто не пользуется OpenID.
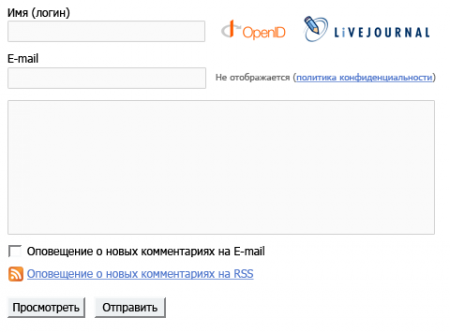
Также надо добавить пояснения к полю ввода адреса электронной почты, чтобы пользователь не боялся ее оставлять. И дополнительно добавим ссылку на RSS с комментариями.
Шаг четвертый: визуальный редактор
Не все знают HTML, но многие хотят создавать комментарии с ссылками, картинками и элементами форматирования. Нужно ли позволять делать это анонимным посетителям вопрос, конечно, спорный, и какие элементы форматирования разрешать должен решать владелец сайта (и не забываем про XSS!).
Я вставил обычный визуальный редактор Tiny MCE и добавил к нему счетчик символов.
Шаг пятый: контекст или как сделать форму легче

Форма у нас получилась немного тяжеловатая. Этот пункт шаг — для тех, кто так считает. Форма у нас не сама по себе, а находиться на сайте. Поэтому мы можем убрать ссылку на RSS, и добавить ленту с комментариями в саму страницу. Также можно заменить логотоипы OpenID и ЖЖ на текст, как итог форма полегчала.
Постскриптум: что еще можно доработать
- каптча — поскольку форма для «анонимусов»
заголовок формы
ввод пароля для OpenID в этой же форме
растягивающееся поле ввода
большее по размеру поле ввода (вы знаете почему в супермаркетах такие большие тележки? 🙂 )
How to create a simple comment box on a web page using HTML, CSS, and JavaScript
![]()
To get feedback or any message from a website visitor you need a comment box on your web page. A comment box can be created using any web technology whether it is simple HTML, CSS or even JavaScript. The three tools HTML, CSS, and JavaScript are enough to make fully functional websites.
We’ll explore how to make a simple comment box with HTML, CSS, and JavaScript in this post.
HTML
Open your favorite editor and type or copy-paste the below-given code. Save the file with HTML extension.
In the above HTML code, we used the link tag in the head tag to reference the CSS file that we will use later. After this, in the body tag first, we initiated an input box where a user can type their comment. Then a button with the name of the post is initiated which will be clicked to enter a comment. After this, we initiated an unordered list (ul) and left it blank because we will add a li element from JavaScript in this tag. You can also see that we use the id attribute in the above code which will be used to reference the corresponding elements in JavaScript code. The last tag is the script tag where we passed the reference of the JavaScript file which will be attached to the current HTML file. The JavaScript file name is code.js.
CSS
Create a file with the name of style.css. It should be noted that you can name your file anything but remember to reference that name in the HTML file link tag. Copy and paste the below code in your CSS file:
body {
background : dodgerblue linear — gradient ( 45deg , aqua , dodgerblue , deeppink ) fixed ;
}
#comment — box , #post {
border : none ;
border — radius : 5px ;
}
#post : hover {
background — color : deeppink ;
}
In the above CSS code, first, we referenced the body tag of HTML and decorated the body background with different colors. Then using the id attribute of the input box, we vanished the border of the input box and gave it a radius of 5px. The same styling was applied to the post button. After this, using the hover property we set a background color of deep-pink for the post button which means whenever a user will hover over the post button its color will change to deep pink.
JavaScript
Create a JavaScript file with js extension for example code.js. It should be noted that the name of the file should be similar to the one that was referenced in the script tag of the HTML file.
In the code.js file, first, we get the HTML button element using getElementById() method and pass the name of the id given to the button in HTML. You can also see an event listener attached to the post which is basically the button element. This event listener will continuously listen and whenever a user clicks on the post button the function within the Event Listener will be executed.
var post = document. getElementById ( «post» ) ;
post. addEventListener ( «click» , function ( ) {
var commentBoxValue = document. getElementById ( «comment-box» ) . value ;
var li = document. createElement ( «li» ) ;
var text = document. createTextNode ( commentBoxValue ) ;
li. appendChild ( text ) ;
document. getElementById ( «unordered» ) . appendChild ( li ) ;
In the Event Listener function, first, we are getting the value of the input box and after that, we created a li element. To set the text of the li element we used createTextNode and after that using the appendChild method we provided the text to the li element. At last, using the appendChild method we are providing the unordered list of the li element we just created.
Conclusion
HTML, CSS, and JavaScript are the building blocks for a web developer and many websites are developed using these three technologies.
In this post, we provided you with the code and explanation of the code on how to create a comment box using HTML, CSS, and JavaScript. This project will come in handy when you are making to-do lists, comments on a web page or feedback forms as well as attach text to a page in any web project.
About the author
Shehroz Azam
A Javascript Developer & Linux enthusiast with 4 years of industrial experience and proven know-how to combine creative and usability viewpoints resulting in world-class web applications. I have experience working with Vue, React & Node.js & currently working on article writing and video creation.