Атрибуты
Кроме добавления классов мы можем ориентироваться на наличие атрибутов элемента и в зависимости от их значений менять стиль кнопок.
Атрибут type
Этот атрибут определяет роль кнопки: обычная, для отправки формы или для её очистки. В табл. 1 показаны возможные значения атрибута type.
По умолчанию к type применяется значение submit , поэтому внутри формы у кнопки атрибут type можно опустить.
По внешнему виду кнопки с разными ролями никак не различаются между собой, но через селекторы атрибутов кнопкам можно задать разный стиль. Селекторы для определения стилей кнопок будут следующими:
Чтобы не повторять одинаковые стилевые правила, сперва добавляем свойства к селектору button , а затем уже к селекторам с button[type] . Свойства у button наследуются, поэтому переопределить нужно только различающиеся значения. В итоге все кнопки будут оформлены единообразно, различаясь друг с другом цветом.
В примере 1 показана форма для поиска с текстовым полем и двумя кнопками: первая кнопка отправляет введённую текстовую строку на сервер, а вторая очищает форму. Эти кнопки различаются цветом фона, текста и рамки.
Пример 1. Кнопки разных цветов
Здесь вокруг кнопки с type=»reset» добавлена рамка, что несколько увеличивает размер кнопки. Чтобы все кнопки получились одинаковой высоты, к ним добавляется рамка, цвет которой совпадает с цветом фона.
Вместо изменения цвета, рядом с надписью на кнопке можно показать соответствующую иконку. Элемент позволяет комбинировать изображения с текстом.
Альтернативный путь состоит в использовании ::before, он создаёт псевдоэлемент до содержимого самого элемента, в нашем случае, . Для этого псевдоэлемента иконку выводим как фоновую картинку через свойство background (пример 2).
Пример 2. Использование ::before
У свойства background из примера указано три параметра:
- 0 — картинка располагается в левом верхнем углу;
- cover — картинка масштабируется и вписывается в размеры иконки (они определяются свойствами width и height);
- url() — адрес картинки.
Атрибут disabled
Атрибут disabled, добавленный к , блокирует кнопку, после чего по такой кнопке нельзя щёлкнуть и она отображается бледнее обычной.
Обычная кнопка Блокированная кнопка
Для управления стилем блокированной кнопкой можно воспользоваться селектором button[disabled] , а также более современным методом — псевдоклассом :disabled.
В примере 3 у блокированной кнопки меняется цвет фона, текста и вид курсора при наведении на кнопку.
Пример 3. Использование :disabled
Здесь изначально кнопка заблокирована через атрибут disabled и становится доступной после написания любого символа в текстовом поле. Если текст стереть, то кнопка вернётся к своему заблокированному состоянию.
Итоги
- У элемента есть два часто используемых атрибута: type и disabled.
- Атрибут type определяет роль кнопки: обычная кнопка, кнопка для отправки формы и кнопка для возврата введённых в форму данных к исходным значениям.
- Для стилизации кнопок с разными значениями type применяются селекторы button[type=»submit»] , button[type=»reset»] , button[type=»button»] .
- Атрибут disabled блокирует кнопку от нажатия — по такой кнопке нельзя щёлкнуть. С помощью JavaScript атрибут можно убирать или добавлять, в зависимости от заданных условий.
- Стиль заблокированной кнопки меняется через псевдокласс :disabled, для этого используется селектор button:disabled .
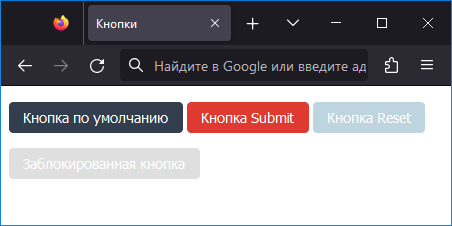
Создайте набор кнопок для разных ситуаций: кнопка по умолчанию, кнопка для отправки формы, кнопка для очистки формы, заблокированная кнопка. Их вид показан на рис. 1.
Рис. 1. Кнопки разных типов
Создайте кнопку с иконкой корзины, показанную на рис. 1.
HTML Button: Using buttons in a website
You can use an HTML button to trigger any event. They are important aspects of user interaction with the web site. HTML provides the button tag to create a simple button and CSS makes them look attractive. There are ways to make the button work. Buttons have a lot of attributes. This article will describe how to use some of these important attributes in HTML.
Topics in this article
A basic example of an HTML button
The following code is a basic button.
this is a simple button
button tag is also placed inside the body tag. Button tag has one opening tag and one closing tag. The type of button is defined by using the type attribute. There are three values for the type attribute, button, submit and reset. However, submit and reset are used while creating a form. The text written between the tags appears on the button.
onclick attribute
We used a button tag to create a button. But what happens when this button is clicked? absolutely nothing. To make this button work, We can use the onclick attribute of the button tag.
In the above example, whenever a user clicks the button, an alert message appears. In the place of an alert message, we can also place a javascript function. We can decide what to do in this javascript function.
Before clicking the button.
onclick attribute can also be used with the button tag to make it work as a link. The following code has a button. When clicked, it opens the homepage of google.
Button size
In the above examples, we can see a normal-sized button. There are few ways of increasing the button size. We can use the font-size property of CSS to increase the size of the button, or we can also use the padding property of CSS. The following example uses the font-size property to increase the size of the button.
As you can see, the font-size is given twenty pixels. This will increase the size of the button according to the size of the text written inside the button.
Here, We have set the padding to twenty pixels. Space between the text and the walls of the button will be twenty pixels.
 Button type
As I mentioned earlier, there are three values we can give to the type attribute of the button.
1.Button: When we want to use a standard button, we have to give “button” as the value of type attribute.
2. Submit: The HTML form tag has data inside it. We use the type as “submit” to submit the form-data. URL entered in the action attribute of form tag is the place where data is submitted. The following code has a form with submit button.
First name:
Last name:
3. Reset: We can also reset the data of a form to its initial values. To do this, “reset” is given as the value of type attribute. The following code has initial values in input fields. We can change the values and then press the reset button to get the initial values inside the input fields. The following code has a form with a reset button.
First name:
Last name:
Styling buttons
A normal HTML button looks dull. But CSS provides many options to style a button. We can change the color, font size, border color, border-radius, etc, of buttons using CSS. I will explain some ways of making a button look better.
The color of the button can be changed using the background-color property of CSS. The following code shows three buttons with three different colors.
Observe the value given in the border property carefully. “5px” defines the size of border. Solid is the style, followed by the color of the border. Instead of solid, there are also few other options for border style, like dotted, dashed, groove, etc.
Usually, a button has a sharp corner. We can make these corner rounded by using the border-radius property of CSS. The following code shows three buttons with rounded corners.
 Action
Action is an attribute of the form tag in HTML. The action attribute specifies where to send the form data. To use the action attribute, the type of the button should be “submit”.
The following code creates a form with two input fields and a submit button. The value of the action attribute should be the URL where the data is to be sent.
 Disabling a button
A button is always active by default. This means, all the time it is clickable. We can make a button non-clickable by using the disabled attribute of the button tag. The disabled attribute is a boolean attribute. The following code shows two buttons, one which is clickable and the second one which is not clickable.
this button is clickable
this button is not clickable
a
Buttons with bootstrap
Apart from CSS, we can use bootstrap to make buttons look better and attractive. Bootstrap provides many classes to modify a button. We can change the color of the button and the size with bootstrap classes. The following code has all the button styles that are provided by bootstrap.
Conclusion
Buttons are very helpful for user interaction. A well-performing button is created by using HTML, CSS, and Javascript. Many options are provided by HTML to work with buttons. All you need is to learn every aspect of it.


 Button type

 Action
  Disabling a button

